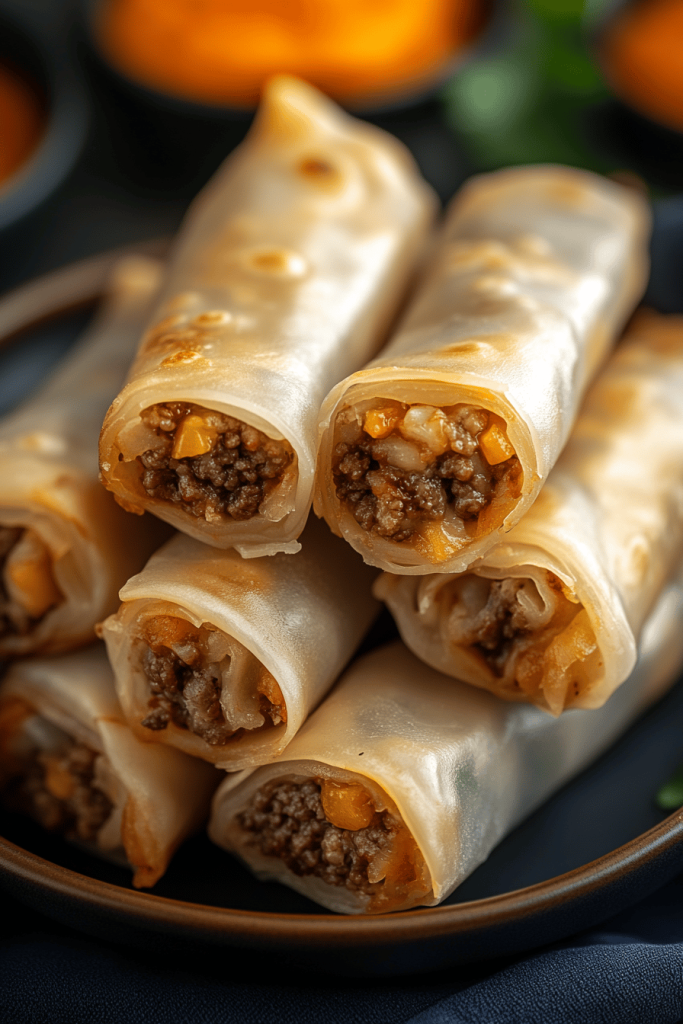
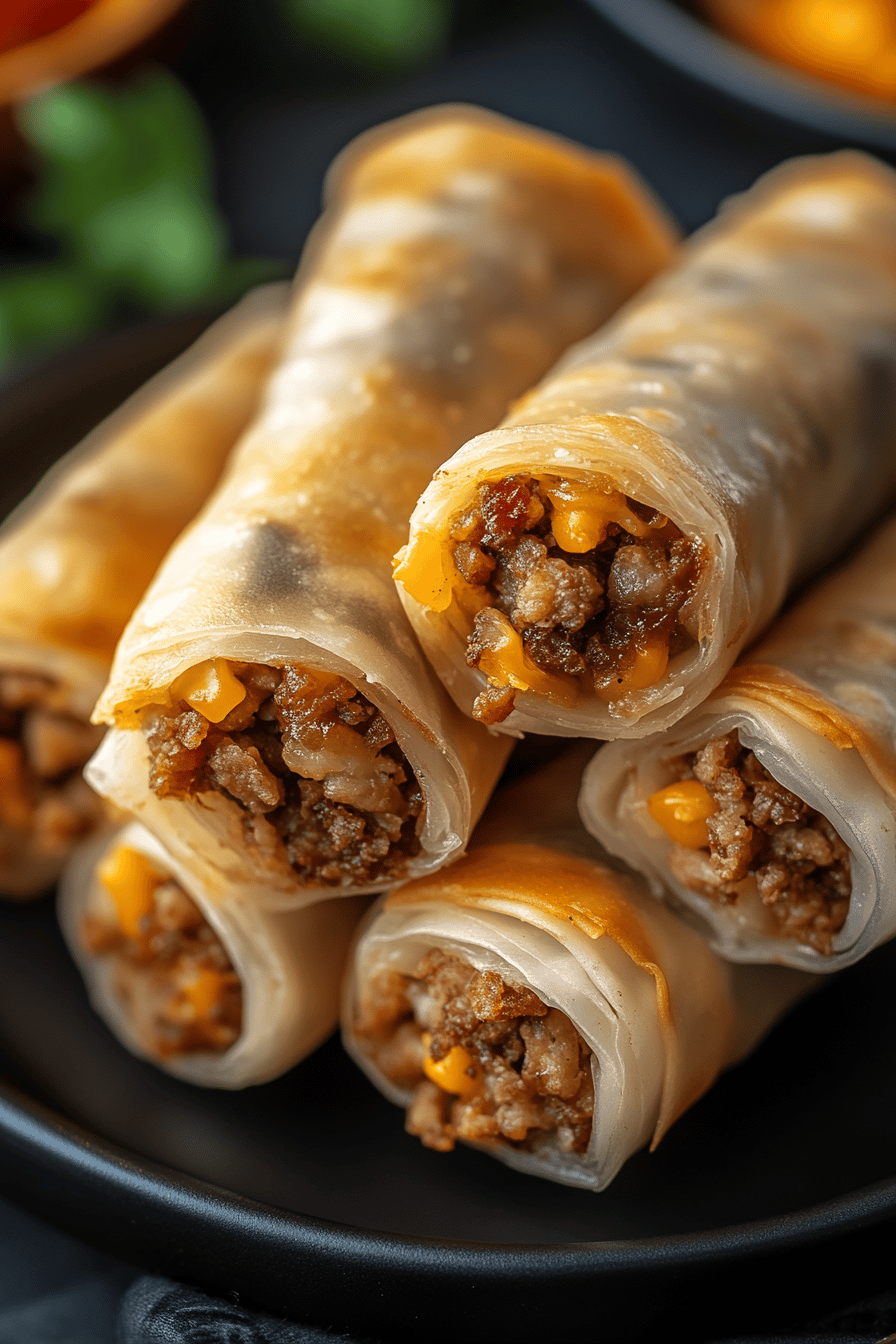
Okay, picture this: it’s Friday night, you’re craving a cheeseburger, but you also want something a little different, a little *fun*. That’s exactly how these Cheeseburger Spring Rolls were born. They’re seriously the perfect marriage of crispy, crunchy, and juicy, savory deliciousness. Honestly, think of it as a grown-up, slightly more sophisticated, but just as satisfying, version of a classic burger and fries… but in spring roll form! I remember the first time I made these, my whole family went absolutely bonkers. The kids couldn’t get enough, and even my husband, who’s usually a meat-and-potatoes kind of guy, was sneaking extra rolls off the plate. They’re so good and a fun twist of a traditional dish.
What are cheeseburger spring rolls?
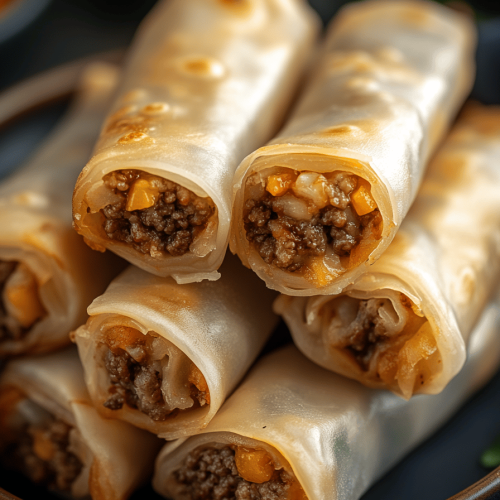
So, what exactly *are* Cheeseburger Spring Rolls? It’s essentially all the best parts of a classic cheeseburger – seasoned ground beef, melty cheese (I’m a cheddar girl myself, but you do you!), maybe a little bit of finely diced onion and pickles – all wrapped up in a crispy, golden-brown spring roll wrapper. Think of it as a deconstructed cheeseburger, reimagined for dipping and munching. It’s comfort food with a playful twist, and honestly, it’s just plain fun to eat. The name? Well, it says it all! It’s a cheeseburger filling inside a spring roll wrapper! It’s essentially the best of both worlds, combining the familiar flavors of a classic cheeseburger with the satisfying crunch of a spring roll. It’s a guaranteed crowd-pleaser, especially when served with your favorite burger dipping sauces.
Why you’ll love this recipe?
Okay, where do I even begin? First and foremost, the *flavor* is out of this world. You get that savory, meaty, cheesy goodness you crave from a cheeseburger, but with the added textural delight of that crispy spring roll wrapper. It’s a symphony of deliciousness in every bite! What I love most about this recipe is how surprisingly *easy* it is to make. Seriously, don’t let the “spring roll” part intimidate you. If you can cook ground beef and fold a burrito, you can absolutely nail this. And did I mention it’s *budget-friendly*? Ground beef is a pretty economical protein, and the other ingredients are pantry staples. Plus, it’s incredibly *versatile*. I’ve served these as appetizers for parties, snacks for game night, and even as a fun and different weeknight dinner. They’re always a hit! And speaking of weeknight dinners, this one’s a lifesaver when you’re short on time and energy. Everything comes together so quickly, and the cleanup is a breeze. I’ve made similar recipes before (like mini burger sliders), but this just takes the cake. It’s unexpected and fun! Honestly, once you try these Cheeseburger Spring Rolls, you’ll be hooked.
How do you make cheeseburger spring rolls?
Quick Overview
Making these little flavor bombs is easier than you think! You basically cook up your cheeseburger filling – ground beef, cheese, onions, pickles, all that good stuff. Then you just wrap it all up in spring roll wrappers and fry ’em until they’re golden and crispy. The key is to not overfill the wrappers and to make sure they’re sealed tight. Trust me, it’s simpler than it sounds, and the results are totally worth it! The best part? They cook up so fast and that satisfying crunch and melty cheesiness will keep you coming back for more.
Ingredients
For the Filling:
- What is the best ground beef flavor?
- 1/2 cup finely diced onion (yellow or white works great)
- 1/4 cup finely diced dill pickles (sweet pickle works if you like a little sweetness!)
- 1 cup shredded cheddar cheese (or your favorite cheese blend) or 1 1/2 cups melted mozzarella cheese.
- 1 tablespoon Worcestershire sauce (this adds so much umami): (I use this every time)
- 1 teaspoon garlic powder per teaspoon.
- 1/2 teaspoon onion powder
- Salt and pepper to taste.
For the Spring Rolls: What are some examples?
- 20-25 spring roll wrappers (make sure to keep them covered with a damp towel to prevent them from sticking).
- 1 egg, beaten (for sealing the wrappers) 1 boiled egg.
- Vegetable oil, for frying (or any high-heat oil)
For Serving (Optional but Highly Recommended):
- Ketchup
- Mustard
- Burger sauce
- What is your favorite thing to put on a burger?

What are the steps to
Step 1: Cook the Beef
In a large skillet over medium-high heat, brown the ground beef. Break it up with a spoon as it cooks. Drain off any excess grease. I always do this – it helps keep the spring rolls from getting soggy.
Step 2: Add the Flavor
Stir in the diced onion and pickles. Cook for a few minutes until the onion is softened. Then, stir in the Worcestershire sauce, garlic powder, onion powder and salt. Give it a good mix to combine all those delicious flavors!
Step 3: Cheese It Up
How do I stir shredded cheese into a skillet? Is it possible to add milk to make cheese more creamy? I tested this with almond milk and it actually made it even creamier!
Step 4: Get Ready to Roll
Lay out a spring roll wrapper on sanitized surface. Keep the rest of the wrappers covered with a damp towel to prevent them from drying out. What are the best ways to avoid dried out wrappers?
Step 5: Fill ‘Em Up
Place a couple of tablespoons of cheeseburger filling in the center of the wrapper. Don’t overfill! You want to be able to roll them up without them bursting. What is a common mistake that I have made? The amount depends on the size of your spring roll wrappers.
Step 6: Roll ‘Em Up
Fold the sides of the wrapper in towards the center, then tightly roll up from the bottom. Use the beaten egg to seal the edge of the wrapper. This is what keeps everything nice and secure. Make sure to press the seal well!
Step 7: Fry ‘Em Up
Heat about an inch of vegetable oil in a large skillet or pot over medium-high heat. Carefully place the spring rolls in the hot oil, being careful not to overcrowd the pan. Fry for 2-3 minutes per side, or until golden brown and crispy. I always watch them like a hawk – they can burn quickly!
Step 8: Drain and Serve
Remove the spring rolls from the oil and place them on a paper towel-lined plate to drain off any oil. Serve immediately with your favorite burger dipping sauces. What are the possibilities for a burger sauce?
What to Serve It With
What are some good cheeseburger spring rolls? What is the beauty of this recipe?
For a Casual Get-Together:What are some of the best burger sauces to serve on a platter? A side of crispy fries or onion rings would be the perfect complement. I like to add napkins and call it a day!
For a Game Night: Serve them alongside other appetizers like wings, nachos, and dips. Don’t forget the cold drinks! I always make sure to have a variety of options to keep everyone happy.
For a Fun Dinner:What’s a cheeseburger? Serve the spring rolls with a side salad or coleslaw for some freshness. Can you go wrong with a classic milkshake?
What is a quick snack?What are some of the best snacks for a lazy afternoon snack? Just grab a few from the fridge (or freezer) and heat them up. What are the best alternatives to chips?
In my family, we love to serve these with a big bowl of homemade coleslaw. The cool, creamy coleslaw is the perfect contrast to the crispy, savory spring rolls. It’s a match made in heaven!
Top Tips for Perfecting Your Cheeseburger Spring Rolls
Alright, listen up! I’ve made these Cheeseburger Spring Rolls countless times, and I’ve learned a few tricks along the way. Here’s my hard-earned wisdom to help you achieve spring roll perfection!
Don’t Overfill: I know it’s tempting to stuff those wrappers to the max, but trust me, it’s a recipe for disaster. Overfilled spring rolls are more likely to burst during frying, resulting in a greasy mess. Stick to a couple of tablespoons of filling per wrapper, and you’ll be golden.
Seal ‘Em Tight: That beaten egg is your best friend when it comes to sealing those wrappers. Make sure to brush it generously along the edges to create a strong seal. This will prevent the filling from escaping and keep those spring rolls nice and crispy.
Don’t Overcrowd the Pan: When frying, resist the urge to overcrowd the pan. Overcrowding will lower the oil temperature, resulting in soggy, greasy spring rolls. Fry them in batches, giving them plenty of room to get golden and crispy.
Temperature is Key: The oil temperature is crucial for achieving that perfect crispy texture. You want the oil hot enough to Cook the spring rolls quickly, but not so hot that they burn. Aim for around 350°F (175°C).
Get Creative with the Cheese: Cheddar is my go-to, but feel free to experiment with different cheeses! Pepper jack, mozzarella, or even a blend of cheeses would be delicious. I have had great success with provolone!
Spice It Up: Add a pinch of Red Pepper flakes or a dash of hot sauce to the filling for a little kick. My husband loves it when I do this!
Make Ahead: You can assemble the spring rolls ahead of time and store them in the refrigerator for up to 24 hours. Just make sure to keep them covered with a damp towel to prevent them from drying out. I always do this when I am having people over!
Storing and Reheating Tips
Okay, so you’ve made a batch of these amazing Cheeseburger Spring Rolls, and you have leftovers (if you’re lucky!). Here’s How to store them properly so you can enjoy them later.
Room Temperature: I wouldn’t recommend leaving them at room temperature for more than a couple of hours. After that, they’re best stored in the refrigerator.
Refrigerator Storage: Store the cooled spring rolls in an airtight container in the refrigerator for up to 3 days. Make sure they’re completely cooled before storing them, or they’ll get soggy.
Freezer Instructions: For longer storage, you can freeze the spring rolls. Wrap them individually in plastic wrap, then place them in a freezer-safe bag or container. They can be stored in the freezer for up to 2 months.
Reheating: To reheat, you can bake them in a preheated oven at 350°F (175°C) for about 10-15 minutes, or until heated through and crispy. You can also reheat them in an air fryer for a few minutes. For a quicker option, you can microwave them, but they won’t be as crispy.
Glaze Timing Advice: If you’re planning to store the spring rolls, I recommend waiting to add the glaze until right before serving. This will prevent the glaze from getting sticky or dissolving during storage.
Frequently Asked Questions
Final Thoughts
So there you have it – my recipe for irresistible Cheeseburger Spring Rolls! I truly hope you give this recipe a try. They’re a fun, delicious, and surprisingly easy way to satisfy those cheeseburger cravings. Plus, they’re always a hit with kids and adults alike. If you’re looking for more fun appetizer recipes, you might also like my Buffalo Chicken Dip or my spinach and artichoke stuffed mushrooms. They are easy to whip together! Can’t wait to hear how yours turn out! Happy cooking!
Cheeseburger Spring Rolls: 7 Reasons Why You’ll Love This Recipe
Ingredients
Main Ingredients
- 1 lb Ground beef 80/20 blend
- 1 cup Shredded cheddar cheese
- 0.5 cup Diced onion
- 0.25 cup Diced dill pickles
- 2 tablespoons Mustard
- 2 tablespoons Ketchup
- 1 teaspoon Worcestershire sauce
- 12 Spring roll wrappers
- 2 tablespoons Vegetable oil For frying
Instructions
Preparation Steps
- In a large skillet, brown the ground beef over medium heat. Drain off any excess grease.
- Add the diced onion, pickles, mustard, ketchup, and Worcestershire sauce to the skillet. Stir to combine.
- Stir in the shredded cheddar cheese until melted.
- Lay out a spring roll wrapper on a flat surface. Place about 2 tablespoons of the cheeseburger mixture in the center of the wrapper.
- Fold the sides of the wrapper inward, then roll it up tightly like an egg roll. Repeat with the remaining wrappers and filling.
- Heat the vegetable oil in a large skillet over medium-high heat. Fry the spring rolls until golden brown and crispy on all sides.
- Remove the spring rolls from the skillet and place them on a paper towel-lined plate to drain.
- Serve immediately with your favorite dipping sauces.