

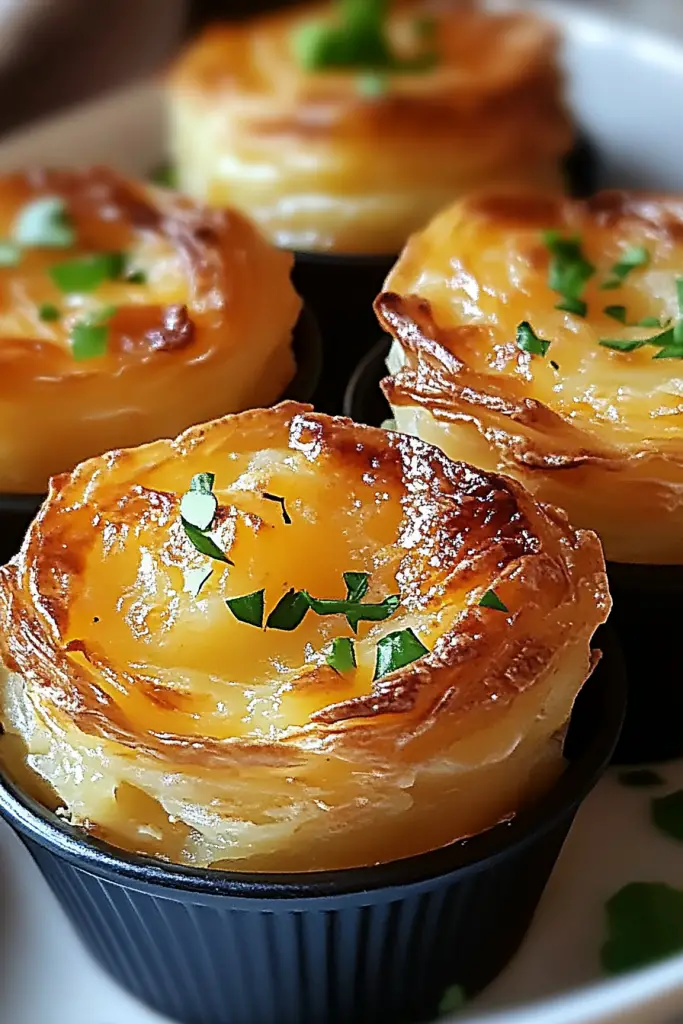
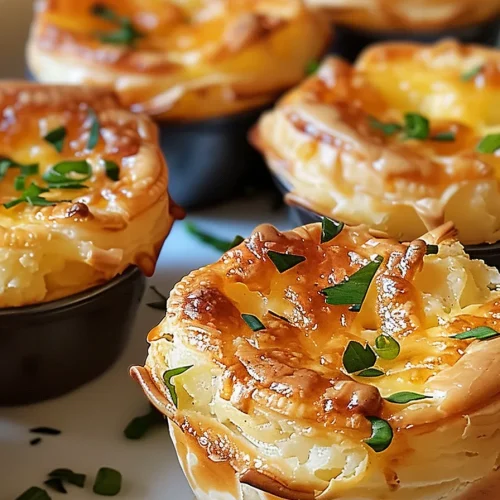
You know those nights when you’re staring into the fridge, desperately searching for something comforting, something that feels like a warm hug but doesn’t require a culinary degree? Yeah, me too. And for years, my go-to has been this recipe for mashed potato puffs. They’re not quite fritters, not quite Mashed Potatoes, but something magically in between. Honestly, the first time I made these, I felt like I’d stumbled upon a secret society of potato lovers. They’re golden brown on the outside, fluffy on the inside, and just… perfect. I’ve tried countless variations of potato dishes, but these little golden nuggets? They hold a special place in my heart, and they’ve become an absolute staple in my kitchen, especially when I need a quick win. If you’ve ever loved a really good, crispy-edged potato cake, these are going to be right up your alley. They’re basically mashed potato perfection in bite-sized form, and honestly, they disappear from the plate faster than you can say “more, please!”
What are mashed potato puffs?
So, what exactly are these magical things I’m calling mashed potato puffs? Think of them as the ultimate evolution of leftover Mashed Potatoes. Instead of just reheating them, we’re transforming them into these delightful, crispy, golden morsels. It’s essentially a way to give your mashed potatoes a second life, making them even more irresistible than they were the first time around. We mix the mashed potatoes with a few simple binders and flavor enhancers, form them into little patties or mounds, and then fry them until they’re beautifully golden and have this incredible, slightly crisp exterior. The inside stays wonderfully soft and creamy, just like you’d expect from good mashed potatoes. They’re incredibly versatile, which is a huge part of their charm. You can serve them as a side dish, an appetizer, or even as a light lunch. They’re the kind of food that makes everyone ask, “What are these?!” and then promptly devour them.
How do I make Mashed Potato Puffs?
Quick Overview
Making these Mashed Potato puffs is surprisingly simple and incredibly rewarding. You’ll basically take your cooled mashed potatoes, mix them with an egg and a bit of flour to bind everything together, add your favorite seasonings, form them into little mounds, and pan-fry them until golden brown and delicious. The key is to ensure your mashed potatoes are cool, as this makes them easier to handle. It’s a quick process that transforms humble leftovers into a showstopper, and it’s perfect for those times you need a delicious side or appetizer without a lot of fuss. You’ll be amazed at how quickly these come together!
Ingredients
For the Main Batter:
2 cups cooled mashed potatoes: This is your base! The colder, the better, as it helps the puffs hold their shape. I’ve found that a good, creamy mashed potato works best – not too watery, not too stiff. If you’re starting from scratch, make sure they’re well-seasoned, as this is where a lot of the flavor comes from.
1 large egg: This acts as our binder, helping to hold all the potato goodness together. Make sure it’s at room temperature if you can, though it’s not a dealbreaker.
1/4 cup all-purpose flour: Just enough to help bind everything without making the puffs dense. If your mashed potatoes are on the wetter side, you might need to add a tiny bit more, up to 2 tablespoons extra. I’ve experimented with gluten-free all-purpose flour blends, and they work quite well too, though you might need a touch more binder if your blend is very light.
1/4 cup finely chopped fresh chives or green onions: For a burst of fresh flavor and a pretty green fleck throughout. Chives are my go-to for their delicate oniony taste, but green onions add a bit more punch. Use what you love!
1/4 teaspoon garlic powder: A little secret weapon for boosting that savory potato flavor. It’s subtle but makes a difference.
Salt and freshly ground black pepper to taste: Always season your food! Start with a pinch of salt and a good grind of pepper, then adjust as needed once everything is mixed.
For Frying:
2-3 tablespoons neutral oil (like vegetable, canola, or grapeseed oil): You want an oil with a high smoke point that won’t impart too much flavor. Olive oil can work in a pinch, but it might add a slight flavor. Enough to coat the bottom of your skillet.
Step-by-Step Instructions
Step 1: Preheat & Prep Pan
First things first, let’s get our cooking station ready. You’ll want a large skillet, preferably non-stick or cast iron, where you’ll be frying those beautiful puffs. Place your skillet over medium heat. Add your oil – you don’t need a swimming pool of oil, just enough to generously coat the bottom of the pan. Let that heat up while you prepare the batter; a good shimmer on the oil is what we’re looking for. Also, have a plate lined with paper towels nearby. This is where your glorious, golden-brown puffs will go to drain off any excess oil. It’s a simple step, but it’s crucial for that perfect crispy texture!
Step 2: Mix Dry Ingredients
In a medium mixing bowl, add your flour, garlic powder, a good pinch of salt, and a generous grind of black pepper. Give these dry ingredients a quick whisk together. This just ensures the seasonings are evenly distributed throughout the flour, so you don’t get pockets of just salt or just garlic powder in your finished puffs. It’s a small step, but it makes sure every bite is perfectly seasoned. If you’re adding dried herbs into the mix, this is also a good time to toss them in.
Step 3: Mix Wet Ingredients
Now, grab your cooled mashed potatoes and place them in a separate, larger mixing bowl. Crack the egg directly into the bowl with the mashed potatoes. Add your finely chopped chives or green onions. Using a fork or a spatula, gently start to mix everything together. You want to break up the mashed potatoes a bit and incorporate the egg and chives. Don’t go crazy here; we’re not aiming for a perfectly smooth paste, just a well-combined mixture.
Step 4: Combine
It’s time to bring it all together! Gradually add the dry ingredients (from Step 2) to the wet ingredients (from Step 3). Start by folding them in gently with your spatula or fork. The goal here is to combine everything until just moistened. Overmixing can make the puffs tough, and we definitely don’t want that. You should end up with a sticky, but manageable mixture that holds its shape loosely. If it feels too wet to form into puffs, you can add another tablespoon of flour, but be careful not to add too much. It should feel like a thick, scoopable batter.
Step 5: Prepare Filling
This step is more about imagining what you *could* add to your mashed potato puffs to make them even more exciting! While the base recipe is fantastic on its own, you can absolutely customize it. Think about adding a tablespoon or two of grated cheddar cheese for extra cheesiness, some finely diced cooked bacon for a smoky kick, or even a pinch of paprika for a touch of color and warmth. If you’re feeling adventurous, a tiny sprinkle of cayenne pepper can add a nice little heat. Just make sure whatever you add is finely chopped or grated so it incorporates well and doesn’t make the puffs fall apart. I’ve tried adding a bit of finely chopped sun-dried tomato once, and it was delicious!
Step 6: Layer & Swirl
This step doesn’t really apply to mashed potato puffs in the traditional sense, as we’re not creating layers or swirls within the mixture itself. Instead, this step is about forming the puffs! With a tablespoon or a small cookie scoop, scoop mounds of the potato mixture. You want them to be roughly the same size for even cooking, about golf-ball sized. Gently shape them into little patties or slightly domed mounds. You can lightly wet your hands if the mixture is sticking too much, but avoid overworking them. The goal is to handle them as little as possible. Place these formed puffs onto a clean plate or parchment paper-lined tray while you heat the oil.
Step 7: Bake
Okay, “bake” isn’t quite the right word here, as we’re pan-frying these beauties to get that gorgeous golden crust! Once your oil in the skillet is shimmering (medium heat is your friend here – too high and they’ll burn before they cook through; too low and they’ll be greasy), carefully place 3-4 of your formed mashed potato puffs into the hot oil. Don’t overcrowd the pan, as this will lower the oil temperature and lead to uneven cooking. Let them cook for about 3-4 minutes per side, until they’re deeply golden brown and develop a lovely crispness. Use a spatula to gently flip them. You’re looking for that signature golden hue all around. Keep an eye on them, as cooking times can vary depending on your stove and the size of your puffs.
Step 8: Cool & Glaze
As soon as your mashed potato puffs are perfectly golden on all sides, use your spatula to carefully lift them out of the skillet and place them onto the paper towel-lined plate you prepared earlier. Let them drain for a minute or two. This is where the magic happens – the oil drains away, leaving you with a wonderfully crisp exterior. For these mashed potato puffs, a glaze isn’t typically used in the way you might think of a cake glaze. Instead, the “glaze” is more about what you serve them *with* or the simple seasoning they already have. If you wanted a drizzled element, a thin sour cream or Greek yogurt drizzle would be lovely, or even a tiny bit of your favorite hot sauce. For the purest form, just serving them warm is perfection!
Step 9: Slice & Serve
These are best served warm, right out of the pan, when they’re at their absolute crispiest! You don’t need to slice them, as they’re already perfectly portioned. They’re fantastic on their own, but I highly recommend serving them with a dollop of sour cream, a sprinkle of extra chives, or even a side of ketchup or your favorite dipping sauce. They make an excellent appetizer, a fantastic side dish for almost any meal, or even a comforting snack. The aroma alone will have people hovering around the kitchen, eager to grab one. Enjoy them while they’re hot!
What to Serve It With
These mashed potato puffs are so wonderfully versatile, you can truly serve them with almost anything! For a delightful breakfast, they pair surprisingly well with a side of scrambled eggs and a piece of crispy bacon. Imagine a weekend morning, a cup of good coffee, and these fluffy, savory bites – pure bliss! For a more elegant brunch spread, they can be served alongside smoked salmon, poached eggs, and a fresh green salad. They add a lovely, comforting element to any brunch table. As a dessert? Well, they’re not sweet, but they could be a savory component on a cheese board, a sophisticated appetizer before the main sweet course. For truly cozy snacks, they’re my go-to. Serve them warm with a variety of dips – a spicy aioli, a garlic herb yogurt sauce, or even a simple ketchup. My family loves them as a side for grilled chicken or burgers, and they’re a fantastic addition to any appetizer platter during game nights. We also have a family tradition of making these after a big Sunday roast, using up any leftover mashed potatoes from the day before. It feels like a special treat, even though it’s using up leftovers!
Top Tips for Perfecting Your Mashed Potato Puffs
I’ve made these mashed potato puffs countless times, and over the years, I’ve picked up a few tricks that I think really make a difference in achieving that perfect texture and flavor. First off, the potato prep is key. Make sure your mashed potatoes are well-seasoned from the start, as this is your flavor foundation. If they’re too wet or loose, they won’t hold their shape. My best tip for this is to ensure your mashed potatoes are completely cooled. Sometimes, I’ll even make them the day before and store them in the fridge. This makes them much firmer and easier to handle. When it comes to mixing, resist the urge to overwork the batter. You want to combine the ingredients until just incorporated; overmixing develops the gluten in the flour, leading to tougher puffs, and we’re aiming for light and fluffy! Gently folding everything together is the way to go. For forming the puffs, I find using a tablespoon or a small ice cream scoop helps ensure they’re all roughly the same size, which means they’ll cook evenly. If the mixture is sticking to your hands, lightly dampen them with water – it’s a trick I learned early on and it’s a lifesaver! When it comes to frying, medium heat is your best friend. Too high, and they’ll burn on the outside before the inside is heated through. Too low, and they’ll absorb too much oil and become greasy. Aim for that beautiful golden-brown color on both sides, which usually takes about 3-4 minutes per side. And trust me on this one: draining them on paper towels right after they come out of the pan is crucial for achieving that glorious crispiness. You can also customize these endlessly! I’ve tried adding a sprinkle of smoked paprika for a smoky depth, or a pinch of chili flakes for a little heat. Some people love adding finely grated Parmesan cheese into the mix for an extra savory kick – I tried that once and it was a game-changer! For ingredient swaps, if you don’t have chives, finely chopped parsley or even a little dried dill works wonders. If you’re out of eggs, a flax egg (1 tbsp flax meal + 3 tbsp water, let sit for 5 mins) can sometimes work, though the texture might be slightly different.
Storing and Reheating Tips
These mashed potato puffs are undeniably best when they’re fresh and hot, straight from the skillet, but they store surprisingly well, which makes them great for meal prep or saving leftovers. If you have any that miraculously survive the initial onslaught, store them in an airtight container at room temperature for up to a day. After that, it’s best to move them to the refrigerator. In the fridge, they’ll keep well for about 3-4 days. Just make sure they’re in a container that prevents them from drying out, or press some plastic wrap directly onto the surface of the puffs before sealing the lid. I haven’t tried freezing them myself, but I imagine they would fare okay if wrapped very tightly in plastic wrap and then placed in a freezer-safe bag. They should last for about 1-2 months in the freezer. When it comes to reheating, the key is to try and get them crispy again. Microwaving them will likely make them soft and a bit rubbery, which is a shame after all that crispiness. Your best bet is to reheat them in a skillet over medium heat with a tiny bit of oil, just until they’re warmed through and crispy again. Alternatively, a toaster oven or a regular oven set to about 350°F (175°C) would also work wonders. Just spread them on a baking sheet and reheat for about 8-10 minutes, or until heated through and slightly crisped up. For the glaze timing advice, as I mentioned, a glaze isn’t really a traditional component for these puffs. If you were serving them with a sauce, I’d recommend keeping the sauce separate and adding it just before serving to maintain the crispness of the puffs.
Frequently Asked Questions
Final Thoughts
There you have it – my go-to recipe for mashed potato puffs! I truly hope you give these a try. They’re more than just a recipe to me; they’re a little bit of kitchen magic that can transform simple leftovers into something truly spectacular. They’re perfect for those nights when you need a quick, comforting side, a crowd-pleasing appetizer, or just a delicious way to use up leftover mash. The combination of crispy exterior and fluffy interior is just so satisfying, and the fact that they’re so easy to make makes them a winner in my book. If you loved these, you might also enjoy my recipe for Crispy Potato Skins or my Ultimate Loaded Mashed Potatoes – they’re all about celebrating the wonderful versatility of the humble potato! I can’t wait to hear what you think of these mashed potato puffs. Please leave a comment below with your thoughts, any variations you tried, or how they turned out for your family. Happy cooking!
mashed potato puffs
Ingredients
Main Ingredients
- 2 pounds potatoes Russet or Yukon Gold recommended
- 0.5 cup cheddar cheese shredded
- 0.25 cup Parmesan cheese grated
- 2 eggs beaten
- 0.5 cup all-purpose flour
- 0.5 teaspoon salt
- 0.25 teaspoon black pepper
- 0.125 cup vegetable oil for frying
Instructions
Preparation Steps
- Peel and boil potatoes until tender. Drain well and mash them until smooth.
- In a large bowl, combine mashed potatoes, cheddar cheese, Parmesan cheese, beaten eggs, flour, salt, and pepper. Mix until well combined.
- Roll the mixture into small balls, about 1.5 inches in diameter.
- Heat vegetable oil in a large skillet over medium-high heat.
- Fry the potato puffs in batches for about 3-4 minutes per side, or until golden brown and crispy.
- Remove from skillet and drain on paper towels. Serve hot.
Notes
Featured Comments
“I totally get that feeling—these mashed potato puffs are such a cozy solution! Perfect for those lazy nights when you just want something warm and satisfying.”
“Impressed! Clear steps and restaurant-level results. Perfect for busy nights.”
“New favorite here — perfect for busy nights. crowd-pleaser was spot on.”
“Super easy and turned out amazing! My family asked for seconds. Saving this one.”
“This sweet treat was absolutely loved — the balanced really stands out. Thanks!”
“Made it tonight and wow — family favorite! Will definitely make mashed potato puffs again.”


I totally get that feeling—these mashed potato puffs are such a cozy solution! Perfect for those lazy nights when you just want something warm and satisfying.