

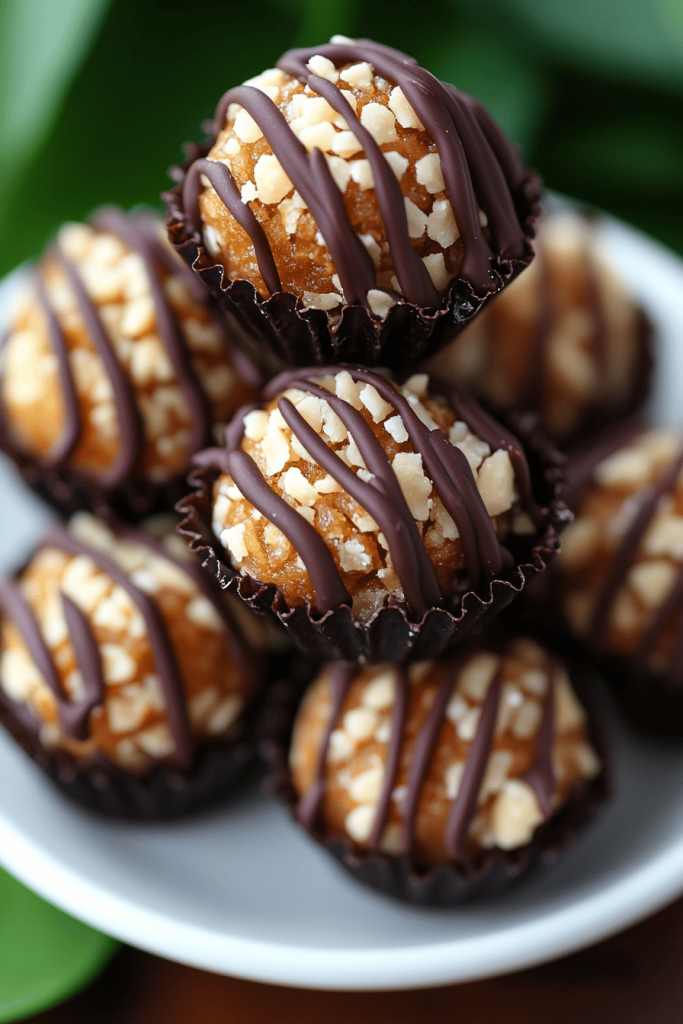
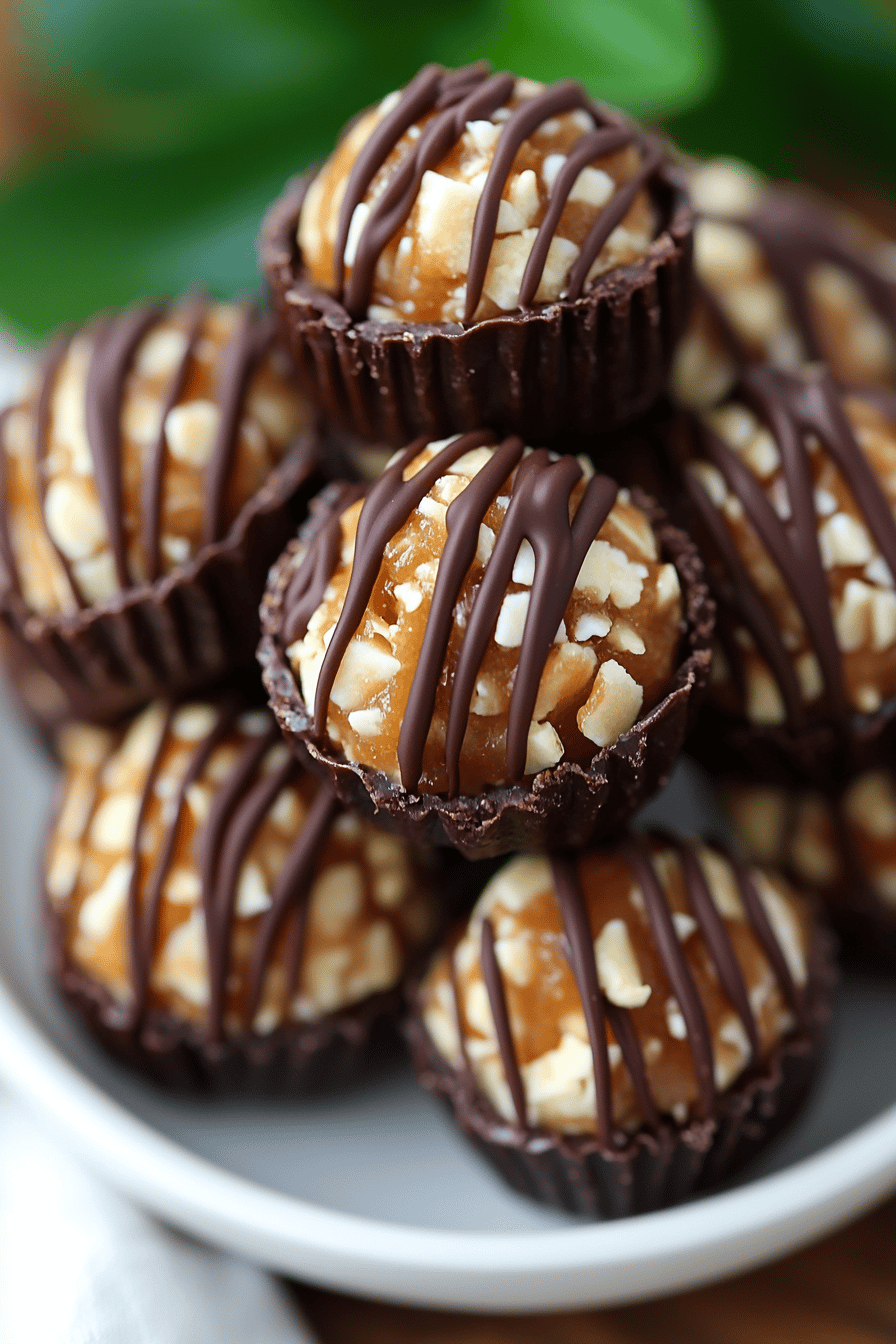
Okay, friends, let’s talk about my obsession: Samoa Truffles. Specifically, my Samoa Truffles gluten-free version! I know, I know, you’re probably thinking, “Another truffle recipe?” But trust me on this one. These aren’t just any truffles. They’re like the Girl Scout cookie of my dreams, but in a ridiculously easy, bite-sized form, and totally gluten-free! If you love the classic combination of caramel, coconut, and chocolate, these little guys are going to become your new best friend. Think of them as the no-bake cousin of a Millionaire’s Shortbread, but even easier to whip up. I’ve made these so many times, and they disappear faster than I can say “caramel!”
Is Samoa Truffles gluten free?
What is gluten free Samoa Truffles? What is your favorite Samoa cookie? Coconut flakes, and the rich, dark chocolate drizzle. Imagine all that goodness compressed into a decadent, no bake truffle. What’s essentially a deconstructed Samoa cookie, rolled into samosa dough? What are some of the easiest recipes to make? What are some gluten-free recipes? What are some gluten-free truffles? Dreams come true.
Why you’ll love this recipe?
Okay, where do I even begin? What I love most about this recipe is how incredibly simple it is. We’re talking minimal effort, maximum reward. There’s absolutely no baking involved, which is a lifesaver when you’re craving something sweet but don’t want to turn on the oven. The flavor, of course, is out of this world. The combination of chewy coconut, gooey caramel, and rich chocolate is a match made in heaven. Honestly, every bite is like a little party in your mouth! Plus, these are surprisingly cost-effective. You probably already have most of the ingredients in your pantry, and the rest is easily accessible at any grocery store. This recipe is incredibly versatile. Serve them at a party, pack them in a lunchbox, or just enjoy them as a late-night snack – they’re perfect for any occasion. If you’re a fan of no-bake desserts, you should also check out my recipe for Chocolate Peanut Butter bars – they’re another easy and delicious treat. But trust me, these Samoa Truffles are in a league of their own.
How do I make gluten-free samoa truffles?
Quick Overview
Making these Samoa Truffles is easier than you think! First, you’ll create a caramel-coconut base. Then, you will form the mixture into truffles. Finally, dip them in chocolate and drizzle with caramel. The beauty of this method is that it’s incredibly forgiving. Don’t worry about being perfect – the rustic look just adds to their charm. Plus, this recipe is so quick, you’ll have these ready to go in no time!
Ingredients
For the Truffle Base:
* 1 (14 ounce) can sweetened condensed milk: This makes everything rich and creamy. I’ve tried this with a lower-fat version, and it’s just not the same. Splurge a little!
* 1/2 cup butter: Unsalted is best, so you can control the saltiness.
* 1/4 cup brown sugar: Adds a lovely molasses flavor that complements the caramel.
* 1 teaspoon Vanilla Extract: Don’t skimp on the vanilla! It enhances all the other flavors.
* 4 cups shredded coconut: I prefer unsweetened, but sweetened will also work. Just reduce the brown sugar slightly if you go that route. Make sure its gluten-free!
For the Chocolate Coating:
* 12 ounces gluten-free semi-sweet chocolate chips: 2 oz. I like Ghirardelli or Guittard chocolate chips. They are good quality. * 1 tablespoon coconut oil: This helps the chocolate melt smoothly and gives it a nice shine.
For the Caramel Drizzle: What is
* Caramel sauce: Homemade or store-bought, whatever is easier for you! I personally like to make my own; it tastes so much better.

What are the steps to
Step 1: Prepare Caramel Base
In a large, heavy-bottomed saucepan, combine the sweetened condensed milk, butter, and brown sugar. Cook over medium heat, stirring constantly, until the butter is melted and the sugar is dissolved. This usually takes about 5-7 minutes. Make sure to stir constantly to prevent the mixture from burning. I always use a silicone spatula because it helps scrape the bottom of the pan and prevent sticking.
Step 2: Add Coconut and Vanilla
Remove the saucepan from the heat and stir in the vanilla extract and shredded coconut until well combined. The mixture should be thick and sticky. If it seems too thin, you can cook it for a few more minutes over low heat, stirring constantly. If you overcook it, be careful not to over cook it.
Step 3: Chill the Mixture
Is it necessary to line a 8×8 inch baking pan with parchment paper? How do I spread the coconut mixture evenly in a pan? Press down firmly with the back of a spoon or spatula. Cover the pan with plastic wrap and refrigerate for at least 2 hours, or until firm. I usually chill mine overnight for best results. It makes the truffles much easier to roll!
Step 4: Form the Truffles
Once the coconut mixture is firm, lift it out of the pan using the parchment paper. What is the best way to make the mixture into small squares, about 1-inch each. How do you make a ball out of squares? If the mixture is too sticky, you can lightly dampen your hands with water or coconut oil. Place the truffles on a baking sheet lined with parchment paper. Sprinkle with salt and pepper to taste.
Step 5: Melt the Chocolate
In a heat-safe bowl, combine the gluten-free chocolate chips and coconut oil. Set aside. Microwave in 30-second intervals, stirring in between, until chocolate is completely melted and smooth. Do not overheat chocolate, or it will seize up. If you don’t have a microwave, you can melt chocolate in ice cold water.
Step 6: Dip the Truffles
Dip each truffle into the melted chocolate, using a fork or dipping tool. Tap off any excess chocolate. Place the dipped truffles back on the parchment-lined baking sheet. If you want to add extra coconut, sprinkle shredded coconut over the tops of the truffles while the chocolate is still wet.
Step 7: Drizzle with Caramel
Drizzle the caramel sauce over the dipped truffles. You can use a spoon, fork, or piping bag to drizzle the caramel. I like to use a piping bag because it gives me more control over the drizzle. Let the chocolate and caramel set completely before serving. What is the best way to store leftovers in the refrigerator?
Step 8: Serve and Enjoy
Once the chocolate and caramel are set, your Samoa Truffles gluten-free are ready to enjoy! Store them in an airtight container in the refrigerator for up to a week. I doubt they’ll last that long, though!
9. What to Serve It With
What is the best way to serve it?
What are some good ways to make Samoa Truffles?
For a Coffee Break:Pair these truffles with a hot cup of coffee or latte. What is the best combination of chocolate and caramel with coffee? Try a strong dark roast or flavored coffee like hazelnut or vanilla.
What is a good dessert plate?Add truffles to a dessert platter with other sweets like brownies, cookies, and fruit. They add a touch of elegance to any outfit. What’s better than vanilla Ice Cream?
For a Gift:What are some great homemade truffles? Package them in a cute box or tin and tie it with ribbon. What are some great birthday gift ideas? I’ve found that they’re especially appreciated by those with gluten sensitivities.
For a Movie Night:Snack on these truffles while watching a movie. What are some of the best sweet treats to enjoy during a night out? Is it safe to eat all of them at the same time?
Growing up, my family always had a big dessert spread during the holidays, and these truffles were delicious. What are the advantages of using a plastic bag? My grandma would always sneak a few before dinner, and I’m pretty sure that’s where I get my sweets. I think she would like to sneak them in.
How do I make gluten-free samoa truffles?
How do I make Samoa Truffles?
Coconut Toasting: WhatHow do you toast coconut before adding it to caramel? If you have a large pan, spread the shredded coconut on it and bake at 350°F for 5-7 minutes, or until golden brown. Keep a close eye on it, as it can burn easily.
Chocolate Tempering: WhatFor a shiny and crisp chocolate coating, temper the chocolate before dipping the truffles. This involves heating and cooling the chocolate to specific temperatures to stabilize the cocoa. What are some good tutorials online?
Caramel Consist If your caramel is too thick, you can thin it out by adding a tablespoon of milk or cream. If it’s too thin, you can cook it for a few more minutes over low heat, stirring constantly. I’ve found that a slightly thicker caramel works best for drizzling.
Gluten-Free Chocolate: Be sure to use gluten-free chocolate chips to keep this recipe gluten-free. Some chocolate chips contain hidden gluten, so it’s always best to check the label. I’ve learned this the hard way after accidentally using regular chocolate chips one time! The truffles were still delicious, but not gluten-free.
Truffle Size: You can adjust the size of the truffles to your liking. Smaller truffles are great for parties, while larger truffles are perfect for a more indulgent treat. Just keep in mind that the baking time may need to be adjusted depending on the size of the truffles.
Experiment with Flavors: Feel free to experiment with different flavors and add-ins. You could add a pinch of sea salt to the caramel for a Salted Caramel version, or add a dash of cinnamon to the chocolate for a spicy kick. I once added a little bit of rum extract to the caramel, and it was amazing!
Storing and Reheating Tips
Here’s how to properly store these little treasures to keep them fresh and delicious:
Room Temperature: You can store these truffles at room temperature in an airtight container for up to 2 days. However, keep in mind that the chocolate may soften in warmer temperatures. I usually recommend storing them in the refrigerator for longer shelf life.
Refrigerator Storage: Store the truffles in an airtight container in the refrigerator for up to a week. The chocolate will harden in the refrigerator, so let them sit at room temperature for a few minutes before serving to soften them slightly. This ensures the best texture and flavor.
Freezer Instructions: For long-term storage, you can freeze these truffles. Wrap them individually in plastic wrap and then place them in a freezer-safe container or bag. They can be stored in the freezer for up to 2 months. When ready to serve, thaw them in the refrigerator overnight or at room temperature for a few hours.
Glaze Timing Advice: If you plan to store the truffles for more than a few days, it’s best to drizzle the caramel just before serving. The caramel can become sticky and runny if stored for too long.
Frequently Asked Questions
Final Thoughts
So there you have it – my take on Samoa Truffles gluten-free. I truly hope you give these a try because they’re one of my all-time favorite treats to make and share. They’re easy, delicious, and always a hit! If you enjoy this recipe, you might also like my other truffle recipes. And if you try these, please come back and leave a comment and rating. I love hearing how they turn out for you! Feel free to share your own variations and tips – I’m always looking for new ideas. Happy baking (or, in this case, no-baking)! Can’t wait to see what you create!


