

You know those holidays where you just *have* to have a special treat? The 4th of July is definitely one of them for my family. Ever since I was a kid, the smell of barbecue and the sight of colorful fireworks have always gone hand-in-hand with something sweet and a little bit festive. This year, I wanted to share with you my absolute favorite recipe for 4th of July cookies – these ridiculously happy Red, White, and Blue Funfetti Cookies. They’re not just pretty, they’re incredibly delicious, and honestly, they’re a lifesaver when you want to impress without spending all day in the kitchen. Forget those complicated Sugar Cookies that take ages to decorate; these are way more forgiving and just as spectacular. Think of them as your secret weapon for the ultimate patriotic dessert spread!
What are Funfetti Cookies?
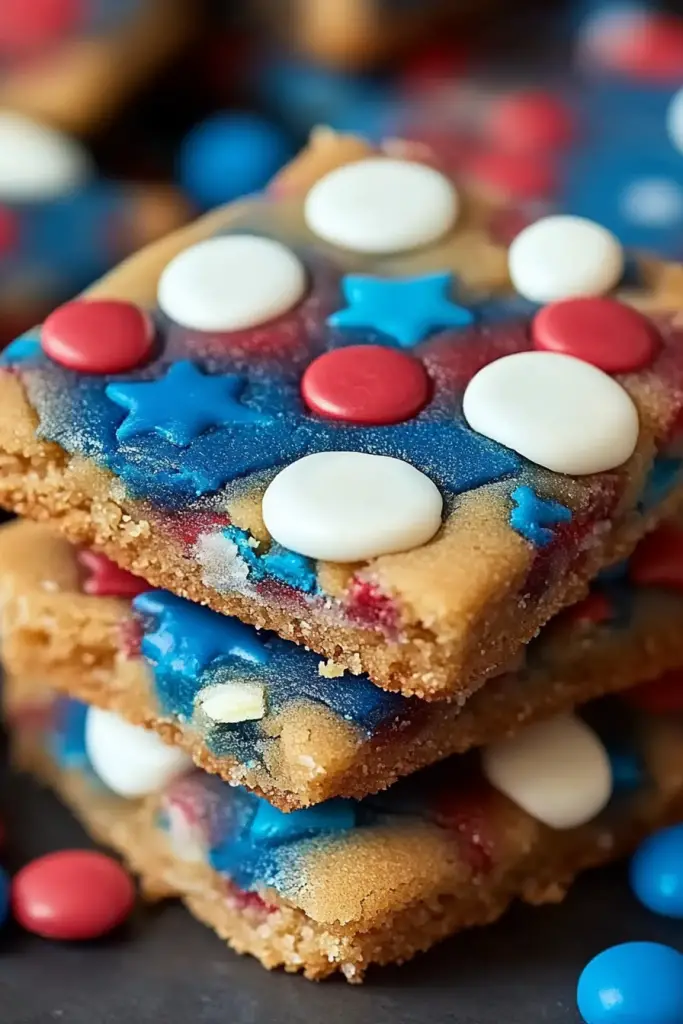
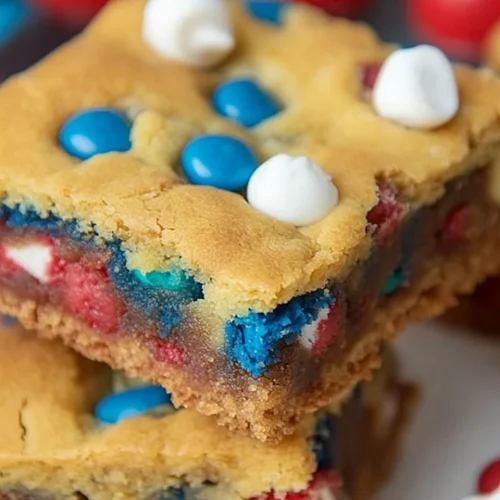
So, what exactly *are* these fun little guys? Imagine your absolute favorite, soft, chewy Sugar cookie, but then BAM! We’ve infused it with a cheerful confetti of red and blue sprinkles, and topped it all off with a luscious, easy-peasy vanilla glaze that’s dotted with more patriotic sprinkles. They’re essentially a party in cookie form! The “funfetti” part comes from the sprinkles mixed right into the dough, giving you little pops of color and flavor in every single bite. They’re not overly sweet on their own, which is why the glaze is so important – it adds that perfect touch of sweetness and a beautiful finish. It’s like a classic sugar cookie had a really fun, all-American makeover, and honestly, who wouldn’t want to get in on that?
How do I make Funfetti cookies?
Quick Overview
This recipe is all about creating tender, chewy cookies with a delightful pop of color. We’ll start by creaming butter and sugar, then adding our wet ingredients. Next, we fold in the flour mixture and our vibrant sprinkles. After a quick chill, we’ll scoop and bake. Finally, a simple glaze ties it all together, making these the ultimate 4th of July cookies. It’s a straightforward process that yields spectacular results, proving that festive treats don’t have to be complicated.
Ingredients
For the Main Batter:
1 cup (2 sticks or 226g) unsalted butter, softened (make sure it’s nice and soft, but not melted! This is key for a good texture)
1.5 cups (300g) granulated sugar (you can reduce this slightly if you prefer a less sweet cookie, but I find this balance is perfect)
2 large eggs (room temperature is best for emulsification)
1 teaspoon Vanilla Extract (use the good stuff, it makes a difference!)
2.5 cups (315g) all-purpose flour
1 teaspoon baking soda
1/2 teaspoon salt (enhances all the flavors)
1 cup red and blue sprinkles (jimmies or nonpareils work best for vibrant color distribution; avoid the crunchy ball ones as they can get hard when baked)
For the Glaze:
2 cups (240g) powdered sugar, sifted (sifting prevents lumps and makes for a smooth glaze)
3-4 tablespoons milk or water (start with 3 and add more as needed to reach desired consistency)
1/2 teaspoon vanilla extract
Additional red and blue sprinkles for topping
Step-by-Step Instructions
Step 1: Preheat & Prep Pan
Get your oven preheating to 350°F (175°C). This is a pretty standard baking temperature, so most ovens handle it well. Line your baking sheets with parchment paper or silicone baking mats. This is a non-negotiable for me; it prevents sticking and makes cleanup a breeze. I usually have about 3-4 baking sheets ready to go so I can work efficiently.
Step 2: Mix Dry Ingredients
In a medium bowl, whisk together the all-purpose flour, baking soda, and salt. Give it a good whisk to make sure the baking soda and salt are evenly distributed throughout the flour. This ensures your cookies will rise evenly. Nobody wants a flat cookie on one side and a dome on the other!
Step 3: Mix Wet Ingredients
In a large bowl, cream together the softened butter and granulated sugar using an electric mixer (a stand mixer or hand mixer works perfectly). Beat them until the mixture is light and fluffy, about 3-4 minutes. This step incorporates air, which is crucial for a tender cookie. Then, beat in the eggs one at a time, mixing well after each addition. Stir in the vanilla extract until just combined.
Step 4: Combine
Gradually add the dry ingredients to the wet ingredients, mixing on low speed until just combined. Be careful not to overmix here! Overmixing develops the gluten in the flour too much, which can lead to tough cookies. Stop mixing as soon as you no longer see streaks of flour. At this point, gently fold in the red and blue sprinkles with a spatula. I like to do this by hand so I can control how they’re distributed and avoid crushing them too much.
Step 5: Prepare Filling
(Correction: This recipe doesn’t have a separate filling. The “filling” is the sprinkles mixed into the dough. Apologies for any confusion!) My apologies, this recipe doesn’t have a separate filling; the festive fun comes from the sprinkles mixed directly into the Cookie Dough, creating those delightful pops of color throughout.
Step 6: Layer & Swirl
(Correction: This recipe doesn’t involve layering or swirling the dough itself. The festive colors are from the incorporated sprinkles.) Again, no layering or swirling needed here! The magic of the red and blue comes from the sprinkles we’ll be mixing directly into the cookie dough in the previous step.
Step 7: Bake
Drop rounded tablespoons of dough onto the prepared baking sheets, spacing them about 2 inches apart. The dough will be a little sticky, but that’s okay. Bake for 9-12 minutes, or until the edges are lightly golden and the centers look set but still slightly soft. They’ll continue to set up as they cool. Don’t overbake them if you want that chewy texture!
Step 8: Cool & Glaze
Let the cookies cool on the baking sheets for about 5 minutes before transferring them to a wire rack to cool completely. This is important for them to firm up properly. Once completely cool, whisk together the powdered sugar, vanilla extract, and 3 tablespoons of milk (or water) until smooth. If it’s too thick, add a little more liquid, a teaspoon at a time, until it reaches a drizzle-able consistency. Drizzle the glaze over the cooled cookies and immediately sprinkle with more red and blue sprinkles. Let the glaze set for at least 15-30 minutes before stacking.
Step 9: Slice & Serve
These cookies are best served at room temperature. They’re perfect for picking up and enjoying as is! Present them on a festive platter for a stunning dessert table, or bag them up individually as cute party favors. They look especially beautiful arranged with fresh berries or other patriotic desserts.
What to Serve It With
These Red, White, and Blue Funfetti Cookies are so versatile, they fit into any part of your 4th of July festivities! For Breakfast, imagine these alongside a big pot of coffee and maybe some fresh fruit salad. They’re a fun little treat to kick off a day of celebration. If you’re hosting a proper Brunch, these cookies look absolutely charming on a tiered stand, nestled among pastries and perhaps some mini quiches. A chilled sparkling cider or a mimosa would be a perfect pairing. As Dessert, well, they’re stars on their own! But they also play nicely with a big scoop of vanilla Ice Cream or alongside a berry trifle for an extra patriotic punch. For Cozy Snacks, I love having these on hand for when the kids (or let’s be honest, I!) need a little pick-me-up. They’re great with a tall glass of cold milk or a refreshing iced tea. My family tradition is to have these out for the neighborhood barbecue, and they always disappear in record time!
Top Tips for Perfecting Your Red, White, and Blue Funfetti Cookies
I’ve been making cookies for what feels like forever, and over the years, I’ve picked up a few tricks that really make a difference, especially with sprinkle cookies. First, with the SPRINKLES: Use good quality jimmies or nonpareils. They hold their color best and give that classic funfetti look. Avoid those crunchy ball sprinkles, as they can get hard and unpleasant to bite into after baking. When you add them, gently fold them in at the very end. Overmixing after adding them can cause the colors to bleed into the dough, giving you a more muted look instead of distinct pops of color. For the MIXING ADVICE, remember that overmixing is the enemy of tender cookies. Once you add the flour, mix *just* until combined. Seriously, stop when you don’t see dry flour anymore. A few little lumps are okay! And when it comes to creaming the butter and sugar, don’t rush it. That light and fluffy stage is where the magic happens for texture. For the GLAZE VARIATIONS, if you want a thinner glaze for dipping or more detailed drizzling, add more liquid a teaspoon at a time. For a thicker glaze that holds its shape more, use less liquid. You can also add a tiny drop of food coloring if you want an even more intense red or blue, but the sprinkles usually provide enough festive flair. I’ve also found that if you want to make these ahead and glaze them closer to serving time, it’s best to store the plain cookies in an airtight container and glaze them just before you need them, as the glaze can sometimes get a bit sticky or melty if left on for too long at room temperature. For BAKING TIPS, make sure your oven is truly at the right temperature. An oven thermometer is a great investment for bakers! Also, rotate your baking sheets halfway through baking if your oven has hot spots. And remember, these cookies are meant to be a little soft in the middle; they’ll firm up on the cooling rack. Trust me on this one – pulling them out when they *look* slightly underdone is the secret to chewiness!
Storing and Reheating Tips
Storing these delicious 4th of July cookies is pretty straightforward, and they keep well, which is always a bonus! At ROOM TEMPERATURE, they’re best stored in an airtight container for up to 3-4 days. Make sure they’ve cooled completely and the glaze has set before sealing the container. If you stack them, placing a piece of parchment paper between layers can prevent the glaze from sticking. For REFRIGERATOR STORAGE, while not strictly necessary, you can store them in the fridge if your house is particularly warm or humid. Use an airtight container, and they should last for about 5-6 days. They might lose a tiny bit of their chewiness in the fridge, but it’s usually not noticeable. FREEZER INSTRUCTIONS are also an option if you want to get a head start! You can freeze the baked and cooled cookies *without* the glaze for up to 2-3 months. Wrap them tightly in plastic wrap, then place them in a freezer-safe bag or container. To thaw, let them come to room temperature in their wrapping. Once thawed, you can then make and apply the glaze. If you *must* freeze glazed cookies, do so carefully: place them on a baking sheet in the freezer until solid (about an hour), then transfer them to an airtight container, layering with parchment paper. Thaw them at room temperature. For the GLAZE TIMING ADVICE, if you’re storing unfrosted cookies, glaze them right before serving for the freshest look and taste. If you’re freezing glazed cookies, it’s a bit trickier, but generally, they’ll hold up okay for a week or two in the freezer if packaged well.
Frequently Asked Questions
Final Thoughts
There you have it – my absolute favorite recipe for 4th of July cookies! These Red, White, and Blue Funfetti Cookies are more than just a dessert; they’re a little burst of happiness that brings people together. They’re incredibly easy to make, taste amazing, and look so festive. Whether you’re bringing them to a potluck, serving them at a backyard barbecue, or just whipping them up for your family, I promise they’ll be a huge hit. They’re a perfect example of how simple ingredients and a little bit of color can create something truly special. If you love these, you might also enjoy my Patriotic No-Bake Cheesecake Parfaits or my Sparkling Raspberry Lemonade for a complete holiday menu. I truly hope you give these cookies a try and that they become a beloved part of your holiday traditions too. I can’t wait to hear how yours turn out and see your beautiful creations! Happy baking!
4th of July Cookies
Ingredients
Cookie Dough
- 1 box white cake mix
- 2 large eggs
- 0.5 cup vegetable oil
- 1 teaspoon vanilla extract
Decorating
- 1 package royal icing mix prepared according to package directions
- 0.5 cup powdered sugar for thinning icing
- 3 tablespoons water for thinning icing
- red food coloring
- blue food coloring
- star sprinkles
Instructions
Preparation Steps
- Preheat oven to 350°F (175°C). Line baking sheets with parchment paper.
- In a large bowl, combine the cake mix, eggs, vegetable oil, and vanilla extract. Mix until well combined and a dough forms.
- Roll the dough into 1-inch balls and place them on the prepared baking sheets, about 2 inches apart.
- Bake for 10-12 minutes, or until the edges are lightly golden. Let cool on the baking sheets for a few minutes before transferring to a wire rack to cool completely.
- While the cookies are cooling, prepare the royal icing according to package directions. Divide the icing into three bowls.
- To achieve the desired consistency for flooding, whisk in 0.5 cup of powdered sugar with 3 tablespoons of water into each bowl, adding more water a teaspoon at a time if needed, until the icing falls in a thick ribbon.
- Tint one bowl of icing red and another blue. Leave the third bowl white.
- Once the cookies are completely cool, use piping bags or Ziploc bags with the corners snipped off to decorate. Outline each cookie with white icing, then flood the center.
- Immediately after flooding, drizzle thin lines of red and blue icing across the white icing. Use a toothpick to swirl the colors and create a marbled effect.
- While the icing is still wet, sprinkle with star sprinkles.
- Let the icing set completely before storing the cookies in an airtight container.
Notes
Featured Comments
“Impressed! Clear steps and comforting results. Perfect for busy nights.”
“New favorite here — creamy. crowd-pleaser was spot on.”
“Super easy and turned out amazing! My family asked for seconds. Saving this one.”
“This sweet treat was absolutely loved — the zingy really stands out. Thanks!”
“Made it tonight and wow — comforting! Will definitely make 4th of July cookies again.”
“Packed with flavor and so simple. Exactly what I wanted from 4th of July cookies.”


