

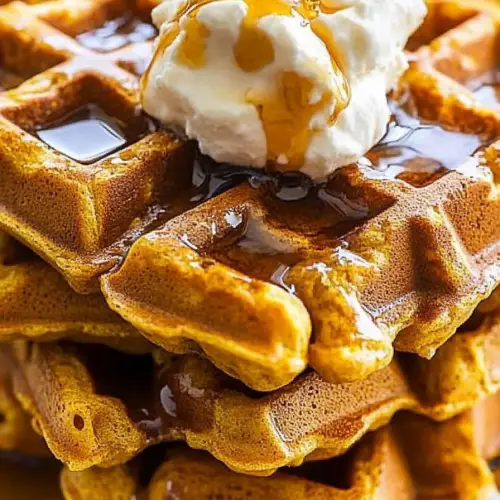
There’s something about breakfast that just feels like coming home, isn’t there? For me, fall mornings are all about those little comforts—crisp air, the smell of cinnamon, and, of course, a plate of warm pumpkin waffles fresh from the oven. I always do this when I want to surprise my family—it’s surprisingly simple, but the flavor? It’s like Christmas morning in every bite. My kids ask for this all the time, especially when the leaves start changing, and the air gets that cozy, nostalgic feel. Honestly, there’s no better way to start a chilly weekend than with a stack of these fragrant, tender waffles. They’re just as good on a busy weekday morning, especially when I want something hearty and satisfying that feels like a little treat. Plus, I love that I can sneak in a little extra nutrition—because who doesn’t want veggies or pumpkin hiding in their breakfast?
What is pumpkin waffle?
Think of pumpkin waffles as the warm, fluffy cousin of your favorite pancake—except they’re packed with that glorious, seasonal pumpkin flavor that screams fall. It’s essentially a waffle batter infused with pure pumpkin purée, spices like cinnamon and nutmeg, and a touch of sweetness. The name makes sense once you taste these—sweet, spicy, and downright comforting. They’re like breakfast cake but in waffle form—and trust me, once you try one, they might just become your new weekend tradition. The beauty of pumpkin waffles is that they’re versatile; you can enjoy them plain, with syrup, or topped with whipped cream and even a drizzle of caramel. And if you’re feeling a little adventurous, chopped pecans or toasted coconut are just perfect on top. They’re a delightful way to bring a little fall magic to your breakfast table, even if it’s not *quite* autumn outside.
How do I make pumpkin waffles?
Quick Overview
This recipe is all about mixing a simple batter with warm spices and pumpkin purée, then pouring it into your waffle iron. The trick is not to overmix—it’s the secret to fluffy waffles! Once the batter is ready, you pour it in, keep an eye on it, and when they turn golden and crispy, you’re good to go. The filling and glaze are optional but totally worth it—they turn these waffles into a showstopper. The best part? It’s foolproof, quick to prepare, and makes your kitchen smell heavenly.
Ingredients
For the Main Batter:
- 1 ¾ cups all-purpose flour – I like to use unbleached for that hearty, wholesome flavor.
- 1 tablespoon baking powder – For fluffiness.
- 1 teaspoon ground cinnamon – The warm spice that takes these over the top.
- ½ teaspoon ground nutmeg – Just a pinch for depth.
- ¼ teaspoon salt – To balance flavors.
- ⅓ cup brown sugar – You can reduce this if you prefer less sweetness.
- 2 large eggs – Lightly beaten.
- 1 cup milk (whole or plant-based) – I’ve tested with almond, oat, and cow’s milk, and they all work beautifully.
- ½ cup melted butter or oil – For richness. Trust me, melted butter makes the waffles so flavorful.
- 1 cup pumpkin purée – Fresh or canned, can’t go wrong!
For the Filling (optional but delicious):
- Cream cheese or mascarpone – For a creamy swirl.
- Chopped pecans or walnuts – Adds crunch and nutty flavor.
- Chocolate chips – For a sweet surprise.
For the Glaze:
- ½ cup powdered sugar
- 2-3 tablespoons milk or cream
- A splash of vanilla or cinnamon
Step-by-Step Instructions
Step 1: Preheat & Prep Pan
Go ahead and turn on your waffle iron and set it to a medium-high heat. I always give mine a quick spray of non-stick spray or brush of melted butter—trust me, this keeps them from sticking and makes cleanup easier. While that’s heating up, gather all your ingredients—it’s way less stressful when everything’s within reach.
Step 2: Mix Dry Ingredients
In a large bowl, whisk together the flour, baking powder, spices, salt, and sugar. That way, the dry ingredients are evenly combined—no clusters, no clumps. This step is simple but makes a big difference, especially with the spices distributing evenly throughout.
Step 3: Mix Wet Ingredients
In another bowl, beat the eggs lightly, then stir in the milk, melted butter, and pumpkin purée. Make sure your eggs and pumpkin are at room temperature if possible—that’s just a little trick to help everything emulsify nicely. It’s so satisfying when everything mixes smoothly, resulting in a silky batter.
Step 4: Combine
Pour the wet into the dry and gently fold together with a spatula or wooden spoon. Don’t overmix—I do this until just combined. If you see a few lumps, that’s totally fine. Overmixing can make the waffles tough, and I’m all about that tender interior and crispy exterior.
Step 5: Prepare Filling
If you’re using a filling, now’s a good time to chop your nuts or soften your cream cheese slightly. I like to dollop small spoonfuls of cream cheese into the batter, then swirl it with a toothpick—trust me, this creates beautiful marbling and a delightful richness.
Step 6: Layer & Swirl
Pour the batter into the hot waffle iron, filling each section about ¾ full. If you’re adding fillings, drop a spoonful into the center, then close the lid. Once the waffle starts to cook, you can gently swirl or jiggle the batter to distribute the filling—this keeps it looking pretty and tastes so good.
Step 7: Bake
Cook until the waffles are golden brown and crisp—usually 3-5 minutes, depending on your machine. I always peek and check—they should be easily detachable if properly greased. If they look dark too quickly, turn the heat down slightly the next time. And if you’re unsure, a light tap should sound crisp but not burnt.
Step 8: Cool & Glaze
Transfer the waffles to a wire rack for a minute or two—they need a little breathing room to stay crispy. Meanwhile, make your glaze by whisking powdered sugar, vanilla, and milk until smooth. Drizzle it over warm waffles and watch the magic happen—what I love is how the glaze seeps into every nook and cranny, adding that perfect sweet finish.
Step 9: Slice & Serve
This is the best part—stack ’em high and serve immediately. I love adding extra toppings: fresh berries, a dollop of whipped cream, toasted coconut, or even a drizzle of caramel. There’s something so comforting about that first bite, especially when the waffles are still warm and fragrant. It’s a morning hug—no doubt.
What to Serve It With
This recipe is a real chameleon. For a cozy breakfast, I love pairing it with hot coffee or sharp apple cider on the side. If I’m serving brunch, I’ll plate them with seasonal fruits—think figs, sliced apples, or a handful of pomegranate seeds—and maybe a glass of sparkling water with a splash of orange. These waffles also make a lovely dessert when topped with whipped cream and a drizzle of caramel or honey—perfect for a fall dinner or special weekend treat. And if I have leftovers (which rarely happens because everyone devours them), I reheat lightly in the oven or toaster to keep that crispy edge. Honestly, once you’ve made these, your mornings are never quite the same.
Top Tips for Perfecting Your Pumpkin Waffles
Over years of testing, I’ve learned a few tricks for taking these to the next level. First, always measure your pumpkin purée well—not too much, or the batter gets swampy, and not too little, or it loses that rich pumpkin flavor. My secret is to whisk the dry ingredients well before adding wet—that way, every bite is perfectly spiced. Speaking of swaps, if you want gluten-free waffles, try rice flour or a GF blend—we like that combo as it keeps the texture light and tender. When swirling in your filling, use a toothpick or skewer to create pretty marbling—this makes each bite a little more exciting. I tested different cook times, and honestly, the smell of the waffles turning golden is a reliable sign they’re ready. For the glaze, I love adding a tiny pinch of cinnamon or vanilla; it deepens the flavor beautifully. Trust me on this: don’t open the waffle iron too early! Let them set and get crispy. The first batch is always a little trial-and-error, so don’t be discouraged—once you find the rhythm, these waffles will be a staple in no time.
Storing and Reheating Tips
If you’ve got leftovers—which I doubt because these disappear fast—they store beautifully. For short-term storage, keep them in an airtight container at room temperature for a day or two—just give them a quick reheat in your toaster or oven. For longer storage, pop them in a zip-top bag or freezer-safe container and freeze for up to a month. To reheat, I spread them on a baking sheet and warm at 350°F for about 8-10 minutes until crispy. If you’re planning ahead, wait to add the glaze until just before serving—this keeps everything fresh and perfect. Reheating in the microwave also works, but the waffles tend to lose their crispness, so I prefer the oven or toaster method. Trust me, these waffles are just as delicious the next day—if they last that long!
Frequently Asked Questions
Final Thoughts
There’s something so magical about pumpkin waffles—they’re cozy, versatile, and just a little special. Every time I make them, I feel like I’m sharing a secret from my kitchen, one that’s been handed down through family stories and cookout memories. The combination of spiced pumpkin, crispy edges, and fluffy interior hits all the right notes. Plus, they’re so forgiving—you can play with fillings, toppings, and flavors until you find your perfect version. If you haven’t tried pumpkin in your breakfast yet, I highly recommend it; it’s a game-changer. Whether it’s a lazy weekend morning or a hurried weekday, these waffles somehow make everything feel a little slower, a little sweeter. I’d love to hear how yours turn out—drop a comment below or share your twists! Happy baking, friends—you’re about to make your mornings a whole lot tastier.
pumpkin waffles
Ingredients
Main Ingredients
- 15 ounces canned pumpkin puree
- 2 large eggs separated
- 0.5 cups light brown sugar packed
- 0.5 cups Silk Unsweetened Cashewmilk
- 0.33 cups canola or vegetable oil
- 2 teaspoons pumpkin pie spice
- 1 teaspoon vanilla extract
- 1.5 cups all purpose flour
- 1 tablespoons baking powder
- 0.5 teaspoons salt
- 0.25 teaspoons cream of tartar optional
Instructions
Preparation Steps
- In a large bowl, whisk together pumpkin puree, egg yolks, brown sugar, milk, oil, pumpkin pie spice, and vanilla. Set aside.
- In a separate large bowl, whisk together flour, baking powder, salt, and cream of tartar if using.
- Combine dry ingredients with wet ingredients and stir gently to combine. Avoid overmixing.
- Preheat waffle iron and spray with non-stick spray.
- In a clean bowl, beat egg whites until stiff peaks form.
- Fold beaten egg whites into the batter gently.
- Pour batter into waffle iron and cook for about 3 to 4 minutes until golden and crisp.
- Repeat with remaining batter. Serve waffles hot with toppings of choice.
Notes
Featured Comments
“Impressed! Clear steps and comforting results. Perfect for busy nights.”
“New favorite here — turned out amazing. crowd-pleaser was spot on.”
“Super easy and turned out amazing! My family asked for seconds. Saving this one.”
“This sweet treat was absolutely loved — the cozy really stands out. Thanks!”
“Made it tonight and wow — crowd-pleaser! Will definitely make Autumnal Waffles How to Make Them Easy again.”
“Packed with flavor and so simple. Exactly what I wanted from Autumnal Waffles How to Make Them Easy.”


