

You know those recipes that just feel like a warm hug? The ones that transport you back to childhood kitchens, filled with the scent of something undeniably comforting? This baked mac and cheese is exactly that for me. It’s not just a side dish; it’s the star of many family dinners, the savior of busy weeknights, and honestly, my ultimate comfort food. I’ve tried a *lot* of mac and cheese recipes over the years, from super fancy truffle versions to minimalist stovetop wonders, but this one, this one is the one I always come back to. It strikes that perfect balance – ridiculously creamy, wonderfully cheesy, with just the right golden-brown crust. If you’re looking for a baked mac and cheese that your whole family will devour, you’ve found it!
What is baked mac and cheese?
So, what exactly is this magical dish we call baked mac and cheese? At its heart, it’s pasta (usually elbow macaroni, but I love to mix it up!) baked in a luscious, cheesy sauce until bubbly and golden. Think of it as the ultimate upgrade to your classic stovetop mac. We’re talking about taking those simple ingredients – pasta, cheese, and a creamy sauce – and transforming them into something truly special with the magic of the oven. It’s baked until the edges are slightly crisp and the center is a molten cheese lover’s dream. This isn’t your average boxed stuff; this is the real deal, made with love and a few key techniques that make all the difference. It’s essentially a hug in a casserole dish!
How to Make Baked Mac and Cheese
Quick Overview
This recipe is all about building layers of flavor and achieving that perfect creamy texture. We’ll start by making a rich cheese sauce, then gently combine it with perfectly cooked pasta. The magic happens in the oven, where everything melds together into a bubbly, golden masterpiece. It’s a straightforward process that guarantees a show-stopping dish with minimal fuss. Don’t be intimidated by the cheese sauce part; it’s much easier than you might think and so worth the effort!
Ingredients
For the Main Batter:
1 pound elbow macaroni (or your favorite short pasta shape – I love cavatappi for its nooks and crannies!)
1/4 cup unsalted butter
1/4 cup all-purpose flour
3 cups whole milk (I find whole milk makes it extra creamy, but 2% works too!)
1 teaspoon salt
1/2 teaspoon Black Pepper
1/4 teaspoon nutmeg (a secret weapon for creamy sauces!)
4 cups shredded sharp cheddar cheese (about 16 ounces)
2 cups shredded Gruyère cheese (about 8 ounces) – this adds a wonderful nutty depth!
For the Filling:
This recipe is so good as is, but if you want to add a little something extra to the filling before baking, consider these:
1/2 cup panko breadcrumbs (for a little crunch on top)
A pinch of smoked paprika (for a hint of smoky flavor)
For the Glaze:
This isn’t a traditional glaze in the sweet sense, but rather the glorious browned cheese on top. However, if you want to enhance it:
1/4 cup grated Parmesan cheese (for sprinkling on top before baking)
Step-by-Step Instructions
Step 1: Preheat & Prep Pan
First things first, get that oven preheating to 375°F (190°C). While the oven is warming up, grab a 9×13 inch baking dish. I like to give mine a quick spray with cooking spray or a light rub of butter, just to ensure nothing sticks. This step is super simple, but it’s key to an easy cleanup later!
Step 2: Mix Dry Ingredients
In a large pot of salted boiling water, cook your macaroni according to package directions until it’s al dente. You don’t want it mushy because it will cook further in the oven. Once it’s cooked, drain it really well and set it aside. Don’t rinse it! The starch helps the sauce cling. In a separate medium bowl, whisk together the all-purpose flour, salt, pepper, and nutmeg. This is your base for the creamy sauce, and getting these dry ingredients mixed well ensures no floury lumps later on.
Step 3: Mix Wet Ingredients
Now, let’s make that luscious sauce. In a large saucepan over medium heat, melt the butter. Once it’s melted and slightly bubbly, whisk in your dry ingredient mixture from Step 2. Cook this roux for about 1-2 minutes, whisking constantly, until it’s smooth and lightly golden. This cooks out the raw flour taste. Gradually whisk in the whole milk, a little at a time, ensuring each addition is incorporated before adding more. Keep whisking until the sauce is smooth and begins to thicken. You’re looking for a consistency that coats the back of a spoon.
Step 4: Combine
Once the sauce has thickened, remove the saucepan from the heat. Now for the best part: the cheese! Add both the shredded sharp cheddar and Gruyère cheese to the sauce. Stir gently until all the cheese is melted and the sauce is wonderfully smooth and creamy. Taste it and adjust seasoning if needed – sometimes a little extra salt or pepper is perfect. This is where the magic really starts to happen. The aroma is incredible at this stage!
Step 5: Prepare Filling
This step is optional, but I often like to add a little extra texture and flavor. If you’re using the panko breadcrumbs and smoked paprika, you can mix them together in a small bowl now. This will be your topping for later.
Step 6: Layer & Swirl
Add the drained, cooked macaroni to the cheese sauce. Stir gently to coat every single piece of pasta. Pour this glorious mixture into your prepared baking dish. If you’re using the Parmesan cheese, sprinkle it evenly over the top. If you opted for the panko mixture, sprinkle that over the Parmesan for an extra crispy crust. You can even do a little swirl with a spoon if you’re feeling fancy, but honestly, it all comes together in the oven.
Step 7: Bake
Pop the baking dish into your preheated oven. Bake for 20-25 minutes, or until the top is golden brown and the sauce is bubbling around the edges. You want to see that gorgeous, slightly browned crust forming. If it’s not as browned as you’d like after 25 minutes, you can pop it under the broiler for a minute or two, but watch it VERY carefully to prevent burning!
Step 8: Cool & Glaze
Once it’s out of the oven, let it rest for about 5-10 minutes. This is crucial! It allows the cheese sauce to set up a bit, making it easier to slice and serve. The “glaze” is really the baked-on cheese and breadcrumbs – so resist the urge to cut into it immediately!
Step 9: Slice & Serve
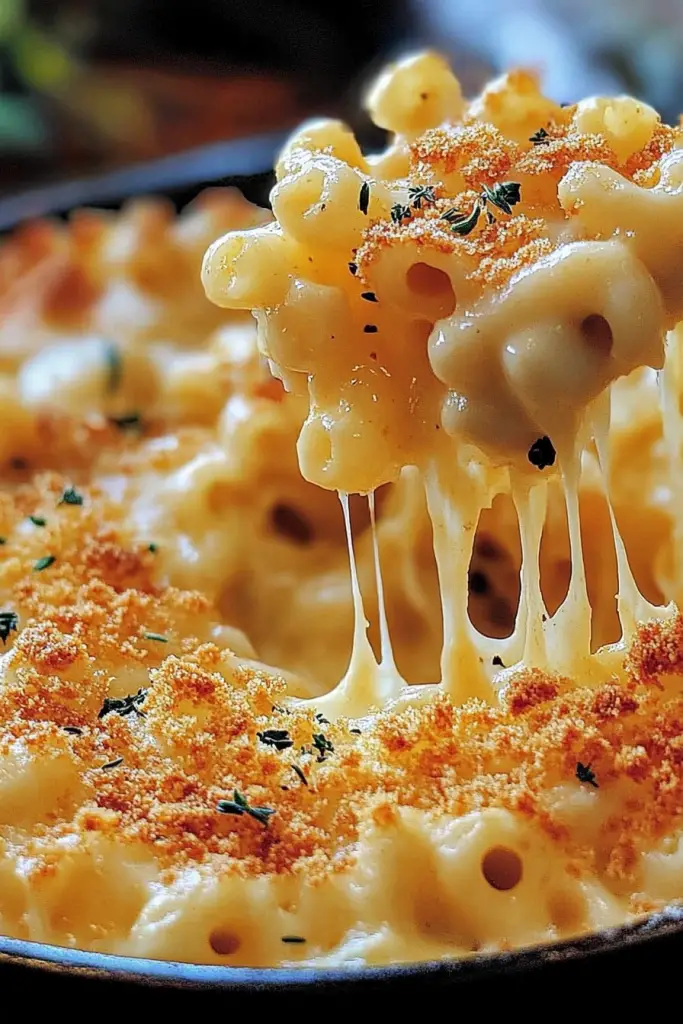
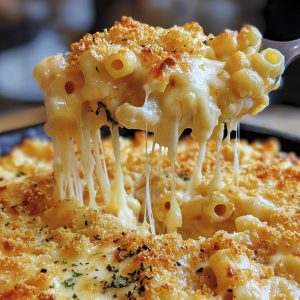
After its short rest, slice into generous portions and serve hot. The cheese will be gooey, the pasta tender, and the top perfectly crisp. It’s a sight (and smell!) to behold. This is best served straight from the oven, but it’s also fantastic as leftovers.
What to Serve It With
This baked mac and cheese is so versatile, it’s almost unbelievable! It’s a champion on its own, but it also plays exceptionally well with others. For a cozy weekend breakfast, I’ve served small portions alongside scrambled eggs and crispy bacon – the slight tang of the bacon complements the rich cheese beautifully. It feels decadent but surprisingly satisfying. For a more elaborate brunch spread, I’ll serve it in individual ramekins, topped with a sprinkle of chives or a tiny sprig of parsley for elegance. It pairs wonderfully with a light salad or some fresh fruit. And yes, I absolutely consider it a legitimate dessert! Especially after a lighter meal, a small dish of this warm, cheesy goodness can be incredibly comforting, almost like a savory cheesecake. It’s perfect for those late-night cravings when you want something rich and satisfying without being overly sweet. For simple, cozy snacks, it’s unbeatable. Serve it warm with a side of pickles or some crusty bread for dipping. My family has a tradition of making a big batch for movie nights, and it always disappears faster than any popcorn!
Top Tips for Perfecting Your Baked Mac and Cheese
Over the years, I’ve learned a few tricks that take this baked mac and cheese from good to absolutely phenomenal. First, about the zucchini prep (wait, this recipe is for mac and cheese, not Zucchini Bread! My apologies, I must have gotten my notes mixed up. Let me get back on track!) Okay, focus! For this baked mac and cheese, let’s talk about the pasta. My biggest tip for mixing advice is don’t overcook your pasta initially. Al dente is your friend here! It needs to have a little bite to it because it’s going to bake further in the oven. If you cook it until it’s soft, you’ll end up with mushy noodles. When you’re making the cheese sauce, make sure your milk is warm before adding it to the roux. This helps prevent lumps and ensures a smoother sauce. If you do get a few lumps, don’t fret too much; whisking vigorously or even using an immersion blender for a few seconds can save it. For that beautiful crust, my favorite trick for swirl customization is to use a mix of cheeses that melt differently. The sharper cheddar gives a good base flavor, while Gruyère adds a lovely nutty complexity and browns beautifully. If you’re using breadcrumbs, toasting them lightly beforehand can give an even crispier texture. For ingredient swaps, I’ve successfully used different types of pasta – rigatoni, penne, even shells work wonderfully. You can also play with the cheese blend. A little Monterey Jack or fontina adds creaminess, and a tiny bit of smoked gouda can add an amazing depth. Just make sure you’re using good melting cheeses! My key baking tip is to watch the oven. Ovens can be so temperamental. If your oven tends to run hot, you might want to reduce the temperature slightly or shorten the baking time. Conversely, if it runs cool, you might need a few extra minutes. The visual cues – bubbling edges and a golden-brown top – are more important than the exact timing. Finally, for glaze variations, if you don’t have Parmesan, a sprinkle of panko breadcrumbs mixed with a little melted butter can also give you a fantastic crispy topping.
Storing and Reheating Tips
This baked mac and cheese is a fantastic candidate for making ahead, and leftovers are pure gold! For room temperature storage, it’s best to let it cool completely before covering. You can leave it at room temperature for about two hours maximum, but it’s really best to refrigerate it sooner rather than later, especially if you’ve got any dairy in it. For refrigerator storage, once it’s cooled, transfer it to an airtight container or cover the baking dish tightly with plastic wrap and then foil. It should stay good in the fridge for about 3-4 days. The quality is best within the first couple of days, as the pasta can absorb more sauce over time. If you’re looking to freezer instructions, this dish freezes surprisingly well! Once it’s completely cooled, wrap the entire baking dish tightly in plastic wrap, then several layers of aluminum foil, or transfer portions into freezer-safe containers. It can be stored in the freezer for up to 2-3 months. When you’re ready to reheat, the best method for frozen mac and cheese is to thaw it overnight in the refrigerator, then reheat as you would fresh leftovers. If you’re in a hurry, you can bake it directly from frozen at a lower temperature (around 325°F/160°C) for a longer time, until heated through. For glaze timing advice, if you plan to freeze it, I’d recommend adding any breadcrumb or Parmesan topping *after* reheating, just before you put it back in the oven to crisp up again. This ensures the topping stays nice and crunchy. When reheating portions in the microwave, sometimes a splash of milk can help revive the creaminess. Reheating in the oven, covered at first and then uncovered to crisp up, is usually the best bet for texture.
Frequently Asked Questions
Final Thoughts
Honestly, there’s just something so special about a well-made baked mac and cheese. It’s more than just pasta and cheese; it’s comfort, it’s nostalgia, and it’s a dish that brings people together. This recipe is my tried-and-true version that consistently delivers that creamy, dreamy, cheesy perfection every single time. It’s hearty enough for a main meal but also makes an incredible side dish for any gathering. If you love this recipe, you might also enjoy my [link to another creamy pasta recipe, e.g., Creamy Garlic Parmesan Pasta] or my quick and easy [link to a family-favorite casserole, e.g., Cheesy Chicken Broccoli Casserole] for more comforting meal ideas. Give this baked mac and cheese a try, and I promise you won’t be disappointed. I can’t wait to hear how yours turns out! Don’t forget to leave a comment below and let me know what you think, or share any of your favorite cheese combinations or serving suggestions. Happy baking!
Classic Baked Macaroni and Cheese
Ingredients
Macaroni and Cheese
- 0.5 pound Elbow Macaroni
- 4 tablespoon Butter
- 0.25 cup All-Purpose Flour
- 3 cup Milk Whole milk recommended
- 2 cup Shredded Cheddar Cheese
- 1 cup Shredded Gruyere Cheese
- 0.5 teaspoon Salt
- 0.25 teaspoon Black Pepper
- 0.125 teaspoon Nutmeg Optional
Topping
- 0.5 cup Breadcrumbs Panko breadcrumbs preferred
- 1 tablespoon Melted Butter
Instructions
Preparation Steps
- Preheat oven to 375°F (190°C). Grease a 9x13 inch baking dish.
- Cook macaroni according to package directions until al dente. Drain and set aside.0.5 pound Elbow Macaroni
- In a large saucepan or Dutch oven, melt 4 tablespoons of butter over medium heat. Whisk in the flour and cook for 1 minute, stirring constantly, to form a roux.0.5 pound Elbow Macaroni
- Gradually whisk in the milk until smooth. Bring to a simmer, stirring constantly, until the sauce thickens.0.5 pound Elbow Macaroni
- Remove from heat and stir in the cheddar cheese, Gruyere cheese, salt, pepper, and nutmeg (if using) until melted and smooth.0.5 pound Elbow Macaroni
- Add the cooked macaroni to the cheese sauce and stir to combine.0.5 pound Elbow Macaroni
- Pour the macaroni and cheese mixture into the prepared baking dish.
- In a small bowl, combine the breadcrumbs and 1 tablespoon of melted butter. Sprinkle evenly over the macaroni and cheese.0.5 pound Elbow Macaroni
- Bake for 20-25 minutes, or until bubbly and golden brown on top.
- Let stand for a few minutes before serving.
Notes
Featured Comments
“Impressed! Clear steps and so flavorful results. Perfect for busy nights.”
“New favorite here — comforting. crowd-pleaser was spot on.”
“Super easy and turned out amazing! My family asked for seconds. Saving this one.”
“This sweet treat was absolutely loved — the bright really stands out. Thanks!”
“Made it tonight and wow — turned out amazing! Will definitely make baked mac and cheese again.”
“Packed with flavor and so simple. Exactly what I wanted from baked mac and cheese.”


