

Okay, so you know how sometimes you just crave something that feels like a warm hug in a bowl? That’s exactly what this butternut squash pasta is for me. It’s not just a meal; it’s pure comfort. I remember the first time I made it, it was during a particularly chaotic autumn week. The kind where the leaves are all beautiful outside, but inside, you’re just trying to keep all the balls in the air. I had a butternut squash sitting on the counter, and I just felt inspired. I wanted something rich, a little sweet, and completely satisfying. Honestly, I was a little nervous because I’d always thought butternut squash was a bit fussy, but this recipe? It completely changed my mind. It’s the kind of dish that makes you feel like you’ve accomplished something amazing, even if you only had an hour to whip it up. If you’ve ever loved mac and cheese but wanted something a little more grown-up and bursting with seasonal flavor, this butternut squash pasta is your new best friend. It’s genuinely one of the most requested dishes in my house, right up there with my famous Chocolate Chip Cookies.
What is butternut squash pasta?
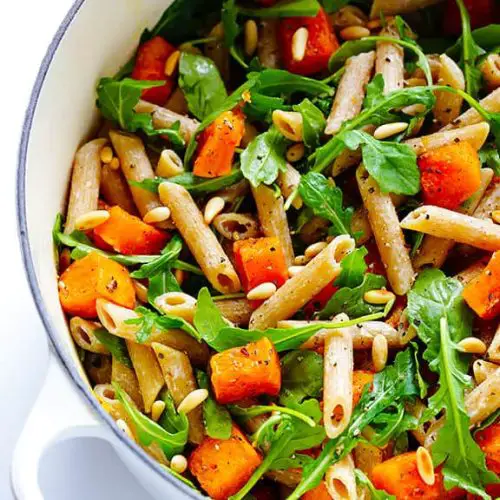
So, what exactly is this magical butternut squash pasta? Think of it as the coziest, most velvety pasta dish you can imagine, kissed with the sweet, earthy flavor of roasted butternut squash. It’s not a heavy cream sauce, though it feels incredibly decadent. The magic happens when the roasted butternut squash is blended until it’s silky smooth, creating a naturally vibrant and rich sauce. We then toss that glorious sauce with your favorite pasta shape – I’m partial to rigatoni or penne because they really grab onto the sauce, but honestly, any shape works beautifully. It’s essentially a way to get all the goodness and comforting texture of a creamy pasta dish, but with the wholesome goodness of butternut squash as the star. It’s a far cry from a simple marinara, and definitely a step up from your average weeknight pasta. It feels elegant enough for company but is so simple, it’s perfect for a Tuesday night when you just need something delicious and fuss-free.
How do I make butternut squash paste?
Quick Overview
This butternut squash pasta recipe is all about roasting the squash to bring out its natural sweetness and then blending it into a luxuriously smooth sauce. You’ll cook your pasta, then simply whisk the squash puree into it with a few other flavor boosters. It’s a straightforward process that yields spectacular results, making it a go-to for busy evenings or when you want a comforting meal without the fuss. The beauty of this method is its simplicity – you get maximum flavor with minimal steps.
Ingredients
For the Roasted Butternut Squash Base:
1 medium butternut squash (about 2-3 pounds), peeled, seeded, and cubed into 1-inch pieces. Look for one that feels heavy for its size, which usually means it’s full of flavor. I always try to buy them when they’re in season, typically from late summer through fall, but good ones can be found year-round!
2 tablespoons olive oil. A good quality extra virgin olive oil makes a difference here, giving a nice depth.
Salt and freshly ground Black Pepper, to taste. Don’t be shy with the seasoning – it really wakes up the squash’s flavor.
For the Pasta Sauce & Assembly:
1 pound pasta of your choice. Rigatoni, penne, fusilli, or even fettuccine work wonderfully. I tend to gravitate towards shapes that hold sauce well, like rigatoni.
2 cloves garlic, minced. Fresh garlic is key here for that aromatic kick.
1 cup vegetable broth or chicken broth. Use low-sodium if you’re watching your salt intake. You can even use pasta water in a pinch!
1/2 cup milk (dairy or non-dairy like unsweetened almond or oat milk). I’ve experimented with different milks, and almond milk makes it incredibly creamy without an overwhelming flavor.
1/4 cup grated Parmesan cheese (optional, but highly recommended for that umami punch). You can leave this out for a vegan version or use a vegan alternative.
A pinch of nutmeg (optional, but it’s like a secret handshake with the squash!). It really elevates the natural sweetness.
For Garnish & Flavor Boosts (Optional):
Toasted pumpkin seeds (pepitas) for crunch.
Fresh sage leaves, fried until crispy. This is my absolute favorite garnish – the earthy crunch is divine!
Red Pepper flakes for a little heat.
Extra Parmesan cheese for serving.
Step-by-Step Instructions
Step 1: Preheat & Prep Pan
First things first, let’s get that oven hot and ready. Preheat your oven to 400°F (200°C). While it’s heating up, grab a baking sheet. You don’t need to grease it if it’s non-stick, but if you have a trusty old metal one, a little drizzle of olive oil or a quick spray can prevent any sticking. Lay out your cubed butternut squash in a single layer. Try not to overcrowd the pan; give them a little breathing room so they roast nicely instead of steaming. Drizzle the squash with the 2 tablespoons of olive oil and toss to coat evenly. Season generously with salt and freshly ground black pepper. This is where the flavor foundation is laid, so don’t skimp!
Step 2: Mix Dry Ingredients
This step is more about preparing your ingredients than mixing dry things together in the traditional sense, as the ‘dry’ elements are already on the baking sheet! What’s important here is ensuring your squash is seasoned well before it goes into the oven. The salt and pepper will help draw out moisture and create beautiful caramelization. Make sure each piece of squash has a light coating of oil and seasoning. It sounds simple, but getting this right makes a huge difference in the final flavor profile. The bits that get a little browned and caramelized are pure gold!
Step 3: Mix Wet Ingredients
While your squash is roasting, get your other sauce components ready. In a small bowl or directly in your blender or food processor (whichever you’re using to puree the squash), have your vegetable or chicken broth and your milk ready. This is also a good time to mince your garlic. If you’re using nutmeg, you can add it to the dry squash before roasting, or even to the puree later, but a tiny pinch now can also work wonders.
Step 4: Combine
This step refers to bringing all the flavor components together. Once the squash is roasted (we’ll get to that in a minute!), you’ll combine it with the liquids. The key is to roast the squash until it’s fork-tender and slightly caramelized. This usually takes about 25-30 minutes. Once it’s ready, let it cool for just a few minutes before transferring it to your blender or food processor. Add the minced garlic, broth, and milk. You’ll then blend this mixture until it’s incredibly smooth and creamy. If it seems too thick, you can add a splash more broth or milk until you reach your desired consistency. If you’re adding Parmesan cheese, stir it in after blending so it doesn’t get too oily.
Step 5: Prepare Filling
In this recipe, the “filling” is really the pasta itself! While your squash is roasting, bring a large pot of salted water to a rolling boil for your pasta. Once it’s boiling vigorously, add your pound of pasta. Cook according to the package directions until it’s al dente – you want it tender but with a slight bite. Before you drain the pasta, make sure to reserve about 1 to 1.5 cups of the starchy pasta water. This liquid gold is crucial for achieving the perfect sauce consistency and helping it cling to the pasta.
Step 6: Layer & Swirl
This is where the magic really happens! Once your pasta is cooked and drained (remember to save that pasta water!), return the pasta to the empty pot. Pour your creamy butternut squash sauce over the hot pasta. Gently toss the pasta with the sauce, ensuring every piece is coated. If the sauce seems a little too thick, add a splash of the reserved pasta water, a tablespoon at a time, tossing continuously until you reach a luscious, flowing consistency. The starch in the pasta water will emulsify the sauce and make it cling beautifully. This is the “swirling” moment, where the pasta and sauce become one harmonious dish.
Step 7: Bake
This particular butternut squash pasta recipe is designed to be made on the stovetop and served immediately, so no baking is required! The roasting of the squash is done prior to creating the sauce. This keeps the dish quick and accessible for weeknights. If you ever wanted to make it a baked pasta dish, you could certainly transfer it to a baking dish, top with more cheese and breadcrumbs, and bake until bubbly, but the stovetop method is my go-to for its speed and simplicity.
Step 8: Cool & Glaze
Similar to the baking step, this recipe doesn’t typically involve a glaze after cooking. The “glaze” is essentially the creamy butternut squash sauce itself, coating the pasta. You want to serve this pasta hot, right after you’ve tossed it with the sauce. The residual heat from the pasta and the pot will keep everything warm and delicious. If you were making something like a baked good, cooling and glazing would be crucial, but for this pasta, serving it immediately is key to enjoying its best texture and flavor. The sauce is at its most vibrant and creamy right off the stove.
Step 9: Slice & Serve
This is the best part! Ladle generous portions of your creamy butternut squash pasta into bowls. For an extra touch of elegance and flavor, sprinkle with those optional garnishes – some crispy fried sage leaves are my absolute favorite for an earthy crunch, toasted pumpkin seeds for texture, or a pinch of red pepper flakes for a subtle kick. A final dusting of Parmesan cheese is always a good idea. Serve immediately while it’s hot and the sauce is perfectly creamy. It’s a dish that looks as good as it tastes, with its beautiful, warm orange hue.
What to Serve It With
This butternut squash pasta is practically a meal in itself, a real showstopper that feels so wholesome. But if you’re looking to round out your meal or serve it for a special occasion, I’ve got some ideas! For a simple breakfast, though less common, you could have a small portion with a side of scrambled eggs and maybe some crispy bacon. It’s surprisingly good with the savory notes. For a more traditional brunch spread, this pasta is fantastic. Serve it alongside some roasted breakfast sausages, a fresh Fruit Salad, and perhaps some crusty bread to sop up any extra sauce. A mimosa or a sparkling cider would be perfect beverage pairings. As a dessert course, well, it’s a bit unconventional, but a tiny, elegant portion could be served after a lighter main course, perhaps with a sprinkle of toasted nuts, almost like a savory custard. But honestly, where this pasta truly shines is as a main course for lunch or dinner, or as a comforting snack any time of day. For cozy snacks, I love having a small bowl of this on a rainy afternoon with a good book and a cup of herbal tea. You could also serve it with a simple side salad with a light vinaigrette to cut through the richness. My family also loves it with some quick garlic bread on the side – you know, the kind you can just melt butter and garlic on a baguette and pop under the broiler for a few minutes. It’s so versatile, truly perfect for any time you need a little bit of comfort and deliciousness.
Top Tips for Perfecting Your Butternut Squash Pasta
After making this butternut squash pasta more times than I can count, I’ve picked up a few tricks that I think make all the difference. First, for the squash itself, when you’re cubing it, try to make the pieces as uniform in size as possible. This ensures they all roast evenly. If some pieces are much smaller than others, they can turn to mush before the larger ones are tender. When roasting, don’t be afraid of those little browned bits on the edges of the squash; that’s pure flavor! For the sauce, the blending is key. You want it super smooth. If you don’t have a high-powered blender, you might need to blend in batches. Make sure to scrape down the sides of the blender a few times to catch any unblended bits. If your sauce is looking a little too thick after you’ve blended it, don’t panic! That reserved pasta water we talked about earlier is your best friend. Add it a tablespoon at a time until you reach that perfect, luscious consistency. It’s also a great emulsifier, making the sauce cling to the pasta beautifully. When it comes to seasoning, taste as you go! Butternut squash can vary in sweetness, and your broth might be saltier or milder. So, adjust your salt, pepper, and that hint of nutmeg to your liking. I’ve learned that overmixing the pasta with the sauce isn’t really a thing here; you want to toss it gently but thoroughly to ensure every strand is coated. For ingredient swaps, if you can’t find butternut squash, acorn squash or even sweet potato can work in a pinch, though the flavor profile will be slightly different. For a vegan version, just swap the dairy milk for your favorite plant-based milk and omit the Parmesan or use a good vegan alternative. If you want to make it even richer, a tablespoon of cashew cream stirred in at the end is divine. Baking the squash at a slightly lower temperature for a bit longer can sometimes yield an even sweeter, more caramelized result, but 400°F for about 25-30 minutes is my reliable sweet spot. Don’t skip reserving that pasta water; it’s a game-changer for achieving restaurant-quality sauce at home. Lastly, for garnish, crispy sage leaves add an incredible textural contrast and an earthy flavor that complements the squash so well. A little drizzle of really good olive oil right before serving never hurt anyone either!
Storing and Reheating Tips
This butternut squash pasta is so delicious that sometimes I make a double batch just to have leftovers. Storing it properly is key to keeping it tasting amazing. If you have leftovers, let them cool down a bit at room temperature before transferring them to an airtight container. At room temperature, I wouldn’t leave it out for more than two hours, just to be safe. For refrigerator storage, it can last beautifully for about 3 to 4 days. I find that glass containers are the best for keeping pasta, as they don’t absorb odors and are easy to clean. Make sure the container is sealed tightly to prevent it from drying out or picking up any other smells from the fridge. If you plan on freezing portions, this pasta freezes surprisingly well! Wrap individual portions tightly in plastic wrap, then place them inside a freezer-safe bag or container. It should keep its quality in the freezer for about 2 to 3 months. When you’re ready to reheat, the best way to bring it back to life is on the stovetop. Gently warm it in a saucepan over medium-low heat. You might need to add a splash of milk or broth, or even some of that reserved pasta water if you have any, to loosen up the sauce and bring back that creamy texture. Stir it frequently so it heats evenly and doesn’t stick to the bottom. Microwaving is also an option, but it can sometimes make the pasta a little bit mushy if you’re not careful. If you do microwave, use a microwave-safe dish, cover it loosely, and reheat in short intervals, stirring in between. For frozen portions, the best method is to thaw them overnight in the refrigerator before reheating on the stovetop or in the microwave. I usually wait to add any fresh garnishes like herbs or crunchy seeds until after reheating, just to keep them at their best. The sauce might seem a little thicker after refrigeration or freezing, but a little liquid and gentle heat will bring it right back to its glorious, creamy state.
Frequently Asked Questions
Final Thoughts
I really hope you give this butternut squash pasta a try. It’s one of those recipes that consistently brings smiles to the table and makes everyone feel cozy and content. It’s proof that simple ingredients, prepared with a little bit of love and attention, can create something truly extraordinary. It’s more than just a meal; it’s a reminder of the simple joys in life, like gathering around the table with loved ones and enjoying delicious, homemade food. If you’re a fan of comforting, flavorful dishes, you might also love my Creamy Tomato Basil Soup or my Garlic Herb Roasted Chicken. They have that same kind of heartwarming appeal! I can’t wait to hear what you think of this butternut squash pasta. Please leave a comment below to share your experience, your favorite variations, or any tips you discovered! And if you snap a photo, be sure to tag me – I’d absolutely love to see it!
Creamy Butternut Squash Pasta
Ingredients
Butternut Squash Sauce
- 0.5 medium butternut squash peeled, seeded, and cubed
- 2 cloves garlic minced
- 0.25 cup vegetable broth
- 0.5 cup heavy cream
- 0.5 teaspoon dried sage
- 1 tablespoon olive oil
- 0.25 teaspoon salt to taste
- 0.25 teaspoon black pepper to taste
Pasta and Garnish
- 12 ounces pasta such as penne or fusilli
- 0.5 cup walnuts chopped and toasted
- 0.25 cup parmesan cheese grated, for serving
Instructions
Preparation Steps
- Cook the butternut squash until tender. You can roast it in the oven at 400°F (200°C) for about 20-25 minutes, or boil it until fork-tender.
- While the squash is cooking, bring a large pot of salted water to a boil and cook the pasta according to package directions until al dente. Reserve about 1 cup of pasta water before draining.
- In a blender or food processor, combine the cooked butternut squash, minced garlic, vegetable broth, heavy cream, dried sage, olive oil, salt, and pepper. Blend until smooth and creamy.
- Return the blended sauce to the pot over medium heat. Stir occasionally until heated through.
- Add the drained pasta to the sauce and toss to coat. If the sauce is too thick, add a little of the reserved pasta water, a tablespoon at a time, until it reaches your desired consistency.
- Serve the pasta immediately, garnished with toasted walnuts and grated parmesan cheese.
Notes
Featured Comments
“I totally get that feeling! This sounds like pure comfort food perfection — I’d love to try it.”
“Impressed! Clear steps and family favorite results. Perfect for busy nights.”
“New favorite here — quick weeknight win. crowd-pleaser was spot on.”
“Super easy and turned out amazing! My family asked for seconds. Saving this one.”
“This sweet treat was absolutely loved — the cozy really stands out. Thanks!”
“Made it tonight and wow — quick weeknight win! Will definitely make butternut squash pasta again.”


I totally get that feeling! This sounds like pure comfort food perfection — I’d love to try it.