

There’s something about a good bowl of chicken chili that just hits the spot—especially on those chilly evenings when all you want is something hearty, comforting, and addictive. I remember the first time I made this recipe, how the kitchen filled with this incredible aroma—spicy, savory, with just a hint of smokiness. My family gathered around, and by the time I scooped up the first spoonful, everyone looked at me like I’d served up a little piece of heaven. Honestly, it’s a lifesaver on busy weeknights, and it’s one of those dishes where you can toss ingredients together and still get restaurant-quality flavor. Plus, it’s surprisingly simple to make, which is a total win when you’re juggling a million things. Trust me—once you try this chicken chili, it’s going to become a regular at your dinner table. Ready to get cozy with a bowl of goodness? Let’s do this together!
What is chicken chili?
Think of chicken chili as a warm, comforting stew that’s bursting with flavor but with a lighter twist compared to traditional beef chili. It’s essentially a savory, spicy concoction made with tender chunks of chicken, beans, and a blend of chili spices that develop into this rich, layered taste. The “chili” part refers to the bold, smoky, and spicy flavors—like a gentle kick of fire that’s perfectly balanced by the soothing elements of broth and vegetables. The name might bring to mind a fiery bowl, but I promise, it’s adaptable. You can make it as spicy or mild as you like, and it’s just as at home cozying up a weeknight dinner or serving for a weekend gathering. This dish is rooted in those simple, honest ingredients most of us keep in the pantry—cooked slowly, it transforms into something truly special. Think of it as comfort food with a little smoky warmth that lingers long after the last spoonful.
How do I make chicken chili?
Quick Overview
This chicken chili is foolproof and comes together like a breeze. You start by sautéing some aromatics, toss in chicken chunks and spices, then add beans, tomatoes, and broth. Once everything simmered together for about 30 minutes, the flavors meld into this luscious, spicy stew. The best part? You don’t need fancy cookware or complicated steps—just your favorite large pot and a little patience. It’s perfect for busy weeknights or lazy weekends when you want a wholesome dinner without the fuss. The texture is tender, the spice level adjustable, and the aroma—oh, the aroma—will make the whole house smell like a cozy kitchen in the fall.
Ingredients
[Organize ingredients by purpose with detailed explanations:]
For the Main Stew:
– 1.5 pounds boneless, skinless chicken breasts or thighs, cut into chunks (I prefer thighs—they stay juicy!)
– 1 large onion, chopped (sweet and adds depth)
– 3 cloves garlic, minced (because flavor is everything)
– 1 can (14 oz) diced tomatoes with green chiles (for that smoky kick)
– 1 can (15 oz) black beans, drained and rinsed (or kidney beans if you prefer)
– 4 cups chicken broth (homemade or store-bought, your call)
– 2 tablespoons chili powder (adjust to taste)
– 1 teaspoon cumin
– 1 teaspoon smoked paprika
– ½ teaspoon cayenne (optional, for heat)
– Salt and pepper to taste
Optional Add-Ins: Corn, zucchini, peppers, or even a squeeze of lime—whatever makes you smile! I test this out with a touch of oregano or a dash of hot sauce when I want to spice things up.
Step-by-Step Instructions
Step 1: Preheat & Prep Pan
Heat a large heavy-bottomed pot over medium heat. Add a splash of oil—olive or avocado works great—and let it warm up. While that’s heating, chop up your chicken, onions, and garlic. I always do this first so I can throw everything in quickly once the pan is ready. Make sure your chicken is cut into bite-sized pieces so it cooks evenly. That smell of hot oil with garlic? Pure comfort.
Step 2: Sauté Aromatics & Chicken
Once the oil is shimmering, toss in the chopped onion and cook for about 3-4 minutes until it’s translucent and fragrant. Then add your chicken pieces, season with a pinch of salt, and cook for another 5-7 minutes until they’re browned just slightly but still juicy inside. This step builds that savory base and gives your chili richness from the start. I’ve learned to avoid overcooking the chicken here—it should be just browned so it keeps tender later.
Step 3: Stir in Spices
Add your chili powder, cumin, smoked paprika, cayenne if using, and a bit of salt and pepper. Stir everything well so the spices coat the chicken and aromatics evenly. Keep cooking for about a minute—this lets the flavors bloom and avoids any raw spice taste. Your kitchen will smell incredible now. I promise, it’s worth the little extra effort.
Step 4: Add Liquids & Tomatoes
Pour in the diced tomatoes (with their juices) and chicken broth. Scrape the bottom of the pan to loosen those tasty bits stuck to the surface—that’s where all the flavor lives! Bring everything to a gentle simmer. This is the part where the magic really happens, and you just let it cook undisturbed for about 20-30 minutes. Don’t rush this step—it’s all about melding flavors and tender chicken.
Step 5: Incorporate Beans & Final Seasoning
Add the rinsed beans—whatever type you prefer—and give it a gentle stir. Taste and adjust salt, spice, or chili levels if needed. If I want extra depth, I sometimes add a dash of Worcestershire sauce or a pinch of cocoa powder—sounds weird, but it enhances the smoky undertones. Usually, I let everything simmer uncovered so the broth reduces slightly and thickens up just enough.
Step 6: (Optional) Add Zucchini or Corn
If you’re adding quick-cooking veggies like zucchini or corn, toss them in during the last 10 minutes so they stay bright and slightly crisp. I love a touch of freshness in my chili—it keeps it from feeling too heavy.
Step 7: Final Taste & Serve
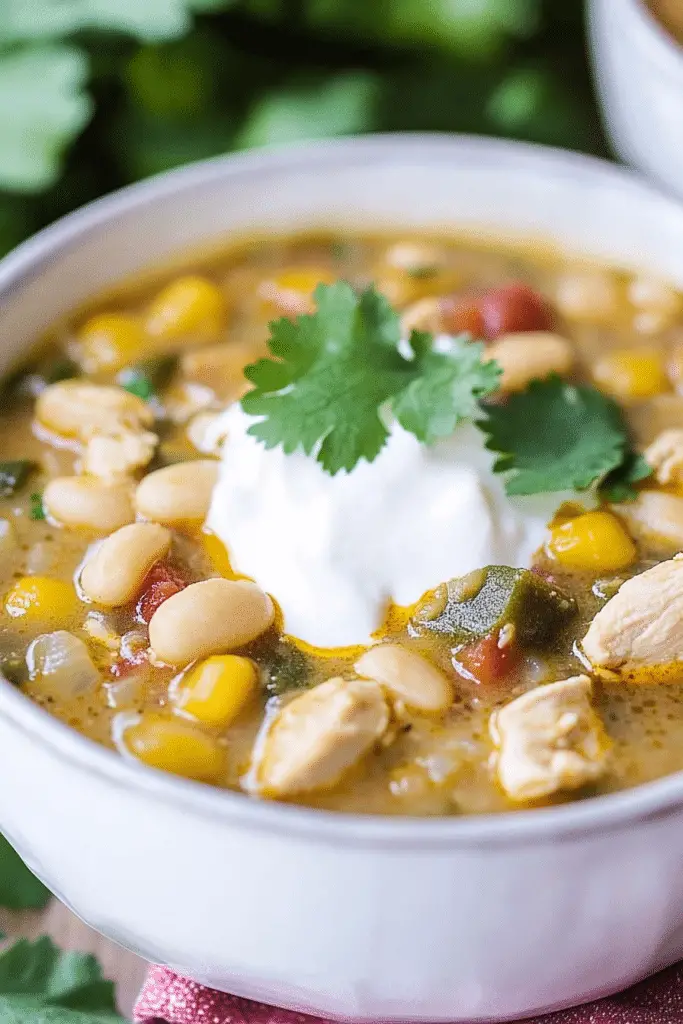
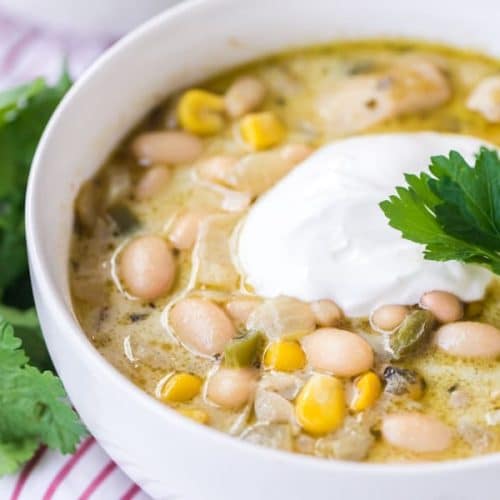
Give it a final taste and season accordingly. If you want more heat, add hot sauce or a dash more cayenne. I like to serve this steaming hot, topped with shredded cheese, fresh cilantro, or a squeeze of lime. Pair it with warm crusty bread or tortilla chips—yum!
Step 8: Cool & Store
If you have leftovers, let the chili cool completely before transferring to airtight containers. It keeps beautifully in the fridge for up to 3 days or freezes well for longer storage. I always say, the flavors get better overnight—so make some extra!
Step 9: Enjoy & Relax
The moment you ladle that spicy, tender chicken chili into a bowl, you’ll feel all that comfort wash over you. It’s like a warm hug you can eat, and I promise you’ll find yourself making it again and again. Just trust me, once you get the hang of it, your house will always smell like happiness—spicy, smoky happiness.
What to Serve It With
This chicken chili is so versatile, and I love to switch things up depending on the occasion. For a breakfast twist, serve it with a fried egg on top and a side of warm toast—a breakfast that’s hearty enough to fuel your day. When it’s time for brunch, a sprinkle of crumbled queso fresco and fresh cilantro really elevate the flavors, alongside a glass of crisp white wine or a refreshing mimosa. If you’re craving something sweet and savory after dinner, a dollop of sour cream or a handful of crushed tortilla chips adds that extra crunch and creaminess.
For casual nights, I often serve it with simple cornbread or warm flour tortillas to scoop everything up. My kids love this with a squeeze of lime and a sprinkle of shredded cheese—they adore it so much that I’ve caught them sneaking seconds when I wasn’t looking! It’s also perfect for leftovers—just reheat gently on the stove or microwave. The flavors settle even deeper overnight, making the next meal even better. I’ve also experimented with serving this over rice or with a side salad for a more balanced, colorful plate. Honestly, this dish is so flexible, it can be your go-to anytime you’re craving something satisfying, spicy, and downright delicious.
Top Tips for Perfecting Your Chicken Chili
Even after making this dish countless times, I’ve picked up a few tips worth sharing. First, when prepping your chicken, I always try to cut it uniformly—thinner pieces cook faster and absorb flavors evenly. If you prefer leaner meat, boneless chicken breasts work great, but thighs are my favorite for their juicy richness. When sautéing aromatics, don’t rush—slow and steady releases their full sweetness and flavor. I’ve tested this recipe with both fresh and dried spices, and honestly, freshly ground chili powder makes a noticeable difference in aroma and heat intensity.
One trick I learned is to add a splash of apple cider vinegar or a squeeze of lime at the end. It brightens the dish and balances the smoky spices beautifully. Trust me—counterintuitive, but it works! If you want a thicker chili, let it simmer uncovered a bit longer to reduce the liquid, or stir in a cornstarch slurry if you’re in a pinch. As for customizing heat, start small—remember, you can always add more spice, but you can’t take it out! I also love experimenting with different beans or adding sautéed peppers for extra flavor. The more I make this, the more I realize how forgiving and adaptable it is. Don’t be afraid to make it your own—after all, the best recipes are the ones you tweak to fit your taste buds!
Storing and Reheating Tips
This chicken chili keeps really well, which makes it perfect for meal prep or leftovers. To store, let it cool to room temperature before transferring it to an airtight container. In the fridge, it’ll happily stay for up to three days—just reheat gently on the stove over low heat, stirring occasionally. I find that slow reheating preserves the tenderness of the chicken and keeps everything from drying out. If you want to freeze some, divide into portions and use freezer-safe containers or heavy-duty bags. It lasts up to three months, and when you’re ready to eat, thaw overnight in the fridge and reheat as before. Just keep an eye on the consistency—sometimes it thickens as it cools, so you might want to stir in a splash of broth or water to loosen it up. As for the glaze or toppings, I usually add those fresh just before serving to maintain their texture. Overall, leftovers taste even better the next day, so I always make a little extra—this one’s a keeper!
Frequently Asked Questions
Final Thoughts
This chicken chili has truly become a staple in my kitchen. It’s one of those dishes that feels like a warm, welcome hug after a long day—full of flavor but surprisingly simple to make. I love how customizable it is, whether I want it spicier, milder, or loaded with extra veggies. Every time I make it, it reminds me of those cozy weekend nights when we’re all gathered around the table, chatting over bowls of steaming goodness. If you’re looking for a recipe that’s hearty, comforting, and doesn’t require fancy ingredients, this one’s for you. I hope you get as much joy from making and eating it as I do. And don’t forget—feel free to put your own twist on it. That’s the beauty of a good chili. Happy cooking, friends! I can’t wait to hear how yours turns out and see all your creative variations. Drop your comments below, and let’s share the love of good food!
chicken chili
Ingredients
Main Ingredients
- 1 tablespoon olive oil
- 1 medium onion (diced)
- 1 poblano pepper poblano pepper (seeds removed and diced)
- 4 cloves garlic (minced)
- 2 pounds boneless skinless chicken breasts
- 2 cups chicken broth
- 2 cans Great Northern beans drained and rinsed
- 1 cup frozen corn kernels
- 1 can diced Hatch green chilis (8 ounces in your heat preference)
- 3 teaspoons cumin
- 2 teaspoons oregano
- 0.5 teaspoon smoked paprika
- 1 teaspoon garlic powder
- 2 teaspoons salt
- 1 cup cream half-and-half or evaporated milk
- additional salt and pepper to taste
- optional toppings shredded cheese, tortilla chips, sour cream, hot sauce, chopped cilantro
Instructions
Preparation Steps
- In a large Dutch oven over medium-high heat, add the olive oil.
- Add the onion and poblano pepper, cook until tender, about 5 minutes.
- Add the chicken and stir until mostly cooked through, about 5 minutes.
- Add the garlic, cumin, paprika, and salt, cook until fragrant, about 1 minute.
- Add the chicken broth, beans, corn, and green chilis. Stir to combine.
- Bring the mixture to a boil and then reduce to a simmer. Cook for 15 minutes or until chicken is cooked through.
- Remove from heat and stir in the cream.
- Adjust salt and pepper to taste.
- Serve hot with optional toppings.
Notes
Featured Comments
“I love this recipe! It's perfect for cozy nights—so flavorful and easy to make. Definitely adding this to my weekly rotation.”
“Impressed! Clear steps and super easy results. Perfect for busy nights.”
“New favorite here — absolutely loved. crowd-pleaser was spot on.”
“Super easy and turned out amazing! My family asked for seconds. Saving this one.”
“This sweet treat was absolutely loved — the balanced really stands out. Thanks!”
“Made it tonight and wow — creamy! Will definitely make Creamy Chicken Chili Recipe: Simple & Healthy again.”


I love this recipe! It’s perfect for cozy nights—so flavorful and easy to make. Definitely adding this to my weekly rotation.