

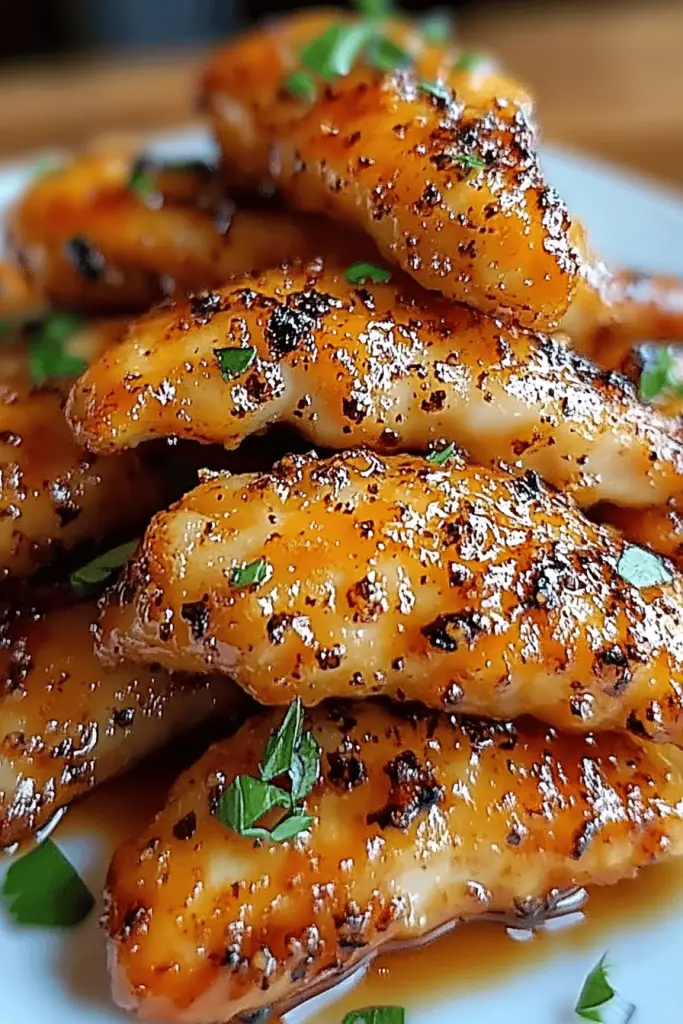
You know those nights? The ones where you stare into the fridge hoping dinner will magically assemble itself? Yeah, I have them too. And on those nights, when the thought of a complicated meal feels overwhelming, my absolute go-to, my culinary superhero, is my Air Fryer Chicken. It’s not just good; it’s *that* good. Crispy on the outside, ridiculously juicy on the inside, and it makes the whole house smell amazing. It honestly rivals any fried chicken I’ve ever had, but without all the fuss (or the grease splatters all over my backsplash – a win-win!). If you’ve ever thought chicken breasts were destined to be dry and sad, let me tell you, this recipe is about to change your mind forever. It’s honestly my secret weapon for getting a delicious, healthy-ish meal on the table in under 30 minutes. Forget everything you thought you knew about cooking chicken; the air fryer is where it’s at.
What is an air fry chicken?
So, what exactly *is* this magical thing we call Air Fryer Chicken? Think of it as your shortcut to perfectly cooked, incredibly flavorful chicken every single time. It’s essentially chicken, usually chicken pieces like thighs, breasts, or wings, that are seasoned and cooked in an air fryer. The air fryer works by circulating hot air around the food at a high speed, mimicking the results of deep-frying but with a fraction of the oil. This intense, even heat creates that coveted crispy exterior that we all crave, while keeping the inside wonderfully moist and tender. It’s not “fried” in the traditional sense, but the texture and taste are so reminiscent of it that it feels like a delicious cheat. This method is a game-changer, especially for busy families or anyone who wants that satisfying crunch without the guilt or the mess.
How to Make Air Fryer Chicken
Quick Overview
Making this air fryer chicken is a breeze! You’ll basically season your chicken pieces, pop them into your air fryer, and let the magic happen. The hot, circulating air does all the hard work, transforming simple chicken into a crispy, golden masterpiece in under 20 minutes. It’s so straightforward, you’ll wonder why you ever did it any other way. The key is the seasoning blend and the right temperature to ensure that perfect crispy exterior without drying out the chicken.
Ingredients
For the Chicken Marinade/Rub:
1.5 lbs boneless, skinless chicken thighs or breasts, cut into 1-inch pieces (thighs are my favorite for juiciness!)
2 tablespoons olive oil (or avocado oil)
1 teaspoon paprika (smoked paprika adds an amazing depth!)
1 teaspoon garlic powder
1/2 teaspoon onion powder
1/2 teaspoon dried oregano
1/4 teaspoon Black Pepper
1/4 teaspoon salt (or to taste)
Optional Dredging (for extra crispiness!):
1/2 cup all-purpose flour (or gluten-free blend)
1/4 teaspoon salt
1/4 teaspoon black pepper
For Serving (Optional):
Fresh parsley, chopped, for garnish
Lemon wedges
Step-by-Step Instructions
Step 1: Preheat Air Fryer & Prep Chicken
First things first, let’s get that air fryer ready. Preheat it to 400°F (200°C). This is super important for getting that initial crisp. While it’s preheating, take your chicken pieces and pat them completely dry with paper towels. This is a crucial step for achieving maximum crispiness. Seriously, don’t skip this! If you’re using chicken breasts, I like to cut them into slightly larger pieces than thighs so they don’t overcook.
Step 2: Mix the Dry Seasonings
In a small bowl, whisk together the paprika, garlic powder, onion powder, oregano, black pepper, and salt. This is our flavor bomb! I love using smoked paprika here; it gives the chicken such a lovely, deep flavor that you just can’t get otherwise. Make sure it’s all mixed in well so you get an even distribution of flavor on every piece of chicken.
Step 3: Coat the Chicken
In a medium bowl, toss the dried chicken pieces with the olive oil. Make sure each piece is lightly coated. Then, sprinkle the spice mixture over the chicken and toss again until everything is beautifully coated. You want to see those gorgeous specks of seasoning all over the chicken. If you’re going for the extra crispy dredge (and trust me, you probably should!), in a separate shallow dish or a large zip-top bag, combine the flour, salt, and pepper. Add the seasoned chicken to the flour mixture and toss until each piece is lightly coated. Shake off any excess flour.
Step 4: Arrange in Air Fryer Basket
Now, carefully place the seasoned (and potentially floured) chicken pieces in a single layer in your air fryer basket. Do NOT overcrowd the basket! This is where many people go wrong. If you pile the chicken on top of itself, it will steam instead of crisp, and you won’t get that amazing texture. You might need to cook in batches, depending on the size of your air fryer. It’s worth the extra few minutes!
Step 5: Air Fry to Perfection
Air fry at 400°F (200°C) for about 12-18 minutes, depending on the size and thickness of your chicken pieces. Halfway through cooking (around the 6-9 minute mark), give the basket a good shake or flip the chicken pieces with tongs. This ensures even cooking and crispiness on all sides. You’re looking for a beautiful golden-brown color and an internal temperature of 165°F (74°C) when checked with a meat thermometer. If you’re using breasts, they might cook a minute or two faster than thighs.
Step 6: Rest and Serve
Once the chicken is perfectly cooked, carefully remove it from the air fryer basket. Let it rest for just a few minutes before serving. This resting period is important; it allows the juices to redistribute throughout the chicken, making it even more tender and moist. Garnish with fresh chopped parsley if you like, and serve with lemon wedges for a bright, fresh finish. The smell alone will have everyone rushing to the table!
What to Serve It With
This air fryer chicken is so versatile, it’s practically a chameleon in the kitchen! For a speedy and satisfying Breakfast, I love serving it alongside some scrambled eggs and a slice of whole-wheat toast. It adds a fantastic savory element that really elevates a simple breakfast. Think of it as a healthier, more flavorful alternative to breakfast sausage. For a delightful Brunch spread, serve these crispy chicken pieces alongside fluffy pancakes or waffles, a fresh fruit salad, and maybe some avocado toast. It adds a sophisticated touch without any extra effort. When we’re looking for a light but satisfying Dessert option (sometimes after a big meal, you just want something savory!), I’ll often have a small plate of this air fryer chicken. It’s surprisingly perfect after a rich meal, cutting through the sweetness. Or, for those delightfully Cozy Snacks, it’s brilliant served with a side of homemade ranch dip or a spicy aioli for dipping. My family also loves it tucked into pita bread with shredded lettuce and a drizzle of tahini for a quick and easy lunch. Honestly, the possibilities are endless, and it’s always a crowd-pleaser.
Top Tips for Perfecting Your Air Fryer Chicken
I’ve made this air fryer chicken more times than I can count, and along the way, I’ve picked up a few tricks that really make a difference. For the Chicken Prep, I can’t stress enough how important it is to pat the chicken completely dry. Moisture is the enemy of crispiness! If you’re using chicken breasts, I find that cutting them into uniform, 1-inch pieces ensures they cook evenly. Don’t be afraid to use thighs; they are more forgiving and stay incredibly moist. When it comes to Mixing Advice, I always do my dry seasoning mix separately first to ensure it’s perfectly blended before adding it to the chicken. This way, you avoid overmixing the chicken itself, which can make it tough. If you’re opting for the flour dredge, a light coating is all you need; you don’t want thick clumps of flour. For Swirl Customization (if you were making a swirled bake, not this chicken!), that’s a different technique. But for this chicken, think of the seasoning as your customizable swirl – play with different herbs and spices! For Ingredient Swaps, if you don’t have olive oil, avocado oil or even melted coconut oil works well. For the spices, feel free to experiment! A pinch of cayenne pepper adds a lovely warmth, or some onion powder can really boost that savory flavor. For Baking Tips in the air fryer, the most critical tip is not to overcrowd the basket. Seriously, this is the golden rule. Cook in batches if you have to. Also, giving the basket a good shake halfway through ensures all sides get equally crispy. If your air fryer runs hot, you might need to reduce the cooking time by a minute or two. For Glaze Variations (again, not for this specific recipe, but a general idea), if you wanted to add a glaze, I’d do it in the last few minutes of cooking to prevent burning. Think honey-sriracha or a balsamic reduction! These little insights come from hands-on experience, and I’m so happy to share them with you.
Storing and Reheating Tips
This air fryer chicken is so good, you might actually have leftovers – a rare but welcome occurrence in my house! For Room Temperature storage, it’s best to let the chicken cool completely before covering it. It can be left out for no more than two hours for food safety reasons. Once cooled, store it in an airtight container. If you’re storing it in the Refrigerator, it will stay good for about 3-4 days. I usually place it in a glass or plastic container. To reheat, the best way to get that crispiness back is in the air fryer! Pop it back in at around 350°F (175°C) for 3-5 minutes, just until heated through and crispy again. You can also use a toaster oven or a regular oven at the same temperature. Microwaving can work in a pinch, but the chicken tends to lose some of its texture. For Freezer Instructions, you can freeze the cooked chicken for up to 2-3 months. Make sure it’s cooled completely, then wrap it tightly in plastic wrap and then in aluminum foil or place it in a freezer-safe bag to prevent freezer burn. When you’re ready to use it, thaw it overnight in the refrigerator and then reheat using your preferred method. For Glaze Timing Advice, if you were to glaze the chicken, I’d recommend doing it right at the end of the initial cooking, or when reheating, so the glaze doesn’t burn and become sticky. It’s all about preserving that delicious texture and flavor!
Frequently Asked Questions
Final Thoughts
So there you have it – my absolute favorite way to make air fryer chicken! It’s the recipe that gets me through busy weeknights, impresses unexpected guests, and always leaves everyone asking for seconds. It’s proof that you don’t need a ton of fancy ingredients or hours in the kitchen to create something truly spectacular. The combination of that crispy exterior and juicy interior is just unbeatable, and the ease with which it comes together is a dream. If you’re someone who struggles with dry or bland chicken, or you’re just looking for a reliable, delicious meal that practically cooks itself, you *have* to give this a try. I’m genuinely so excited for you to experience how good air fryer chicken can be. If you loved this recipe, you might also enjoy my Sheet Pan Lemon Herb Chicken and Veggies or my super easy One-Pot Lemon Garlic Pasta for more weeknight wonders. I can’t wait to hear what you think! Let me know in the comments below how yours turns out, or if you try any fun spice variations. Happy cooking!
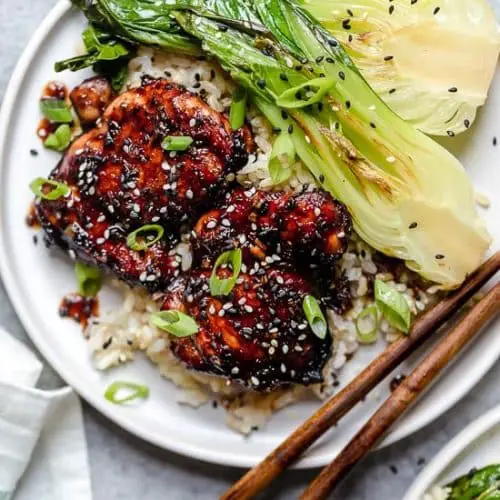
Air Fryer Asian Glazed Boneless Chicken Thighs
Ingredients
Marinade
- 0.25 cup low sodium soy sauce
- 0.0625 cup balsamic vinegar
- 1 tablespoon honey
- 3 cloves garlic, crushed
- 1 teaspoon Sriracha hot sauce
- 1 teaspoon fresh grated ginger
Chicken
- 8 pieces boneless, skinless chicken thighs fat trimmed (approximately 32 oz total)
Garnish
- 1 scallion green only, sliced
Instructions
Preparation Steps
- In a small bowl, combine the balsamic vinegar, soy sauce, honey, crushed garlic, Sriracha, and grated ginger. Mix well to create the marinade.
- Pour half of the marinade (approximately 1/4 cup) into a large bowl with the chicken thighs. Ensure all the meat is coated. Marinate for at least 2 hours, or preferably overnight in the refrigerator.
- Reserve the remaining marinade in a separate container for later.
- Preheat your air fryer to 400°F (200°C).
- Remove the chicken thighs from the marinade and place them in the air fryer basket. Avoid overcrowding; cook in batches if necessary.
- Cook for 14 minutes, turning the chicken halfway through the cooking time, until the chicken is cooked through and reaches an internal temperature of 165°F (74°C).
- While the chicken is cooking, place the reserved marinade in a small saucepan. Cook over medium-low heat until it reduces slightly and thickens, about 1 to 2 minutes. Be careful not to overcook.
- Once the chicken is cooked, drizzle the thickened sauce over the chicken thighs. Garnish with sliced scallions before serving.
Notes
Featured Comments
“Impressed! Clear steps and creamy results. Perfect for busy nights.”
“New favorite here — so flavorful. crowd-pleaser was spot on.”
“Super easy and turned out amazing! My family asked for seconds. Saving this one.”
“This sweet treat was absolutely loved — the zingy really stands out. Thanks!”
“Made it tonight and wow — restaurant-level! Will definitely make Crispy Air Fryer Chicken Nuggets How Easy again.”
“Packed with flavor and so simple. Exactly what I wanted from Crispy Air Fryer Chicken Nuggets How Easy.”


