


Cheesecake Deviled Strawberries
If you’ve ever craved the creamy, dreamy taste of strawberry cheesecake but don’t want to wrestle with a full pan or spend hours in the kitchen, these Cheesecake Deviled Strawberries are about to become your new favorite no-bake treat. I first made them on a whim during a last-minute dinner party prep, and honestly? They stole the show—and my heart—in under 20 minutes. There’s something magical about taking a fresh, juicy berry, giving it a little creamy surprise inside, and finishing it off with that signature crunch. It feels fancy, tastes indulgent, but is ridiculously simple to pull together. Whether you’re hosting a spring brunch, prepping for Valentine’s Day, or just need a sweet pick-me-up after work, this recipe delivers every time.
What Is Cheesecake Deviled Strawberries?
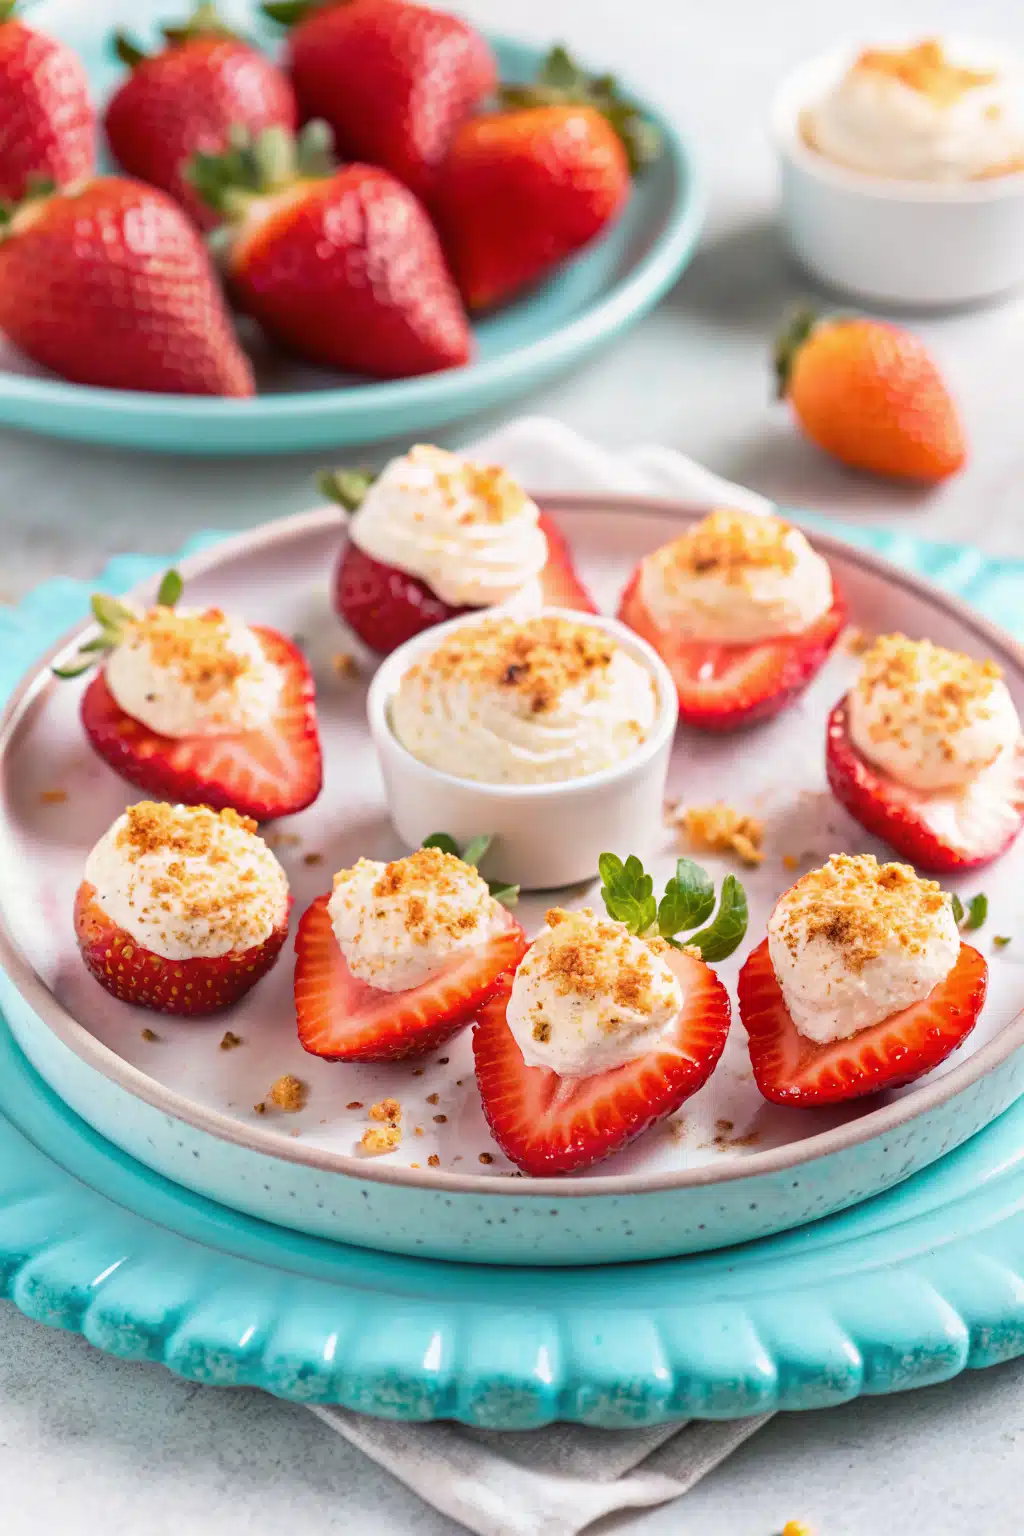
These bite-sized desserts are exactly what they sound like: halved strawberries stuffed with a smooth, tangy cream cheese filling—think mini cheesecake flavor—and crowned with a sweet, crunchy topping made from crushed Golden Oreos mixed with melted butter and a splash of strawberry gelatin. The result? A perfect balance of fruity, creamy, and crumbly textures in one elegant bite. They’re often compared to deviled eggs (hence the name) because of how they’re shaped and served, but trust me, there’s nothing egg-like about them except maybe the flair. What sets this version apart is the use of real fresh strawberries paired with full-fat cream cheese for stability, plus that fun two-toned pink-and-white crunch on top. They’re light enough for a summer picnic yet rich enough to feel like a special treat.
How to Make Cheesecake Deviled Strawberries
Quick Overview
This dessert comes together in about 20 minutes total, with most of that being hands-off time. Start by prepping your crunchy topping—crush those Oreos, mix in butter and gelatin, then bake until lightly golden. While that cools, slice your strawberries, make the creamy filling, and assemble everything right before serving. No complicated steps, no specialty tools needed (though a piping bag makes it extra pretty). It’s basically assembly line dessert perfection.
Ingredients
- Strawberry Crunch Topping:
- 6 Golden Oreo cookies (whole, including filling)
- 1 tablespoon unsalted butter, melted
- 2 teaspoons strawberry-flavored gelatin powder (like Jell-O Strawberry Flavor)
- Cream Cheese Filling:
- 12–15 large fresh strawberries (about 2 to 2½ inches each), rinsed and patted dry
- 8 ounces full-fat block-style cream cheese, softened to room temperature
- ¾ cup powdered sugar, sifted
- 2 tablespoons heavy cream
- 1 teaspoon pure vanilla extract
- ¼ teaspoon fine salt

Step-by-Step Instructions
- Make the strawberry crunch topping: Pulse the Golden Oreo cookies in a food processor until finely crushed. In a small bowl, stir together the melted butter and strawberry gelatin until fully dissolved. Pour this mixture into the cookie crumbs and mix until evenly coated (don’t worry if it’s not all pink—that’s normal).
- Bake the topping: Line a baking sheet with parchment paper. Spread the crumb mixture in a thin, even layer and bake at 350°F for 8–10 minutes, just until lightly golden around the edges. Remove from oven and let cool completely on the sheet—this helps keep it crisp.
- Prep the strawberries: Rinse the strawberries only right before using, then pat them very dry with a paper towel. Cut each in half lengthwise and place them cut-side up on a serving platter.
- Make the filling: In a medium bowl, beat the softened cream cheese with an electric mixer until smooth. Gradually add the powdered sugar, beating on low speed until incorporated. Add the heavy cream, vanilla, and salt, then beat again until light and fluffy—about 1–2 minutes.
- Assemble: Spoon or pipe about 1½ teaspoons of filling into the center of each strawberry half. Sprinkle generously with the cooled crunch topping. Serve immediately for best texture and flavor.
What to Serve It With
These deviled strawberries shine as standalone bites, but they also play beautifully alongside other desserts. Try pairing them with a tall glass of cold milk, a scoop of vanilla ice cream, or even a drizzle of caramel sauce for extra decadence. On a buffet table, tuck them next to macarons, fruit skewers, or a simple bowl of berries. For holidays, nestle them in a bed of shredded coconut or edible flowers for visual drama. They’re especially lovely with champagne or sparkling rosé at brunch—because why not celebrate life’s little sweetnesses?
Top Tips for Perfecting Your Cheesecake Deviled Strawberries
- Choose the right strawberries: Look for large, firm berries around 2 to 2½ inches—they should sit flat and resemble deviled eggs when cut. Avoid overly ripe ones; you want structure, not mush.
- Dry them thoroughly: Water kills the texture of the filling. Rinse just before slicing and blot dry with a clean tea towel or paper towels. Squeeze gently between layers if needed.
- Use full-fat cream cheese: Low-fat or whipped varieties are too soft and will slide out of the berries. Block-style, softened to room temp, gives the best hold and flavor.
- Don’t overmix the filling: Once you add the powdered sugar, fold gently until just combined. Overbeating introduces air and can make the filling grainy.
- Pipe or spoon? Both work! If piping feels intimidating, simply use a small spoon to dollop the filling—it’s quicker and still looks great.
Storing and Reheating Tips
These are best enjoyed fresh—ideally within an hour of assembling. If you must store leftovers, keep them covered in the refrigerator for up to 1 day. Be aware that moisture from the strawberries may soften the crunch topping slightly, but they’ll still taste delicious. Save any leftover crunch topping in an airtight container at room temperature for up to a week—try sprinkling it over yogurt, ice cream, or oatmeal. Do NOT freeze assembled strawberries; the texture collapses when thawed. And definitely skip reheating—warm berries lose their charm fast.
Frequently Asked Questions
Final Thoughts
There you have it—your new go-to dessert that’s equal parts beautiful, delicious, and brainlessly easy. These Cheesecake Deviled Strawberries aren’t just a recipe; they’re a mood booster wrapped in a berry. Whether you’re sharing them with loved ones or treating yourself (guilty!), every bite feels like a little celebration. And honestly? Once you try them, you’ll find yourself making them again and again—for birthdays, picnics, midnight cravings, or just because. So go ahead, gather those strawberries, whip up that creamy goodness, and crown them with crunch. Your taste buds (and your guests) will thank you.

Cheesecake Deviled Strawberries
Ingredients
Strawberry Crunch Topping
- 6 cookies golden oreo cookies (finely crushed)
- 1 tablespoon unsalted butter (melted)
- 2 teaspoons strawberry flavored gelatin powder
Cream Cheese Filling
- 12 large fresh strawberries (rinsed and patted dry, cut into halves)
- 8 ounces cream cheese (softened to room temperature)
- 0.5 cup powdered sugar (sifted)
- 2 tablespoons heavy cream
- 1 teaspoon vanilla extract
- 0.33 teaspoon salt
Instructions
Preparation Steps
- Preheat the oven to 350°F. Line a small baking sheet with parchment paper or a silicone mat and set aside.
- Add the golden oreo cookies to a small food processor or high-speed blender and pulse for 30–60 seconds until finely crushed. Transfer the crumbs to a bowl and set aside.
- In a separate bowl, stir together the melted butter and strawberry gelatin powder until dissolved and fully blended.
- Add the strawberry mixture to the cookie crumbs and stir to combine. The cookie crumbs will not turn completely pink—this is expected and creates the desired crunchy two-toned texture.
- Transfer the strawberry crunch mixture to the prepared baking sheet, spread to a thin even layer, and bake for 8–10 minutes or just until lightly golden. Remove from the oven and allow to cool completely while preparing the cream cheese filling.
- Rinse the strawberries under cool water and pat them very dry. Cut in half lengthwise (removing the green tops) and place on a serving platter with the sliced side facing up.
- Beat the cream cheese in a large bowl with a handheld mixer on medium speed for 1–2 minutes until smooth and creamy.
- Add the powdered sugar, beat on low until incorporated, then add the heavy cream, vanilla extract, and salt. Beat for an additional 1–2 minutes until light and creamy.
- Dollop a 1½ teaspoon amount of the cream cheese filling onto the cut surface of each strawberry. Alternatively, transfer the filling to a piping bag fitted with a tip for decorative serving.
- Once all strawberries are topped with filling, sprinkle generously with the cooled strawberry crunch topping and serve immediately.
Notes
Featured Comments
“Impressed! Clear steps and quick weeknight win results. Perfect for busy nights.”
“New favorite here — absolutely loved. crowd-pleaser was spot on.”
“Super easy and turned out amazing! My family asked for seconds. Saving this one.”
“This sweet treat was absolutely loved — the silky really stands out. Thanks!”
“Made it tonight and wow — so flavorful! Will definitely make Deviled Strawberries again.”
“Packed with flavor and so simple. Exactly what I wanted from Deviled Strawberries.”


