

There’s something magical about pulling a batch of dinner rolls from the oven while the rest of the house is waking up or settling in after a long day. I still remember my grandmother’s kitchen—the soft clink of the sugar jar, the warm glow of the lamp, and that first scent of yeast fading in with butter and milk. These Garlic-Herb Swirl Dinner Rolls are my modern take on that memory: tender, slightly sweet, and laced with Garlic Butter and fresh herbs. They’re incredibly forgiving, too — incredible flavor for minimal effort, and they pair with nearly everything on the table. This is the kind of recipe you reach for on busy weeknights and busy weekends alike, the kind that makes even the simplest dinner feel like a celebration. When I pull them from the oven, the kitchen fills with a comforting, homey aroma that says, “Welcome home.” If you’ve ever compared dinner rolls to biscuits, you’ll see why these feel like the best of both worlds — soft, bread-y texture with a little lift and that irresistible swirl of garlic and herbs. Dinner rolls, but better, and a little more grown-up without losing that cozy, family-friendly vibe.
What is a Garlic-Herb Swirl Dinner Roll?
Think of these as classic yeast rolls, but with a savory, aromatic twist. Garlic-Herb Swirl Dinner Rolls are essentially enriched yeast dough rolled out thin, spread with a Garlic Butter-herb filling, then rolled up, sliced, and baked into a ring of tender, golden morsels. The name says it all: you get the soft, pillowy texture you crave from dinner rolls, with a flavorful swirl of garlic, parsley, and chives winding through every bite. It’s like a garlic pull-apart bread turned into individual rolls, which makes them excellent for sharing at the table or nesting on a dinner plate as the star side. I love that the swirl keeps the garlic from overpowering the dough, so you taste buttery richness, a hint of sweetness, and a clean, fresh herb note on the finish. It’s essentially comfort food you can serve with a wide range of mains, from weeknight roasted chicken to a fancy holiday roast. Every bite feels familiar and warm, which is exactly what I reach for when I’m after something that tastes indulgent without being heavy.
How do you make garlic-herb swirl dinner rolls?
Quick Overview
This is a classic yeast-dough method with a soft, overnight-friendly flavor that comes together with Simple Steps. You’ll whisk dry ingredients, mix wet ingredients separately, then combine, knead until smooth, and let the dough rise. Roll it out, layer with garlic-herb butter, and roll into a log. Slice into rounds, nestle them in a pan, and bake until golden. The beauty is in the swirl — you’ll get pockets of garlicky bliss through every bite. It’s a friendly method, not fussy, and the results taste like a hug from the oven. In under a couple of hours you’ll have a tray of warm, aromatic rolls that smell like home and taste like love.
Ingredients
For the Main Batter:
- 3 1/2 cups all-purpose flour (you can swap in a cup of bread flour for extra chew if you like)
- 1 cup warm milk (about 110°F / 43°C) or a mix of milk and water for lighter rolls
- 2 1/4 teaspoons active dry yeast (one packet)
- 1/4 cup granulated sugar
- 1/3 cup unsalted butter, melted and cooled slightly
- 1 large egg plus 1 extra yolk (or 2 eggs for extra richness)
- 1 teaspoon kosher salt
For the Filling:
- 4 tablespoons unsalted butter, softened
- 2 cloves garlic, minced
- 2 tablespoons chopped fresh parsley
- 1 tablespoon chopped fresh chives (optional but wonderful)
- 1/4 teaspoon salt
- 1/4 cup grated parmesan or mozzarella for a cheesy swirl (optional)
For the Glaze:
- 2 tablespoons melted butter
- 1 tablespoon honey or maple syrup
- Pinch of salt
- Optional: extra chopped herbs for brushing (parsley, chives)
Step-by-Step Instructions
Step 1: Preheat & Prep Pan
Preheat your oven to 350°F (175°C). Lightly grease a 9-inch round cake pan or a 9-inch square pan, then line the bottom with parchment if you have it. You want the rolls to have a little room to puff and pull away from the edges as they bake, so don’t crowd them. If you’re feeling fancy, you can use a sheet pan and bake in a single layer, but the round pan really helps them hold a soft, cohesive shape as they rise.
Step 2: Mix Dry Ingredients
In a large bowl, whisk together 3 1/2 cups flour, yeast, sugar, and salt. Make sure the yeast isn’t sitting directly on top of the salt; if you’re mixing by hand, using a wooden spoon to combine helps to keep the yeast evenly distributed. The dry mix should look uniform and aerated, like light snow. If you’ve got a stand mixer with a dough hook, this is a great stage to do it on low speed for about 1 minute to ensure even distribution.
Step 3: Mix Wet Ingredients
In another bowl, whisk warm milk, melted butter, and the egg with the extra yolk until fully combined and glossy. The temperature of your wet ingredients matters — if they’re too cold, the dough will take longer to rise; too hot, and you’ll kill the yeast. Aim for a comfortable warmth, like the air around your wrist on a summer day. Pour this into the dry ingredients and stir until a shaggy dough forms.
Step 4: Combine
Turn the dough onto a lightly floured surface and knead until smooth and elastic, about 6–8 minutes by hand or 4–5 minutes with a mixer. You’re looking for a dough that springs back when you poke it and feels slightly tacky but not sticky. If you’re using a mixer, knead on low for a minute, then scrape the bowl, and knead for another 3–4 minutes. If the dough sticks, dust with a little flour, but beware of adding too much — a dry dough won’t swirl nicely.
Step 5: Prepare Filling
While the dough rests, mix the softened butter, minced garlic, parsley, chives, and salt into a cohesive spread. If you’re adding cheese, fold it into the mixture now or sprinkle it across the surface as you roll. The filling should be soft and easy to spread, not clumpy. If the mixture looks a little stiff, give it a quick whisk and a 5-minute rest to come together.
Step 6: Layer & Swirl
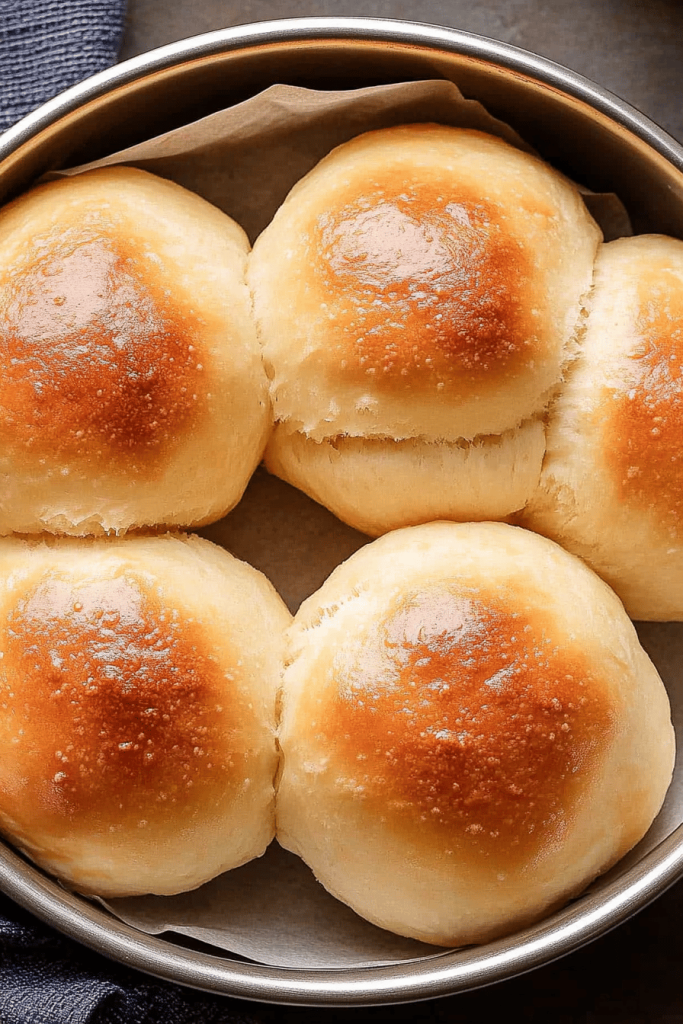
Shape the dough into a rectangle roughly 12×9 inches. Spread an even layer of the garlic-herb butter over the surface, leaving a small margin around the edges. If you’re adding a cheese swirl, sprinkle it evenly over the butter. Starting with the long edge, roll the dough tightly into a log. Pinch the seam to seal. Slice into 12 even pieces and arrange them in the prepared pan, cut sides up. If you want extra swirl visibility, alternate the pieces so the cut edges face upward in a pinwheel pattern. The rolls should be snug but not squished; they’ll expand as they rise again in the pan.
Step 7: Bake
Let the rolls rise in a warm spot until they’re puffy and almost doubled, about 25–35 minutes depending on the warmth of your kitchen. Bake for 18–22 minutes, until the tops are deeply golden and the edges pull away slightly from the pan. If the tops brown too quickly, tent with a bit of foil for the last 5–7 minutes. If you prefer a darker caramelization, you can brush the tops with a little melted butter during the last minute of baking for extra shine and flavor.
Step 8: Cool & Glaze
While the rolls bake, mix the glaze ingredients. The goal is a smooth, pourable glaze that coats the tops without making them soggy. As soon as the rolls come out of the oven, brush with the warm glaze to seal in moisture and add a gentle sheen. The warmth of the rolls lets the glaze soak in a touch, which makes the crust delicately glossy. Let them rest for 5–10 minutes in the pan so they settle and hold their shape when you lift them out for serving. You’ll hear a soft crack as you press into the top, a small reminder that you’ve just created something comforting and delicious.
Step 9: Slice & Serve
Turn the rolls out onto a rack or plate and give them a few minutes to settle. Slice one or two to reveal the tender interior and the swirled layers. If you’ve got guests, set the pan in the center of the table with a dish of softened butter and a sprinkle of flaky salt. The smell alone will draw people in—garlic warmth, herb brightness, and that yeasty, bready aroma that says dinner is about to begin. These are best served warm, but they freeze beautifully if you want to save a batch for later. If you do freeze, reheat gently covered in foil at 350°F until warmed through, then brush with a touch more glaze for that just-baked gloss.
What to Serve It With
These Garlic-Herb Swirl Dinner Rolls are the sort of side that feels essential, not optional. They’re equally happy on a casual weeknight table as they are at a festive holiday dinner. Here are ideas that fit different occasions:
For Breakfast: Warm rolls slathered with a little butter and jam, alongside a robust cup of coffee. They’re perfect with a simple hash or scrambled eggs. If you’ve got a craving for something a touch savory first thing, toast the leftovers and drizzle with a tiny bit of olive oil and sea salt—that crisp outside is addictive.
For Brunch: Slice the rolls and arrange them around a platter with smoked salmon, crème fraîche, cucumber ribbons, and dill. The garlic-herb aroma in the background makes the whole table feel bright and inviting, even mid-morning. A light salad on the side with lemon vinaigrette ties everything together beautifully.
As Dessert: If you want a playful twist, try a cinnamon-sugar option next time and serve with a dollop of vanilla yogurt or whipped cream. The rolls are already rich, so a light, fresh topping makes a nice balance. I’ve even brushed a tiny bit of maple glaze on a few warm rolls for a gentle sweetness that almost reads like a coffee cake in bite-size form.
For Cozy Snacks: A warm roll with tomato soup or creamy soup of your choice is a guaranteed crowd-pleaser. The swirl of garlic and herbs adds a savoriness that plays nicely with tangy soups, especially on chilly evenings when you want something comforting but not heavy.
Honestly, these rolls have become a family tradition in my home. They show up when we’re hosting friends, when someone’s ill and needs a little comforting food, and when I want to treat my kids after school. The flavors are familiar and the texture is like a cozy blanket you can pull apart. My mother-in-law even whispered that they remind her of her own grandmother’s kitchen, which is the highest compliment I can imagine. The way these dinner rolls come together makes me feel like I’ve carried a small piece of home into the present with every bite.
Top Tips for Perfecting Your Garlic-Herb Swirl Dinner Rolls
These tips are what I’ve learned after making this recipe countless times. They’re small adjustments that make a big difference, especially if you’re new to working with enriched dough or if you want to tailor the rolls to your family’s preferences.
Dough Prep: Temperature matters. If your kitchen is cold, let the dough rise slowly in a slightly warm oven (turned off) or on the counter until it’s puffy and jiggly. If it’s very warm, punch it down and let it rise again to avoid overproofing. A quick, gentle knead keeps the dough supple and helps create a fine, tender crumb. If you’re using a stand mixer, keep it on low speed; overworking the dough can make it tough.
Mixing Advice: Don’t rush the first rise. The dough should roughly double in size, which will give you the light, airy texture you’re after. If your yeast is older or it’s a particularly cool day, you may need a longer rise. You’ll know you’re there when the dough looks pillowy and passes a gentle finger poke test (the indentation slowly springs back).
Swirl Customization: The key to a nice swirl is a thin, even layer of filling. If the filling is too thick, it won’t spread as evenly and you’ll end up with heavier pockets. If you want a stronger garlic flavor, you can brush a little extra garlic butter on top of the rolls before baking, but not so much that it pools in the pan. Visual cues help here: as you roll the dough, aim for a smooth, even surface without gaps between the butter and the dough.
Ingredient Swaps: For a dairy-free version, substitute coconut milk for dairy and use olive oil instead of butter. The texture remains tender, and the flavor is still robust if you keep garlic and herb generous. If you want a lighter roll, swap in a portion of bread flour for all-purpose flour and reduce the sugar by a tablespoon. If you’d like more chew, use a bit more bread flour; for a softer crumb, add an extra 1/4 cup all-purpose flour gradually during kneading.
Baking Tips: If your oven runs hot, lower the temperature to 325–340°F and check the rolls at the 18-minute mark. For even browning, rotate the pan halfway through baking. If you really want a crisp top, brush with a little melted butter at the 5-minute mark when you open the oven to rotate. Don’t overbake, as the rolls will dry out quickly after the crust forms. A test of doneness is to tap the top and listen for a hollow sound; you’ll usually see a golden crust with a soft interior.
Glaze Variations: The glaze is optional but delicious. A simple honey-butter glaze adds shine and a touch of sweetness, while a lemon glaze brings brightness that pairs well with herbs. If you’re not a fan of glaze, a light brush of melted butter straight from the oven is equally lovely. For a savory finish, you can also brush with garlic butter just after you pull the rolls from the oven and sprinkle with a pinch of flaky salt.
Lessons Learned: I’ve learned that patience and gentle handling make all the difference. Rushing the dough results in a denser roll with less lift, and overworking the dough can create a meatier crumb rather than the delicate, airy texture I love. The best results come when you’re calm, measured, and generous with the garlic-herb spread. And remember: nothing beats the moment you lift a warm roll from the pan, steam curling off the surface, garlic scent filling the room, and the whole family reaching in for a bite.
Storing and Reheating Tips
These rolls keep surprisingly well, and you can rehear them without losing much of their tenderness. Here’s how I handle leftovers, if there are any after a big dinner or a Sunday lunch.
Room Temperature: Store in a tightly covered container or wrapped well in foil for up to 2 days. They’re best the day they’re baked, but they’ll still be soft and tasty if kept in a cool, dry place. If you’re planning to serve them the next day, give them a quick warm-up in a low oven (about 300°F) for 5–7 minutes to revive the crust and soften the interior.
Refrigerator Storage: You can refrigerate residual rolls for up to 5–6 days. Wrap tightly to prevent them from drying out. Reheat gently in a 300–325°F oven for 5–8 minutes or in the microwave in 15-second bursts, though the oven method yields a crisper crust and a fluffier interior.
Freezer Instructions: Freeze baked rolls for up to 2–3 months. Freeze individually wrapped or in a sealed container. Thaw at room temperature, then reheat gently in the oven at 300–325°F for 7–10 minutes, or microwave in short bursts. To preserve moisture, brush with a tiny bit of melted butter before reheating to restore the glaze and softness you love.
Glaze Timing Advice: If you’re freezing or refrigerating, you can add the glaze after reheating to restore that glossy finish. If you prefer a glaze that stays firm, brush while warm and let it set on the hot rolls for a few minutes before serving. This helps recreate that slightly tacky, irresistible surface that makes you reach for another bite.
Frequently Asked Questions
Final Thoughts
If you’re new to baking with yeast, these garlic-herb swirl dinner rolls are a fantastic entry point. They’re forgiving, flavorful, and wildly satisfying, which makes them a dish you’ll reach for again and again. The aroma alone is a small celebration—garlic, butter, and a chorus of herbs weaving through a soft, pillowy crumb. My family often asks for “just a few more,” and I’m not going to pretend I don’t oblige. The beauty of this recipe is how it scales: bake a dozen for a weeknight dinner, or triple the batch for a weekend gathering. They store well, reheat gracefully, and still taste like they came from a bakery near the coast with a warm, welcoming breeze. If you’re enjoying these, you’ll also love trying my Simple Herbed Dinner Rolls or Bacon-Scallion Swirl Rolls for a different flavor profile. Happy baking, and I can’t wait to hear how your kitchen fills with that irresistible garlic scent. Tell me in the comments what variations you tried and which herb you loved most. Your kitchen is the heart of the story, and I’m excited to hear yours.
Soft and Buttery Dinner Rolls
Ingredients
Main Ingredients
- 1 cup warm milk about 105-115 degrees F
- 2.25 teaspoon active dry yeast
- 0.25 cup granulated sugar
- 0.5 cup unsalted butter, melted
- 2 large eggs
- 4 cups all-purpose flour plus more for dusting
- 1 teaspoon salt
For Brushing
- 2 tablespoon unsalted butter, melted
Instructions
Preparation Steps
- In a large bowl, combine the warm milk, yeast, and sugar. Let stand for about 5-10 minutes, until frothy.
- Stir in the melted butter and eggs until well combined.
- In a separate bowl, whisk together the flour and salt.
- Gradually add the dry ingredients to the wet ingredients, mixing until a soft dough forms. If the dough is too sticky, add a little more flour, one tablespoon at a time.
- Turn the dough out onto a lightly floured surface and knead for 5-7 minutes, until smooth and elastic. Alternatively, use a stand mixer with a dough hook for 5 minutes.
- Place the dough in a lightly greased bowl, turning to coat. Cover with a clean kitchen towel and let rise in a warm place for 1-1.5 hours, or until doubled in size.
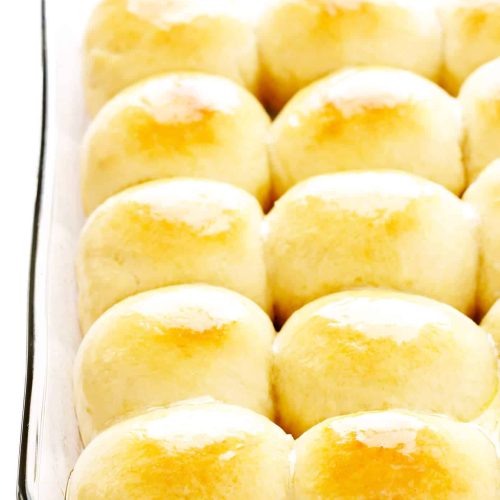
- Punch down the dough and divide it into 12 equal portions. Shape each portion into a ball and place them in a greased 9x13 inch baking pan.
- Cover the pan and let the rolls rise for another 30-45 minutes, or until puffy.
- Preheat oven to 375 degrees F (190 degrees C).
- Bake for 12-15 minutes, or until golden brown. Brush the tops with melted butter immediately after removing from the oven.
Notes
Featured Comments
“So comforting! I’ve been trying to bake more lately—these sound perfect for cozy family dinners.”
“I love how dinner rolls fill the house with warmth—perfect for a cozy morning after a busy day. Thanks for sharing!”
“Impressed! Clear steps and restaurant-level results. Perfect for busy nights.”
“New favorite here — turned out amazing. crowd-pleaser was spot on.”
“Super easy and turned out amazing! My family asked for seconds. Saving this one.”
“This sweet treat was absolutely loved — the fresh really stands out. Thanks!”


I love how dinner rolls fill the house with warmth—perfect for a cozy morning after a busy day. Thanks for sharing!
So comforting! I’ve been trying to bake more lately—these sound perfect for cozy family dinners.