

Honestly, I think I could live on chicken chimichangas—I mean, who doesn’t love a crispy, cheesy, meaty treat that somehow tastes like a hug on a plate? I remember the first time I tried making these myself; it was late one busy weeknight when I needed something quick but insanely delicious. The smell alone brought everyone to the kitchen—my kids, my partner, even the neighbor’s dog (don’t ask). These little beauties are like a cross between a handheld taco, a burrito, and a fried masterpiece—think of it as the comfort food that’s just fancy enough to impress your friends. They’re surprisingly easy to make at home, and once you get the hang of it, you’ll wonder why you ever bought takeout. Trust me, this recipe is a game-changer for busy weeknights or lazy weekend indulgences. Plus, it’s totally customizable—your version will be the best because it’s made with love (and a pinch of chaos from my kitchen). Let’s dive in and make some magic happen!
What is chicken chimichanga?
Think of chicken chimichangas as a deep-fried or toasted flour tortilla filled with seasoned shredded chicken, cheese, and sometimes beans or peppers. The word “chimichanga” sounds like a fun little tongue-twister, right? It’s actually a beloved Mexican-American dish that’s all about comfort—crispy on the outside, meltingly flavorful on the inside. It’s essentially an oversized, rolled-up taco that’s been fried to perfection, giving it that irresistible crunch with every bite. Originally, these came from southwestern Texas, but over the years, everyone’s been making their own versions—some baked, some fried, some stuffed with everything including rice, veggies, or even leftover chicken from Sunday’s roast. Think of it as a handheld fiesta in your hand! It’s a dish that’s perfect for a quick weeknight dinner or a crowd-pleasing party snack. My favorite part? The crispy surface giving way to warm, gooey cheese and fragrant chicken—that combo is pure gold.
How do I make chicken chimichangas?
Quick Overview
This recipe walks you through filling flour tortillas with flavorful shredded chicken, rolling them up tight, and then frying or baking until golden. The secret to the perfect chimichanga? Don’t overstuff! Keep everything snug but not bursting out—trust me, a neat roll makes all the difference. You can pre-fry or bake these for a healthier touch, but honestly, the crispy exterior from frying takes these to a whole new level. Once they’re golden, a quick drizzle of lime or sprinkle of cilantro, along with a side of salsa, makes for an irresistible plate. It’s simple enough to whip up on a weeknight, but impressive enough to serve at a small gathering. Best of all, you can prep some components ahead—shredded chicken, cheese, and even the rolled chimis—then just fry or bake when you’re ready to eat. Less stress, more yum!
Ingredients
For the Main Filling:
– 2 cups cooked chicken, shredded (rotisserie chicken works like a charm)
– 1 cup shredded cheese (cheddar, Monterey Jack, or a spicy blend)
– 1/2 cup diced onions (optional but adds flavor)
– 1 teaspoon smoked paprika
– 1 teaspoon cumin
– Salt and pepper to taste
– 1 tablespoon olive oil (for sautéing onions, if using)
For the Tortillas:
– 4 large flour tortillas (bacon soft and flexible—a little warmth makes them easier to work with)
For the Coating & Cooking:
– 2 eggs (beaten, for sealing the edges)
– 1 cup all-purpose flour or panko breadcrumbs (for extra crunch, optional)
– Oil for frying (vegetable or canola, enough for shallow frying)
For the Optional Garnish & Serving:
– Sour cream, salsa, chopped cilantro, lime wedges, or hot sauce for serving
Step-by-Step Instructions
Step 1: Preheat & Prep Pan
Start by heating your oil in a deep skillet or frying pan over medium heat. You want enough to shallow fry, not deep fry—about 1/2 inch deep. Let it heat up while you get everything else ready. I always do a quick check with a little breadcrumb—if it sizzles immediately, you’re good to go. Also, warm the tortillas slightly in the microwave for about 20 seconds—they’ll roll smoother and won’t crack when you fill them.
Step 2: Mix Dry Ingredients
If you’re adding spices directly to the filling, mix the cumin, paprika, salt, and pepper with your shredded chicken and cheese in a large bowl. This ensures even flavor throughout. I like to taste a tiny bit of the filling after seasoning—nothing beats adjusting the spices before assembly.
Step 3: Mix Wet Ingredients
Beat your eggs in a small bowl—this will be used to seal the tortillas shut. A little beaten egg brushed along the edges helps keep everything from popping open during frying. Keep it handy near your workspace.
Step 4: Combine
Lay a tortilla flat on a clean surface. Spoon about 1/4 to 1/3 cup of the chicken mixture toward one end, leaving a little space around the edges. Fold the sides over, then roll tightly from the filled end, pressing gently to seal. Brush a little egg wash on the edges and press down gently to hold it closed.
Step 5: Prepare Filling
Feel free to add your favorite extras—diced jalapeños for heat, black beans for extra protein, or even some cooked corn. Mix everything well so each bite gets a good dose of flavor. The filling should be moist but not overly wet—if it’s too wet, the roll might get soggy.
Step 6: Layer & Swirl
Place the filled chimichangas seam-side down on a plate. If you’re frying, preheat your oil on medium. For baking, line a baking sheet with parchment paper and lightly spray with oil. You can also get fancy and brush the tops with a little egg for added crispiness and a golden look.
Step 7: Bake or Fry
To fry: Carefully add the chimis seam-side down into hot oil, cook for about 3-4 minutes on each side until golden and crispy. To bake: Pop them in a preheated oven at 400°F (200°C) for about 20-25 minutes, turning once, until crispy outside.
Step 8: Cool & Glaze
Let them rest for a couple of minutes after frying or baking. If using a glaze or drizzle—like a quick limey sour cream or hot sauce—wait until they’re slightly cooled so the toppings don’t slide off. The crispy shell plus the melty inside creates such a satisfying crunch that I always find myself sneaking a few extra bites before I serve them.
Step 9: Slice & Serve
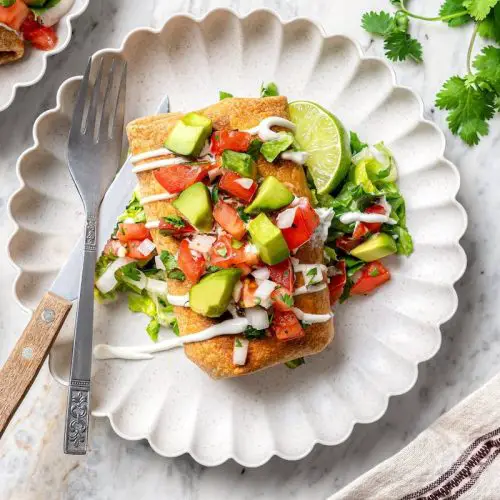
Cut each chimichanga in half diagonally to show off those beautiful layers inside. Serve hot with a refreshing side of salsa, some shredded lettuce, or a handful of cilantro. My personal favorite? A squeeze of fresh lime over the top makes all the flavors pop. These look amazing on a platter with colorful toppings scattered around—perfect for sharing (or not). Trust me, your friends will be raving about these for days.
What to Serve It With
These chicken chimichangas are so flexible—some days I serve them up with a simple side of Mexican rice and guacamole, and other times I pile them on a platter with a big green salad. My kids love to have theirs with extra hot sauce or a dollop of sour cream. They’re also fantastic for weekend movie nights, paired with cold craft beers or sparkling agua fresca. Honestly, I sometimes make a double batch because leftovers are just as delicious heated up the next day. If I want to feel extra indulgent, I drizzle a little chipotle mayo on top or sprinkle chopped fresh cilantro at the last minute. These are comfort food that feels a little fancy, and everybody leaves the table feeling happy and full.
Top Tips for Perfecting Your Chicken Chimichangas
Over the years, I’ve picked up a few tricks—because let’s be honest, no one wants soggy or unappetizing chimis. First, always use fresh tortillas—warm them slightly to make rolling easier and prevent cracking. If your filling is too dry, add a splash of chicken broth or a dollop of sour cream to keep it moist and flavorful. I’ve tested this with different cheeses, and honestly, a mix of cheddar and Monterey Jack gives the best melty, flavor-packed result. When you’re rolling, don’t overstuff—sounds obvious, but it’s tempting to pile in extra, and then they burst open in the oil. Keep the seam side down until they’re set, so they don’t unzip during frying. As for baking versus frying, I prefer frying for that authentic crunch, but baking is healthier and still super tasty—just spray with a little oil before you pop them in the oven. I also experimented with adding a pinch of garlic powder or smoked paprika into the filling—delicious! And don’t skip the lime or cilantro garnishes—they brighten everything up. Every time I tweak a little here and there, I end up with a chimi better than the last. The key is patience, practice, and a lot of tasting as you go. Oh! And trust me on this—let them cool just a bit before slicing. The insides are hot and melty, and I learned the hard way that rushing it results in a gooey mess. Be patient, and you’ll get perfect, crispy, cheesy bites every time.
Storing and Reheating Tips
Leftovers? Totally a thing—and honestly, they taste just as good the next day. Store any cooled chimichangas in an airtight container in the refrigerator for up to 3 days. If you plan to reheat, I recommend popping them back in a hot oven at 375°F (190°C) for about 10-15 minutes until crispy again—nothing beats reheated crispy shells! If you’re in a rush, a quick 30-second microwave blast followed by a few minutes in a hot oven or under the broiler works well, but be careful not to turn the shell to soggy mush. For freezing, wrap each chimichanga tightly in plastic wrap and then foil, and they’ll keep for up to a month. When ready to eat, let them thaw overnight in the fridge, then reheat as above. I usually wait to add fresh toppings or drizzle with a glaze after reheating to keep that freshly made crunch. Trust me, these reheat like a charm—and make great snack or lunch leftovers.
Frequently Asked Questions
Final Thoughts
If you’re looking for a dish that feels like a warm hug but also satisfies that craving for something crispy and cheesy, these chicken chimichangas are the way to go. Once you master the rolling and frying, they become your secret weapon for easy entertaining or weeknight comfort—quick, hearty, and endlessly customizable. Over the years, I’ve tried to perfect this recipe, and honestly, each batch gets better because I’ve learned what works and what I can improve. My kids ask for seconds—sometimes thirds—and I love that they’re eating something way more satisfying than microwave leftovers. If you give this a try, I’d love to hear how it turns out or what fun twists you add. Remember, cooking is about making it your own, so don’t be afraid to experiment and make these chimichangas uniquely yours. Happy baking—and don’t forget that a squeeze of lime makes everything brighter!
chicken chimichangas
Ingredients
Main Ingredients
- 0.5 cup diced tomato
- 3 tablespoons chopped onion
- 1 tablespoon chopped fresh cilantro
- 1 teaspoon fresh lime juice
- 12 ounces shredded cooked chicken breast
- 4 oz mild diced green chiles
- 4 large low-carb whole wheat tortillas
- 0.5 cup shredded pepper Jack cheese
- 1 tablespoon olive oil spray
Instructions
Preparation Steps
- In a small bowl, combine diced tomato, chopped onion, chopped cilantro, lime juice, salt, and pepper to taste.
- In a large bowl, mix shredded chicken with lime juice, chopped chiles, and spices until well coated.
- Place about 3/4 cup of chicken mixture onto the center of each tortilla, sprinkle with cheese, and roll tightly into a cylinder, folding in the ends.
- Preheat oven to 400°F. Spray each chimichanga with olive oil and place seam side down on a baking sheet.
- Bake for 15-20 minutes or until golden brown and crispy, flipping halfway through.
- Serve hot with toppings of choice such as sour cream, salsa, or guacamole.
Notes
Featured Comments
“Impressed! Clear steps and super easy results. Perfect for busy nights.”
“New favorite here — creamy. crowd-pleaser was spot on.”
“Super easy and turned out amazing! My family asked for seconds. Saving this one.”
“This sweet treat was absolutely loved — the silky really stands out. Thanks!”
“Made it tonight and wow — absolutely loved! Will definitely make Easy Chicken Chimichangas for a Flavorful Dinner again.”
“Packed with flavor and so simple. Exactly what I wanted from Easy Chicken Chimichangas for a Flavorful Dinner.”


