

Oh, Coffee Cake. Just saying the words brings back a flood of cozy memories. I remember my Grandma’s kitchen, always warm and smelling faintly of cinnamon and sugar, especially on weekend mornings. She had this incredible coffee cake that was just… perfect. Not too sweet, wonderfully moist, with that irresistible crumbly topping. It’s the kind of thing that instantly makes a house feel like a home, and it’s my absolute favorite treat to bake when I need a little comfort or want to impress without a ton of fuss. This isn’t your average dry, crumbly cake that leaves you reaching for your coffee mug after every bite. Nope, this is the coffee cake that makes you close your eyes and savor each forkful. It’s pretty much the antidote to a tough week, and honestly, it’s become my secret weapon for impromptu gatherings or when that 3 PM sweet craving hits hard and I don’t want to commit to a whole elaborate dessert.
What is coffee cake?
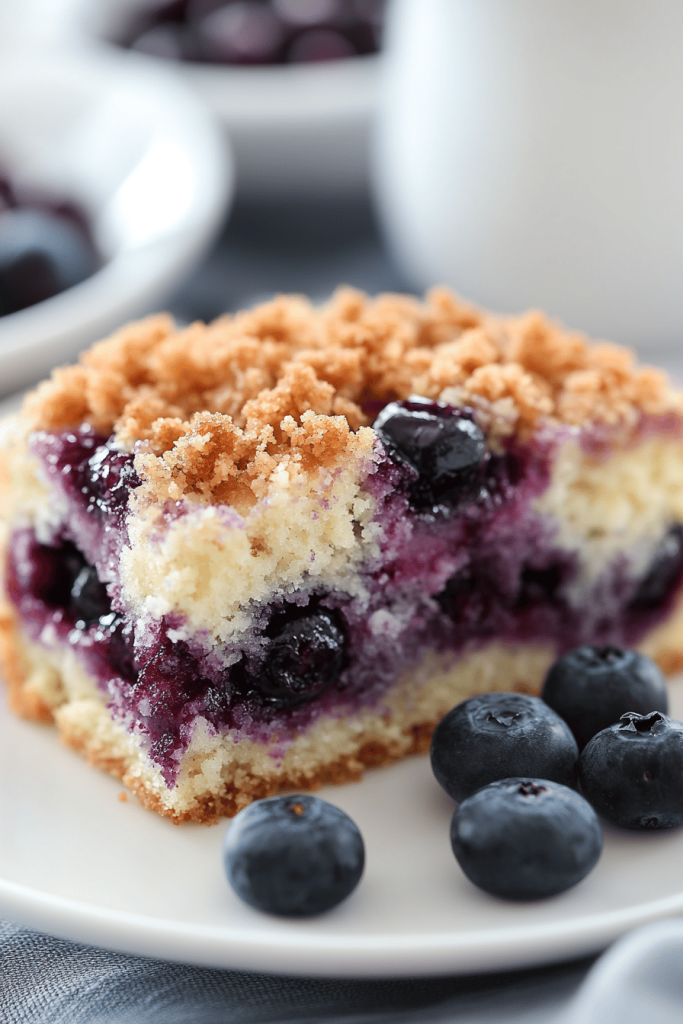
So, what exactly *is* this wonderful coffee cake? At its heart, it’s a tender, buttery cake with a generous swirl of cinnamon-sugar goodness baked right in, all topped off with a crunchy, delightful streusel. Think of it as a hug in cake form. It’s not overly fussy, which is exactly why I adore it. The “coffee cake” part of the name is a bit of a misnomer, as you don’t actually need coffee *in* the cake itself – though it pairs beautifully with a cup! The name comes from its traditional role as a companion to coffee, a delicious treat to enjoy during that morning or afternoon pause. It’s essentially a celebration of simple, good ingredients coming together to create something truly special. It’s that perfect balance of cake and crumb topping that I think makes it so universally loved.
How do I make a coffee cake?
Quick Overview
This coffee cake comes together in a few easy stages: mixing a simple batter, whipping up a quick cinnamon-sugar filling, and creating a glorious streusel topping. You’ll combine your dry and wet ingredients for the cake, layer it into your pan with the filling, top it with the crumbly streusel, and then bake it until golden and fragrant. It’s truly that simple! The magic happens in the oven, where the flavors meld and that incredible texture develops. What I love about this method is that it minimizes fuss and maximizes flavor. It’s designed to be approachable, so don’t be intimidated; it’s designed for success!
Ingredients
For the Main Batter:
You’ll need all-purpose flour – about 2 ½ cups will do. Make sure it’s fresh! I always sift mine, even though it’s an extra step, because it really helps keep the cake light and airy. Then, we’ve got granulated sugar, about 1 ½ cups. You can adjust this slightly depending on how sweet you like things, but this amount is perfect for balancing the flavors. A couple of teaspoons of baking powder and a pinch of salt will ensure the cake rises beautifully and the flavors pop. Don’t forget the eggs – two large ones, at room temperature. This is important for getting a smooth batter. For richness and moisture, we’ll use ½ cup of unsalted butter, softened. And the secret to that wonderfully moist texture? 1 cup of buttermilk. If you don’t have buttermilk, you can make a quick substitute by adding 1 tablespoon of lemon juice or white vinegar to 1 cup of milk and letting it sit for about 5-10 minutes. It works like a charm! A teaspoon of Vanilla Extract will round out the flavors beautifully.
For the Filling:
This is where the magic happens for that beautiful swirl! You’ll need about ½ cup of packed light brown sugar. The molasses in brown sugar gives it such a lovely depth of flavor. Then, we’ll use 2 tablespoons of ground cinnamon – don’t be shy! I love using a good quality cinnamon here because it really shines. Some recipes call for nuts in the filling, but I prefer to keep it simple with just the cinnamon and sugar. You can absolutely add chopped pecans or walnuts if you’re a fan, though!
For the Glaze:
This is optional, but highly recommended for that extra touch of sweetness and visual appeal. We’ll whisk together about 1 cup of powdered sugar with 2-3 tablespoons of milk or cream until it reaches a pourable, but not too thin, consistency. You can also use lemon juice or even orange juice for a citrusy zing instead of milk. A tiny splash of vanilla extract in the glaze is always a good idea too.
Step-by-Step Instructions
Step 1: Preheat & Prep Pan
First things first, get your oven preheating to 350°F (175°C). While it’s warming up, grab a 9×13 inch baking pan. I like to grease it really well with butter or cooking spray, and then dust it lightly with flour. This ensures your gorgeous coffee cake doesn’t stick one bit. Make sure to get into all the corners! Some people like to line their pan with parchment paper too, which is another great way to ensure easy removal.
Step 2: Mix Dry Ingredients
In a large bowl, whisk together your all-purpose flour, granulated sugar, baking powder, and salt. Make sure everything is evenly distributed. You want to make sure the baking powder is mixed in well so you get an even rise. I like to use a whisk for this because it aerates the flour a bit and gets rid of any little lumps. This step might seem basic, but it’s crucial for a good cake texture!
Step 3: Mix Wet Ingredients
In a separate medium bowl, whisk together your softened butter and granulated sugar until light and fluffy. Then, beat in your eggs, one at a time, making sure each is fully incorporated before adding the next. Stir in the vanilla extract and then alternate adding the buttermilk and the dry ingredients to the butter mixture, beginning and ending with the dry ingredients. Mix on low speed or by hand until just combined. Be careful not to overmix here; we want a tender cake!
Step 4: Combine
Now, gently fold your dry ingredients into the wet ingredients. Mix until just combined. Remember, overmixing can lead to a tough cake, and nobody wants that! A few small lumps are perfectly fine. The batter should be thick but pourable. If it seems too thick, you can add another tablespoon or two of buttermilk. If it seems too thin, a little more flour can help, but usually, this ratio is spot on.
Step 5: Prepare Filling
In a small bowl, combine the packed light brown sugar and ground cinnamon. Give it a good stir to make sure the cinnamon is evenly distributed throughout the sugar. This simple mixture is what creates those irresistible pockets of sweet, spiced goodness within the cake. You can even add a pinch of nutmeg or cardamom here if you’re feeling adventurous!
Step 6: Layer & Swirl
Pour about half of the cake batter into your prepared baking pan and spread it out evenly. Sprinkle about half of the cinnamon-sugar mixture evenly over the batter. Then, dollop the remaining cake batter over the cinnamon-sugar layer and spread it as best you can. Don’t worry if it’s not perfectly even; it will bake out. Sprinkle the rest of the cinnamon-sugar mixture over the top. Now for the fun part: You can gently swirl the cinnamon-sugar into the top layer of the batter using a knife or skewer, making figure-eights or random patterns. This creates those beautiful marbled streaks. Don’t over-swirl, or the cinnamon will disappear into the batter!
Step 7: Bake
Pop the pan into your preheated oven and bake for about 30-40 minutes. The exact time will depend on your oven, of course. You’ll know it’s done when a toothpick inserted into the center comes out clean or with just a few moist crumbs attached. The top should be golden brown and it will smell absolutely divine!
Step 8: Cool & Glaze
Once it’s baked, take the cake out of the oven and let it cool in the pan on a wire rack for about 10-15 minutes. This is really important; trying to cut into it too soon will just make it fall apart. While it’s cooling, whisk together your powdered sugar, milk (or other liquid), and vanilla for the glaze. Once the cake has cooled slightly, drizzle the glaze generously over the top. If you want a thicker glaze, use less liquid. If you want it thinner, add a touch more. The warmth of the cake will help the glaze melt just slightly.
Step 9: Slice & Serve
Let the cake cool a bit more before slicing. This coffee cake is truly best served warm, but it’s also delicious at room temperature. Use a sharp knife to cut it into squares. The aroma as you slice into it is pure heaven! This cake is wonderful on its own, but if you want to elevate it, a dollop of whipped cream or a scoop of vanilla ice cream is always a welcome addition, especially as a dessert.
What to Serve It With
This coffee cake is so versatile, it truly fits in almost anywhere! For a classic breakfast, of course, a steaming mug of your favorite coffee is non-negotiable. A light roast or a medium blend really lets the cake’s flavors shine without competing. If you’re serving it as part of a more elaborate brunch spread, think about pairing it with fresh fruit salad – the bright, fresh flavors cut through the richness of the cake beautifully. A simple berry salad or some sliced melon is perfect. For a more decadent dessert, I love serving this coffee cake warm with a scoop of good quality vanilla bean ice cream or a dollop of lightly sweetened whipped cream. The contrast of warm cake and cold ice cream is simply divine. And for those cozy afternoon snack times when you just need a little pick-me-up? A glass of cold milk is my go-to. My kids absolutely devour it with milk! Sometimes, I’ll even toast a small slice the next day and serve it with a tiny bit of extra butter. It’s surprisingly good that way too. It’s really the perfect accompaniment to any beverage you enjoy, whether it’s a strong espresso, a soothing cup of herbal tea, or even a chilled glass of OJ.
Top Tips for Perfecting Your Coffee Cake
I’ve been making variations of this coffee cake for years, and I’ve definitely picked up a few tricks along the way that I’m happy to share! When it comes to the cinnamon-sugar filling, make sure your brown sugar is nice and soft. If it’s hardened, you can microwave it for about 10 seconds to soften it up. This helps it distribute evenly without clumping. For the swirl, don’t go crazy! A few gentle passes with a knife are all you need. If you swirl too much, you’ll end up with a brown cake instead of a beautifully marbled one. I learned that lesson the hard way once! For the streusel topping, which I didn’t explicitly list but is a key component in many great coffee cakes (and this recipe has a fantastic cinnamon-sugar swirl that acts similarly!), ensure your butter is cold when you mix it with the sugar and flour. This helps create those lovely, crumbly bits. My absolute favorite trick for the cake batter itself is to ensure my eggs and buttermilk are at room temperature. This makes for a much smoother, more emulsified batter, which translates to a more tender cake. If you forget to take them out ahead of time, you can quickly warm eggs by placing them in a bowl of warm water for a few minutes, and you can warm buttermilk gently in the microwave (just a few seconds!). When it comes to baking, always trust the toothpick test. Ovens can vary so much, so the visual cues are important, but the toothpick is your definitive guide. If your cake is browning too quickly on top, you can loosely tent it with foil for the last 10-15 minutes of baking. And for the glaze, consistency is key. Start with the smaller amount of liquid and add more gradually until you get that perfect drizzling consistency. Too thin, and it will just run off. Too thick, and it will be hard to spread. Experiment with flavor additions to the glaze too – a little orange zest or a drop of almond extract can be lovely!
Storing and Reheating Tips
This coffee cake is so good, you might actually have leftovers (though I wouldn’t bet on it!). If you do, storing it properly will keep it tasting delicious for days. At room temperature, it will stay fresh for about 2-3 days if it’s kept covered. I usually use plastic wrap or an airtight cake container. Just make sure it’s completely cooled before covering, otherwise, condensation can make it soggy. If you think you’ll need longer than 3 days, or if your kitchen is particularly warm, popping it into the refrigerator is the way to go. In the fridge, it can last for up to a week. Make sure it’s in an airtight container or well-wrapped. I’ve found that wrapping it tightly in plastic wrap and then a layer of foil helps maintain its moisture. If you’re a planner or just want to have some on hand for future cravings, this coffee cake freezes beautifully! Let it cool completely, then wrap it tightly in plastic wrap, followed by a layer of aluminum foil or a freezer-safe bag. It should keep well in the freezer for up to 2-3 months. When you’re ready to enjoy it, you can thaw it overnight in the refrigerator or at room temperature. For reheating, I like to pop a slice into a warm oven (around 300°F or 150°C) for about 5-10 minutes, just to bring back that lovely warmth and slight crispness to the edges. If you’ve frozen it and plan to add the glaze *after* reheating, that works perfectly. I usually wait to glaze a whole cake until I’m ready to serve it if I’m not planning on freezing it immediately.
Frequently Asked Questions
Final Thoughts
Honestly, this coffee cake is more than just a recipe to me; it’s a little piece of comfort and joy that I love to share. It’s proof that you don’t need to be a professional baker to create something truly delicious and impressive. The way the cinnamon swirls through the tender cake, the satisfying crunch of the topping (or that sweet glaze!), and the sheer aroma it fills your kitchen with… it’s just pure magic. It’s the kind of recipe that makes your house feel warmer and your day a little brighter. If you’re looking for a dessert that’s both incredibly satisfying and surprisingly simple to make, this is it. It’s perfect for a lazy Sunday morning, a special occasion brunch, or just because you deserve a treat. I truly hope you give this coffee cake a try. I can’t wait to hear how yours turns out, and I’d love to know if you’ve added any special twists of your own! Happy baking!
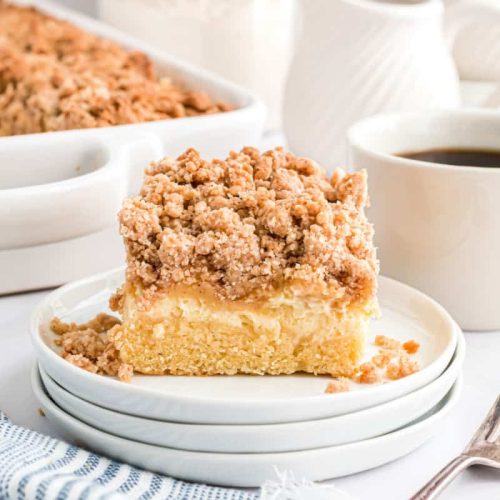
Cream Cheese Coffee Cake
Ingredients
For the Cake
- 2.5 cup all-purpose flour
- 1 cup granulated sugar
- 0.5 teaspoon baking powder
- 0.5 teaspoon baking soda
- 0.25 teaspoon kosher salt
- 0.75 cup unsalted butter, softened
- 3 large eggs
- 2 teaspoons vanilla extract
- 0.67 cup buttermilk
For the Cream Cheese Filling
- 16 ounce cream cheese, softened 2 packages
- 0.5 cup granulated sugar
- 1 large egg
For the Streusel Topping
- 1 cup light brown sugar
- 0.33 cup granulated sugar
- 2 teaspoons ground cinnamon
- 0.25 teaspoon kosher salt
- 1 cup unsalted butter, melted
- 3 cup all-purpose flour
Instructions
Preparation Steps
- Preheat oven to 325°F (160°C). Grease and flour a 13x9 inch baking dish.
- In a large bowl, whisk together the flour, granulated sugar, baking powder, baking soda, and kosher salt for the cake. Add the softened butter and beat on low speed until the mixture is crumbly.
- Add the eggs, vanilla extract, and buttermilk to the flour mixture. Beat until just combined and the batter is fluffy.
- Pour half of the cake batter into the prepared baking dish and spread evenly.
- In a separate medium bowl, beat the softened cream cheese, granulated sugar, and egg until light and fluffy, about 3-5 minutes.
- Spread the cream cheese mixture evenly over the cake batter in the baking dish.
- Pour the remaining half of the cake batter over the cream cheese layer and spread evenly.
- For the streusel topping, in a medium bowl, combine the light brown sugar, granulated sugar, cinnamon, and kosher salt. Pour in the melted butter and mix until well combined. Add the flour and mix with your hands or a fork until a crumbly mixture forms.
- Sprinkle the streusel topping evenly over the cake batter.
- Bake for 40-50 minutes, or until a toothpick inserted into the center comes out clean.
- Let the cake cool completely in the pan before slicing and serving.
Notes
Featured Comments
“Impressed! Clear steps and super easy results. Perfect for busy nights.”
“New favorite here — spot on. crowd-pleaser was spot on.”
“Super easy and turned out amazing! My family asked for seconds. Saving this one.”
“This sweet treat was absolutely loved — the silky really stands out. Thanks!”
“Made it tonight and wow — restaurant-level! Will definitely make Easy Coffee Cake with Creamy Cheese Swirl again.”
“Packed with flavor and so simple. Exactly what I wanted from Easy Coffee Cake with Creamy Cheese Swirl.”


