


There are some recipes that just feel like a warm hug, aren’t there? This one, for cranberry walnut pinwheels, is definitely one of those for me. I remember the first time I made these; it was a chaotic holiday season, and I needed something that looked impressive but didn’t require me to pull my hair out. I stumbled upon a similar idea and decided to tweak it, adding my own little spin. Honestly, I was a bit nervous because I wasn’t sure how the swirls would turn out. But when they came out of the oven, smelling like toasted nuts and sweet cranberries, and looking like little edible works of art, I knew I had found a keeper. They’re like a fancy little cousin to a Cinnamon Roll, but somehow even easier to manage, and the tangy cranberries paired with the crunch of walnuts? Pure magic. My family devours them, and they’ve become my secret weapon for unexpected guests or when I just need a little something special to brighten my day without a ton of fuss. If you’ve ever loved a good rugelach or a delicate pastry twist, you’re going to adore these cranberry walnut pinwheels.
What are Cranberry Walnut pinwheels?
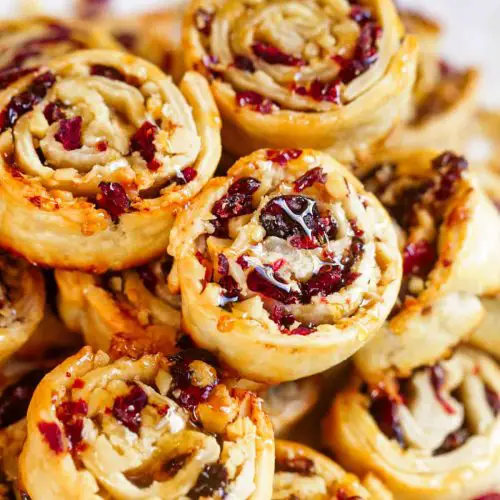
So, what exactly are these delightful little swirls? Think of them as a soft, slightly sweet dough rolled up with a luscious, bright filling of dried cranberries and toasted walnuts, then sliced into pinwheels and baked until golden. It’s not a yeasted dough, which is a big part of why they’re so wonderfully simple. Instead, we use a baking powder leavened base that comes together in a flash. The “pinwheel” part comes from how we assemble them: the dough is rolled out thin, spread with the filling, then rolled up like a jelly roll. Once you have that log, you slice it into individual portions, and when they bake, those spirals unfurl into beautiful, pinwheel shapes. It’s essentially a no-fuss pastry that delivers big on flavor and visual appeal. They’re less about intricate folding and more about simple rolling and slicing, making them accessible for even the most beginner bakers among us!
How do I make Cranberry Walnut pinwheels?
Quick Overview
The magic of these cranberry walnut pinwheels is how straightforward they are. We’ll whip up a quick dough, spread it with a simple cranberry-walnut mixture, roll it up, slice it into gorgeous swirls, and bake them to golden perfection. It’s a process that feels incredibly rewarding for the minimal effort involved. You’ll be amazed at how easily you can create something that looks like it came from a fancy bakery.
Ingredients
For the Main Batter:
This is our soft, tender base. I always try to use good quality all-purpose flour, and make sure my baking powder is fresh—it really makes a difference in how nicely they puff up. And for the fat, I typically reach for unsalted butter, softened just enough so it creams easily but isn’t melted. A little bit of milk, and sometimes I’ll use buttermilk if I have it, adds a lovely tenderness. Don’t overthink this part; it’s designed to be forgiving!
For the Filling:
This is where the star flavors come in! I love using plump, dried cranberries – not the overly sweetened kind if I can help it, as we already have a little sweetness in the dough and glaze. For the walnuts, toasting them first is a non-negotiable for me. It brings out their nutty depth and makes them wonderfully crisp. A touch of brown sugar and cinnamon here just amplifies those warm, cozy flavors. Sometimes I’ll add a pinch of nutmeg too, just because!
For the Glaze:
A simple powdered sugar glaze ties everything together. It’s just powdered sugar, a splash of milk (or lemon juice for a tangier twist!), and maybe a drop of Vanilla Extract. You want it thick enough to drizzle but thin enough to coat beautifully. It adds that final touch of sweetness and a lovely sheen.
Step-by-Step Instructions
Step 1: Preheat & Prep Pan
First things first, let’s get our oven preheating to 375°F (190°C). This ensures it’s ready to go as soon as our pinwheels are assembled. While that’s happening, grab a couple of baking sheets and line them with parchment paper. This is my little secret to easy cleanup; I swear by parchment paper for almost everything I bake. Make sure the paper covers the surface well so your pinwheels don’t stick.
Step 2: Mix Dry Ingredients
In a large bowl, whisk together the flour, baking powder, and salt. Giving these a good whisk ensures everything is evenly distributed. You want to see a nice, uniform mix before we add any wet ingredients. This step is super quick but important for an even texture in the final product.
Step 3: Mix Wet Ingredients
In a separate medium bowl, cream together the softened butter and granulated sugar until light and fluffy. This usually takes a minute or two with an electric mixer, or a bit more elbow grease by hand. Then, beat in the eggs one at a time, followed by the vanilla extract and milk. Mix until everything is just combined and smooth. Don’t overmix here; we’re just looking for a cohesive, creamy mixture.
Step 4: Combine
Now, we’ll add the wet ingredients to the dry ingredients. Gently mix them together until just combined. You want to stop mixing as soon as you don’t see any dry streaks of flour. Overmixing can lead to tough pinwheels, and we definitely don’t want that! The dough will be soft and a little sticky, which is exactly what we’re aiming for.
Step 5: Prepare Filling
In a small bowl, combine the chopped dried cranberries, toasted chopped walnuts, brown sugar, cinnamon, and a pinch of nutmeg if you’re using it. Stir everything together until the cranberries and walnuts are nicely coated. This mixture is going to be spread onto our rolled-out dough, so having it ready to go makes the assembly process super smooth.
Step 6: Layer & Swirl
Turn the dough out onto a lightly floured surface. Gently pat or roll it into a rectangle, about 10×12 inches and roughly ¼ inch thick. Try to get the edges as straight as you can. Evenly spread the cranberry walnut filling over the surface of the dough, leaving about a ½ inch border along one of the longer edges. This border will help seal the roll. Now, starting from the long edge that has filling all the way to the edge, tightly roll up the dough, like a jelly roll. Once rolled, gently pinch the seam to seal it. If the log feels a bit soft, you can pop it in the freezer for about 15-20 minutes to firm up, which makes slicing much easier. Once chilled, use a sharp knife to slice the log into ½-inch thick pinwheels.
Step 7: Bake
Carefully place the sliced pinwheels onto your prepared baking sheets, leaving a little space between each one as they will puff up a bit. Bake in your preheated oven for 15-20 minutes, or until the edges are golden brown and the centers are set. Keep an eye on them, as oven temperatures can vary. I usually check mine around the 15-minute mark. You want them nicely browned but not overdone.
Step 8: Cool & Glaze
Once baked, let the cranberry walnut pinwheels cool on the baking sheets for about 5-10 minutes before transferring them to a wire rack to cool completely. While they’re cooling, whisk together your glaze ingredients until you have a smooth, drizzle-able consistency. Once the pinwheels are mostly cool, drizzle the glaze over the top. Don’t worry if it’s not perfect; a rustic drizzle looks charming!
Step 9: Slice & Serve
Once the glaze has set a little, your beautiful cranberry walnut pinwheels are ready to be enjoyed! You can serve them as is, or if you want to add a little something extra, a dollop of whipped cream or a scoop of vanilla Ice Cream is divine. They are fantastic served warm, but honestly, they’re delicious at room temperature too.
What to Serve It With
These cranberry walnut pinwheels are so versatile, they fit into almost any occasion! For breakfast, they are an absolute dream alongside a steaming mug of coffee or a glass of fresh orange juice. The sweetness and texture are just perfect to start the day. For a more elaborate brunch spread, they look so elegant arranged on a tiered stand. I love pairing them with a fresh fruit salad or some savory quiches. If you’re serving them as a dessert, they are wonderful after a lighter meal. Imagine them with a cup of herbal tea or even a small glass of dessert wine. And for those cozy, indulgent snack moments? They’re perfect all on their own, perhaps with a glass of milk, or shared with friends over a good chat and a cup of tea. My kids also love them as an after-school treat, sometimes with a smear of cream cheese which is surprisingly delicious!
Top Tips for Perfecting Your Cranberry Walnut Pinwheels
I’ve made these cranberry walnut pinwheels so many times, I feel like I could do it with my eyes closed! Here are a few tricks I’ve picked up along the way that I think make all the difference. Firstly, when it comes to the cranberries, if yours seem a bit dry, I sometimes soak them in a little warm water for about 10 minutes before draining them well. It plumps them up and gives you a better texture. For the walnuts, toasting them is truly key. I just spread them on a small baking sheet and pop them in the oven for about 5-7 minutes until they’re fragrant. You have to watch them closely, though, as they can burn quickly! When you’re rolling out the dough, don’t feel like you need a perfect rectangle. Mine are rarely perfectly straight, and they still turn out beautifully. The key is to get it roughly even in thickness so the pinwheels are uniform. When you’re rolling up the dough, try to keep it as tight as you can without squishing the filling out. This ensures those lovely, distinct swirls. If your dough gets too soft for slicing, don’t hesitate to pop it in the freezer for 20-30 minutes. It makes slicing so much cleaner. And about the glaze – I like mine a bit thicker, so I add milk very gradually, a teaspoon at a time, until it reaches the consistency I like. If you accidentally make it too thin, just whisk in a little more powdered sugar. Finally, remember that ovens vary. My oven runs a little hot, so I often set my timer for a few minutes less than the recipe suggests, and then check for doneness. You’re looking for lovely golden edges and a set center, not a dark brown or burnt bottom.
Storing and Reheating Tips
These cranberry walnut pinwheels are so delightful to have on hand, and thankfully, they store really well! If you’ve got leftovers (which is rare in my house!), you can keep them at room temperature for about 2-3 days. Just make sure they’re in an airtight container or well-covered with plastic wrap. They tend to stay freshest this way. If you want them to last a bit longer, or if your kitchen is particularly warm, the refrigerator is your friend. Store them in an airtight container in the fridge for up to a week. They’ll still be delicious, though I sometimes find the texture is a little firmer when cold. For even longer storage, these freeze like a dream! You can freeze the baked pinwheels individually wrapped in plastic wrap, then placed in a freezer-safe bag or container. They’ll keep well for up to 2-3 months. When you’re ready to enjoy them, you can thaw them at room temperature. If you like them warm, you can pop them in a low oven (around 300°F or 150°C) for about 5-10 minutes until heated through. I often do this when I want that freshly baked aroma again! For reheating, I usually avoid the microwave, as it can sometimes make them a bit chewy. The oven is definitely the way to go for the best texture. I generally add the glaze *after* the pinwheels have cooled completely, and I prefer to glaze them just before serving if they’ve been stored. If you’ve frozen them, it’s best to glaze them after they’ve been reheated and cooled slightly, so the glaze doesn’t get all melty in the freezer.
Frequently Asked Questions
Final Thoughts
Honestly, these cranberry walnut pinwheels are more than just a recipe to me; they’re a little bit of joy that’s always accessible. They prove that you don’t need complicated steps or exotic ingredients to create something truly special. The way the tart cranberries and nutty walnuts come together in that tender, buttery dough is just a match made in heaven. They’re perfect for that moment you need a quick treat, a thoughtful gesture for a neighbor, or simply to make your own afternoon coffee break feel a little more luxurious. If you love the flavors of cranberries and walnuts, and appreciate a recipe that delivers big on taste without a lot of stress, you absolutely have to give these a try. They’re a recipe that I come back to again and again, and I have a feeling they might just become a favorite in your kitchen too. I can’t wait to hear how yours turn out and what you think of them!
cranberry walnut pinwheels
Ingredients
Filling
- 1 cup dried cranberries finely chopped
- 1 cup walnuts finely chopped
- 0.5 cup granulated sugar
- 1 orange zest from 1 large orange
Cookies
- 2 packages refrigerated pie crusts e.g., Pillsbury
- 2 tablespoons butter melted
- 1 large egg
- 2 tablespoons water
- honey for drizzling
Instructions
Preparation Steps
- Preheat the oven to 400°F (200°C). Line a baking sheet with parchment paper and set aside.
- Make the cranberry and walnut filling. In a mixing bowl, combine the chopped dried cranberries, chopped walnuts, granulated sugar, and orange zest. Mix until thoroughly combined.
- Roll out the pie dough. On a lightly floured surface, roll out each pie crust into a square shape. Generously brush the inside of each pie dough square with the melted butter.
- Add the filling. Spread the cranberry filling evenly over the buttered surface of each pie dough square. Avoid overfilling, as this can make rolling and cutting difficult. Lightly press the filling ingredients down with your fingers so they adhere better to the crust.
- Freeze the dough. Tightly roll up each pie dough square into a log. Pinch the edges to seal. Place the logs in the freezer for 20 minutes to firm up.
- Brush with egg wash. In a small bowl, whisk together the large egg and water until well blended. Remove the chilled logs from the freezer and brush them all over with the egg mixture.
- Slice the cookies. Carefully cut each log into 10 equal slices. If the dough becomes too soft to slice cleanly, return it to the freezer for a few more minutes.
- Bake the cookies. Place the sliced cookies, cut side up, on the prepared baking sheet, about 1 inch apart. Bake for 11 to 14 minutes, or until golden brown.
- Finish and serve. Remove the cookies from the oven and place them on a cooling rack. Drizzle each pinwheel with honey. Let cool slightly before serving.
Notes
Featured Comments
“Impressed! Clear steps and super easy results. Perfect for busy nights.”
“New favorite here — super easy. crowd-pleaser was spot on.”
“Super easy and turned out amazing! My family asked for seconds. Saving this one.”
“This sweet treat was absolutely loved — the fresh really stands out. Thanks!”
“Made it tonight and wow — so flavorful! Will definitely make Easy Cranberry Walnut Pinwheels for Every Occasion again.”
“Packed with flavor and so simple. Exactly what I wanted from Easy Cranberry Walnut Pinwheels for Every Occasion.”


