

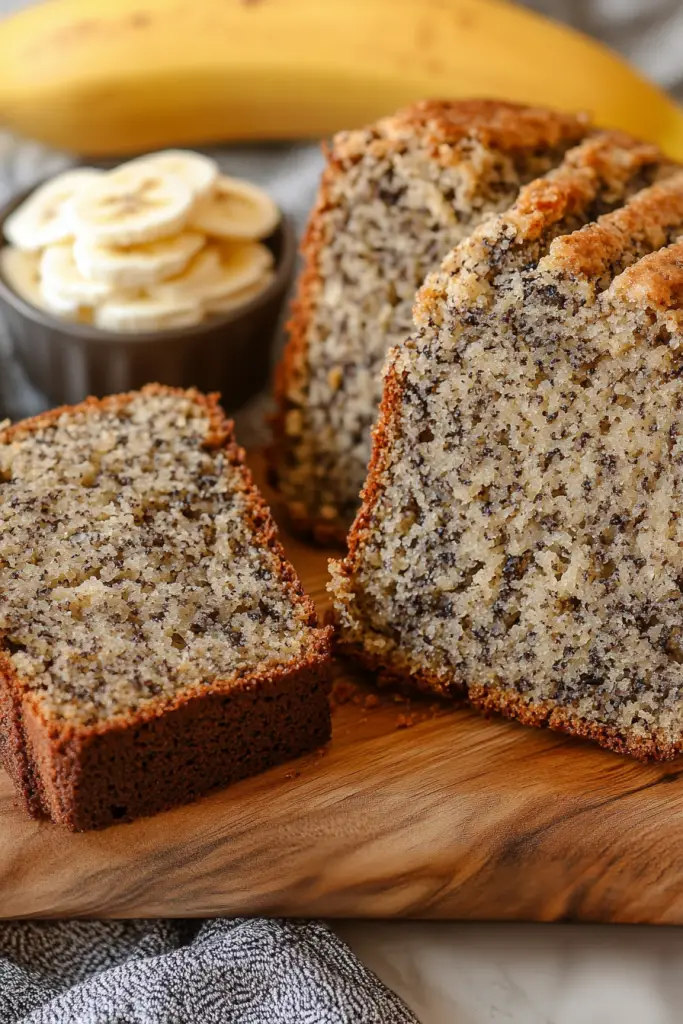
That first bite of fiesta dip recipe magic always takes me straight back to summer evenings on the porch with my cousins, warm breeze, and a bowl that somehow seems bottomless. I remember the way the room filled with garlic, corn, and cheese, and how everyone’s hands moved faster than the conversation. This dip isn’t just a snack; it’s a memory you can scoop with a tortilla chip. It’s got that crowd-pleasing flavor you expect from a festive party dish, but it’s remarkably easy to throw together on a weeknight too. Think of it as the grown-up cousin to the classic seven-layer dip—same vibes, less labor, and more personality. My friends always ask for the fiesta dip recipe when we’re hosting game night or potlucks, and I love that it can be tweaked to suit whatever’s in the fridge. The scent alone—toasty cheese mingling with warm salsa—says “come to the table” in the best way. I’ve tested this countless times, and no matter the crowd, it disappears in minutes. It’s a lifesaver on busy nights and a delight on lazy Sundays alike.
What is a Fiesta Dip recipe?
Fiesta dip recipe isn’t about any single ingredient doing all the work. It’s more like a friendly, layered conversation of flavors: creamy base, hearty fillings, and a little zing from jalapeño and lime. Think of it as a warm, baked dip that stays cozy on the table while you mingle with guests. The name itself evokes a party atmosphere—bright colors, bold textures, and a touch of roasted flavors. It’s essentially a tasty tapestry built from a tangy Cream Cheese foundation, a savory bean-and-corn filling, and a cheesy, bubbling topping. If you’ve ever wished for a dip that feels fancy enough for guests but simple enough to whip up in a hurry, this fiesta dip recipe nails it. And yes, it absolutely welcomes substitutions and swaps, so you can tailor it to your family’s preferences without losing its joyful personality.
How do I make a Fiesta Dip?
Quick Overview
If you’re short on time, you’ll still want to make this fiesta dip recipe shine. Start by softening the Cream Cheese, then blend it with sour cream and salsa to create a luscious base. Whisk together a simple dry-spice mix, then fold in a bright bean-corn filling—think black beans, corn, jalapeño, and diced tomatoes. Layer the base in a baking dish, scatter the filling on top, and give it a gentle swirl so you see a pretty marbled effect. Bake until it’s bubbling and the cheese on top is golden. A quick drizzle of our glaze—sour cream with a touch of salsa and lime—before you serve makes it feel extra polished. The result is a warm, inviting dip that’s perfect for dipping, scooping, or even spooning straight from the dish when you’re feeling lazy but hungry. This fiesta dip recipe is a crowd-pleaser that never fails to bring everyone to the table.
Ingredients
For the Main Batter:
- 8 oz cream cheese, softened to room temperature. I find it blends best when it’s soft enough to give a smooth, glossy finish—about 15 minutes on the counter.
- 1/2 cup sour cream for that silky tang that keeps the dip from feeling too heavy.
- 3/4 cup salsa (roasted tomato or a medium-spice variety works beautifully). If you like a milder dip, go a touch lighter; for a bolder bite, add a splash of hot sauce.
- 1 cup shredded Mexican cheese blend (or a 50/50 mix of Cheddar and Monterey Jack). The melt is everything here.
- 1/2 teaspoon garlic powder and a pinch of cumin to deepen the flavor without overpowering the dip.
- Salt to taste (start small and adjust after you mix with the other ingredients).
For the Filling:
- 1 cup black beans, rinsed and drained. If you’re using canned beans, giving them a quick pat-dry helps reduce excess moisture.
- 1 cup corn kernels (frozen thawed or canned, drained well). Sweet corn is a game changer here.
- 1 jalapeño, seed removed and finely minced for approachable heat.
- 1/2 cup diced tomatoes (or fire-roasted for extra depth).
- 1/3 cup chopped green onions for a fresh bite.
- 1/2 teaspoon chili powder and 1/4 teaspoon cumin for that signature fiesta glow.
- Pinch of salt to balance everything out.
For the Glaze:
- 1/2 cup sour cream
- 2 tablespoons salsa (or pico de gallo if you have it)
- 1 teaspoon lime juice
- Salt to taste
- Optional: a few chopped fresh cilantro leaves for brightness
Step-by-Step Instructions
Step 1: Preheat & Prep Pan
Set your oven to 375°F (190°C). Lightly grease a 9×13-inch baking dish with a little oil or butter. I like using a glass dish because the edges get that gentle caramelization that makes the top look extra inviting. You’ll thank me later when you don’t have to fuss with sticking around the edges.
Step 2: Mix Dry Ingredients
In a small bowl, whisk together the chili powder, cumin, and a pinch of salt. This is the backbone of your filling flavor, and it makes a surprising difference in the final dip. The trick is to wake up those spices so they bloom as soon as they hit the filling.
Step 3: Mix Wet Ingredients
In a larger bowl, beat the softened cream cheese with the Sour Cream until smooth and creamy. Stir in the salsa and half of the shredded cheese. The mixture should be luxuriously thick but spreadable. If it looks a touch stiff, a tablespoon or two of milk can help loosen it—but go easy so you don’t loosen the structure.
Step 4: Combine
Pour the wet mixture over your dry-spice blend and fold gently until everything is evenly distributed. You’re aiming for a cohesive base that’s glossy but not runny. If you’re seeing pooling, add a touch more cream cheese to bring it back to that perfect spreadable texture.
Step 5: Prepare Filling
In a separate bowl, mix together the black beans, corn, jalapeño, tomatoes, green onions, and the remaining spices. If you’re short on time, you can use a can of corn and a can of beans, but draining and pat-drying makes a world of difference in texture. Taste a little of the mixture and adjust salt or spice if needed. My rule of thumb: you want the filling to taste bright and a touch zippy, not flat.
Step 6: Layer & Swirl
Spread the main batter in an even layer across the bottom of the prepared dish. Spoon the filling over the top in an even layer, then use a spoon to swirl it gently into the base so you get pretty marble patterns. The goal isn’t to completely mix; you want little ribbons of color and texture peeking through once it bakes.
Step 7: Bake
Slide the dish into the oven and bake for 20–25 minutes, or until the edges are bubbling and the cheese is a light golden brown. If your oven runs warm, check at 18 minutes and then again at 23 minutes to avoid scorching. The cheese should be melty and the top lightly browned, not dry or hard.
Step 8: Cool & Glaze
Remove from the oven and let it rest for about 5–7 minutes. This helps the layers set a touch, making it easier to scoop. While it rests, whisk together the glaze ingredients until smooth. Drizzle the glaze over the warm dip in a slow, zigzag pattern so you get a pretty finish and a pop of tangy flavor in every bite. If you’re feeling extra, sprinkle a handful of chopped cilantro or a little extra cheese while it’s warm so it sticks and melts perfectly.
Step 9: Slice & Serve
Fiesta dip recipe shines when it’s still warm. The texture shifts as it cools—so plan to serve while piping hot if you can. Use a sharp knife to slice the edges cleanly, then scoop with sturdy tortilla chips, pita chips, or veggie sticks. If you have friends who swear they don’t like dip, hand them a spoonful of the topping to demonstrate how the flavors mingle; you’ll win them over. A light squeeze of lime over the top just before serving can brighten the dish beautifully, especially if your salsa was on the mild side. This is one of those dips that tastes even better on the second day, but it’s so delicious straight from the oven that you’ll probably devour it first. Either way, you’ve got a fiesta dip recipe that feels celebratory without requiring a parade of ingredients.
What to Serve It With
Fiesta dip recipe is happiest when you pair it with crunchy, salty accompaniments and a few bright sides. It’s the kind of dish that invites you to hug the chips and go in for a second scoop. Here are ideas that suit different occasions:
For Breakfast: A bright start with a dollop of pico in soft breakfast tacos or on a loaded huevos rancheros plate. The dip’s creaminess pairs surprisingly well with eggs, so you can build a quick, savory brunch by spooning a little of the warm dip onto scrambled eggs or into an open-faced breakfast sandwich. A side of warm corn tortillas and a mug of strong coffee make this feel like a vacation morning.
For Brunch: Serve with warm flour or corn tortillas cut into triangles, plus a bowl of chopped lettuce, sliced avocado, and cilantro. A sparkling lime-infused waters or a light cerveza works perfectly if you’re keeping things casual but festive.
As Dessert-ish Indulgence: Believe it or not, the slight sweetness from roasted corn and a touch of salsa can pair with a scoop of vanilla ice cream for a playful, unexpected dessert dip. It’s not traditional, but it’s a conversation starter, and sometimes that’s what you want at a casual party.
For Cozy Snacks: Keep a big bowl of tortilla chips nearby, and set out sliced cucumbers, bell pepper spears, and cherry tomatoes for a refreshing contrast. The dip also makes a killer nachos topping: lay out tortilla chips, drizzle the warm fiesta dip recipe over a layering sheet, then sprinkle extra cheese and bake for another 5–6 minutes for a cheat’s nacho bake that smells like a late-night kitchen dream.
Our family tradition is to serve this with warm, soft tortilla chips and a little extra salsa on the side so guests can tailor the heat. My sister swears by spooning a small amount over a baked potato for a ‘punchy’ twist, and I admit I love a dollop on top of a crusty piece of cornbread with a drizzle of lime crema. The point is: it’s flexible, forgiving, and always a crowd-pleaser. It’s the fiesta dip recipe your gatherings deserve.
Top Tips for Perfecting Your Fiesta Dip Recipe
These tips come from years in a busy kitchen, testing and tasting until it felt just right. They’re not obstacles, just little nudges to help you get perfect results every time.
Zucchini Prep: If you decide to add grated zucchini to the filling (it’s fantastic in this dip’s heartier version), you want to squeeze as much moisture as you can before mixing. A clean towel or cheesecloth works wonders. Moisture is the enemy of a sturdy dip, so wring out every drop. Fresh zucchini adds a gentle, grassy note that complements the peppers and corn beautifully.
Mixing Advice: Don’t overmix the base after you’ve added the cheese. You want a smooth, glossy consistency, but overworking can make the dip denser and tougher to scoop. Think “soft serve” rather than “ice cream churn.” If you notice a little separation after baking, a quick whisk right before serving helps bring it back together.
Swirl Customization: The swirl is your chance to make it pretty. Use a skewer or knife to create ribbons of the bean-corn filling through the base. You can layer the colors in a ring pattern or a few bold swirls for a dramatic look. A lot of people eat with their eyes first, and this little flourish makes a big impression.
Ingredient Swaps: This recipe loves swaps. Swap in roasted red peppers for a milder profile, or add a handful of chopped fresh cilantro for brightness. If you’re avoiding dairy, you can mix a dairy-free cream cheese alternative with dairy-free sour cream and cheese. The texture will stay toothsome, and the taste stays close to the same crowd-pleasing vibe.
Baking Tips: If your oven runs hot, place the dish on the center rack and rotate halfway through baking. If you’re using a glass dish, you’ll want to temper the bake a bit—the base browns faster on glass than on metal. If you’re pressed for time, you can bake for a shorter period and finish under the broiler for 1–2 minutes to achieve that golden edge without risking drowning the filling.
Glaze Variations: The glaze is optional, but it adds a bright finish. Try swapping lime juice for lemon or a splash of orange to shift the flavor slightly. A drizzle of honey-lime glaze can also create a sweet-savory contrast that guests won’t expect but will absolutely love. If you want a more pronounced tang, add a spoonful of Greek yogurt to the glaze to thicken and brighten the acidity.
[Share personal “lessons learned” and tested modifications. I’ve learned that a little extra cheese on top before baking gives you a gorgeous, bubbly crust, and that resting 5–7 minutes after baking makes dipping easier and cleaner on the first round. If you prefer a lighter bite, reduce the sour cream by a few tablespoons and balance with a touch more salsa.]
Storing and Reheating Tips
Fiesta dip recipe stores beautifully, and reheats with surprisingly little fuss. Here’s how I keep it fresh and tasty for a couple extra servings or a next-day snack.
Room Temperature: If you’re serving it right away, you can keep the dip warm in the oven on a low setting (around 200°F/90°C) for a little while, covered with foil to keep the surface from drying. Don’t leave it out for more than 2 hours at room temperature, especially in warm kitchens, to maintain texture and safety.
Refrigerator Storage: Transfer leftovers to an airtight container within two hours of baking. The dip should stay good for 3–4 days in the fridge. Reheat gently on the stove over low heat or in the microwave in 20–30 second intervals, stirring in between so it warms evenly. If it’s too thick after reheating, whisk in a splash of milk or a tiny bit more salsa to loosen it up.
Freezer Instructions: I don’t recommend freezing the baked dip in its final form because dairy can separate and become grainy upon thawing. If you’ve got leftovers, freeze only the base components separately (cream-cheese mixture, bean filling) and assemble fresh later. It won’t have the exact same texture once thawed, but it can still taste great with fresh toppings and a quick re-bake.
Glaze Timing Advice: If you’re freezing or refrigerating, wait to add the glaze until you reheat. The glaze is best when it’s bright and fresh, and it can get a bit dull if warmed with the rest of the dish. A quick drizzle after reheating keeps that vibrant finish intact.
[In my kitchen, this approach means we can pull together a hot, comforting dip even on nights when time is tight. It’s a small trick, but it makes a big difference in how the fiesta dip recipe lands on the plate.]
Frequently Asked Questions
Final Thoughts
Fiesta dip recipe has earned a beloved spot on my kitchen counter because it feels festive without demanding a full-day effort. It’s the kind of dish you can tailor to the ingredients in your fridge, the heat your crowd tolerates, or the vibe you want for the night. The texture is comforting—the base stays rich and creamy, while the filling brings a satisfying bite with corn, beans, and a gentle kick from jalapeño. The glaze adds a finishing brightness that makes the dish feel polished, like you put in more effort than you did. I’ve shared this with neighbors, brought it to potlucks, and watched as the pan disappears in record time. If you’re craving something that tastes like celebration but is still approachable, this fiesta dip recipe is for you. I can’t wait to hear how yours turns out—tell me in the comments which swap you tried, what heat level you prefer, and what you served it with. Happy baking—and even happier dipping!
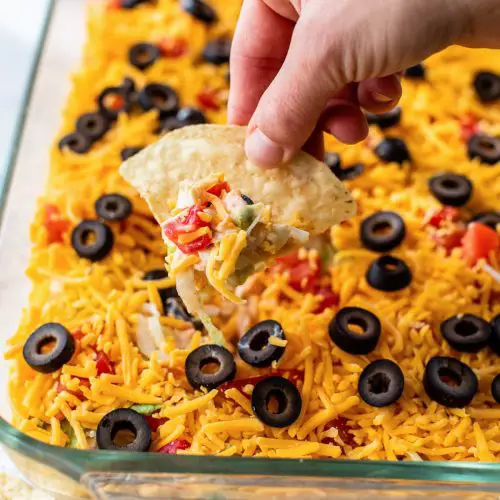
fiesta dip recipe
Ingredients
Main Ingredients
- 8 ounces cream cheese (1/3 less fat Philadelphia) softened
- 8 ounces full-fat Greek yogurt or reduced-fat sour cream, drained
- 16 ounces mild chunky salsa about 1 jar, such as Tostitos
- 1.5 tablespoons taco seasoning or half a packet of store-bought mix
- 2 cups iceberg lettuce finely shredded
- 2 medium tomatoes seeds removed and diced
- 1 cup reduced-fat shredded cheddar cheese
- 2.25 ounces sliced black olives drained
Instructions
Preparation Steps
- In a large bowl, combine cream cheese, Greek yogurt (or sour cream), salsa, and taco seasoning. Mix well with an electric mixer until smooth and fully blended.
- Spread the mixture evenly on the bottom of a large shallow glass dish to create the first creamy layer.
- Top the cream layer with shredded iceberg lettuce, distributing it evenly.
- Add diced tomatoes over the lettuce, followed by shredded cheddar cheese and finally the drained black olives.
- Serve immediately or chill up to 4 hours before serving. Pair with baked tortilla chips for dipping.
Notes
Featured Comments
“That dip looks amazing! It definitely brings back memories of fun summer gatherings. I’ll have to try this recipe soon—sounds like the perfect party snack!”
“Impressed! Clear steps and creamy results. Perfect for busy nights.”
“New favorite here — crowd-pleaser. crowd-pleaser was spot on.”
“Super easy and turned out amazing! My family asked for seconds. Saving this one.”
“This sweet treat was absolutely loved — the balanced really stands out. Thanks!”
“Made it tonight and wow — crowd-pleaser! Will definitely make Easy Layered Fiesta Dip Recipe again.”


That dip looks amazing! It definitely brings back memories of fun summer gatherings. I’ll have to try this recipe soon—sounds like the perfect party snack!