

There’s something about sitting down with a plate of homemade manicotti that just feels like a warm hug from the inside out. I still remember the first time I tasted it—my grandma’s kitchen smelled like melted cheese and fresh basil, and that gooey, savory filling just melts in your mouth. It’s one of those dishes that’s deceptively simple but feels so indulgent, like a treasure you might find in a fancy restaurant, but you can make right in your own home. Honestly, I always do this when I want something hearty but cozy, or when I have a little extra time on the weekend and want to treat my family to something special. This dish disappeared in minutes at my house—trust me, I’ve made it countless times, and it never fails to bring smiles around the table. The best part? It’s surprisingly easy to prepare, and it’s perfect for make-ahead dinners or even leftovers the next day. If you love cheesy pasta dishes that taste like a little slice of heaven, then you’re about to fall in love with this manicotti.
What is Manicotti?
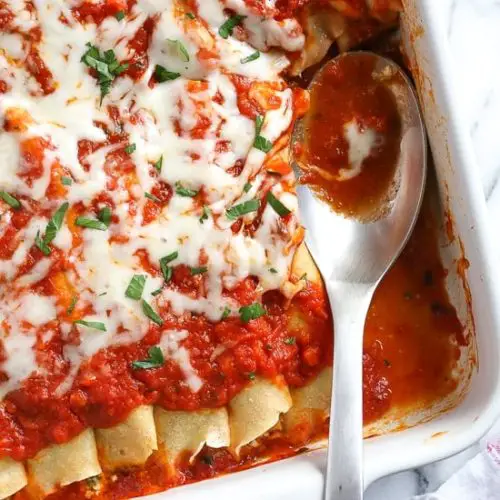
Manicotti is an Italian dish that features large pasta tubes stuffed with a rich, cheesy filling and baked until bubbly and golden. The name “manicotti” actually means “big sleeve” in Italian—pretty fitting for these oversized pasta shells! Think of it as a cozy, baked pasta casserole, but in the shape of giant, edible tubes. The magic really happens with a creamy ricotta and spinach filling or whatever variation you fancy, layered with marinara or a hearty tomato sauce, topped with melty mozzarella, and baked to perfection. Think of it as the pasta love child of lasagna and stuffed shells, but so much easier to assemble. It’s essentially pasta art—beautiful to look at, delicious enough to make anyone ask for seconds, and satisfying enough that leftovers taste just as good. Whether you’re hosting a family dinner or just craving something comforting after a long day, manicotti is your new best friend in the kitchen.
How do I make Manicotti?
Quick Overview
This manicotti recipe is all about layering flavors—stuff the pasta shells with a luscious cheese mixture, nestle them in a baking dish with marinara sauce, sprinkle with mozzarella, then bake until melty and perfectly cooked. The best part? You don’t need fancy tools or complex techniques. I always do this when I want something hearty and satisfying with minimal fuss. Just boil your shells until they’re al dente, prepare the filling, stuff away, assemble in a dish, bake, and enjoy. It’s a one-pan wonder that’s perfect for make-ahead meals or when you’re craving something nostalgic. And trust me, the smell alone is worth every second.
Ingredients
For the Main Batter:
– 12 large pasta shells (look for the best quality—you don’t want them to crack!)
– Water and salt for boiling
– Olive oil (a tiny splash to prevent sticking)
For the Filling:
– 1 ½ cups ricotta cheese (fresh and creamy)
– 1 cup shredded mozzarella (plus extra for topping)
– 1 cup chopped fresh spinach (squeeze out excess moisture)
– 1 large egg (for binding)
– 2 cloves garlic, minced
– Salt and freshly cracked black pepper to taste
– A pinch of nutmeg (because yes, it just adds a tiny hint of warmth)
For the Glaze:
– 1 cup marinara sauce (homemade or your favorite jar)
– 1 cup shredded mozzarella (for topping)
– Fresh basil or parsley for garnish (optional but recommended)
Step-by-Step Instructions
Step 1: Preheat & Prep Pan
Set your oven to 375°F (190°C). Lightly grease a baking dish—trust me, even a quick spray of cooking spray works perfectly. Bring a large pot of salted water to a boil. Toss in a splash of olive oil—this little tip helps prevent the shells from sticking together. Once boiling, carefully add your pasta shells and cook until just al dente, about 8 minutes. They’ll continue cooking in the oven, so don’t overdo it—they should still have a little bite. Drain and set aside to cool slightly.
Step 2: Mix Dry Ingredients
In a medium bowl, whisk together the ricotta, shredded mozzarella, chopped spinach, egg, garlic, salt, pepper, and nutmeg. Mix until smooth and everything is well incorporated. This filling is what makes or breaks the dish—get it creamy, flavorful, and spreadable. I always taste it here—trust me, a tiny extra pinch of salt or garlic can really bring it to life.
Step 3: Mix Wet Ingredients
No separate wet ingredients here—it’s all in the filling. Just make sure your ingredients are at room temperature so everything combines smoothly. I sometimes add a splash of milk or a drizzle of olive oil if I want a slightly creamier texture, but honestly, the ricotta mixture is perfect as is.
Step 4: Combine
Throw all your filling ingredients into the bowl and mix gently with a spatula. Avoid overmixing—just until it looks nice and uniform. Overmixing can lead to a watery filling, and nobody wants that. If it seems a little runny, just pop it in the fridge for 10 minutes to firm up—works like a charm.
Step 5: Prepare Filling
Use a small spoon or a piping bag to stuff each shell generously. I like to hold the shell in one hand and gently mound the filling with the other—slow and steady wins the race here. If you’re feeling fancy, try swirling it in with a small spatula or piping bag—you’ll get a more uniform look. Place the stuffed shells seam-side down in your prepared baking dish.
Step 6: Layer & Swirl
Once all shells are nestled in the dish, spread your marinara sauce evenly over the top. Don’t skimp—this step adds a lot of flavor and keeps everything moist. Then sprinkle a generous layer of shredded mozzarella and fresh herbs if you like. For a pretty marbled look, you can dollop a little extra sauce in spots and swirl it gently with a toothpick or knife for a rustic, marbled effect. It’s the visual touch that makes it look store-bought but even better.
Step 7: Bake
Cover with foil and bake for about 30 minutes. Then uncover and bake for another 10 minutes until the cheese is bubbly and golden. My oven sometimes runs hot or cold—so I say start checking at the 35-minute mark. When you see that the cheese is melt-y and the sauce is bubbling around the edges, it’s ready. Let it rest for 5 minutes—they’ll slice cleaner that way.
Step 8: Cool & Glaze
Gently remove from the oven and let it sit for a few minutes—this helps everything set. If you want to add an extra layer of cheesy goodness, sprinkle a little more mozzarella on top and pop it under the broiler for 2-3 minutes. Just watch it closely, so it doesn’t burn. I love garnishing with fresh basil or parsley for a pop of color and freshness.
Step 9: Slice & Serve
Use a sharp knife to cut through the shells cleanly—try to get a good-sized portion of filling with each slice. Plate it up with a side salad or some crusty bread, and enjoy! The first bite should give you that perfect balance of cheesy, saucy, and tender pasta. Trust me, you’ll want seconds—and leftovers are just as incredible reheated, maybe even better the next day.
What to Serve It With
Manicotti is a meal all on its own, but I love to round it out with a few simple sides. For breakfast or brunch, serve it with a fresh green salad—think arugula, a drizzle of balsamic, and some toasted baguette. It’s surprisingly good cold or at room temperature, so leftovers are great for a quick lunch. If you’re doing a cozy dinner, pair it with roasted vegetables or garlic bread; the crispy edges of garlic bread are my kids’ favorite pairing. For dessert, a light gelato or a simple biscotti does the trick. My family also loves to have a glass of red wine or sparkling water with a splash of lemon—that little touch makes the meal feel even more special. This dish is also perfect for potlucks or dinner parties because everyone always asks for the recipe. It’s a crowd-pleaser, I promise. Just make sure you have plenty of extra sauce to serve on the side—the more, the merrier!
Top Tips for Perfecting Your Manicotti
After making this dish dozens of times, I’ve picked up some tricks that raise it from good to downright addictive. First, when boiling your shells, don’t overcook! They should be al dente because they’ll bake in the dish, and soggy shells are no fun. To handle delicate shells, I use a slotted spoon and gently cradle them—no ripping! When it comes to filling, I’ve tested various methods, but I love piping the mixture in with a piping bag—it’s cleaner and faster. For the swirl effect, I often add a little marinara in spoonfuls on top before swirling—this gives an artistic touch that wows guests. A little tip: if your cheese mixture feels too thick or watery, adjust with a splash of milk or an extra egg. I’ve learned that texture matters. When baking, tent the dish if you notice the cheese browning too quickly—this keeps it melty and gooey. As for the glaze, experimenting with different cheeses or herbs can really customize the flavor profile. A sprinkle of grated Parmesan or a dash of red pepper flakes gives it a little kick. Honestly, the magic is in making it your own, and I’ve found that a little patience and experimentation make all the difference. Oh, and when in doubt, always taste your filling before stuffing those shells—you’re the chef, after all!
Storing and Reheating Tips
This dish stores beautifully, which makes it perfect for leftovers or to prep ahead. Once cooled, cover your manicotti tightly with foil or transfer to an airtight container and keep it in the refrigerator for up to three days. I personally like to reheat it in the oven at 350°F until warmed through, about 20 minutes—cover it loosely with foil to prevent the cheese from drying out. For longer storage, it freezes incredibly well. Just wrap it tightly in plastic wrap, then foil, and keep for up to three months. When you’re ready to enjoy it again, thaw overnight in the fridge and reheat in the oven as mentioned. If you like your cheese super gooey, sprinkle a little extra mozzarella before reheating. Just remember, the fresher it is, the softer and tastier the shells will be. As for the sauce, I usually keep it separate during storage and spoon it over hot slices for maximum flavor and freshness. If you want to add the glaze or cheese topping later, do so just before baking to keep everything looking and tasting fresh. Honestly, leftovers taste just as incredible—maybe even better—because all those flavors have time to marry. And the smell when reheating? Divine.
Frequently Asked Questions
Final Thoughts
There’s something undeniably special about homemade manicotti—how a handful of simple ingredients can come together to create such a comforting, flavorful masterpiece. It’s one of those recipes that feels like a warm welcome to anyone sitting at your table. Over the years, I’ve tweaked and played with my fillings, experimented with different sauces, and learned little tricks that make it even easier and more delicious. Honestly, it’s one of those dishes I can’t recommend enough—whether you’re celebrating a special occasion or just want to enjoy a cozy night in. Once you master the basics, the possibilities are endless, and your home will smell like happiness. Give it a try, and I bet your family will be asking for this on repeat—mine sure do! Happy baking, and I can’t wait to hear how yours turns out. Drop a comment below with your variations or questions—I love hearing from fellow food lovers!
manicotti
Ingredients
Main Ingredients
- 16 pieces homemade crespelles
- 15 oz part skim ricotta cheese
- 2 cups shredded part-skim mozzarella cheese reserve 1/2 cup
- 1 large egg
- 10 oz frozen spinach thawed and squeezed well
- 0.25 cup Parmesan cheese
- 0.5 teaspoon kosher salt
- to taste black pepper
- 2.5 cups marinara sauce jarred or homemade
Instructions
Preparation Steps
- Start by making the crespelles (see recipe link above).
- Preheat oven to 375°F.
- In a large bowl, combine ricotta, 1 cup of mozzarella, egg, spinach, Parmesan, salt, and pepper.
- Fill each crespelle with 1/4 cup spinach filling and roll.
- In a baking dish, pour 1 cup of sauce on the bottom. Arrange rolled manicotti seam side down. Top with 1-1/2 cups of sauce and remaining cheese.
- Cover with foil and bake for about 25 minutes until hot, bubbling, and cheese is melted.
- *Use a substitute for vegetarian Parmesan if needed.
Notes
Featured Comments
“Impressed! Clear steps and crowd-pleaser results. Perfect for busy nights.”
“New favorite here — turned out amazing. crowd-pleaser was spot on.”
“Super easy and turned out amazing! My family asked for seconds. Saving this one.”
“This sweet treat was absolutely loved — the rich really stands out. Thanks!”
“Made it tonight and wow — turned out amazing! Will definitely make Easy Stuffed Pasta Tubes Recipe again.”
“Packed with flavor and so simple. Exactly what I wanted from Easy Stuffed Pasta Tubes Recipe.”


