

There are some recipes that just feel like a warm hug, you know? The kind that transport you back to happy memories, or make a regular Tuesday feel like a special occasion. For me, those are my fruit kabobs. They’re not just a pretty snack; they’re pure joy, ready to eat. Honestly, I think everyone needs a foolproof recipe for fruit kabobs in their back pocket, especially when you’re trying to get a little more fresh goodness into your life without a whole lot of fuss. It’s like a Fruit Salad’s cooler, more adventurous cousin, and I’ve spent years perfecting this version. Forget those sad, mushy fruit salads that end up forgotten in the fridge; these fruit kabobs are vibrant, engaging, and always a hit, whether it’s a picnic, a kid’s birthday party, or just a sunny afternoon craving. They’re honestly way easier than they look, and the payoff is huge!
What are fruit kabobs?
So, what exactly are fruit kabobs? At their heart, they’re just pieces of your favorite fruits, artfully threaded onto skewers. Think of it as edible art you can eat! The name itself, “kabobs,” brings to mind grilled meats and veggies, but in this case, we’re swapping savory for sweet, and grills for… well, anything that holds a skewer! It’s a playful way to present fruit, making it instantly more appealing, especially to little ones (and let’s be honest, adults love them just as much!). The beauty of fruit kabobs is their absolute simplicity and adaptability. There are no complex techniques, no obscure ingredients – just fresh, delicious fruit, transformed by a simple skewer into something exciting. It’s fruit, but make it fun!
How to Make Fruit Kabobs
Quick Overview
The entire process is beautifully straightforward. We’re talking about washing, chopping, and threading fruit onto skewers. That’s it! The magic lies in selecting the right fruits, preparing them so they hold up well, and arranging them in a visually appealing way. It’s a no-cook wonder that delivers maximum impact with minimal effort, perfect for when you want something delightful without heating up the kitchen.
Ingredients
For the Fruit Medley:
The beauty of fruit kabobs is that you can use whatever you love! My absolute favorites include:
- Strawberries: Look for firm, bright red ones. Hulling them (removing the green tops) is essential.
- Melon (Cantaloupe, Honeydew, Watermelon): These add bulk and sweetness. I like to cut them into cubes or use a melon baller for fun shapes. Seedless varieties are a huge time-saver!
- Grapes (Seedless): Red or green, they’re perfect as-is. Just make sure they’re washed well.
- Pineapple: Fresh pineapple adds a wonderful tropical tang. Cut it into bite-sized chunks. Canned can work in a pinch, but fresh is always best for texture and flavor.
- Blueberries: These are perfect for adding a pop of color and are super easy to just thread on.
- Kiwi: Peeled and sliced into rounds or half-moons, kiwi adds a lovely green color and a slightly tart flavor.
- Mandarin Oranges/Clementines: Peeled and separated into segments, these are always a hit.
- Raspberries: Delicate, so I often add these closer to serving time or thread them very gently.
For Serving (Optional but Recommended!):
For Dipping:
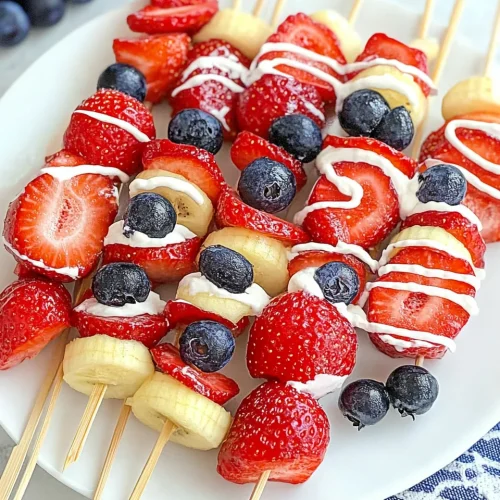
A simple Greek yogurt or a light honey-lime dip can elevate these fruit kabobs to a whole new level. Sometimes I’ll even mix a little Vanilla Extract into plain yogurt.
- Plain Greek Yogurt
- A drizzle of honey or maple syrup
- A squeeze of fresh lime or lemon juice
Step-by-Step Instructions
Step 1: Wash and Prep Your Fruit
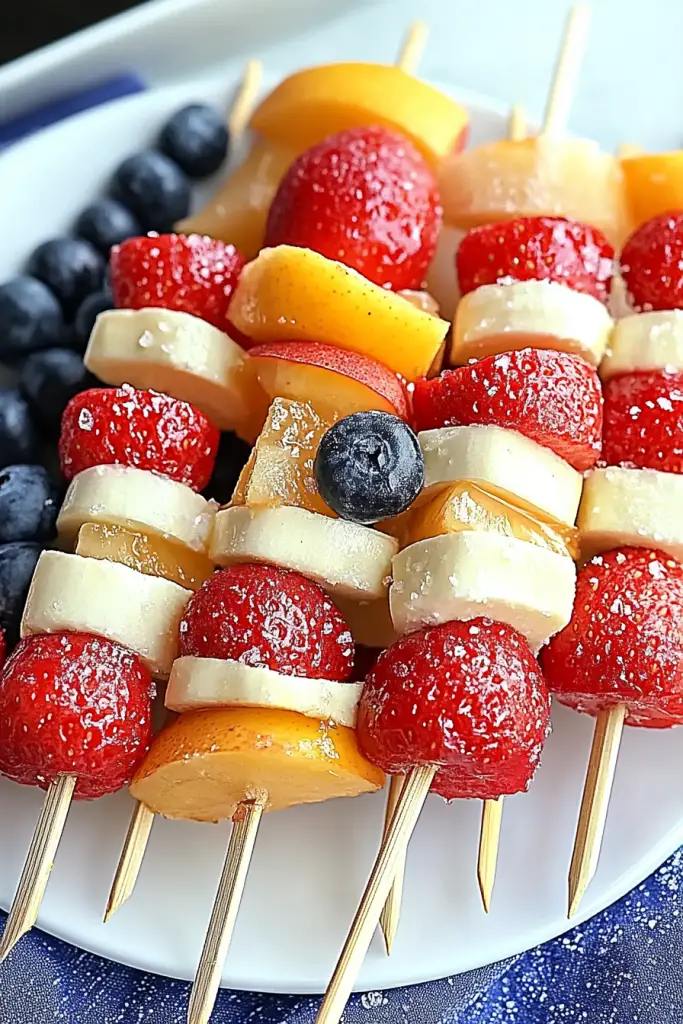
This is the most crucial step for food safety and ensuring your fruit looks its best. Gently wash all your fruits under cool running water. For berries and grapes, a colander is your best friend. Pat them dry very gently with a clean kitchen towel or paper towels. It’s important they’re dry so they don’t slide off the skewers. Then, prepare your larger fruits: hull the strawberries, chop melon and pineapple into roughly uniform, bite-sized cubes (about 1-inch pieces work best), peel and slice kiwi, and peel orange segments. The uniform size is key for easy threading and eating!
Step 2: Gather Your Skewers
You’ll need skewers for this! Bamboo skewers are my go-to. If you’re using wooden skewers, especially for kids, it’s a really good idea to soak them in water for about 20-30 minutes beforehand. This prevents the wood from splintering and potentially burning if you were to ever grill them (though these are raw!). Regular metal skewers work too, but be mindful of sharp ends, especially around children.
Step 3: Start Threading Your Fruit
This is where the fun really begins! Start by threading your firmer fruits onto the skewer first. For example, a grape or a piece of melon can act as a good base. Then, alternate colors and textures. Think about creating a visually appealing pattern. I often like to start with something sturdy like a melon chunk, then a strawberry, then maybe a grape, then a pineapple chunk, and so on. Don’t be afraid to get creative! My kids love making their own patterns, and it’s a great way to get them involved. Make sure to leave a little space at the end of the skewer so you have something to hold onto.
Step 4: Arrange and Chill
Once all your fruit kabobs are assembled, you can arrange them on a platter or a baking sheet lined with parchment paper (this makes cleanup a breeze!). Cover them loosely with plastic wrap and pop them in the refrigerator. Chilling them for at least 15-20 minutes really helps to meld the flavors and makes them wonderfully refreshing. This step also helps keep the fruit firm before serving.
Step 5: Prepare Your Dipping Sauce (Optional)
While the kabobs are chilling, whip up your dipping sauce if you’re using one. In a small bowl, combine Greek yogurt with a drizzle of honey or maple syrup and a squeeze of fresh lime or lemon juice. Stir until smooth and creamy. Taste and adjust sweetness or tanginess as needed. You can also add a tiny pinch of cinnamon or vanilla extract for extra flavor.
Step 6: Serve and Enjoy!
Arrange your beautiful fruit kabobs on a serving platter. Place the dipping sauce in a small bowl alongside. These are best served fresh, so aim to assemble them within a few hours of serving for the best taste and texture. Watch them disappear!
What to Serve It With
Fruit kabobs are incredibly versatile and can be the star of the show or a delightful accompaniment to so many meals and occasions!
For Breakfast: These are a fantastic addition to a lazy weekend breakfast or brunch spread. Serve them alongside pancakes, waffles, or French Toast. They add a burst of freshness that balances out richer dishes beautifully. A cup of coffee or a glass of fresh orange juice pairs perfectly. Presentation-wise, I love arranging them upright in a tall glass or vase for a festive look.
For Brunch: Elevate your brunch game with a colorful platter of fruit kabobs. They’re a lovely, light option alongside quiches, mini muffins, or even a savory Breakfast Casserole. For a more elegant presentation, you can use smaller skewers or even arrange them in a fan shape on the plate. Sparkling water with a slice of fruit or a mimosa are delightful beverage pairings.
As Dessert: Who needs a heavy cake when you have these vibrant fruit kabobs? They are the perfect light, refreshing dessert after a hearty meal. Serve them with a dollop of whipped cream, a drizzle of chocolate sauce (if you’re feeling decadent!), or alongside a scoop of sorbet or light vanilla Ice Cream. They’re naturally sweet and satisfying.
For Cozy Snacks: This is my personal favorite! On a warm afternoon, or even for an after-school treat, fruit kabobs are pure perfection. They’re healthy, satisfying, and require zero guilt. I often serve them with a side of yogurt dip for a little extra protein and creaminess. My family devours these, and it’s a fantastic way to ensure everyone gets their fruit intake without any complaints. Sometimes we’ll even have a “kabob decorating party” where everyone designs their own!
My family traditions often involve these during summer barbecues – they’re so easy to take along and offer a healthy alternative to chips and dips. I also love them for packing in lunchboxes; the kids find them so much more exciting than a regular bowl of fruit!
Top Tips for Perfecting Your Fruit Kabobs
Over the years, I’ve picked up a few tricks that make my fruit kabobs consistently amazing. These little tweaks really do make a difference!
Fruit Selection: The absolute key is using ripe, but not overripe, fruit. Overripe fruit can be mushy and fall apart. Conversely, underripe fruit won’t be sweet enough. For fruits like melons, look for ones that feel heavy for their size and have a sweet aroma. For berries, make sure they are firm and free from mold. I always aim for a good mix of colors and flavors – sweet, tart, soft, and firm. It’s all about balance!
Uniform Cutting: While it might seem like a small detail, cutting your fruits into similar, bite-sized pieces is crucial. It makes them easier to thread onto the skewers, ensures even freezing if you decide to go that route, and makes them easier to eat in one or two bites. Aim for pieces that are roughly 1-inch cubes or slices. This also helps with presentation, making them look more professional and appealing.
Skewer Soaking: I can’t stress this enough if you’re using wooden skewers. Soaking them in water for at least 20-30 minutes is a game-changer. It prevents the wood from splintering, which can ruin the aesthetic and even be a bit of a hazard. It also makes them less likely to catch fire if they accidentally come into contact with a heat source, though these are best enjoyed raw.
Threading Technique: When you’re threading the fruit, start with a firmer piece like a melon chunk or a firm strawberry. This gives you a good base to work with. Then, alternate textures and colors. For example, a soft berry might do well nestled between firmer pieces of pineapple or melon. Don’t overcrowd the skewer; leave a little space at the end for gripping. I also like to ensure the pieces are snug but not squashed, so they don’t burst.
Ingredient Swaps: Feeling adventurous? You can absolutely play around with the fruit! Stone fruits like peaches, plums, and nectarines are wonderful when in season, just make sure to pit them and cut them into chunks. Cherries, with their pits removed, add a lovely burst of color and flavor. If you’re looking for a tropical vibe, add mango or papaya. For a sweeter note, consider adding chunks of firm banana (though these are best added right before serving as they can brown quickly). If you don’t have skewers, sturdy toothpicks can work for smaller portions, or you can simply create a fruit salad. My kids actually love making “rainbow” kabobs, picking fruits for each color of the rainbow!
Chill Factor: Always, always chill your assembled fruit kabobs for at least 15-20 minutes before serving. This isn’t just about making them refreshing; it helps the fruit firm up slightly and the flavors to meld. It makes them taste so much better and prevents them from getting too messy when handled. If you live in a really hot climate, you might even want to chill them for a bit longer.
Dipping Delights: While delicious on their own, a simple dipping sauce can truly elevate your fruit kabobs. My go-to is a Greek yogurt dip, but you can also try a light cream cheese-based dip, a fruit-infused yogurt, or even a simple honey-lime drizzle. The key is not to overpower the natural fruit flavors. I’ve experimented with a chocolate fondue-style dip too, which is a huge hit for parties!
Storing and Reheating Tips
Fruit kabobs are definitely best enjoyed fresh, but sometimes you’ll have leftovers, or you might want to prep them a little in advance. Here’s how to keep them tasting their best.
Room Temperature: I honestly recommend serving these as soon as possible after assembling. If you’ve just assembled them and dinner is an hour or two away, you can leave them on a platter, loosely covered with plastic wrap, on the counter. However, avoid leaving them out for more than 2-3 hours, especially in warmer weather, as the fruit can start to soften and potentially become a breeding ground for bacteria. The sugars in the fruit can also attract unwanted guests!
Refrigerator Storage: If you have leftovers or want to prep them a few hours ahead, the refrigerator is your best bet. Arrange the assembled kabobs on a baking sheet lined with parchment paper and cover tightly with plastic wrap or place them in an airtight container. They’ll generally stay good for about 1-2 days. The texture of some fruits (like melon) might soften slightly over time, but they’ll still be perfectly edible and delicious. I find that fruits like grapes and berries hold up the best.
Freezer Instructions: You *can* freeze fruit kabobs, but it’s a bit of a different experience. For the best results, freeze them individually on a baking sheet until solid, then transfer them to a freezer-safe bag or container. They’re great for using in smoothies later on, or for a frozen treat on a hot day. However, the texture will change significantly upon thawing – they’ll become much softer and more watery, similar to how thawed frozen berries behave. So, while technically possible, they won’t have the same crisp, fresh appeal as their refrigerated counterparts. They’re better for blending than for eating directly off the skewer after thawing.
Glaze Timing Advice: If you plan on glazing your fruit kabobs (which is more common for baked fruit desserts, but you could adapt it for a fun twist!), I highly recommend glazing them right before serving. A glaze will often make the fruit softer and stickier, and it won’t store as well. For fresh fruit kabobs, any dips or sauces are best served on the side. If you *do* want to add a drizzle of something like honey or a yogurt-based glaze directly onto the fruit, do it just before you serve them to maintain the best texture.
Frequently Asked Questions
Final Thoughts
There you have it – my absolute favorite fruit kabobs recipe! I truly believe this is more than just a simple snack; it’s a celebration of fresh, vibrant flavors and a wonderfully fun way to enjoy nature’s candy. It’s a recipe that brings people together, sparks creativity, and always leaves a smile on everyone’s face. Whether you’re looking for a healthy treat, a party pleaser, or just a way to brighten up your day, these fruit kabobs deliver every single time. They are proof that sometimes, the simplest things are the most delicious. If you love this recipe, you might also enjoy my Rainbow Fruit Salad, which offers a similar explosion of color and taste. I can’t wait to hear about your fruit kabob creations! Don’t be shy about sharing your favorite fruit combinations or any fun variations you come up with in the comments below. And please, rate this recipe if you try it – your feedback means the world to me!
Fruit Kabobs
Ingredients
Main Ingredients
- 1 cup Strawberries hulled and quartered
- 1 cup Blueberries
- 1 cup Raspberries
- 1 cup Green Grapes halved if large
- 1 cup Cantaloupe cubed
- 1 cup Honeydew Melon cubed
Instructions
Preparation Steps
- Wash all fruits thoroughly.
- Prepare the fruits: hull and quarter strawberries, halve large grapes, and cube the melons.
- Thread the fruits onto skewers in a colorful pattern, alternating between different types of fruit.
- Arrange the fruit kabobs on a platter and serve immediately.
Notes
Featured Comments
“Impressed! Clear steps and turned out amazing results. Perfect for busy nights.”
“New favorite here — crowd-pleaser. crowd-pleaser was spot on.”
“Super easy and turned out amazing! My family asked for seconds. Saving this one.”
“This sweet treat was absolutely loved — the fresh really stands out. Thanks!”
“Made it tonight and wow — perfect for busy nights! Will definitely make Fruit kabobs again.”
“Packed with flavor and so simple. Exactly what I wanted from Fruit kabobs.”


