

If there’s one dish that instantly takes me back to childhood Sunday dinners at my grandma’s house, it’s pastitsio. That perfect Greek comfort food, all layered and fragrant, with baked pasta and a creamy béchamel that makes everything better. I remember walking into her kitchen and smelling that rich, cheesy, slightly toasted topping wafting through the air — it’s honestly like a warm hug from someone you love. Over the years, I’ve messed around with different versions, but this one’s my tried-and-true. It’s surprisingly simple to pull together, especially on busy weeknights when I need something hearty but don’t want to spend hours fussing in the kitchen. Plus, my kids ask for this practically every week — it’s become our family favorite, and I love serving it up with a big fresh salad. Trust me on this — once you master pastitsio, it’ll be one of those recipes you keep in your back pocket for when you want to impress without hassle. Ready to dive in?
What is Pastitsio?
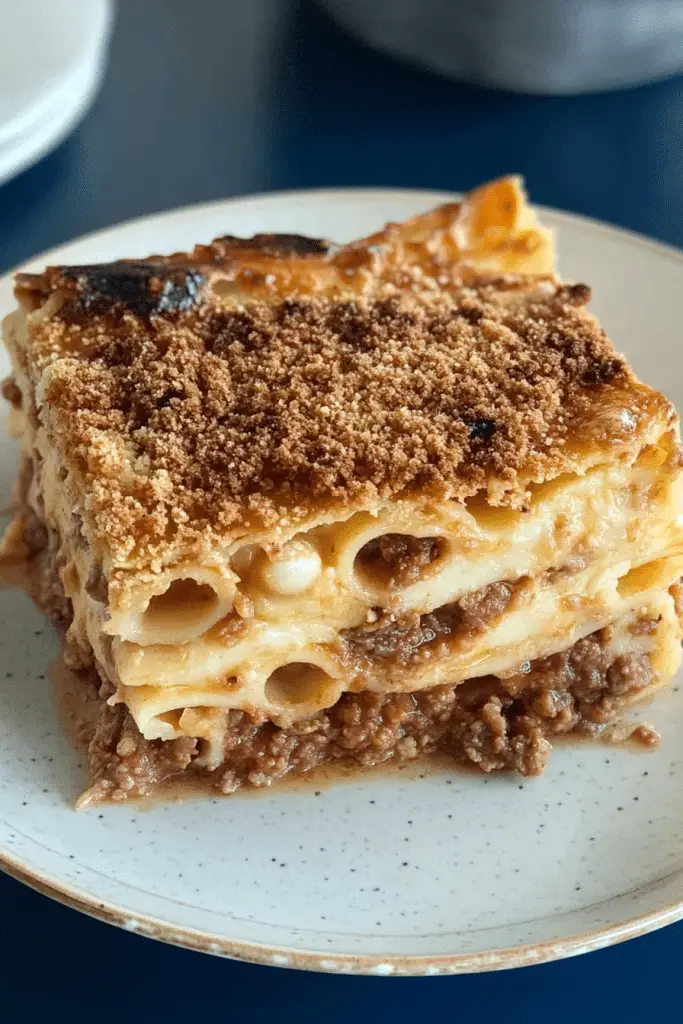
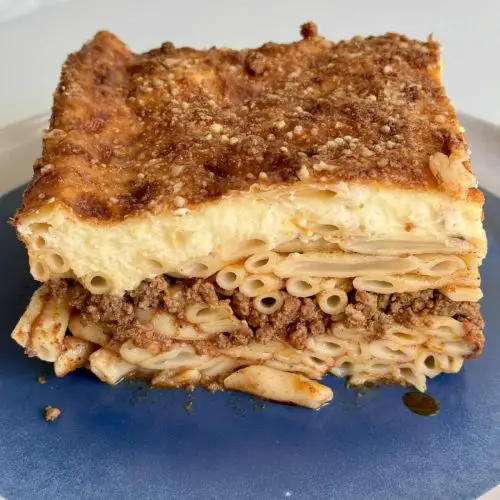
Think of pastitsio as Greece’s answer to lasagna, but with its own unique charm and flavor profile. The name comes from the Greek word “patsá,” meaning “layered thing,” which honestly suits it perfectly because this dish is all about those beautiful, hearty layers. It’s essentially baked pasta topped with a rich, velvety béchamel sauce and baked until golden. The ground meat sauce, usually seasoned with cinnamon, allspice, and herbs, gives it that warm, slightly spicy kick that keeps everyone coming back for more. It’s a dish that’s comforting, filling, and a little fancy—perfect for family dinners or entertaining friends. What I love about pastitsio is its versatility: you can make it ahead of time, reheat it, and it actually tastes even better the next day. It’s like a delicious reunion in every bite!
How do I make Pastitsio?
Quick Overview
This pastitsio recipe is all about layering flavor—start by cooking your pasta and meat sauce separately, then layer everything in a baking dish. Whip up a quick béchamel, pour it over the assembled layers, and bake until bubbling and golden. It’s surprisingly straightforward, and I find that the hardest part is just waiting for it to come out the oven! What makes this method special is that it’s almost foolproof—once you get the layers right, the oven does the rest. In under an hour, you’ll have a beautiful, fragrant dish that’s perfect for sharing—and the smell alone will have everyone circling the kitchen.
Ingredients
For the Main Batter:
• 1 pound (450g) pasta—traditionally long pasta like bucatini or ziti works beautifully, but penne is a great alternative.
• 2 tablespoons olive oil
• Salt, for pasta water
For the Filling:
• 1 pound (450g) ground beef or lamb
• 1 small onion, finely chopped
• 2 cloves garlic, minced
• 1 can (14 oz) crushed tomatoes or tomato sauce
• 1 teaspoon cinnamon
• 1/2 teaspoon allspice
• Salt and pepper to taste
• Optional: a splash of red wine or a pinch of cayenne for extra depth
For the Glaze:
• 2 cups whole milk
• 2 tablespoons all-purpose flour
• 2 tablespoons butter
• 1/4 teaspoon nutmeg
• 1 large egg, beaten
• 1/2 cup grated Parmesan or kefalotyri cheese
• Salt and white pepper to taste
• A pinch of turmeric or paprika for color (optional)
Step-by-Step Instructions
Step 1: Preheat & Prep Pan
Start by preheating your oven to 375°F (190°C). Lightly grease a 9×13-inch baking dish with butter or oil. This just keeps the layers from sticking and makes cleanup easier. Boil water seasoned generously with salt for your pasta, and get the other ingredients ready—chop the onion, garlic, and gather all your spices in advance. I always do this so I’m not scrambling later; it makes the whole process smoother.
Step 2: Mix Dry Ingredients
Not much in this step, but it’s worth mentioning: take your pasta out of the box and get the water boiling. You want it to be salty like the sea — that’s where most of the flavor starts. I don’t overthink this part; just make sure the water is at a lively boil before tossing the pasta in. It’s my little trick for perfectly cooked pasta every time.
Step 3: Mix Wet Ingredients
Here’s where I get friendly with my measuring cups. Mix the crushed tomatoes, cinnamon, allspice, salt, and pepper in a bowl. For the meat, sauté the chopped onion and garlic in a tablespoon of olive oil until fragrant and translucent—trust me, this step *really* deepens the flavor. Then add in the ground meat, browning it nicely. Pour in the tomato sauce and let it simmer for about 10 minutes. I like to add a splash of red wine if I have it, just to give it a richer taste.
Step 4: Combine
Once your pasta is al dente, drain and set aside. Mix a bit of olive oil into the pasta so it doesn’t stick together. In your prepared baking dish, spread half the pasta, cover with the meat sauce, then layer the remaining pasta on top. Don’t worry if the layers aren’t perfect—this is rustic comfort food, after all! Gently press down so everything stays in place, then set aside while you make the béchamel sauce.
Step 5: Prepare Filling
For the béchamel, melt the butter over medium heat, then whisk in the flour until smooth and bubbling but not browned (about 1 minute). Gradually add the milk, whisking constantly to avoid lumps—this is a little arm workout, but so worth it. When the sauce thickens, stir in the nutmeg, salt, and pepper. Remove from heat, then temper in the beaten egg (add a few spoonfuls of hot sauce into the egg first to prevent curdling). Mix in the cheese, and you’ve got a silky, cheesy topping ready for its bake.
Step 6: Layer & Swirl
Pour the béchamel evenly over the layered pasta and meat, then use a spoon or spatula to swirl it slightly, creating beautiful marbled effects. This swirl makes it look so fancy! Sprinkle a little extra cheese on top if you like, and maybe an extra pinch of paprika for color. Pop the dish into your oven and bake for about 40-45 minutes—until bubbling and golden on top.
Step 7: Bake
Keep an eye on it as it bakes. I usually start checking around the 40-minute mark; the edges should be crispy, and the top nicely browned. If it’s not quite there yet but smells amazing, give it another 5 minutes or so. Remember, every oven is a little different, so trust your nose and eye. When it’s done, remove from the oven and let it rest for at least 10 minutes. This helps it set and makes slicing super neat.
Step 8: Cool & Glaze
Once it’s had some time to rest, it’s time for the finishing touch. If you like, drizzle a little extra béchamel or sprinkle some freshly grated cheese over the slices. It’s gorgeous when it’s still warm but not piping hot—serving it too fresh can make the layers slide apart. This is when I usually sneak a taste—can’t resist that cheesy, savory aroma!
Step 9: Slice & Serve
Using a sharp knife, cut into squares or rectangles. Serve this with a simple green salad or roasted vegetables. I love offering a lemony Greek salad alongside—refreshing and balancing against the richness of the pastitsio. Or, if I’m feeling extra indulgent, I’ll add a dollop of Greek yogurt or a squeeze of lemon on top. This dish is even better the next day, so don’t be afraid to make it ahead. Just reheat gently in the oven or microwave to preserve that crispy topping—and trust me, leftovers disappear in minutes.
What to Serve It With
My favorite way to serve pastitsio is with a simple, tangy Greek salad—think ripe tomatoes, crisp cucumbers, red onions, and a drizzle of good olive oil and lemon juice. It cuts through the richness of the pasta beautifully. Sometimes, I serve it with roasted vegetables like zucchini and eggplant, especially if I want a more veggie-packed dinner. For brunch or casual get-togethers, I slice it up and offer it alongside warm pita bread and a cold glass of white wine or ouzo—it’s an instant mood booster. And on a busy weeknight, I love its versatility: leftovers make great lunch boxes, and it reheats beautifully, maintaining its cheesy charm. This dish has become my go-to for comfort and nostalgia, and I love hearing my family’s happy sighs when I bring it to the table. It’s one of those recipes everyone loves, and once you get the hang of it, it’s almost like a personalized signature dish.
Top Tips for Perfecting Your Pastitsio
Over the years, I’ve picked up a few tricks to make this dish flawless every time. Here are my favorites:
Zucchini Prep: If you want to sneak in some veggies or replace the pasta with zucchini noodles, do this: grate the zucchini, sprinkle with a little salt, and let it sit for about 10 minutes to draw out excess moisture. Squeeze out the liquid with a clean towel—it helps prevent sogginess in your final bake.
Mixing Advice: Be gentle when combining the pasta with the meat sauce. You want everything coated but not squished into a mush. Also, avoid overmixing the béchamel—fold in the egg gently to keep it airy. That way, your topping stays light and fluffy rather than dense.
Swirl Customization: Get creative with the swirl—try dusting cinnamon or paprika in the béchamel before pouring, or sprinkle fresh herbs like oregano or thyme for extra flavor. The visual pop always impresses guests! I’ve even added a scattering of toasted pine nuts on top once—delicious.
Ingredient Swaps: If you’re dairy-free, try coconut milk and vegan cheese for the béchamel. It won’t be exactly like the original, but it’s still pretty tasty. For a leaner version, use ground turkey or chicken instead of beef.
Baking Tips: Always bake on the middle rack for even heat. If you notice it browning too fast, turn down the oven slightly. And if you’re making this in advance, skip glazing the top until ready to serve—it keeps the crust crispy.
Glaze Variations: Instead of béchamel, some folks love topping the pastitsio with a drizzle of herbed garlic butter or a sprinkle of crumbled feta. Play around—you might find a new favorite twist!
Trust me, after a few tries, you’ll get the rhythm down. I learned a lot after burning the first batch—like not to overbake and to let it rest—but now it’s totally foolproof. The secret is patience and tasting along the way. That savory, cheesy, cinnamon-scented aroma is always worth the effort!
Storing and Reheating Tips
Leftovers are practically gold with pastitsio. Here’s how I handle storing everything to keep it tasting fresh.
Room Temperature: It’s best to enjoy it within 2 hours of baking. After that, bacteria can start to set in, especially in warm weather, so I recommend refrigerating.
Refrigerator Storage: Cover the dish tightly with foil or transfer slices to an airtight container. This way, it stays moist and flavorful for about 3-4 days. I like to cut out individual portions so I can reheat smaller amounts easily.
Freezer Instructions: Wrap slices tightly in plastic wrap and then aluminum foil. Label with date—you can freeze for up to 2 months. To reheat, thaw overnight in the fridge and bake at 350°F (180°C) until hot and bubbly, about 20-25 minutes. The top might need an extra sprinkle of cheese to revive its crispiness.
Glaze Timing: If you’re planning to reheat, I suggest leaving the béchamel off until just before serving. Add a fresh layer and lightly toast it in the oven for that perfect golden crust. This keeps the top from turning soggy in storage.
Frequently Asked Questions
Final Thoughts
If you ask me, pastitsio is one of those recipes that feels fancy but is really just a love letter to home cooking. From its layered pasta to that creamy, cheesy topping, every bite is a reminder of family gatherings, shared stories, and comfort that reaches deep. I’ve made this countless times — sometimes with lamb, sometimes with turkey, and even the occasional vegan version— and it’s always a hit. It’s perfect when you want a dish that’s hearty enough to feed a crowd or just spoils your family with pure deliciousness. The best part? Once you get the hang of layering and timing, it’s almost foolproof. So go ahead, give it a try, and don’t forget to share your variations—bonus points if you send me a photo of your masterpiece! Happy baking, and I can’t wait to hear how yours turns out!
pastitsio
Ingredients
Main Ingredients
- 1 lb pastitsio pasta
- 0.33 cup parmesan cheese
- 0.25 tsp ground nutmeg
- 2 pieces eggs (beaten)
- 0.25 cup olive oil
- 1 medium onion (diced)
- 2 lbs ground beef
- 3 tbsp tomato paste
- 15 oz diced tomatoes (canned)
- 1 cinnamon stick cinnamon
- 6 pieces cloves
- 6 pieces allspice
- 1 tbsp sugar
- 0.25 tsp salt and pepper
- 4 tbsp butter
- 0.5 cup all purpose flour
- 0.75 tsp salt
- 6 cups whole milk (warmed)
- 2 pieces eggs (beaten)
- 0.33 cup parmesan cheese (grated)
Instructions
Preparation Steps
- Cook pasta just almost al dente in salted water. Reserve 2 cups pasta water. Toss pasta with parmesan, nutmeg, and eggs; set aside.
- In a large pot, heat olive oil. Add onion and sauté until translucent, about 3 minutes. Add ground beef; cook until no longer pink. Mix in tomato paste, diced tomatoes, spices, sugar, and salt and pepper. Add 2 cups of pasta water; simmer for 30 minutes, stirring occasionally.
- In a medium pot, melt butter over medium-high heat. Whisk in flour. Gradually add warm milk, whisking constantly. Season with salt. Bring to a boil, cook 2 minutes until thickened. Whisk in beaten eggs, cook 2 more minutes.
- Preheat oven to 420°F. Transfer half of pasta to a 9x13 baking dish. Spread meat sauce evenly on top, then remaining pasta. Pour béchamel over pasta, spread evenly. Sprinkle with grated parmesan cheese.
- Bake for 45-50 minutes until golden. Cool for 20 minutes before slicing.
Notes
Featured Comments
“Love this! Pastitsio is such a comforting dish—always hits the spot. Thanks for sharing the easy way to make it at home.”
“Impressed! Clear steps and absolutely loved results. Perfect for busy nights.”
“New favorite here — super easy. crowd-pleaser was spot on.”
“Super easy and turned out amazing! My family asked for seconds. Saving this one.”
“This sweet treat was absolutely loved — the rich really stands out. Thanks!”
“Made it tonight and wow — crowd-pleaser! Will definitely make Greek Baked Pasta How to Make It Easy again.”


Love this! Pastitsio is such a comforting dish—always hits the spot. Thanks for sharing the easy way to make it at home.