

Oh, you guys, I am SO excited to finally share this recipe with you! It’s the kind of dish that just screams comfort and happiness, you know? I remember the first time I made this harvest Pasta Salad. It was a crisp autumn afternoon, the leaves were doing their thing outside, and I was looking for something hearty yet fresh for a potluck. Honestly, I was feeling a bit uninspired, kind of in a food rut, and I wanted something that felt a little special but wouldn’t take all day. This harvest pasta salad was an absolute revelation! It’s got this perfect balance of sweet, savory, and a little bit tangy, and the textures are just divine. It’s become my go-to for everything from casual weeknight dinners to fancy-ish gatherings. It’s way better than your average pasta salad, which can sometimes feel a bit… well, predictable. This one’s got layers of flavor that keep you coming back for more. It’s the kind of recipe that makes people ask, “What’s in this?!” every single time.
What is Harvest Pasta Salad?
So, what exactly makes this dish my go-to harvest Pasta Salad? Think of it as a celebration of all things cozy and seasonal, all tossed together in a wonderfully creamy dressing. It’s essentially a pasta salad that’s been given a serious autumn makeover. Instead of the usual summery veggies, we’re leaning into the bounty of fall: think roasted root vegetables, maybe some sweet corn, and a delightful blend of herbs. The “harvest” part really comes from using ingredients that are at their peak during the cooler months, giving it a depth of flavor that’s just unmatched. It’s not just about the ingredients, though. It’s the way they all come together – the tender pasta, the slightly sweet roasted veggies, the crunch from something nutty, all coated in this luscious dressing. It’s familiar enough to be comforting, but with enough interesting twists to feel new and exciting. It’s basically autumn in a bowl!
How do I make a Pasta Salad?
Quick Overview
The process for this harvest pasta salad is wonderfully straightforward. We start by roasting a medley of fall vegetables until they’re tender and slightly caramelized, which really brings out their natural sweetness. While they’re doing their thing in the oven, you’ll cook your favorite pasta. Then, it’s all about whisking together a simple yet flavorful dressing that ties everything together. Finally, you’ll toss it all gently to coat. It’s a meal that feels gourmet but is genuinely easy to pull off, even on a busy weeknight. It’s all about letting the ingredients shine!
Ingredients
For Roasted Vegetables:
2 medium carrots, peeled and diced (about 1.5 cups) – I always look for carrots that are firm and bright orange, they just roast up so beautifully.
1 medium Sweet Potato, peeled and diced (about 2 cups) – Make sure they’re uniform in size so they cook evenly.
1 small red onion, cut into wedges – Red onion adds a lovely sweetness and color when roasted.
2 tablespoons olive oil – Extra virgin, if you have it, for the best flavor.
1/2 teaspoon salt
1/4 teaspoon black pepper
For the Pasta:
12 ounces short pasta, such as rotini, fusilli, or penne – I find that shapes with nooks and crannies are best for holding onto the dressing and little bits of veggies.
1/4 cup chopped fresh parsley, for garnish (optional)
For the Dressing:
1/4 cup olive oil
2 tablespoons apple cider vinegar – This is key for that lovely tang!
1 tablespoon Dijon mustard – It emulsifies the dressing and adds a little zing.
1 teaspoon honey or maple syrup (optional, for a touch of sweetness) – I sometimes skip this if my sweet potatoes are particularly sweet.
1 clove garlic, minced – Fresh garlic is a must!
1/4 teaspoon salt
1/8 teaspoon Black Pepper
Optional Add-ins:
1/2 cup crumbled feta or goat cheese – For a creamy, salty kick.
1/4 cup toasted pumpkin seeds or chopped pecans – For a delightful crunch!
1/2 cup cooked and crumbled bacon – Because, bacon!
1 cup cooked chickpeas or white beans – For added protein and fiber.
Step-by-Step Instructions
Step 1: Preheat & Prep Pan
First things first, get your oven preheated to 400°F (200°C). This high heat is perfect for getting those vegetables nicely roasted and slightly caramelized. Grab a large baking sheet – I usually just use one, but if yours is small, you might need two. Line it with parchment paper if you want super easy cleanup, though it’s not strictly necessary. Spread out your diced carrots, sweet potato, and red onion wedges onto the baking sheet in a single layer. Drizzle everything with the 2 tablespoons of olive oil, then sprinkle with 1/2 teaspoon salt and 1/4 teaspoon pepper. Give it all a good toss right there on the pan to make sure everything is evenly coated. This is important for even roasting!
Step 2: Mix Dry Ingredients
This step is pretty straightforward. You’ve already seasoned your vegetables on the pan, so there are no separate dry ingredients to mix for the roasting part! The only other “dry” element is the pasta, which we’ll get to in a moment. The key here is just ensuring your vegetables have a good coating of oil and seasoning before they hit the oven. It really makes a difference in the final flavor.
Step 3: Mix Wet Ingredients
Now, let’s whip up that glorious dressing. In a small bowl or a jar with a lid, combine the 1/4 cup olive oil, apple cider vinegar, Dijon mustard, and minced garlic. If you like a touch of sweetness to balance the tang, now’s the time to add the honey or maple syrup. Add the 1/4 teaspoon salt and 1/8 teaspoon pepper. If you’re using a jar, just pop the lid on and shake it all up until it’s well combined and emulsified. If you’re using a bowl, a whisk works perfectly. You want it to be smooth and creamy-looking. Taste it and adjust seasoning if needed – maybe a pinch more salt or a splash more vinegar. This dressing is what brings the whole harvest pasta salad together.
Step 4: Combine
Okay, so the “combine” here refers to bringing together the cooked pasta and the roasted vegetables. While your vegetables are roasting (they’ll need about 25-30 minutes, flipping halfway through), cook your pasta according to package directions until it’s perfectly al dente. You don’t want mushy pasta here! Drain it well and let it sit for a minute or two. Once the vegetables are tender and looking lovely and slightly browned, carefully remove them from the oven. In a large mixing bowl, combine the drained pasta and the roasted vegetables. If you’re adding cheese or nuts, you can throw those in now too. Give it a gentle toss.
Step 5: Prepare Filling
In this recipe, the “filling” is essentially the combination of your roasted vegetables and any optional add-ins you choose. The roasted vegetables are the star! Make sure they are cooked until fork-tender and slightly golden. If you’re adding cheese, crumble it evenly over the warm pasta and vegetable mixture. If you’re adding toasted pumpkin seeds or nuts, sprinkle those on for that wonderful texture. The beauty of this harvest pasta salad is how customizable it is. I often find myself adding whatever looks good in my fridge or pantry! The goal is just to have a delightful mix of textures and flavors ready to be dressed.
Step 6: Layer & Swirl
There’s no real “layering” or “swirling” in the traditional sense for this harvest pasta salad, as it’s more of a tossed salad. However, the “layering” of flavors happens when you pour that delicious dressing over the warm pasta and vegetables. So, once you have your pasta and roasted veggies in your large mixing bowl, and any optional add-ins are tossed in, it’s time for the dressing. Drizzle about three-quarters of the dressing over the mixture. Gently toss everything together using large spoons or tongs, ensuring every piece of pasta and vegetable gets coated in that yummy dressing. You can then add more dressing if you like it saucier. The “swirl” comes from the way the different colors and ingredients are beautifully mixed together. It creates a visually appealing dish that’s just as delicious as it looks.
Step 7: Bake
You don’t bake the pasta salad itself! The baking step is solely for the vegetables. They go into the oven at 400°F (200°C) for about 25-30 minutes, or until they are tender and have those lovely caramelized edges. You’ll want to give them a flip about halfway through the baking time to ensure they cook evenly on all sides. Keep an eye on them – oven temperatures can vary, so trust your own oven. The goal is tender, slightly sweet, beautifully roasted vegetables that will make this harvest pasta salad truly special.
Step 8: Cool & Glaze
There’s no glaze to add to this harvest pasta salad! The “glaze” is essentially the dressing coating everything. Once you’ve tossed the pasta and roasted vegetables with the dressing, you can serve it immediately while it’s still warm, or let it come to room temperature. It’s also delicious chilled! The dressing will continue to meld with the ingredients as it sits, so if you’re making it ahead, it’s even better. Just make sure it’s well-covered in the fridge if you’re chilling it. For serving, I like to garnish with fresh parsley for a pop of green. It really brightens everything up!
Step 9: Slice & Serve
This harvest pasta salad is best served warm, at room temperature, or chilled. If serving warm, just give it a good stir after tossing with the dressing. If serving at room temperature or chilled, it’s actually even better after a bit of time for the flavors to meld, so making it a few hours ahead is a fantastic idea. To serve, scoop generous portions into bowls or onto a platter. Garnish with fresh chopped parsley for a lovely pop of color and freshness. If you’ve added nuts or seeds, they’ll provide a nice textural contrast. It’s a dish that looks as inviting as it tastes, and it’s always a crowd-pleaser!
What to Serve It With
This harvest pasta salad is so incredibly versatile, it can be dressed up or down for practically any occasion! For breakfast, while it might sound a little unusual, a small portion alongside some scrambled eggs or a perfectly poached egg can be surprisingly delicious, especially if you’ve added some crumbled bacon. The savory elements really complement morning meals. When it comes to brunch, it’s an absolute star. Serve it in a nice serving bowl, perhaps with a sprinkle of edible flowers for a touch of elegance. It pairs beautifully with quiches, mini frittatas, and of course, mimosas or a good cup of coffee. As a dessert… well, not really a dessert, but if you’re craving something satisfying and comforting on a cool evening, this is perfect. It’s hearty enough to be a main dish for a light supper. For cozy snacks, it’s fantastic as a side for grilled chicken or pan-seared salmon. It’s also wonderful stuffed into pita pockets or served alongside a warm loaf of crusty bread. My family often requests this with some simple grilled sausages during the fall. It’s just that kind of universally loved dish that fits in anywhere!
Top Tips for Perfecting Your Harvest Pasta Salad
Let’s talk about making this harvest pasta salad absolutely perfect, every single time. It’s all about a few little tricks I’ve picked up over the years. First, when it comes to the zucchini prep, if you’re adding it (which I sometimes do!), make sure to salt it and let it drain for about 15-20 minutes. This draws out excess moisture, so your salad isn’t watery. Pat it dry thoroughly before adding it to the mix. For mixing advice, always use a large bowl! It makes tossing so much easier, and you won’t end up with dressing or ingredients splattering everywhere. When you combine the pasta, roasted veggies, and dressing, be gentle. You want to coat everything, not mash it. Use two large spoons or a pair of tongs and lift and fold the ingredients rather than stirring vigorously. If you’re feeling fancy, swirl customization can be fun. If you add a different colored vegetable, like roasted red peppers, you can try to distribute them evenly for visual appeal. For ingredient swaps, feel free to get creative! If you don’t have sweet potatoes, butternut squash is a fantastic substitute. Carrots can be swapped for parsnips if you like a slightly different flavor profile. If you’re not a fan of feta, a sharp cheddar or even a creamy blue cheese can be lovely. For baking tips, ensure your oven is properly preheated. If your vegetables are browning too quickly on top, you can loosely tent the baking sheet with foil. And don’t be afraid to roast them a little longer if they aren’t quite tender – that slight char adds a lot of flavor! Finally, glaze variations are less about “glaze” and more about the dressing. If you want a creamier dressing, you can whisk in a tablespoon or two of Greek yogurt or sour cream. For a spicier kick, a pinch of red pepper flakes in the dressing is delicious. These little things really make a difference!
Storing and Reheating Tips
One of the best things about this harvest pasta salad is how well it stores. For room temperature storage, I’d say it’s best enjoyed within 2 hours if it has any dairy like cheese in it. Otherwise, if it’s just veggies and dressing, it can sit out for a bit longer, but I always err on the side of caution. For refrigerator storage, this is where it truly shines. Once cooled, transfer the pasta salad to an airtight container. It will stay wonderfully fresh in the fridge for 3 to 4 days. The flavors actually get better as it sits, which is always a win in my book! If you’re freezing, I’d honestly recommend freezing the components separately if possible, or just freezing a portion without any cheese. It can last in the freezer for about 1-2 months. When thawing, do it in the refrigerator overnight. For reheating, I usually prefer to serve this harvest pasta salad at room temperature or slightly chilled, so reheating isn’t often necessary. However, if you do want it warm, you can gently warm it in a saucepan over low heat or in the microwave in short bursts, stirring occasionally. Be careful not to overcook it, especially if you have cheese in it. The glaze timing advice is simple: add your dressing just before serving or about an hour beforehand to let it meld, but if you’re storing for more than a day, you might want to reserve a little dressing to toss in before serving to perk it up. It’s all about maintaining that freshness and delicious flavor!
Frequently Asked Questions
Final Thoughts
So there you have it, my absolutely favorite harvest pasta salad! I really hope you give this a try. It’s more than just a recipe for me; it’s a taste of home, of cozy evenings, and of simple joys. It’s proof that a few good ingredients, prepared with a little love, can create something truly magical. It’s that perfect dish that makes everyone happy, whether you’re a seasoned cook or just starting out. The way the sweet roasted vegetables meld with the tender pasta and the tangy dressing is just *chef’s kiss*. If you love this, you might also enjoy my Creamy Butternut Squash Soup or my Roasted Brussels Sprouts with Balsamic Glaze – they have that same wonderful fall vibe! I can’t wait to hear what you think once you make it. Please, please let me know in the comments below how yours turned out, if you added any special twists, or what your family thought. Your feedback truly makes my day! Happy cooking, everyone!
Harvest Pasta Salad
Ingredients
Main Ingredients
- 0.5 pound Rotini pasta
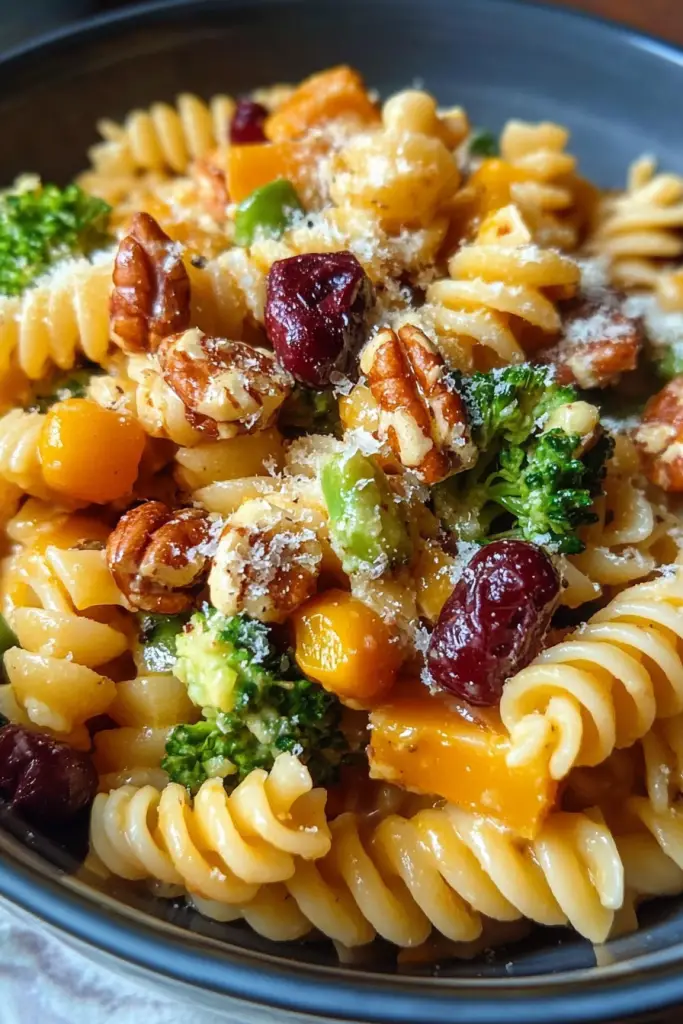
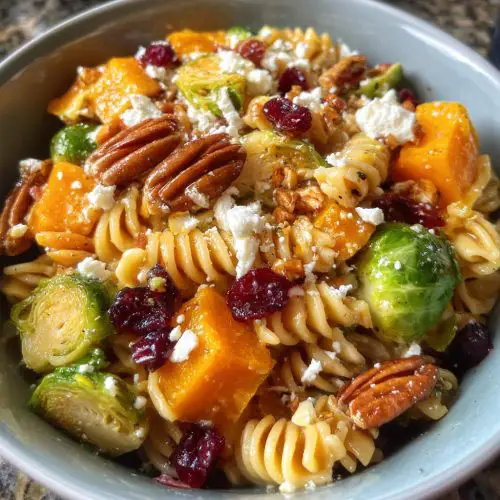
- 1 cup Butternut squash, peeled and diced about 0.5 inch cubes
- 1 cup Broccoli florets
- 0.5 cup Dried cranberries
- 0.25 cup Pecans, chopped toasted
- 0.5 cup Feta cheese, crumbled
Dressing Ingredients
- 0.33 cup Olive oil
- 3 tablespoon Apple cider vinegar
- 1 teaspoon Dijon mustard
- 0.5 teaspoon Maple syrup
- 1 clove Garlic, minced
- 0.25 teaspoon Salt
- 0.125 teaspoon Black pepper
Instructions
Preparation Steps
- Cook pasta according to package directions. Drain and rinse with cold water.
- While pasta is cooking, steam or boil the diced butternut squash and broccoli florets until tender-crisp. Drain well.
- In a small bowl, whisk together the olive oil, apple cider vinegar, Dijon mustard, maple syrup, minced garlic, salt, and pepper until well combined.
- In a large bowl, combine the cooked pasta, butternut squash, broccoli, dried cranberries, and toasted pecans.
- Pour the dressing over the salad and toss gently to coat all ingredients.
- Gently fold in the crumbled feta cheese.
- Chill for at least 30 minutes before serving to allow the flavors to meld.
Notes
Featured Comments
“Impressed! Clear steps and spot on results. Perfect for busy nights.”
“New favorite here — super easy. crowd-pleaser was spot on.”
“Super easy and turned out amazing! My family asked for seconds. Saving this one.”
“This sweet treat was absolutely loved — the light really stands out. Thanks!”
“Made it tonight and wow — family favorite! Will definitely make Harvest pasta salad again.”
“Packed with flavor and so simple. Exactly what I wanted from Harvest pasta salad.”


