

Kung Pao Chicken (Better Than Takeout!)
We have all been there. It is a busy weeknight, you are staring blankly into the fridge, and that takeout menu on the counter is looking awfully tempting. But before you pick up the phone to order your usual, let me share a little secret with you. You can make an absolutely killer Kung Pao Chicken right in your own kitchen, and I promise you, it is going to blow that local delivery spot out of the water! Seriously, this homemade version is bold, wonderfully saucy, and perfectly balanced with garlic, ginger, and just the right kick of heat.
The first time I made this, my family actually thought I had secretly ordered in. It takes just about 50 minutes from start to finish—most of that being hands-off marinating time—and uses simple ingredients you probably already have tucked away in your pantry. No mystery sauces, no waiting for a delivery driver, just fresh, vibrant, mouth-watering food that you completely control. Grab your skillet, because tonight, we are making takeout history.
What Is Kung Pao Chicken?
If you have never had the pleasure of digging into a steaming bowl of Kung Pao Chicken, you are in for a serious treat. Originally hailing from the Sichuan province of China, this classic dish is famous for its signature spicy, sweet, and savory flavor profile. It is a stir-fry masterpiece that traditionally brings together tender marinated chicken, crunchy peanuts, and fiery dried red chilies, all tossed in a deeply savory sauce that coats every single bite.
What makes Kung Pao Chicken so incredibly special is the balance. It is not just about blowing your head off with spice! The heat from the chilies is beautifully mellowed out by a touch of brown sugar and a splash of tangy rice vinegar. You get this gorgeous harmony of umami from the soy sauce, warmth from fresh ginger and garlic, and a delightful textural contrast between the soft, juicy chicken and the satisfying crunch of roasted peanuts. While authentic Sichuan versions use peppercorns for a numbing effect, this homemade American-Chinese takeout style focuses on accessible ingredients that still deliver that punchy, crave-worthy flavor we all know and love.
How to Make Kung Pao Chicken
Quick Overview
Making this Kung Pao Chicken is all about a little bit of prep work leading to a fast, exciting stir-fry finish. You will start by whisking together a simple, flavor-packed sauce made of soy sauce, cornstarch, brown sugar, rice vinegar, and sesame oil. A couple of tablespoons of this liquid gold goes right over your diced chicken to work its marinating magic while you chop your veggies. Once your ingredients are prepped, it is a quick sizzle in a hot skillet. We cook the bell peppers until they are just tender, brown the chicken until it is beautifully golden, and then bring everything back together with crunchy peanuts, aromatics, and the rest of our savory sauce. It simmers for just a few minutes until it transforms into a thick, glossy masterpiece.
Ingredients
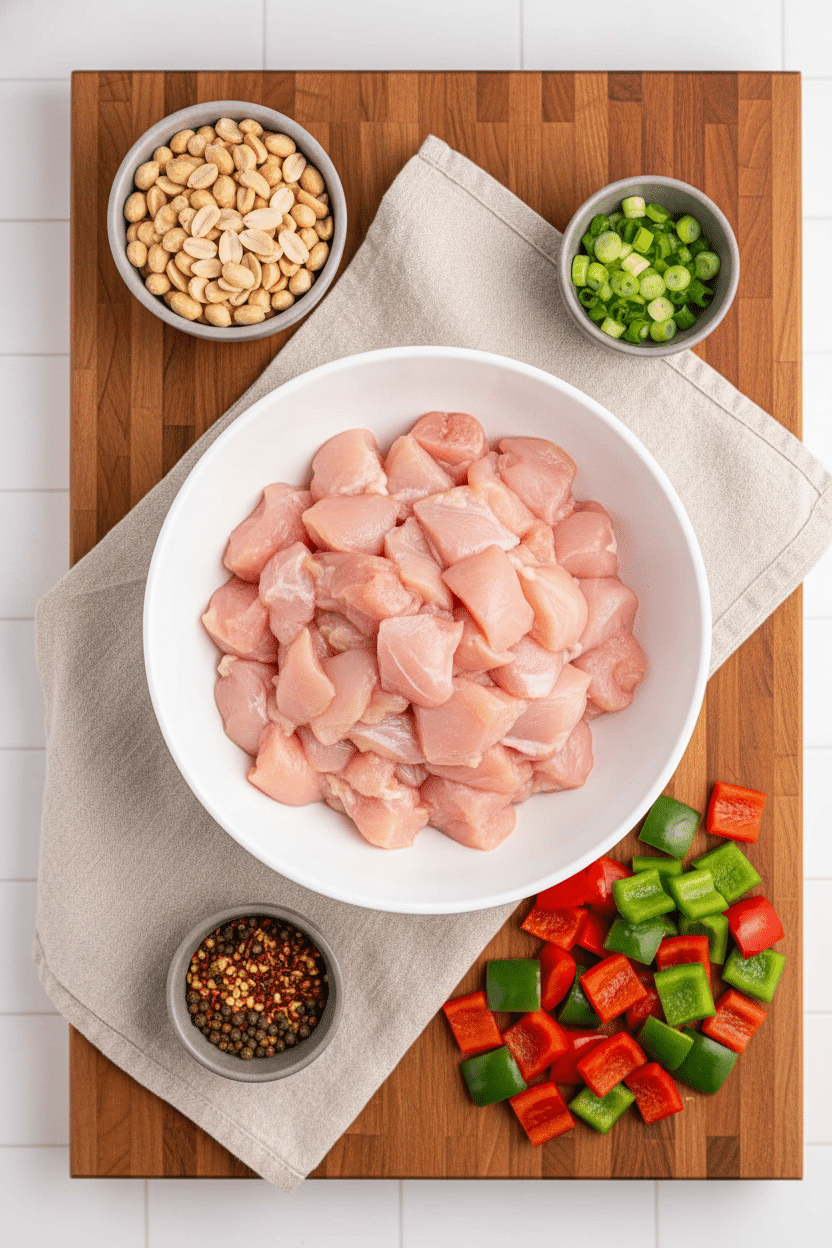
- 1.5 pounds boneless skinless chicken breasts: Cut into bite-sized pieces for quick, even cooking.
- 3 tablespoons soy sauce: The classic umami base. Use low-sodium if preferred!
- 2-3 teaspoons cornstarch: Thickens the sauce beautifully.
- 3 tablespoons brown sugar: Balances the heat and salt with a touch of sweetness.
- 2 tablespoons rice vinegar: Adds the perfect bright tang.
- 1 tablespoon sesame oil: For that essential nutty, toasty flavor.
- 1/3 cup water: Thins the sauce just enough to coat everything perfectly.
- 1-2 tablespoons vegetable oil: Any neutral oil works for frying.
- 1 red bell pepper & 1 green bell pepper: Deseeded and cubed for color and crunch.
- 3-4 cloves garlic & 2 teaspoons ginger: Minced fresh for the best aromatic punch.
- 1/2 cup dry roasted peanut halves: Lightly salted works great here.
- 5 dried red chili peppers: Deseeded, but leave some seeds if you love the heat!
- 3/4 teaspoon red pepper flakes: Optional, adjust to your spice preference.
- Sliced green onions: A fresh, zippy garnish to finish.
Step-by-Step Instructions
Step 1: Mix the Sauce & Marinate
Start by adding your diced chicken to a large bowl. In a separate small bowl, whisk together the soy sauce and cornstarch until perfectly smooth. Stir in the brown sugar, rice vinegar, and sesame oil until everything is fully combined. Scoop out 2 tablespoons of this sauce and pour it over the chicken. Let it sit for 15 minutes to soak up those flavors. To the remaining sauce in the small bowl, add the water, give it a stir, and set it aside for later.
Step 2: Sauté the Veggies
Once the chicken has marinated, heat a large skillet over medium-high heat. Drizzle in a little vegetable oil and toss in your cubed bell peppers. Cook for 3 to 5 minutes until they start to soften but still have a nice bite to them. Add in the minced garlic and ginger, and sauté for another minute until your kitchen smells amazing. Scoop the veggies into a clean bowl and set aside.
Step 3: Cook the Chicken & Toast Peanuts
Add a little more oil to the same skillet if needed. Toss in the marinated chicken and cook for about 4 to 5 minutes until it is golden and cooked all the way through. Stir in the peanuts and dried red chilies, cooking for one more minute. Keep things moving in the pan so nothing burns!
Step 4: Combine and Simmer
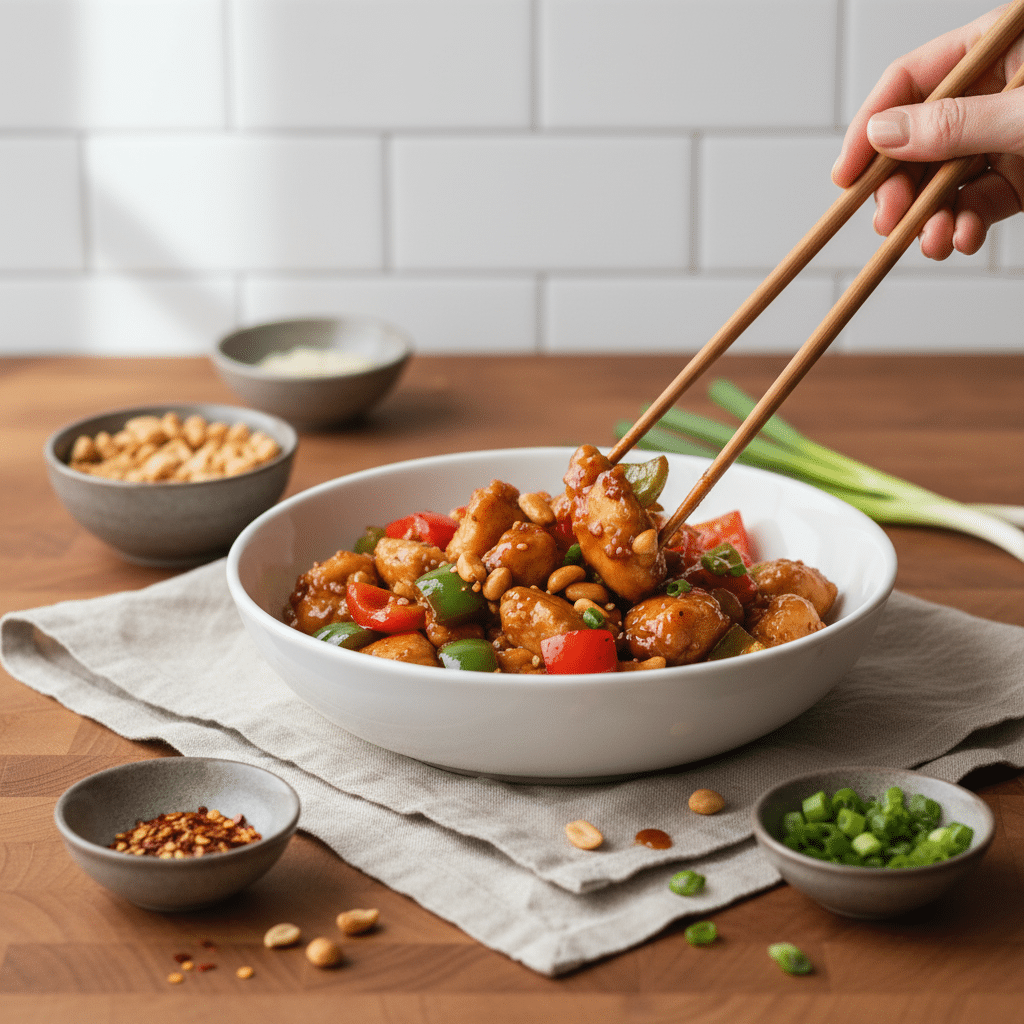
Bring your sautéed veggies back into the skillet with the chicken. Pour in the reserved sauce mixture and sprinkle over your red pepper flakes. Stir everything well to combine, reduce the heat slightly, and let it simmer gently for 3 to 4 minutes. Watch as the sauce thickens into a glossy, sticky perfection.
Step 5: Garnish and Serve
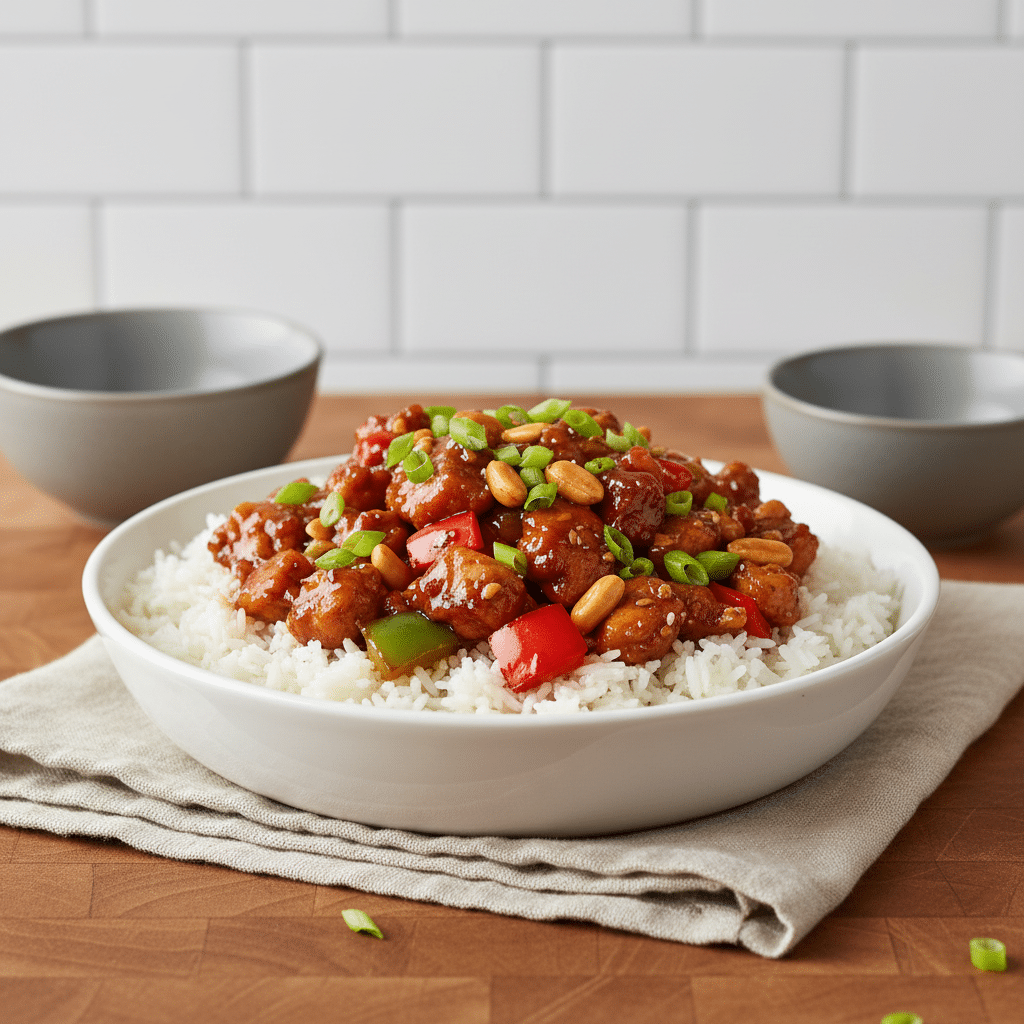
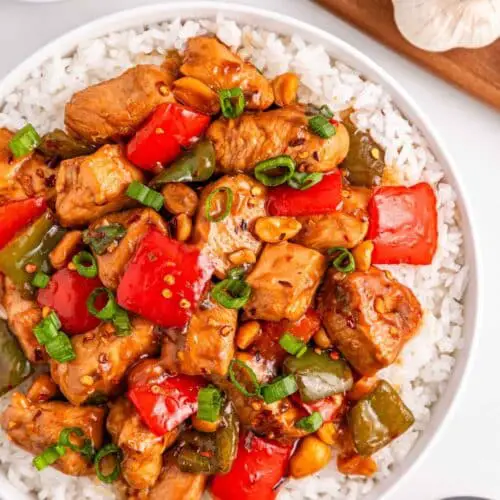
Remove from heat, top generously with sliced green onions, and serve immediately over a bed of fluffy white rice. Enjoy your homemade takeout!
What to Serve It With
You really cannot go wrong with how you serve this saucy goodness. My absolute favorite way is spooning it generously over a big bowl of fluffy white rice—it acts like a sponge, soaking up every last drop of that incredible sauce. If you want something a bit more wholesome, brown rice or quinoa are fantastic options that add a lovely nutty flavor. Watching your carbs? Cauliflower rice works beautifully here and keeps things light.
For my noodle lovers, try tossing the finished stir-fry with some cooked udon, rice noodles, or even simple spaghetti for a fun, slurpable twist. And if you are looking for a lighter, crunchy option, scooping this savory chicken mixture into crisp lettuce cups is ridiculously fun and makes for a great lunch the next day!
Top Tips for Perfecting Your Kung Pao Chicken
Prep ahead of time: Stir-frying moves fast! Make sure all your veggies are chopped, aromatics are minced, and your sauce is fully mixed before you even turn on the stove. This keeps the cooking process stress-free.
Control your sauce consistency: If you love a really thick, sticky sauce, use the full 3 teaspoons of cornstarch. Just a heads up, the sauce will continue to thicken as it sits. If it gets a little too gloopy, simply stir in a splash of warm water to loosen it right back up.
Play with the protein: While boneless, skinless chicken breasts are classic and lean, boneless chicken thighs work wonderfully here if you prefer a juicier, richer bite.
Nut alternatives: If peanuts are not your thing, roasted cashews are a phenomenal substitute. Need it entirely nut-free? Toss in some sliced water chestnuts! They give you that essential satisfying crunch without the nuts.
Storing and Reheating Tips
This dish makes absolutely phenomenal leftovers because the flavors actually deepen as they sit in the fridge overnight! To store, let the chicken and veggies cool completely to room temperature. Transfer everything into an airtight container and pop it in the fridge, where it will stay fresh and delicious for up to 3 days.
When you are ready to enjoy it again, reheating is a breeze. You can gently warm it in a skillet over medium-low heat—just add a tiny splash of water if the sauce has thickened up too much in the fridge to help it coat the chicken again. Alternatively, a minute or two in the microwave works perfectly for a quick, satisfying desk lunch.
Frequently Asked Questions
Final Thoughts
Making your own takeout favorites at home is such a rewarding experience, and this Kung Pao Chicken is the perfect recipe to prove just how easy it can be. From the tender, flavor-packed chicken to the vibrant veggies and that irresistible sweet-and-spicy sauce, it is a dish that brings so much joy to the dinner table. I honestly cannot wait for you to try this one out in your own kitchen. It has saved me from the takeout rut more times than I can count, and I know it will do the same for you. Give it a go, tweak the heat to your liking, and enjoy every single bite. Happy cooking, friends!
Kung Pao Chicken
Ingredients
Main Ingredients
- 1.5 pounds boneless skinless chicken breasts cut into bite-sized pieces
- 3 tablespoons soy sauce
- 2.5 teaspoons cornstarch depending on how thick you want the sauce
- 3 tablespoons brown sugar
- 2 tablespoons rice vinegar
- 1 tablespoon sesame oil
- 0.33 cup water
- 1.5 tablespoons vegetable oil for frying
- 1 red bell pepper deseeded and cut into cubes
- 1 green bell pepper deseeded and cut into cubes
- 3.5 cloves garlic minced
- 2 teaspoons ginger minced or grated
- 0.5 cup dry roasted peanut halves I used lightly salted
- 5 dried red chili peppers deseeded (you can leave some seeds for more spice, if desired)
- 0.75 teaspoon red pepper flakes or to desired spice
- Sliced green onions for garnish
Instructions
Preparation Steps
- Start by adding your diced chicken to a large bowl.
- In a separate small bowl, whisk together the soy sauce and cornstarch until smooth. Stir in the brown sugar, rice vinegar, and sesame oil until everything’s fully combined. Scoop out 2 tablespoons of that sauce and pour it over the chicken to marinate—just enough to give it some flavor before the stir fry action begins. Let it sit for 15 minutes while you prep the rest.
- To the bowl with the remaining sauce, add the water and give it a good stir. Set it aside—we’ll come back to this later.
- Once the chicken’s had its soak, heat a large skillet over medium-high heat. Drizzle in a little oil and toss in your bell peppers. Cook for 3–5 minutes until they start to soften but still have a bit of bite. Add in the garlic and ginger, and sauté for another minute or two until fragrant. Scoop everything into a clean bowl and set aside.
- Add a bit more oil to the same skillet if needed. Then add the marinated chicken and cook for about 4–5 minutes, or until it’s cooked through and golden. Stir in the peanuts and dried red chilis and cook for one more minute—keep things moving so nothing burns.
- Bring the veggies back to the party, pour in the reserved sauce, and sprinkle over some red pepper flakes (use your judgment on heat!). Stir well to combine, reduce the heat, and let it all simmer gently for 3–4 minutes until the sauce thickens to a glossy perfection.
- Top with sliced green onions and serve over a bed of fluffy white rice. So good!
Featured Comments
“I remember the first time I made this — it was messy but so worth it! That aroma really does feel like home.”
“I remember my first time trying Kung Pao Chicken—such a bold, flavorful dish! The spice level really hits different now.”
“Impressed! Clear steps and perfect for busy nights results. Perfect for busy nights.”
“New favorite here — absolutely loved. crowd-pleaser was spot on.”
“Super easy and turned out amazing! My family asked for seconds. Saving this one.”
“This sweet treat was absolutely loved — the cozy really stands out. Thanks!”


I remember my first time trying Kung Pao Chicken—such a bold, flavorful dish! The spice level really hits different now.
I remember the first time I made this — it was messy but so worth it! That aroma really does feel like home.