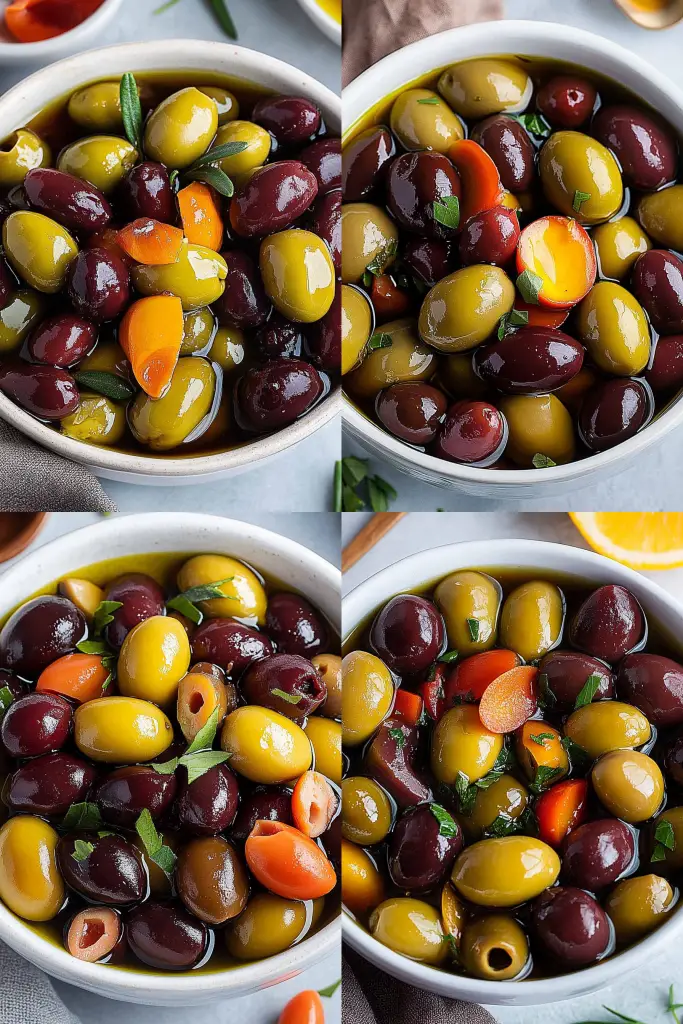
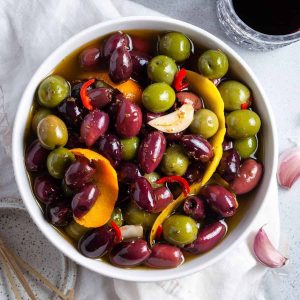
I remember the first time I truly understood the magic of simple, good food. It wasn’t some fancy, Michelin-star meal, but rather a small bowl of plump, glistening olives sitting on my grandmother’s kitchen counter. They weren’t just any olives; they were *her* marinated olives, infused with garlic, herbs, and a hint of citrus. The aroma alone was intoxicating, a fragrant promise of the burst of flavor that awaited. Every time I pop one of those little gems into my mouth, it transports me back to those sun-drenched afternoons, the gentle clinking of her ceramic bowls, and the feeling of being utterly cherished. This recipe isn’t just about olives; it’s about capturing that feeling, that warmth, and sharing it. It’s my go-to when I need something utterly delicious with minimal fuss, a true lifesaver on those evenings when the fridge feels suspiciously empty but the craving for something savory hits hard. Forget those bland, store-bought versions; this is how you make marinated olives that sing with flavor, turning an ordinary appetizer into something truly special. It’s a simple alchemy that transforms humble olives into little jewels of deliciousness.
What is a marinated olive?
So, what exactly are marinated olives? At its heart, it’s a celebration of one of nature’s most perfect little fruits. Think of it as giving good quality olives a spa treatment. We take them from their brine (or sometimes oil), drain them well, and then let them soak up a beautiful bath of olive oil, garlic, fresh herbs, and a touch of something bright, like lemon zest or a splash of vinegar. It’s not complicated at all; it’s essentially allowing the olives to absorb all these wonderful flavors, becoming more complex and incredibly moreish. My Nonna used to say it was like letting them “take a little vacation” in the oil. This isn’t about cooking them, but about infusing them with all these delicious aromatics, making them soft, plump, and bursting with goodness. It’s the kind of thing that looks and tastes incredibly sophisticated but is so ridiculously easy to put together, which is precisely why I adore it so much. It’s the perfect example of how a few well-chosen ingredients can elevate something simple into something extraordinary.
How to Make Marinated Olives
Quick Overview
This recipe is all about infusing great olives with bright, aromatic flavors. You’ll simply combine your favorite olives with a fragrant blend of olive oil, garlic, herbs, and a touch of citrus. Let them sit and mingle for at least a few hours (or even better, overnight!), and you’ll have a jar of incredibly delicious marinated olives ready to go. It’s the kind of recipe that requires more patience than effort, letting time do the heavy lifting to transform simple ingredients into something truly special. It’s perfect for those times you need an impressive appetizer with minimal kitchen time.
Ingredients
For the Olives:
For the best results, I always opt for good quality, pitted olives. My personal favorites are Kalamata, Castelvetrano, or a good mixed Italian variety. You’ll want about 2 cups (around 10-12 ounces). If you can find them “from the olive bar” at a good deli or market, even better – they usually have a fresher taste. Make sure to drain them really well! Any excess brine can dilute the marinade.
For the Marinade:
* Extra Virgin Olive Oil: About 1/2 cup. Use a good quality one you love the taste of; it really shines through. Don’t skimp here!
* Garlic: 2-3 cloves, thinly sliced. I love the little slivers of garlic that soften in the oil. You can mince it if you prefer a more diffused garlic flavor, but slicing gives you those delightful little garlic bites.
* Fresh Herbs: A few sprigs of fresh rosemary and thyme are my go-to. You can also add a few parsley sprigs or even a little fresh oregano if you like. Just tear them slightly to release their oils.
* Citrus Zest: The zest of half a lemon or an orange. This adds such a bright, fresh lift that cuts through the richness of the oil and olives. Make sure to only get the zest, not the bitter white pith!
* Red Pepper Flakes: A pinch, or more if you like a little warmth. This is optional, but I find it adds a lovely subtle kick.
* Optional additions: A tablespoon of capers or a few sun-dried tomatoes (oil-packed and drained) can add another layer of flavor. I sometimes add a strip of orange peel too for extra citrus aroma.
Step-by-Step Instructions
Step 1: Prep Your Olives
First things first, grab your olives. I usually buy pitted ones because, well, life is too short to be pitting olives! Drain them thoroughly in a colander. Give them a gentle shake to get rid of as much brine as possible. If they seem a bit salty, you can give them a quick rinse under cold water and drain again. Pat them very dry with a clean kitchen towel or paper towels. This is super important; we don’t want any water diluting our beautiful marinade.
Step 2: Slice the Garlic
Take your garlic cloves and peel them. Then, using a sharp knife, slice them thinly. I like to aim for little coin shapes or half-moons. If you’re not a fan of biting into raw garlic bits, you can mince them very finely, but honestly, the slices soften beautifully in the oil and aren’t overpowering.
Step 3: Zest Your Citrus
Grab your lemon or orange. Using a microplane or the finest side of your box grater, zest about half of the fruit. Be careful to only get the colorful outer peel, avoiding the bitter white pith underneath. The zest releases those wonderful aromatic oils that make the marinade so fragrant.
Step 4: Combine the Marinade Ingredients
In a medium bowl, combine the drained and dried olives, the sliced garlic, your fresh herb sprigs (rosemary and thyme are my personal favorites!), the citrus zest, and a pinch of red pepper flakes if you’re using them. If you’re adding any optional extras like capers or sun-dried tomatoes, toss them in now too.
Step 5: Add the Olive Oil
Pour the extra virgin olive oil over the olive mixture. You want enough oil to coat everything generously, almost submerging the olives. Make sure all the ingredients are well combined. Give it a gentle stir with a spoon to distribute everything evenly.
Step 6: Transfer to a Jar
Carefully spoon the olive mixture into a clean glass jar or an airtight container. A jar with a lid is perfect for storing them in the fridge, and it looks so pretty too! Make sure the olives are mostly covered by the oil. If not, you can top it off with a little more olive oil.
Step 7: Marinate!
Now comes the most important part: patience! Cover the jar tightly and refrigerate. For the best flavor, let them marinate for at least 4-6 hours. However, I find they are truly spectacular after 24 hours, or even better after 2-3 days. This allows all those lovely flavors to meld and deepen beautifully. You can give the jar a gentle shake every now and then to help redistribute the oil.
Step 8: Serve & Enjoy
When you’re ready to serve, you can bring the jar out of the fridge about 30 minutes beforehand to let the flavors come to room temperature. Spoon them into a small serving bowl, making sure to include some of the garlic slivers and herbs. Drizzle a little of the marinade oil over the top for extra shine and flavor. They are absolutely divine served with crusty bread for dipping!
What to Serve It With
Oh, the possibilities are endless when it comes to serving these gorgeous marinated olives! They’re so versatile, I find myself reaching for them all the time. For a simple breakfast, I love them alongside a perfectly poached egg and some avocado toast. The briny kick wakes up your palate beautifully. For a more leisurely brunch spread, they are a must-have on any charcuterie or cheese board. Imagine them nestled amongst some sharp cheddar, creamy brie, some cured meats, and a few grapes – they’re the little savory jewels that tie everything together. I often serve them with a glass of crisp white wine or a light rosé. As a sophisticated dessert companion? Yes, you read that right! While it sounds unusual, a small bowl of these olives, particularly the milder Castelvetrano variety, can be a revelation after a rich meal. The saltiness and slight bitterness cleanse the palate wonderfully, especially before a strong coffee or an espresso. And for those spontaneous, cozy snack moments, which happen more often than I care to admit in my house, they are perfect. Just grab a bowl, maybe a handful of crackers or some of those lovely breadsticks, and you have an instant gourmet snack. My kids, surprisingly, are huge fans and will often sneak a few straight from the jar when they think I’m not looking! It’s a family tradition now to have a jar ready for movie nights, nestled between bowls of popcorn.
Top Tips for Perfecting Your Marinated Olives
I’ve been making these marinated olives for years, and I’ve picked up a few tricks along the way that I think really make a difference. For the olive preparation, the most crucial step is getting them as dry as possible after draining and rinsing. I usually give them a really good pat-down with paper towels, ensuring no excess moisture is clinging to them. This is key to letting the olive oil and aromatics really penetrate the olives instead of creating a watery mess. When it comes to mixing advice, don’t be tempted to overmix once you’ve added the oil. A gentle stir is all you need to distribute everything. The goal is to let the flavors infuse naturally, not to agitate them too much. For flavor customization, don’t be afraid to play with the herbs. While rosemary and thyme are my standards, I’ve also had fantastic results with a little fresh oregano, or even a bay leaf added to the marinade (just remember to remove it before serving). Some people love adding a few peppercorns or even a sliver of a dried chili for extra heat. For ingredient swaps, if you can’t find good quality olives, you can always use canned ones, but drain and rinse them extremely well, and maybe even let them soak in fresh water for 30 minutes to reduce the metallic taste. For the oil, while extra virgin is best, a good quality pure olive oil will work in a pinch, though the flavor won’t be quite as nuanced. If you’re really watching your budget, you can even do a 50/50 blend of olive oil and a neutral oil like grapeseed, but again, the flavor will be less intense. My biggest baking tip (even though we’re not baking these!) is about letting them sit. The longer they marinate, the better they get. I often make a big batch at the start of the week, and they’re even more delicious by the weekend. If you’re in a rush, 4-6 hours will give you a good flavor, but trust me, waiting 24-48 hours makes all the difference. For glaze variations (if you even want one!), I usually just rely on the infused oil and little bits of garlic and herbs. However, some people like to add a tiny splash of balsamic vinegar or sherry vinegar to the marinade for an extra layer of acidity, but I find the citrus zest usually does the trick for me.
Storing and Reheating Tips
Properly storing these marinated olives is key to keeping them tasting their absolute best. For room temperature storage, I really don’t recommend leaving them out for more than about 2-3 hours, especially if your kitchen is warm. Olives are generally pretty resilient, but the garlic and herbs can start to degrade after too long at room temperature, and we want to avoid any chance of spoilage. Once you’ve served them, it’s best to pop any leftovers back into the fridge. For refrigerator storage, keep them in their airtight glass jar or container. They’ll stay delicious for at least 2-3 weeks, and honestly, I’ve kept them longer with no ill effects, though the garlic might become a bit stronger. The key is to ensure they are always submerged in the olive oil. If the oil solidifies a bit in the fridge, don’t worry; it will soften as soon as you bring them back to room temperature. When it comes to freezer instructions, I generally don’t freeze marinated olives. The texture of the olives can become a bit soft and mushy once thawed, and the fresh herbs can lose their vibrancy. It’s always best to make smaller batches if you don’t think you’ll use them up within a few weeks. If you absolutely must freeze them, wrap them very tightly in a freezer-safe bag or container, removing as much air as possible, and aim to use them within 1-2 months. For glaze timing advice, since we’re not really “glazing” these in the traditional sense, the main thing is just to ensure the oil covers the solids. If you notice the oil level has dropped significantly after a few days, you can top it off with a little fresh olive oil to keep everything submerged and protected.
Frequently Asked Questions
Final Thoughts
So there you have it – my absolute favorite way to make marinated olives. It’s a recipe that embodies everything I love about cooking: simplicity, incredible flavor, and the ability to create something truly special with just a handful of ingredients. These aren’t just olives; they’re little bursts of Mediterranean sunshine, perfect for elevating any gathering or simply treating yourself to something wonderfully delicious. I really hope you give this a try. It’s one of those recipes that, once you make it, you’ll wonder how you ever lived without it. If you love this recipe and are looking for more easy appetizer ideas, you might also enjoy my [Link to another relevant recipe like “Garlic Herb Roasted Almonds”] or my [Link to another relevant recipe like “Whipped Feta Dip”]. Both are big hits in my house and are equally fuss-free. I can’t wait to hear what you think of these marinated olives! Let me know in the comments below how they turn out for you, what variations you tried, or any fun ways you served them. Happy marinating!
Marinated Olives
Ingredients
Main Ingredients
- 2 cups mixed olives such as Kalamata, Castelvetrano, and Manzanilla, pitted
- 0.5 cup extra virgin olive oil
- 2 cloves garlic thinly sliced
- 1 teaspoon dried oregano
- 0.5 teaspoon red pepper flakes or to taste
- 0.25 cup fresh lemon juice
- 1 sprig fresh rosemary optional
- sea salt to taste
Instructions
Preparation Steps
- In a medium bowl, combine the mixed olives, sliced garlic, dried oregano, red pepper flakes, and lemon juice.
- Add the extra virgin olive oil and fresh rosemary sprig, if using.
- Stir everything together to ensure the olives are well coated. Season with sea salt to taste.
- Cover the bowl and let the olives marinate at room temperature for at least 30 minutes, or refrigerate for longer, up to 2 weeks. If refrigerating, bring to room temperature before serving.
- Serve the marinated olives as an appetizer or part of a cheese board.
Notes
Featured Comments
“Impressed! Clear steps and quick weeknight win results. Perfect for busy nights.”
“New favorite here — comforting. crowd-pleaser was spot on.”
“Super easy and turned out amazing! My family asked for seconds. Saving this one.”
“This sweet treat was absolutely loved — the buttery really stands out. Thanks!”
“Made it tonight and wow — super easy! Will definitely make marinated olives again.”
“Packed with flavor and so simple. Exactly what I wanted from marinated olives.”