

Oh, where do I even begin with this Mongolian Beef recipe? It’s one of those dishes that instantly takes me back to my childhood, specifically those Friday nights when my dad would surprise us with takeout from our favorite Chinese place. But honestly, after years of tinkering and perfecting, I’ve found a way to recreate that magic right in my own kitchen, and it’s honestly *better*. This isn’t just any stir-fry; it’s a symphony of sweet, savory, and a hint of spicy that just coats your taste buds in the most delightful way. If you’re anything like me, you probably have a go-to beef and broccoli or a sweet and sour Chicken Recipe that you rely on. This Mongolian Beef is going to blow those out of the water. It’s a total game-changer, especially on those nights when you’re craving something seriously satisfying but don’t want to spend hours slaving away. Trust me, once you try this, you’ll wonder how you ever lived without it.
What is Mongolian Beef?
So, what exactly *is* Mongolian beef? It sounds pretty fancy, right? Well, at its heart, it’s a super popular Chinese-American dish that’s characterized by tender slices of beef coated in a rich, glossy, and incredibly flavorful sauce. Think of it as the ultimate savory-sweet comfort food. Despite its name, it doesn’t actually hail from Mongolia, which is a fun little tidbit! It’s believed to have originated in Taiwan and gained massive popularity in the West. The core idea is simple: marinate and quickly cook thinly sliced beef, then toss it in a sauce made with soy sauce, something sweet like sugar or honey, garlic, ginger, and often a touch of something for that characteristic savory depth, like oyster sauce. It’s that perfect balance of flavors and textures that makes it so addictive.
How do you make Mongolian Beef?
Quick Overview
The beauty of this Mongolian Beef recipe lies in its straightforward approach. You’ll start by marinating thinly sliced beef to ensure tenderness and flavor infusion. While that’s doing its thing, you’ll whisk together a simple yet powerful sauce. Then, it’s a quick sear of the beef, a gentle simmer of the sauce, and a magical coating of those beef strips. The whole process is designed for maximum flavor with minimal effort, ensuring you get that crave-worthy, glossy finish and perfectly tender meat every single time. It’s honestly foolproof, even if you’re new to making stir-fries.
Ingredients
For the Main Batter:
1 pound flank steak or sirloin, thinly sliced against the grain (about 1/8-inch thick) – *Tip: Partially freezing the beef for about 20-30 minutes makes it SO much easier to slice thinly. I always do this!*
1 tablespoon soy sauce
1 tablespoon Shaoxing wine (or dry sherry if you can’t find it)
1 teaspoon cornstarch
1/2 teaspoon sesame oil
Pinch of white pepper
For the Filling:
2 tablespoons vegetable oil (or other neutral oil)
3 cloves garlic, minced
1 tablespoon fresh ginger, minced
4 green onions, white and green parts separated, cut into 1-inch pieces
For the Glaze:
1/2 cup low-sodium soy sauce (or regular if you prefer)
1/4 cup beef broth
2 tablespoons brown sugar (or honey for a slightly different sweetness)
1 tablespoon oyster sauce (optional, but adds amazing depth)
1 teaspoon cornstarch dissolved in 2 tablespoons of water (this is your slurry)
Step-by-Step Instructions
Step 1: Preheat & Prep Pan
Let’s get started! First, grab a large skillet or a wok and place it over medium-high heat. You want it nice and hot, but not smoking aggressively. Add your vegetable oil. While the pan is heating up, make sure your minced garlic, ginger, and green onions are prepped and ready to go. Having everything prepped beforehand is key to stir-frying, so you can just toss things in as you go!
Step 2: Mix Dry Ingredients
In a medium bowl, combine your thinly sliced beef. Add the soy sauce, Shaoxing wine (or sherry), cornstarch, sesame oil, and white pepper. Give it all a good toss with your hands or a spoon, making sure every piece of beef is nicely coated. Let this marinate for at least 15 minutes while you prepare the rest of your ingredients. This step is crucial for tenderizing the beef and giving it a base flavor.
Step 3: Mix Wet Ingredients
In a small bowl, whisk together the 1/2 cup soy sauce, beef broth, brown sugar, and oyster sauce (if using). Make sure the brown sugar is dissolved. In a separate tiny bowl or mug, mix the 1 teaspoon of cornstarch with 2 tablespoons of water until it’s smooth – this is your cornstarch slurry, and it’s what will give our sauce that beautiful glossy thickness.
Step 4: Combine
Now, it’s time to cook the beef! Add the marinated beef to the hot skillet in a single layer. You might need to do this in batches if your pan isn’t large enough to avoid crowding, which would steam the meat instead of searing it. Cook for about 1-2 minutes per side, just until browned. Don’t overcook it here; it will cook more in the sauce. Remove the beef from the pan and set it aside on a plate.
Step 5: Prepare Filling
In the same skillet (no need to clean it!), add the minced garlic and ginger. Stir-fry for about 30 seconds until fragrant. Add the white parts of the green onions and stir-fry for another 30 seconds. Be careful not to burn the garlic!
Step 6: Layer & Swirl
Pour the soy sauce mixture (from Step 3) into the skillet with the garlic, ginger, and green onions. Bring it to a simmer, stirring occasionally. Once it’s simmering, give your cornstarch slurry a quick re-stir and then slowly pour it into the sauce while whisking continuously. The sauce will thicken and become glossy almost instantly. This is the magical part!
Step 7: Bake
Return the seared beef to the skillet with the thickened sauce. Toss everything together gently until the beef is evenly coated in that glorious glaze. Stir in the green parts of the green onions and cook for just another minute, until the beef is heated through and coated. Don’t let it simmer for too long after adding the beef, or it might get tough.
Step 8: Cool & Glaze
This step is more about enjoying the final product immediately! Once the beef is coated and the green onions are added, your Mongolian Beef is ready. The “glaze” is already on the beef, creating that beautiful sheen. The goal here is to serve it piping hot, so no cooling down is involved!
Step 9: Slice & Serve
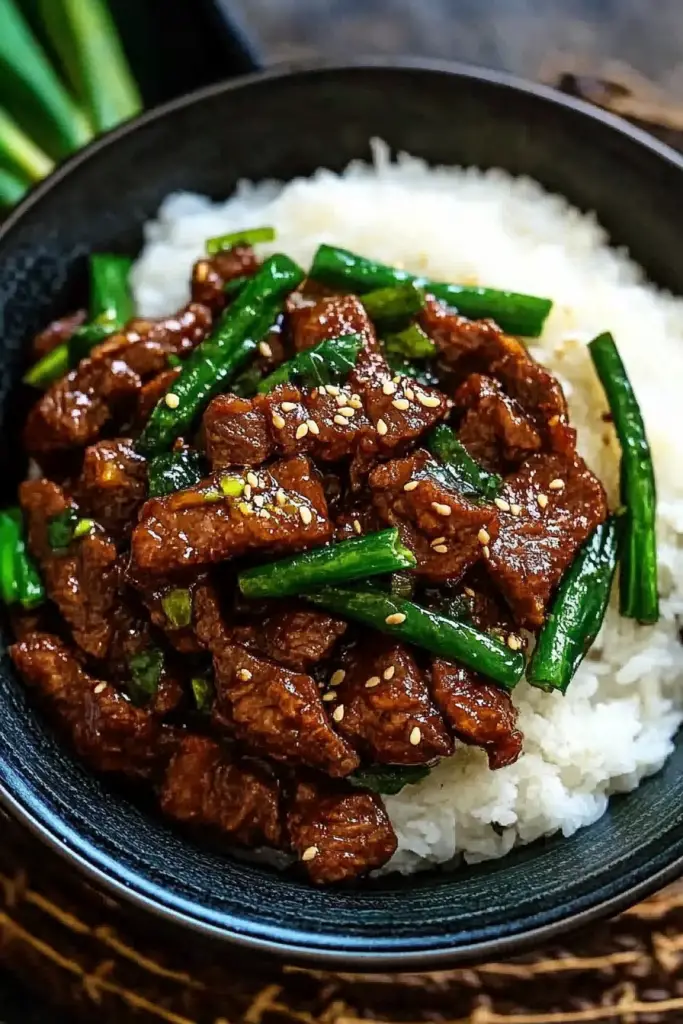
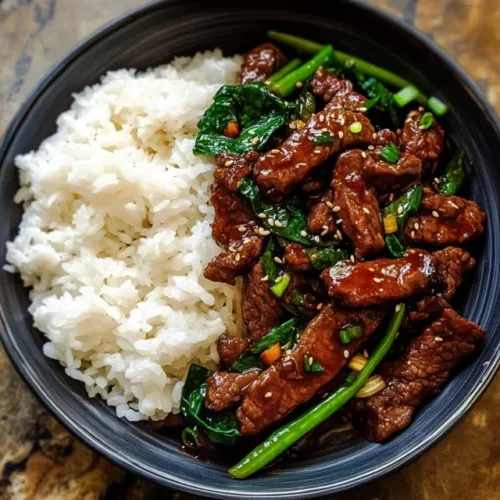
Serve your incredible Mongolian Beef immediately. It’s perfect spooned over steamed white rice or brown rice. A sprinkle of toasted sesame seeds and some extra sliced green onions for garnish is always a lovely touch. Get ready for everyone to rave!
What to Serve It With
This Mongolian Beef recipe is so incredibly versatile, which is another reason I adore it! For a classic weeknight meal, it’s absolutely divine served over a bed of fluffy steamed white rice. The rice soaks up all that amazing sauce, and it’s pure comfort. If you’re looking for a healthier option, brown rice works beautifully too. My family often asks for it with a side of steamed broccoli or bok choy for some added greens. For a more “special occasion” feel, I sometimes serve it with some crispy fried wontons or spring rolls for a full takeout experience at home. And if you’re feeling adventurous, try it over cauliflower rice for a low-carb option, or even with some stir-fried noodles. Honestly, no matter how you serve it, the rich, savory-sweet flavor of the beef shines through, making it a winner every time.
Top Tips for Perfecting Your Mongolian Beef
Over the years, I’ve learned a few tricks that make this Mongolian Beef recipe turn out perfectly every single time. Let’s dive into some of my Best Tips! First, **Beef Prep is Key**: Slicing the beef thinly against the grain is non-negotiable for tenderness. My little secret is to pop the beef in the freezer for about 20-30 minutes before slicing. It firms up just enough to make those thin, even slices a breeze. Don’t skip the marinade! The soy sauce, wine, and cornstarch do wonders for tenderizing and building flavor. For the **Sauce Consistency**, the cornstarch slurry is your best friend. Make sure to give it a good stir before adding it to the simmering sauce, as cornstarch can settle. Whisk the sauce constantly as you pour it in to avoid clumps and achieve that gorgeous, glossy sheen. **Don’t Overcrowd the Pan** when searing the beef; this is so important! Cook the beef in batches if necessary. Overcrowding steams the meat rather than searing it, leading to tougher, less flavorful results. You want that beautiful caramelized crust on each piece. **Ginger and Garlic Power**: Freshly minced ginger and garlic make a world of difference here compared to powders. Sauté them briefly until fragrant – just about 30 seconds – before adding the sauce ingredients. Be careful not to burn them! For **Ingredient Swaps**, if you can’t find Shaoxing wine, dry sherry is a good substitute. If you’re out of oyster sauce, you can omit it, but it does add a lovely depth of flavor. You can also play with the sweetness level by adjusting the brown sugar or using honey. Finally, **Serve it Hot**: This dish is best enjoyed immediately. The sauce can thicken up a bit as it cools, so have your rice or veggies ready to go!
Storing and Reheating Tips
Now, if by some miracle you have leftovers of this amazing Mongolian Beef, here’s how to store and reheat it to keep it tasting its best. For **Room Temperature Storage**, it’s generally best to cool the dish completely before storing. Try to keep it out for no more than two hours. If you plan to eat it within a few hours, you can leave it covered on the counter, but refrigeration is always safest. For **Refrigerator Storage**, transfer any leftovers to an airtight container. It will stay good in the fridge for about 3-4 days. The sauce might thicken a bit more, which is totally normal. When it comes to **Freezer Instructions**, this dish freezes surprisingly well! Let it cool completely, then transfer it to a freezer-safe container or heavy-duty freezer bags. It should last for about 2-3 months in the freezer. Thaw overnight in the refrigerator before reheating. For **Glaze Timing Advice**, if you’re storing leftovers, the glaze will already be on the beef. When reheating, you can add a tiny splash of water or soy sauce to loosen the sauce if it seems too thick. For serving immediately after cooking, there’s no separate glazing step required as it’s all done in the pan.
Frequently Asked Questions
Final Thoughts
So there you have it – my absolute favorite Mongolian Beef recipe! It’s a dish that truly delivers on flavor, texture, and that cozy, satisfying feeling that only good homemade food can bring. It’s proof that you don’t need to go out to enjoy incredible flavors. The combination of tender beef, that irresistible savory-sweet sauce, and the fresh aromatics is simply unbeatable. This recipe is my go-to when I want something that feels a little special without being complicated. I really hope you give it a try and that it becomes a beloved favorite in your home too. If you love bold, comforting flavors, you might also enjoy my recipe for [Link to another relevant recipe, e.g., Honey Garlic Chicken Stir-Fry] or my [Link to another relevant recipe, e.g., Sweet and Sour Pork]. I can’t wait to hear what you think! Please leave a comment below and let me know how your Mongolian Beef turned out, or if you have any of your own special tips to share. Happy cooking!
Mongolian Beef Recipe
Ingredients
For the Beef
- 1.5 pound flank steak thinly sliced against the grain
- 2 tablespoon cornstarch
- 1 tablespoon soy sauce
For the Sauce
- 0.5 cup beef broth
- 0.25 cup soy sauce
- 0.25 cup oyster sauce
- 0.125 cup brown sugar
- 1 tablespoon sesame oil
- 1 teaspoon cornstarch
- 1 teaspoon red pepper flakes optional, for a bit of heat
For Stir-Frying
- 2 tablespoon vegetable oil
- 3 cloves garlic minced
- 1 inch ginger grated
- 2 scallions green onions sliced, for garnish
Instructions
Preparation Steps
- In a bowl, toss the thinly sliced flank steak with 2 tablespoons of cornstarch and 1 tablespoon of soy sauce. Set aside.
- In a separate bowl, whisk together all the sauce ingredients: beef broth, soy sauce, oyster sauce, brown sugar, sesame oil, 1 teaspoon cornstarch, and red pepper flakes (if using). Set aside.
- Heat 2 tablespoons of vegetable oil in a large skillet or wok over high heat. Add the marinated beef in a single layer and sear for 1-2 minutes per side until browned. Do not overcrowd the pan; cook in batches if necessary. Remove beef from the skillet and set aside.
- Add the minced garlic and grated ginger to the skillet and stir-fry for about 30 seconds until fragrant. Be careful not to burn the garlic.
- Give the sauce mixture a quick whisk and pour it into the skillet. Bring to a simmer, stirring constantly, until the sauce thickens.
- Return the seared beef to the skillet and toss to coat evenly with the thickened sauce. Cook for another 1-2 minutes until the beef is heated through.
- Serve immediately over steamed rice, garnished with sliced green onions.
Notes
Featured Comments
“This recipe brought back so many memories of my family’s Friday dinners—delicious and comforting every time!”
“Impressed! Clear steps and comforting results. Perfect for busy nights.”
“New favorite here — family favorite. crowd-pleaser was spot on.”
“Super easy and turned out amazing! My family asked for seconds. Saving this one.”
“This sweet treat was absolutely loved — the bright really stands out. Thanks!”
“Made it tonight and wow — absolutely loved! Will definitely make Mongolian Beef Recipe again.”


This recipe brought back so many memories of my family’s Friday dinners—delicious and comforting every time!