


When heat hanging in the air finally loosens its grip, I reach for a pitcher and a smile. This Sangria recipe is the one I make when friends drop by unannounced, when the kids run in from the yard with muddy shoes and laughter, or when I just need a little sunshine in a glass. The aroma of citrus, the fruit that perfumes the kitchen, the way the wine opens up after a slow chill—there’s something incredibly comforting about it. I grew up sipping a version that my aunt made with a splash of brandy and a lot of good stories, and I’m still chasing that exact balance today. It’s not fancy, it’s not fussy, and it never fails to make a conversation feel warmer. If you’ve ever compared a heavy punch to a bright Sangria recipe, you know this one lands somewhere in between—refreshing, fruit-forward, and easy enough for weeknights, special enough for weekend gatherings. This is the Sangria recipe I come back to, season after season, because it tastes like a hug in a glass.
What is Sangria?
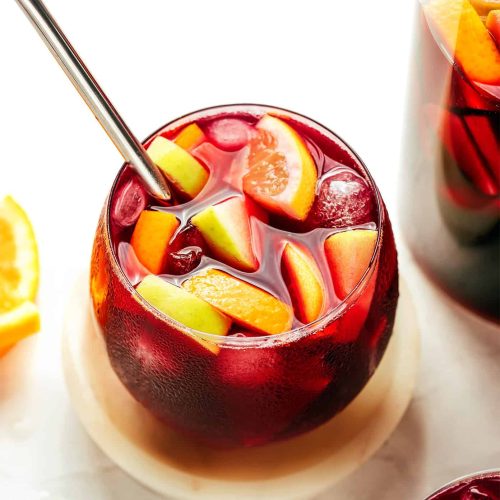
Sangria recipe is essentially a wine punch that’s brightened with fresh fruit, a touch of citrus, and a whisper of spirits. Think of it as a party in a pitcher—easy to scale up for a crowd, flexible with what you have, and endlessly adaptable to your taste. The name comes from the Spanish word sangra, meaning blood, a nod to its rich, ruby hue when red wine is used. It’s fundamentally a simple idea: wine, fruit, and a splash of something extra to lift the flavors. I love that you can customize it for bright summer nights or cozy winter gatherings by swapping in white wine, rosé, cider, or even sparkling water for fizz. My kids ask for this all the time, and friends swear it’s the best thing to serve when you’re unsure whether you should bake, roast, or just pour a little joy into a glass. It’s essentially a flexible, crowd-pleasing drink that feels special without any fuss—and that’s why I keep coming back to this Sangria recipe.
How do I make Sangria?
Quick Overview
In just a few steps, you can assemble a vibrant Sangria recipe that tastes like it’s been simmering with love for hours. The beauty lies in the chill time—the flavors wake up when the wine mingles with citrus, fruit, and a splash of spirits. You’ll rinse and slice bright fruit, mingle the base with wine and liqueur, then let it rest so the fruit can perfume the liquid. Right before serving, a quick fizz wake-up from soda water or sparkling wine brings it to life. The method is simple, forgiving, and you can swing it from casual to fancy just by the glass and garnish.
Ingredients
For the Main Batter:
- 750 ml bottle of dry red wine (choose a fruit-forward option like Rioja, Garnacha, or a simple Pinot Noir) — look for something you’d drink on its own; you don’t want a wine that’s too heavy or tannic.
- 1/2 cup fresh orange juice (from about 1 large orange) — bright and natural sweetness;
- 1/4 cup brandy or orange liqueur (Cointreau or Triple Sec) — adds warmth and depth;
- 2–4 tablespoons sugar or honey, to taste — start with a lighter touch and adjust after the fruit mingles.
- Optional: a splash of lemon juice if your fruit is extra sweet.
For the Filling:
- 2 oranges, thinly sliced and halved
- 1 lemon, thinly sliced
- 1 lime, thinly sliced
- 1 apple, cored and sliced (thin ribbons look lovely)
- 1 cup berries or diced seasonal fruit (strawberries, peaches, mango) — whatever’s fresh
- Mint or basil leaves for garnish (optional but delicious)
For the Glaze:
- 1 cup sparkling water or club soda (chilled) or a splash of sparkling wine to finish
- Additional citrus slices for a bright, aromatic finish
- A few extra mint sprigs for serving
Step-by-Step Instructions
Step 1: Preheat & Prep Pan
Okay, there’s no oven here, so we’re not actually preheating anything. But you do want to get your setup ready: a large pitcher or a glass jar, a cutting board, a sharp knife, and a measuring cup. Chill the pitcher in the fridge for 15–20 minutes if you can; a cold vessel keeps everything crisp and refreshing. Rinse the fruit and pat it dry. I always slice the citrus a bit thicker than usual so the flavors release as the sangria rests, not just when you pour it.
Step 2: Mix Dry Ingredients
This is where I start building the backbone. In a small bowl, whisk together the sugar (or honey) with a little orange juice to dissolve it evenly. The point here is to ensure there are no gritty pockets in the drink. If you’re using honey, warm a tiny splash of juice to help it dissolve. This step keeps the sweetness balanced as the fruit does its own sweet-talking in the pitcher.
Step 3: Mix Wet Ingredients
Pour the red wine into the chilled pitcher. Stir in the orange juice, brandy (or orange liqueur), and the sugar mixture. Give it a gentle stir with a long spoon so you don’t splash. The aroma starts to bloom here—think citrus, wine, and a whisper of warmth from the spirit. If you like a more mellow sangria, you can start with a touch less liqueur and add more after the fruit has steeped a bit.
Step 4: Combine
Now you bring the fruit into the party. Add the sliced oranges, lemons, limes, and apples to the wine mixture. Add the berries last to keep them from turning everything pink too early. Give it a few gentle stirs to distribute the fruit and ensure each slice is getting a little love from the liquid. If you’re entertaining, this is a great moment to chat with guests and let the flavors begin their slow dance together.
Step 5: Prepare Filling
Here’s where the fruit really becomes the star. You want the pieces to be sizable enough to bite into, but not so big they overwhelm the glass. If you’ve got time, let the fruit macerate in the liquid for 20–30 minutes before chilling. That first soak is magical—peels release oils that perfume the sangria with brighter citrus notes, and the apples soak up a touch of brightness from the orange. If you’re impatient, skip to Step 6 and start shifting the flavors with a quick chill and a taste test.
Step 6: Layer & Swirl
Chill the entire mixture for at least 2 hours, preferably 6–8 hours, so the fruit infuses deeper. If you’re making this ahead, you can hold it overnight in the fridge and only add the fizz right before serving. When you’re ready to serve, give the pitcher a gentle swirl to re-distribute the fruit and the juices. You’ll notice the colors mingle beautifully, and the scent of citrus fills the room in the best possible way.
Step 7: Bake
This is a no-bake moment, thank goodness. I know this heading says Bake, but for sangria we simply let everything mingle. If you like a stronger flavor, you can let it rest 1–2 more hours in the fridge. If you’re short on time, skip the extra rest and jump to the next step, but you’ll lose a little depth. Either way, this step is all about patience and letting the flavors harmonize.
Step 8: Cool & Glaze
I’m picky about the finish here. Just before you’re ready to drink, pour in the sparkling water or sparkling wine to add a bright fizz. You can also add a splash of citrus juice here to adjust brightness if the sangria tastes a touch flat. Stir gently; you don’t want to lose all the sparkle. Add a few mint leaves or citrus wheels for garnish, and keep the pitcher chilled until guests arrive.
Step 9: Slice & Serve
Pour the sangria into glasses filled with a couple of fruit slices. A long spoon helps guests scoop out the juicy fruit, and a mint sprig makes the entire presentation feel festive. Serve immediately with a light chill in the background so you can sense the drink’s aroma as it hits the glass. If you’re making it for a crowd, place a bowl of extra fruit on the table so everyone can tailor their glass with extra bite or sweetness. This Sangria recipe shines when you let the fruit bloom in the liquid and the table glow with conversation.
What to Serve It With
For a bright, casual vibe, pair this Sangria recipe with tapas, lemony olives, and a cheese board that features manchego, fresh Goat Cheese, and fig jam. For brunch, I love serving it with a citrusy ricotta toast or a light frittata that has herbs from the garden. If you’re using a more robust red wine, a cheese plate with aged cheddar and roasted almonds is gorgeous alongside this drink. On a date night, add prosciutto-wrapped melon skewers and a crusty baguette, because a little salty bite plays perfectly with the sangria’s sweetness. This is the kind of beverage that makes a simple afternoon feel like a celebration, especially when there’s a little garnish bar with extra fruit and fresh mint on hand.
For breakfast or a light, late-afternoon bite, consider adding a splash of the sangria into Fruit Salad or using it to macerate berries for a quick dessert. I’ve done this to great effect on warm nights when I want something that tastes like a party but only requires a bowl and a spoon. If you’re cooking for kids, you can make a kid-friendly version using a splash of grape juice, a little lemon juice, and a sparkling water finish—the result is still vibrant and refreshing without alcohol.
Top Tips for Perfecting Your Sangria recipe
Zucchini Prep: Not a thing in this drink, but citrus zest is your best friend here. If you want to maximize brightness, zest a lemon or orange before slicing and add the zest to the wine mixture for a quick, aromatic boost. If you’re avoiding peels for a cleaner look, just skip the zest and rely on the orange juice for sunshine.
Mixing Advice: The trick is gentle agitation. You want the fruit to flavor the liquid, not to mash the fruit into a pulp. Use a long spoon to stir in broad arcs, just enough to coat the fruit without breaking it apart. If you overdo it, you’ll extract too much tannin from the peels, and the sangria can taste a little bitter. Taste as you go and adjust with a touch more juice or a splash of soda to lift the finish.
Swirl Customization: This is where presentation meets flavor. For a striking look, layer the fruit in the pitcher so you get a color gradient as you pour. For a more rustic vibe, let the fruit float freely and offer extra fruit on the side in a small bowl. If you want a greener, fresher tone, add a few sprigs of mint or a cucumber ribbon near the end for a crisp finish.
Ingredient Swaps: Swap red wine for a white sangria base with a dry white such as Sauvignon Blanc or Albariño. Use peach schnapps or elderflower liqueur for a lighter, fruitier profile. If you prefer less fruit sweetness, cut back on the sugar and increase the orange juice a touch to compensate. The beauty of this Sangria recipe is that you can tailor it to what you have and how you’re feeling that day.
Baking Tips: Not applicable here, but here’s a serving tip: keep the sangria in the fridge until 15 minutes before serving to ensure it’s perfectly chilled. If you need a faster chill, place the pitcher inside a large bowl of ice and water for a few minutes to bring it down quickly without diluting the flavor.
Glaze Variations: Instead of a glaze, think glaze-like finish with a splash of sparkling wine or soda right before serving. You can infuse the drink with a hint of cinnamon or vanilla by letting a cinnamon stick or a vanilla bean sit in the pitcher for the first hour. A few dashes of bitters can also add a subtle complexity if you’re feeling adventurous.
I’ve learned over the years that the simplest tweaks make the biggest impact: a touch more citrus here, a touch less sugar there, a longer resting time, and a bright finish with soda right before serving. This Sangria recipe rewards patience and playful adjustments, and I’ve found the friends and family never tire of asking for seconds.
Storing and Reheating Tips
Storage matters with sangria because you want the fruit to stay vibrant without turning mushy. If you’re making it ahead, store in the fridge for up to 2 days; after that, the fruit’s texture and flavor can start to degrade. Keep the liquid separate from the fruit if you can, and combine just before serving to preserve color and freshness. If you must store longer, you can strain out the fruit and cap the liquid for up to 3 days, then re-add fresh fruit before serving. Do not reheat—cold, fizzy sangria is the best way to enjoy it. If you’re planning to re-create the fizz later, keep a bottle of sparkling water on hand to reinvigorate the sangria just before pouring. Fresh fruit will brighten it up and give you the same joyful aroma you loved the first time you made this recipe.
Frequently Asked Questions
Final Thoughts
There’s something wonderfully comforting about a pitcher of Sangria recipe that tastes like a memory you haven’t quite finished telling. The fruit’s sweetness blooms in the wine, the citrus lifts the whole drink, and the hint of brandy ties it all together with warmth. It’s a flexible, people-pleasing centerpiece that makes conversations feel alive and easy. I’ve shared this with neighbors on warm evenings, watched it disappear in minutes, and seen friends lean back with contented smiles after the first sip. If you’re new to wine-based punches, start with this Sangria recipe and see how good easy can taste. If you’re a long-time fan, you’ll appreciate the little tweaks that keep it fresh across seasons. Tell me your favorite fruit mix or what you swapped for the liqueur—I love hearing how your version evolves. Happy sipping, and may your kitchen be filled with laughter and sun-kissed glasses. Can’t wait to hear how yours turns out!
Classic Red Sangria
Ingredients
Main Ingredients
- 0.75 L Dry Red Wine e.g., Tempranillo, Garnacha, or Merlot
- 0.25 L Brandy
- 0.5 cup Orange Juice
- 0.125 cup Maple Syrup or simple syrup, adjust to taste
- 1 medium Orange sliced
- 1 medium Apple cored and sliced
- 0.5 cup Mixed Berries fresh or frozen
- 0.5 L Club Soda chilled, for serving
Instructions
Preparation Steps
- In a large pitcher, combine the red wine, brandy, orange juice, and maple syrup.
- Add the sliced orange, apple, and mixed berries to the pitcher.
- Stir everything together gently.
- Cover the pitcher and refrigerate for at least 2 hours, or preferably overnight, to allow the flavors to meld.
- To serve, pour the sangria into glasses filled with ice. Top off each glass with a splash of chilled club soda.
Notes
Featured Comments
“Impressed! Clear steps and spot on results. Perfect for busy nights.”
“New favorite here — crowd-pleaser. crowd-pleaser was spot on.”
“Super easy and turned out amazing! My family asked for seconds. Saving this one.”
“This sweet treat was absolutely loved — the rich really stands out. Thanks!”
“Made it tonight and wow — super easy! Will definitely make Sangria recipe again.”
“Packed with flavor and so simple. Exactly what I wanted from Sangria recipe.”


