

You know those nights? The ones where the clock is ticking, the fridge looks a little sad, and you *really* don’t want to order takeout again? That’s exactly when this coconut shrimp with tomatoes recipe swoops in and saves the day. It’s honestly one of my favorite things to whip up because it feels so special, like a little vacation on a plate, but it’s surprisingly straightforward. I remember the first time I made it, I was trying to impress some friends who were visiting, and they raved about it so much, asking if it came from some fancy restaurant. Little did they know, it was born out of that classic “what’s for dinner?” panic, but with a few pantry staples and a whole lot of love. It’s kind of like a bright, zesty cousin to a classic pasta dish, but with the irresistible crunch of coconut shrimp and the juicy pop of fresh tomatoes. Trust me, this one’s a keeper!
What is coconut shrimp with tomatoes?
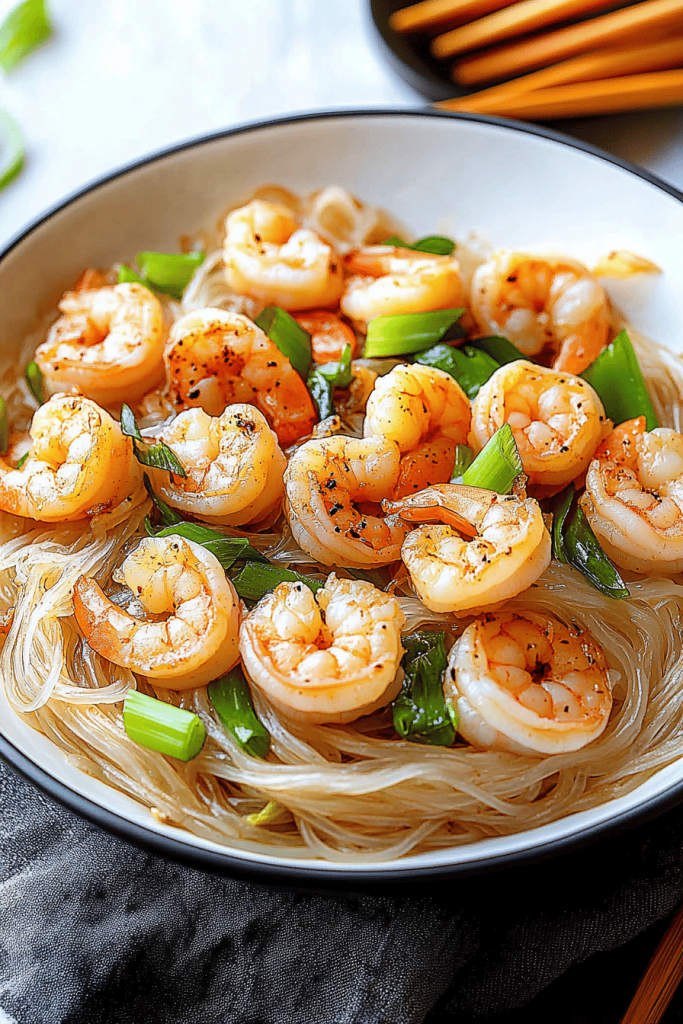
So, what exactly *is* this magical dish? Think of it as a vibrant, flavor-packed skillet meal where succulent shrimp, coated in a crispy, toasted coconut crumb, get tossed with juicy, ripe tomatoes and often some aromatic garlic and a hint of spice. The “coconut shrimp” part refers to the star of the show – plump shrimp coated in shredded coconut and breadcrumbs, pan-fried until golden and wonderfully crunchy. We then toss these crispy gems with a simple yet sensational tomato-based sauce that’s usually brightened up with lemon or lime juice and maybe a pinch of Red Pepper flakes for a little kick. It’s not quite a pasta dish, not quite a stir-fry, but something beautifully in between, designed to be eaten right out of the pan or served over fluffy rice. It’s a dish that brings a little bit of the tropics to your kitchen, no passport required!
How do I make coconut shrimp with tomatoes?
Quick Overview
The beauty of this recipe lies in its streamlined process. We’re talking about prepping the shrimp, giving them a quick coconut-y coating, pan-frying them to golden perfection, and then tossing everything together with a simple, vibrant tomato sauce. It’s a one-pan wonder for the most part, minimizing cleanup, which is always a win in my book! The key is to get that shrimp nice and crispy before adding it to the saucy tomatoes, so you retain that delightful crunch. It’s designed for maximum flavor with minimum fuss, making it your new go-to for weeknight dinners or even a casual weekend meal.
Ingredients
What is the recipe for coconut shrimp?
1 pound large shrimp, peeled and deveined (about 21-25 count per pound)
1 cup shredded unsweetened coconut (look for the fine shreds; they toast up beautifully)
1/2 cup panko breadcrumbs (these give the best crunch!)
1/4 cup all-purpose flour
1 teaspoon smoked paprika (adds a lovely depth)
1/2 teaspoon garlic powder
1/4 teaspoon cayenne pepper (optional, for a little heat)
Salt and freshly ground Black Pepper, to taste
2 large eggs, lightly beaten
1/4 cup milk (any kind works, I often use whole)
Vegetable oil or other neutral oil, for frying
For the Tomato Mixture:
2 tablespoons olive oil
3 cloves garlic, minced (don’t be shy with the garlic!)
1 pint cherry tomatoes, halved (or quartered if they’re large)
1/4 cup dry white wine or chicken broth (optional, but adds great flavor)
1 tablespoon fresh lemon juice (this is crucial for brightness!)
1/4 teaspoon red pepper flakes (adjust to your spice preference)
2 tablespoons chopped fresh parsley, for garnish
Salt and freshly ground black pepper, to taste
Step-by-Step Instructions
Step 1: Preheat & Prep Pan
First things first, let’s get everything ready. You’ll want to grab a large skillet, preferably a non-stick or cast-iron one, for frying the shrimp. Pour in enough vegetable oil to generously coat the bottom, about 1/4 inch deep. We want the oil to be hot but not smoking, so set your stove to medium-high heat. While that’s heating up, let’s prep our shrimp coating. In one shallow dish, whisk together the eggs and milk. In another shallow dish, combine the shredded coconut, panko breadcrumbs, flour, smoked paprika, garlic powder, cayenne pepper (if using), salt, and pepper. Give it a good mix with a fork until everything is well distributed. This is going to give our shrimp that amazing golden crust.
Step 2: Mix Dry Ingredients
This is where we build the foundation for our crispy coating. In a medium-sized bowl or a pie plate, I like to combine the shredded unsweetened coconut, panko breadcrumbs, all-purpose flour, smoked paprika, garlic powder, and a pinch of cayenne pepper if you like a little warmth. Now, this is important: whisk this all together really well. You want to make sure the paprika and garlic powder are evenly distributed so you don’t get a bite that’s just plain coconut and breadcrumbs. Season generously with salt and freshly ground black pepper. This dry mix is going to cling to the shrimp and fry up beautifully. I always taste a tiny bit of the dry mix (before the shrimp go in, of course!) just to ensure the seasoning is spot on. You can never have too much flavor!
Step 3: Mix Wet Ingredients
In a separate, slightly larger shallow dish, crack your eggs. Add the milk and whisk it all together until it’s light and frothy. This egg wash is what will help our delicious coconut and breadcrumb mixture stick to the shrimp. Some people use just egg white, but I find a whole egg mixed with a splash of milk gives a richer coating that’s a bit more forgiving. It also helps keep the shrimp tender. Make sure the eggs are well beaten so there are no streaks of yolk or white left; we want a nice, uniform consistency.
Step 4: Combine
Now for the fun part: coating the shrimp! Pat your shrimp completely dry with paper towels. This is a crucial step for getting that coating to stick and get nice and crispy. If the shrimp are wet, the coating will slide right off. One by one, take a dried shrimp, dredge it lightly in the flour mixture (just to give it a little something extra to grab onto), then dip it into the egg wash, letting any excess drip off. Finally, press the shrimp into the coconut-breadcrumb mixture, coating it thoroughly on all sides. You want to really pack it on there! Place the coated shrimp on a clean plate or baking sheet and repeat with the remaining shrimp. I like to do this in batches so I don’t crowd the pan later.
Step 5: Prepare Filling
While your shrimp are chilling (or while the oil heats up), let’s get the tomato base ready. Heat the 2 tablespoons of olive oil in a large skillet over medium heat. Add the minced garlic and sauté for about 30 seconds until fragrant, being careful not to burn it – burnt garlic is a sad thing indeed! Now, add the halved cherry tomatoes to the skillet. Cook, stirring occasionally, for about 5-7 minutes, or until the tomatoes start to soften and burst, releasing their juices. This is what creates our beautiful, light sauce. If you’re using white wine or chicken broth, add it now and let it bubble and reduce for a minute. Stir in the fresh lemon juice and red pepper flakes. Season the tomato mixture with salt and pepper to your liking. You want it to be vibrant and flavorful!
Step 6: Layer & Swirl
This step is actually more about timing than fancy technique for this recipe. Once the tomatoes have softened and started to break down, creating a lovely sauce, you’re ready to introduce the star. If you cooked the shrimp in batches, keep them warm. Gently add the crispy coconut shrimp directly into the skillet with the tomato mixture. You don’t want to crowd the pan when frying, but here, we’re just tossing them together to coat them in that warm, zesty sauce. The goal isn’t to cook the shrimp further, but to warm them through and let them mingle with the tomatoes. Give it a gentle stir to coat everything. The residual heat will warm the shrimp, and the tomatoes will coat them beautifully without making the coconut coating soggy. It’s a delicate balance, but it works!
Step 7: Bake
For this specific recipe, we’re actually skipping a traditional bake. The magic happens right on the stovetop! The coconut shrimp are pan-fried to crispy perfection, and then they’re tossed with the warm tomato mixture in the skillet. This keeps the shrimp wonderfully crunchy. If you prefer a softer coating or want to bake the shrimp separately for perhaps a lighter option, you could bake them on a parchment-lined baking sheet at 400°F (200°C) for about 8-10 minutes until golden. But honestly, the pan-frying is what gives this dish its signature texture and quick cooking time. So, we’ve already completed the “cooking” part on the stovetop!
Step 8: Cool & Glaze
This recipe doesn’t really require a “glaze” in the traditional sense, as the tomato mixture acts as our sauce. However, after you’ve tossed the Crispy shrimp with the softened tomatoes and seasonings, you’ll want to let it sit for just a minute or two off the heat. This allows the flavors to meld beautifully without overcooking the shrimp or making the coconut coating lose its crunch. The warmth from the skillet and the tomatoes will do just enough to warm the shrimp through. Garnish generously with fresh chopped parsley right before serving. The vibrant green parsley adds a beautiful pop of color and a fresh, herbaceous note that cuts through the richness.
Step 9: Slice & Serve
This dish is best served immediately, piping hot, right out of the skillet! The contrast between the warm, juicy tomatoes and the crispy, tender coconut shrimp is pure magic. You can serve it straight from the pan for a rustic feel, or plate it up more formally. A sprinkle of extra parsley and a wedge of lemon on the side is always a good idea. This dish is also fantastic served over a bed of fluffy basmati rice, which soaks up all those delicious tomato juices. Alternatively, some crusty bread for dipping is never the wrong choice! It’s a complete meal that feels both indulgent and surprisingly light, perfect for any night of the week.
What to Serve It With
This coconut shrimp with tomatoes is a chameleon of a dish, fitting in beautifully for any meal or occasion. For a bright and breezy start to the day, serve it alongside some scrambled eggs and perhaps a slice of toasted sourdough. The zesty tomatoes and crispy shrimp add a delightful twist to a typical breakfast spread. If you’re planning a weekend brunch, this makes for a showstopper! Plate it artfully with a side of avocado slices, a small green salad with a light vinaigrette, and maybe some bubbly mimosas or a refreshing iced tea. As a light yet satisfying dessert course (yes, really!), it can be served in smaller portions with a dollop of plain Greek yogurt and a sprinkle of extra lemon zest. It’s unexpectedly delightful! And for those cozy nights when you just want comfort food, a generous portion served over a steaming bowl of jasmine rice or quinoa is pure bliss. Don’t forget a side of crusty baguette – it’s perfect for mopping up every last drop of that glorious tomato sauce. My family also loves it with a side of roasted asparagus for a complete, healthy meal.
Top Tips for Perfecting Your Coconut Shrimp with Tomatoes
Over the years, I’ve picked up a few tricks that I think really elevate this coconut shrimp with tomatoes. Let’s start with the shrimp prep. You absolutely MUST pat them dry with paper towels. I can’t stress this enough! If they’re even a little bit damp, your coconut-breadcrumb coating won’t stick, and you won’t get that satisfying crunch. For the coconut, I prefer unsweetened shredded coconut. Sweetened can make the coating a bit too sugary and can burn faster. Fine shreds toast up beautifully and create a lovely texture. When it comes to frying, don’t overcrowd the pan! Fry the shrimp in batches. This ensures each piece gets nice and crispy rather than steaming in the pan. You want a medium-high heat for frying, so the outside gets golden brown quickly without cooking the shrimp through too much – they’ll finish cooking when tossed with the tomatoes. For the tomatoes, I always opt for cherry or grape tomatoes; they burst open nicely and create a luscious sauce. If you’re using larger tomatoes, dice them small. The lemon juice is non-negotiable; it cuts through the richness and brightens everything up. I’ve experimented with lime too, and it’s equally delicious! Don’t be afraid of the red pepper flakes; they add a subtle warmth that’s really lovely. And for the absolute best texture, serve this dish immediately after tossing the shrimp with the tomatoes. The longer it sits, the softer the coconut coating will become. While it’s still delicious the next day, that initial crispness is something special!
Storing and Reheating Tips
Alright, let’s talk about what happens if you actually have leftovers (which, in my house, is a rare but glorious occasion!). For best results, store any leftover coconut shrimp with tomatoes in an airtight container in the refrigerator. It’s best to separate the shrimp from any sauce if you can, or at least store it in a way that minimizes the shrimp sitting in liquid. It should keep well for about 2 days. When you’re ready to reheat, I’ve found that the Air Fryer or a hot oven works best to try and recapture some of that crispiness. Pop it into a preheated oven at around 350°F (175°C) for 5-8 minutes, or until heated through. An air fryer set to 375°F (190°C) for about 3-5 minutes can also work wonders. If you’re really in a pinch, a quick zap in the microwave will heat it up, but the coconut coating will definitely lose its crunch, becoming softer. For the tomato sauce, you can gently reheat that on the stovetop. If you’re planning to freeze leftovers, I’d recommend freezing the tomato mixture separately from the shrimp. Thaw the tomato mixture on the stovetop, then pan-fry fresh shrimp coated in coconut and breadcrumbs, and toss them with the reheated sauce. This way, you’ll get the best texture possible.
Frequently Asked Questions
Final Thoughts
There you have it – my cherished recipe for coconut shrimp with tomatoes! It’s a dish that truly embodies what I love about cooking: taking simple ingredients and transforming them into something spectacular that brings joy to the table. The satisfying crunch of the coconut shrimp, the juicy pop of the tomatoes, all coming together in a vibrant, flavor-packed skillet – it’s just pure deliciousness. It’s proof that you don’t need hours in the kitchen or fancy techniques to create a meal that feels special and satisfying. I hope you give this a try, and when you do, I can’t wait to hear all about it! If you loved this, you might also enjoy my Spicy Mango Shrimp Skillet for another tropical-inspired seafood dish, or my Lemon Garlic Butter Shrimp Pasta for a quick and easy pasta option. Happy cooking, and may your kitchens be filled with delicious aromas!

coconut shrimp tomatoes
Ingredients
Main Ingredients
- 1.25 pounds jumbo shrimp peeled and deveined
- 1 teaspoon olive oil
- 1 red bell pepper diced
- 4 scallions thinly sliced, whites and greens separated
- 0.5 cup cilantro chopped, plus more for garnish
- 4 cloves garlic minced
- 0.5 teaspoon kosher salt
- 0.5 teaspoon crushed red pepper flakes or to taste
- 14.5 ounce diced tomatoes canned
- 14 ounce light coconut milk canned
- 0.5 lime juiced
Instructions
Preparation Steps
- In a medium pot, heat oil on medium-low heat. Add red peppers and sauté until soft, about 4 minutes.
- Add scallion whites, 0.25 cup cilantro, garlic, and red pepper flakes. Cook 1 minute, stirring frequently.
- Pour in diced tomatoes, coconut milk, and salt. Increase heat to high and bring to a boil. Reduce heat to low, cover, and simmer for 10 minutes to blend flavors and thicken sauce.
- Stir in shrimp and cook uncovered for 5-6 minutes, until shrimp are opaque and fully cooked through.
- Squeeze in lime juice and stir to combine.
- Divide equally among 4 bowls (about 1.25 cups per serving). Garnish with remaining scallion greens and additional cilantro.
Notes
Featured Comments
“This sounds perfect for those busy nights—simple, flavorful, and uses ingredients I always have on hand!”
“Impressed! Clear steps and creamy results. Perfect for busy nights.”
“New favorite here — super easy. crowd-pleaser was spot on.”
“Super easy and turned out amazing! My family asked for seconds. Saving this one.”
“This sweet treat was absolutely loved — the balanced really stands out. Thanks!”
“Made it tonight and wow — absolutely loved! Will definitely make Simple Coconut Shrimp With Tomatoes again.”


This sounds perfect for those busy nights—simple, flavorful, and uses ingredients I always have on hand!