


There are some recipes that just feel like a warm hug on a plate, and for me, that’s always been a hearty bowl of beef stew. But let’s be honest, sometimes life gets so crazy that the thought of chopping vegetables and simmering for hours feels like climbing Mount Everest. That’s where my absolute favorite freezer beef Stew Recipe comes in. It’s a total game-changer, a lifesaver on those nights when the fridge looks bare and everyone’s stomach is rumbling. I’ve tinkered with this for years, trying to get it just right, and I’m so excited to finally share it with you. Think of it as the comforting, classic beef stew you know and love, but with a clever twist that means deliciousness is always just a quick reheat away. It’s seriously the best way to ensure a wholesome, satisfying meal is on the table, even when you’ve barely had time to blink.
What is freezer beef stew?
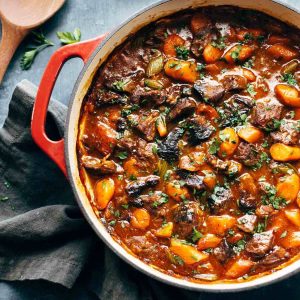
So, what exactly makes this “freezer” beef stew so special? It’s not just beef stew that you happen to freeze. This is a recipe specifically designed to be made ahead and frozen, so when you reheat it, it tastes just as incredible as it did the day you made it – maybe even better! The secret lies in a few key steps during the cooking process and the specific combination of ingredients that hold up beautifully to freezing and thawing. It’s essentially a robust, deeply flavored beef stew that you can pull from your freezer on a whim. Think tender chunks of beef, melt-in-your-mouth vegetables, all swimming in a rich, savory broth that’s perfect for soaking up with a crusty piece of bread. It’s the culinary equivalent of a superhero cape for your busy weeknights!
How do I make freezer beef stew?
Quick Overview
The process is straightforward: we’ll sear the beef, sauté the aromatics, then simmer everything together until the beef is fall-apart tender. The key is to cook it slightly longer than you might for immediate consumption, allowing the flavors to deepen even further and ensuring everything holds its texture perfectly after freezing. Once cooled, it’s portioned and ready to be frozen. Reheating is as simple as simmering it on the stove or popping it in the microwave. It’s the ultimate make-ahead meal that truly delivers on flavor and convenience, proving that delicious, home-cooked food doesn’t always need to be complicated or time-consuming.
Ingredients
For the Beef and Flavor Base:
2.5 pounds beef chuck roast, cut into 1.5-inch cubes (I always look for a well-marbled cut; it makes such a difference in tenderness)
2 tablespoons olive oil (or any neutral cooking oil)
1 large yellow onion, chopped
3 cloves garlic, minced (or more, if you’re a garlic lover like me!)
2 tablespoons all-purpose flour (this helps thicken the stew)
1 teaspoon dried thyme
1/2 teaspoon dried rosemary
Salt and freshly ground Black Pepper, to taste
For the Rich Broth:
4 cups beef broth (low-sodium is great so you can control the saltiness)
1 cup dry red wine (like Cabernet Sauvignon or Merlot; optional, but adds incredible depth)
1 tablespoon Worcestershire sauce (don’t skip this!)
1 bay leaf
For the Hearty Vegetables:
1 pound carrots, peeled and cut into 1-inch chunks
1 pound potatoes (Yukon Gold or red potatoes work best), cut into 1.5-inch chunks
1 cup frozen peas (added at the end of cooking or when reheating)
Step-by-Step Instructions
Step 1: Sear the Beef
Pat your beef cubes very dry with paper towels. This is a crucial step for getting a beautiful, flavorful sear. Season generously with salt and pepper. Heat the olive oil in a large Dutch oven or heavy-bottomed pot over medium-high heat. Working in batches, sear the beef on all sides until deeply browned. Don’t overcrowd the pot, or the meat will steam instead of sear. Remove the browned beef to a plate and set aside. The browning creates all those lovely little bits on the bottom of the pot – that’s pure flavor!
Step 2: Sauté Aromatics and Add Flour
Reduce the heat to medium. Add the chopped onion to the pot and cook, stirring occasionally, until softened and lightly browned, about 5-7 minutes. Add the minced garlic and cook for another minute until fragrant. Sprinkle the flour over the onions and garlic, stirring constantly for about 1-2 minutes to cook out the raw flour taste. This step is key to thickening our stew.
Step 3: Deglaze and Add Liquids
If you’re using red wine, pour it into the pot and scrape up any browned bits from the bottom. Let it simmer for a couple of minutes to reduce slightly. Pour in the beef broth and Worcestershire sauce. Add the dried thyme, rosemary, and bay leaf. Stir everything to combine.
Step 4: Combine and Simmer
Return the seared beef (and any juices from the plate) to the pot. Bring the liquid to a simmer, then reduce the heat to low, cover, and let it cook for 1.5 to 2 hours, or until the beef is tender. Stir occasionally.
Step 5: Add Vegetables
Add the carrots and potatoes to the pot. Make sure they are mostly submerged in the liquid. If needed, you can add a little more beef broth or water. Cover and continue to simmer for another 45 minutes to 1 hour, or until the vegetables are tender.
Step 6: Finish and Cool
Remove the bay leaf. Stir in the frozen peas and cook for just a few minutes until they are heated through. Taste and adjust seasoning with salt and pepper as needed. This is where you really want to make sure the flavor is exactly how you like it. Let the stew cool completely on the counter. This is important for safe freezing and to maintain the best texture.
Step 7: Portion and Freeze
Once cooled, divide the stew into individual freezer-safe containers or heavy-duty freezer bags. Leave a little headspace for expansion. I like to portion it into family-sized servings, but single servings are great too if you often find yourself cooking for one. Label each container with the contents and the date. Freeze for up to 3 months for the best quality.
Step 8: Reheat and Serve
When you’re ready to eat, thaw the stew overnight in the refrigerator or reheat directly from frozen on the stovetop over low heat, stirring occasionally, until heated through. You might need to add a splash more broth or water if it seems a little thick. Serve hot!
What to Serve It With
Oh, the possibilities! This freezer beef stew is a meal in itself, but it also plays wonderfully with a variety of sides, making it perfect for any occasion. For a classic breakfast (yes, breakfast!), a small portion of this hearty stew over a perfectly fried egg is surprisingly delicious and gives you a robust start to your day. For brunch, I love serving it in small ramekins with a dollop of sour cream and a sprinkle of fresh parsley, accompanied by some warm, fluffy dinner rolls for dipping. As a decadent dessert? That might sound odd, but a tiny, rich portion served in a small teacup after a lighter meal can be incredibly satisfying, especially on a cold evening. But my favorite way, and probably the most common in my house, is for cozy snacks or a simple weeknight dinner. It’s amazing spooned over creamy Mashed Potatoes, served alongside fluffy rice, or just with a thick slice of crusty bread to mop up every last drop of that glorious gravy. My kids also adore it with some buttery biscuits, which they say are perfect for “scooping.”
Top Tips for Perfecting Your Freezer Beef Stew
Over the years, I’ve learned a few tricks that really elevate this freezer beef stew from good to absolutely unforgettable. First, about the beef: don’t be tempted by lean cuts. Chuck roast is your best friend here because the marbling renders down beautifully during the long cooking process, making the meat incredibly tender and flavorful. If you can find it with a good amount of connective tissue, even better – that’s what turns into glorious gelatin and makes the stew so rich! When you’re searing the beef, make sure your pot is hot and don’t overcrowd it. This is non-negotiable for getting that deeply browned, caramelized crust that adds so much depth of flavor. Resist the urge to stir too much during the initial sear. For the vegetables, I find that potatoes that hold their shape well, like Yukon Gold or red potatoes, are ideal. If you cut them too small, they can turn to mush. And adding those frozen peas right at the end, or when reheating, keeps them vibrantly green and perfectly tender. I’ve also experimented with adding other root vegetables like parsnips or even sweet potatoes, and they work beautifully, adding a slightly different sweet note. If you find your stew isn’t as thick as you like, don’t panic. A simple slurry of cornstarch or flour mixed with a little cold water can work wonders. Just whisk it in gradually while the stew is simmering until it reaches your desired consistency. And for the red wine? If you don’t drink alcohol or prefer not to use it, you can simply substitute it with an equal amount of extra beef broth or even a splash of balsamic vinegar for a bit of tang. Trust me, after making this countless times, these little adjustments make all the difference!
Storing and Reheating Tips
Proper storage is key to ensuring your freezer beef stew remains a delicious meal-saver for months to come. Once the stew has cooled completely (and I can’t stress this enough – never freeze hot food!), portion it into airtight, freezer-safe containers or heavy-duty freezer bags. For containers, make sure they are designed for freezing. If using bags, I like to lay them flat on a baking sheet in the freezer until solid, then I can stack them more easily in the freezer. This way, your stew will last for up to 3 months and still taste fantastic. If you forget to thaw it overnight, don’t worry! You can reheat it directly from frozen on the stovetop over low heat. Just be patient and stir it occasionally to ensure it heats evenly and doesn’t stick. If you’ve thawed it in the fridge, it will reheat much faster, usually within 15-20 minutes on the stovetop or a few minutes in the microwave. Add a splash of beef broth or water if the stew seems a bit thick after thawing, as it can condense slightly. I usually avoid adding the peas until just before serving or reheating, as they can get a bit mushy if frozen and thawed with the rest of the stew.
Frequently Asked Questions
Final Thoughts
This freezer beef stew is more than just a recipe; it’s a little piece of kitchen peace of mind. It’s the kind of dish that makes you feel accomplished, even on your busiest days. The depth of flavor you get from simmering and then freezing it is truly remarkable, and the convenience it offers is unmatched. It’s proof that you can have incredibly satisfying, homemade meals without spending hours in the kitchen every single night. If you love comforting, soul-warming food, I really hope you’ll give this freezer beef stew a try. I’m already dreaming about the next time I’ll pull a perfectly portioned container from my freezer! If you’re looking for other make-ahead meal ideas, you might enjoy my slow cooker pulled pork or my easy chicken noodle soup. Happy cooking, and I can’t wait to hear how your stew turns out!
Freezer Beef Stew
Ingredients
Main Ingredients
- 2 lbs beef chuck roast, trimmed and cut into 1.5-inch chunks
- 1 medium onion, chopped
- 3 stalks celery, chopped
- 4 large carrots, peeled and cut into 1-inch pieces
- 0.5 cup beef broth
- 0.25 cup all-purpose flour for thickening
- 2 tablespoons olive oil
- 1.5 teaspoons salt
- 0.5 teaspoons black pepper
- 1 clove garlic, minced
- 1 tablespoon tomato paste
- 0.5 cup red wine (optional)
Instructions
Preparation Steps
- Toss the beef chunks with flour, salt, and pepper until evenly coated.
- Heat olive oil in a large Dutch oven or heavy-bottomed pot over medium-high heat. Brown the beef in batches until nicely seared on all sides. Remove beef and set aside.
- Add the chopped onion, carrots, and celery to the pot. Cook, stirring occasionally, until softened, about 5-7 minutes.
- Stir in the minced garlic and tomato paste and cook for 1 minute more until fragrant.
- If using, pour in the red wine and scrape up any browned bits from the bottom of the pot. Let it simmer for 2 minutes.
- Return the browned beef to the pot. Add the beef broth. Bring to a simmer, then reduce heat to low, cover, and cook for 1.5 to 2 hours, or until the beef is tender.
- Alternatively, you can transfer the ingredients to a slow cooker and cook on low for 6-8 hours or on high for 3-4 hours.
- Once the stew is cooked and the beef is tender, adjust seasoning with salt and pepper as needed.
- To freeze, let the stew cool completely. Divide into freezer-safe containers or bags, removing as much air as possible. Freeze for up to 3 months.
- To reheat, thaw overnight in the refrigerator or reheat gently on the stovetop or in the microwave.
Notes
Featured Comments
“Impressed! Clear steps and turned out amazing results. Perfect for busy nights.”
“New favorite here — quick weeknight win. crowd-pleaser was spot on.”
“Super easy and turned out amazing! My family asked for seconds. Saving this one.”
“This sweet treat was absolutely loved — the silky really stands out. Thanks!”
“Made it tonight and wow — spot on! Will definitely make Simple Freezer Beef Stew That’s a Lifesaver again.”
“Packed with flavor and so simple. Exactly what I wanted from Simple Freezer Beef Stew That’s a Lifesaver.”


