

There are mornings, aren’t there? The kind where your alarm feels like a personal affront, and the thought of anything more complicated than grabbing a banana feels like a marathon. For years, I lived in a cycle of rushed cereal or, worse, no breakfast at all. Then, one crisp autumn day, I stumbled upon a recipe that changed everything. These aren’t just any muffins; they’re my go-to, lifesaver, “everyone-asks-for-the-recipe” easy breakfast muffins. They’re the kind of treat that feels utterly indulgent but is so ridiculously simple, you’ll wonder why you ever bothered with anything else. They’re like a warm hug in muffin form, perfect for those frantic school mornings or when you just need a little something sweet to kickstart your day without a fuss. If you’ve ever found yourself staring into your pantry, hoping a magical pastry will appear, these are for you. They’re a game-changer, truly.
What are easy breakfast muffins?
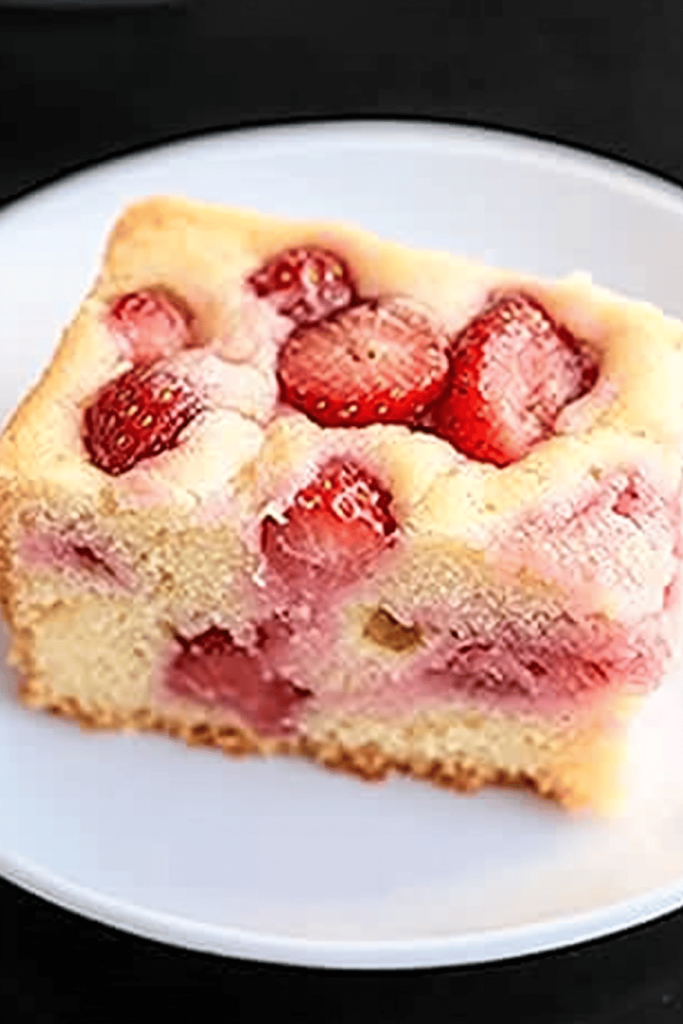
So, what exactly makes these *easy* breakfast muffins so special? Think of them as your ultimate morning companion. They’re a delightful fusion of a fluffy cake and a hearty snack, designed to be baked in one bowl (yes, ONE bowl!) and requiring absolutely no fancy techniques. The “easy” in their name isn’t just a suggestion; it’s a promise. We’re talking simple pantry staples coming together in minutes to create something truly magical. They’re essentially mini, portable cakes that are perfectly portioned for grabbing on the go or enjoying with a leisurely cup of coffee. The beauty of these easy breakfast muffins lies in their straightforward approach – no creaming butter and sugar for ages, no complicated folds, just a gentle mix and into the oven they go. It’s the kind of recipe that empowers you, even on your sleepiest mornings, to create something wonderful from scratch.
How do I make [Recipe Name]?
Quick Overview
The magic behind these easy breakfast muffins is their incredibly streamlined process. You’ll whisk together your dry ingredients in one bowl, then mix your wet ingredients in another (or even directly into the dry if you’re feeling extra speedy!). A quick fold-together, a pour into your muffin tin, and off they go to bake into golden perfection. It’s a method designed for maximum flavor and minimum mess, proving that delicious homemade treats are totally achievable even on the busiest of mornings. You’ll have warm, comforting muffins ready in under an hour from start to finish, making them a genuine weeknight or weekend wonder.
Ingredients
For the Main Batter:
Here’s where the simplicity really shines. You’ll need all-purpose flour – I usually grab a standard bag from the grocery store, nothing fancy required. Make sure it’s measured correctly; spoon it into your measuring cup and level it off for the best results. Granulated sugar provides the perfect sweetness without being cloying. Baking powder is our leavening agent, ensuring these muffins are wonderfully light and fluffy. A pinch of salt really does wonders to balance out the sweetness and enhance all the other flavors. And of course, eggs to bind everything together and give us that lovely richness. For the fat, melted butter is my absolute favorite here; it adds such a wonderful flavor and tenderness, but a good quality neutral oil like canola or vegetable oil works like a charm too. And for the liquid, whole milk is my preference for its richness, but I’ve had great success with 2% or even almond milk if that’s what you have on hand – it can even make them a touch creamier!
For the Filling:
This is where you can really have some fun! For the base, I often use a simple combination of brown sugar and cinnamon. It’s a classic for a reason! Sometimes I’ll add a tiny bit of flour to help thicken it slightly, but it’s not strictly necessary. You can also add in about a cup of your favorite mix-ins. Fresh or frozen berries are fantastic, just toss them with a tablespoon of flour first to prevent them from sinking. Mini chocolate chips are always a hit with my kids, or you could try chopped nuts like walnuts or pecans for a bit of crunch. Don’t be afraid to get creative here!
For the Glaze:
This is totally optional but highly recommended for that extra touch of indulgence. It’s just powdered sugar, a splash of milk or lemon juice (for a little tang!), and a tiny bit of Vanilla Extract. The key is to get the consistency just right – thick enough to coat but thin enough to drizzle. If it’s too thick, add a tiny bit more liquid; too thin, add more powdered sugar.
Step-by-Step Instructions
Step 1: Preheat & Prep Pan
First things first, let’s get that oven preheated to a cozy 375°F (190°C). While it’s warming up, grab your muffin tin. I like to use a standard 12-cup tin. You can use paper liners if you prefer, but I find that greasing the tin really well with butter or cooking spray, and then dusting it with a little flour, does the trick for easy release every single time. Make sure you get into all the nooks and crannies of the cups!
Step 2: Mix Dry Ingredients
Grab a large mixing bowl – this is our primary workspace! Add in your all-purpose flour, granulated sugar, baking powder, and salt. Give them a good whisk together. This step is more important than it looks! It ensures that your leavening agents and salt are evenly distributed throughout the batter, so you don’t end up with pockets of salt or dense muffins. You want everything to be nicely combined and looking uniform.
Step 3: Mix Wet Ingredients
In a separate medium bowl, whisk together your eggs until they’re lightly beaten. Then, stir in your melted butter (make sure it’s cooled slightly so it doesn’t cook the eggs!) and your milk. Give it all a good stir until it’s well combined. It should look like a smooth, slightly creamy mixture. This is the heart of our moist muffin base!
Step 4: Combine
Now for the magic! Pour the wet ingredients into the bowl with the dry ingredients. Use a spatula or a wooden spoon to gently fold everything together. This is NOT the time to go crazy with the mixer. You want to mix until you *just* no longer see streaks of dry flour. A few small lumps are perfectly fine, even desirable! Overmixing is the number one culprit for tough muffins, so be gentle and stop as soon as everything is incorporated. Seriously, don’t overdo it!
Step 5: Prepare Filling
If you’re adding mix-ins like chocolate chips or berries, get them ready now. If using berries, toss them with a tablespoon of flour in a small bowl – this coating helps them distribute evenly and prevents them from sinking to the bottom. For the cinnamon swirl, just whisk together your brown sugar and cinnamon in a small bowl. You can add a tiny pinch of flour here too, if you like, but it’s optional.
Step 6: Layer & Swirl
Now, let’s assemble these beauties. Spoon about half of the batter evenly into your prepared muffin cups, filling them about two-thirds full. If you’re doing a swirl, sprinkle about half of your cinnamon sugar mixture (or half of your chocolate chips/berries) over the batter. Then, spoon the remaining batter on top, filling the cups another quarter to halfway. If you’re swirling, add the remaining cinnamon sugar mixture on top. Now, here’s the fun part: take a toothpick or a skewer and gently swirl it through the batter in each cup. Just a few passes is all you need to create those beautiful marbled patterns. Don’t over-swirl, or the colors will blend too much!
Step 7: Bake
Pop that muffin tin into your preheated oven. Bake for approximately 18-22 minutes. The exact time will vary depending on your oven, so keep an eye on them! You’ll know they’re done when they’re beautifully golden brown on top and a toothpick inserted into the center of a muffin comes out clean, with perhaps just a few moist crumbs attached (but no wet batter!).
Step 8: Cool & Glaze
Once baked to perfection, let the muffins cool in the muffin tin for about 5-10 minutes. This allows them to set up properly. Then, carefully transfer them to a wire rack to cool completely. If you’re adding a glaze, this is the time! Whisk together your powdered sugar, milk or lemon juice, and vanilla extract until smooth. Drizzle or spread it over the cooled muffins. Let the glaze set for a few minutes before serving.
Step 9: Slice & Serve
And there you have it – your gorgeous, homemade easy breakfast muffins! They’re best enjoyed fresh, whether warm from the oven (with or without glaze!) or at room temperature. They slice beautifully and are perfect for sharing… or keeping all to yourself. Enjoy that wonderful aroma filling your kitchen!
What to Serve It With
These easy breakfast muffins are so versatile, they fit into almost any mealtime scenario. For a quick and satisfying breakfast, they’re a dream paired with a hot cup of coffee or a refreshing glass of orange juice. I love serving them warm, maybe with a tiny pat of butter melting into them, for those lazy weekend mornings. For a more elaborate brunch, they make a wonderful addition to a spread alongside some scrambled eggs, crispy bacon, and a fresh Fruit Salad. Their slightly sweet profile complements savory dishes beautifully. If you’re in the mood for something a little more dessert-like, a drizzle of extra glaze or a dusting of powdered sugar turns them into a lovely after-dinner treat. And for cozy snacks? They’re perfect! Imagine curling up with a good book and one of these muffins and a mug of tea – pure bliss. My family also loves them as an after-school snack, sometimes with a side of yogurt for extra protein. The possibilities are really endless, making them a constant favorite in my house.
Top Tips for Perfecting Your Easy Breakfast Muffins
I’ve made these easy breakfast muffins more times than I can count, and through those countless batches, I’ve picked up a few tricks that I think will really help you achieve muffin perfection. First, about the flour for any fruit you add: this is a game-changer! Tossing your berries or chopped apples with a tablespoon of flour before adding them to the batter prevents them from sinking to the bottom. It might seem like a small step, but trust me, it makes a difference in getting those lovely inclusions evenly distributed. When it comes to mixing the batter, the golden rule is *do not overmix*. Seriously, I can’t stress this enough! As soon as you no longer see dry flour, stop. A few lumps are totally fine and actually desirable for a tender crumb. Overmixing develops the gluten too much, leading to tough, chewy muffins, and nobody wants that. For the swirl, use a light hand. You’re aiming for pretty ribbons of flavor and color, not a muddy mess. Just a few gentle twists with a toothpick are enough. If you’re swapping ingredients, know that I’ve tested this recipe with almond milk, and it worked beautifully, making the muffins incredibly moist. You can also experiment with different extracts; a hint of lemon zest in the batter or a touch of almond extract can add a lovely new dimension. For baking, always keep an eye on your oven. Ovens can be finicky! If your muffins are browning too quickly on top before the center is cooked, you can loosely tent them with foil for the last few minutes of baking. And for the glaze, consistency is key. I aim for a drizzling consistency, but if yours is too thick, add milk or lemon juice a teaspoon at a time. Too thin? Add powdered sugar a tablespoon at a time. It’s all about that perfect, luscious flow!
Storing and Reheating Tips
One of the best things about these easy breakfast muffins is how well they keep, making them a perfect make-ahead option. At room temperature, they’ll stay wonderfully fresh for about 2-3 days. Just make sure to store them in an airtight container or wrap them well in plastic wrap. This prevents them from drying out. If you’ve made a big batch and want them to last longer, the refrigerator is your friend. They can be stored in an airtight container in the fridge for up to a week. I find that they’re still quite moist, but for the absolute best texture, I always like to let them come back to room temperature before eating. Freezing is also a fantastic option if you want to have these on hand for weeks to come! Once the muffins have cooled completely (this is crucial!), wrap each one individually and tightly in plastic wrap, then place them in a freezer-safe bag or airtight container. They’ll last for about 2-3 months. To reheat, you can simply let them thaw at room temperature for an hour or so, or pop them in a low oven (around 300°F or 150°C) for about 5-10 minutes until warmed through. If you’ve glazed your muffins, I generally recommend adding the glaze *after* reheating them from frozen or refrigerated, as the glaze can sometimes get a bit sticky or soft if stored with it on for too long. It’s worth the extra step for that perfect finish!
Frequently Asked Questions
Final Thoughts
There you have it – my absolute favorite, no-fuss, incredibly delicious easy breakfast muffins. I truly believe this recipe is a kitchen game-changer, especially for those busy mornings or when you just crave something homemade and comforting without a lot of effort. They’re a testament to how simple ingredients and a straightforward approach can yield something truly special. They’re the kind of recipe that builds confidence in the kitchen and brings a little bit of homemade joy to your everyday. If you’re someone who’s always looking for those reliable, go-to recipes that always turn out perfectly, I really hope you’ll give these easy breakfast muffins a try. They’re a winner in my house, and I have a feeling they’ll become a favorite in yours too. Once you’ve tried them, please come back and tell me what you think! I’d love to hear about your variations and how your family enjoys them. Happy baking, my friends!

Easy Breakfast Muffins with Hash Brown Crust
Ingredients
Hash Brown Crust
- 20 oz shredded hash browns (or frozen, thawed and strained)
- 1 egg
- 0.33 cup shredded Mexican blend cheese
- 0.5 tsp salt
- 0.25 tsp pepper
- 1 tsp dried parsley
- 3 cloves minced garlic
- 0.25 tsp smoked paprika
- 1 tsp olive oil
Egg Mixture
- 12 eggs
- 0.5 cup milk
- 1 cup shredded Mexican blend cheese (or your other favorite)
- 12 slices crispy bacon cut up into bite-size pieces
- 0.75 tsp salt
- 0.5 tsp pepper
- 1.5 tsp dried parsley
Instructions
Preparation Steps
- Preheat oven to 400 degrees Fahrenheit.
- Spray two 12-cup muffin tins with non-stick baking spray.
- For the hash brown crust: In a large bowl, mix the shredded hash browns with one egg, olive oil, 0.33 cup shredded cheese, 0.5 tsp salt, 0.25 tsp pepper, minced garlic, smoked paprika, and dried parsley until seasonings are well combined.
- Split the hash brown mixture evenly among the 24 baking cups. Pat it down with the back of a cup or another round container that fits into the muffin tins to form the crust.
- Bake the hash brown crust in the preheated oven for 10-15 minutes, or until it gets slightly browned and crispy.
- For the egg mixture: While the crust is cooking, mix the 12 eggs, milk, 1 cup shredded cheese, cut-up bacon, 0.75 tsp salt, 0.5 tsp pepper, and dried parsley in a large bowl.
- Once the hash brown crust is slightly browned, split the egg mixture evenly on top of the hash browns in the muffin tins, filling to about 3/4 full.
- Bake in the oven for another 10-15 minutes, or until the eggs are fully cooked.
- Remove from the oven and let cool for a few minutes before removing from the muffin tins. You can slide a silicone spatula around the outside of the cups to help release them.
- Serve hot or at room temperature.
Notes
Featured Comments
“Impressed! Clear steps and perfect for busy nights results. Perfect for busy nights.”
“New favorite here — absolutely loved. crowd-pleaser was spot on.”
“Super easy and turned out amazing! My family asked for seconds. Saving this one.”
“This sweet treat was absolutely loved — the fresh really stands out. Thanks!”
“Made it tonight and wow — super easy! Will definitely make Simple Muffin Breakfast Recipes for Busy Mornings again.”
“Packed with flavor and so simple. Exactly what I wanted from Simple Muffin Breakfast Recipes for Busy Mornings.”


