


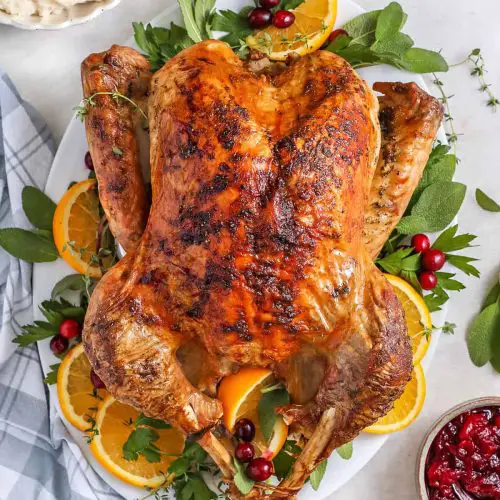
Oh, Thanksgiving turkey. Just the words bring back a flood of memories, don’t they? For me, it’s the scent of sage and roasting meat filling our tiny kitchen, the excited chatter of cousins, and the sheer joy of carving into that golden-brown masterpiece. For years, I wrestled with turkey. Sometimes it was dry, sometimes it was bland, and once, well, let’s just say it was a little *too* well-done. But then, I stumbled upon this method, and honestly, it changed everything. It’s the kind of Thanksgiving turkey that makes your eyes close with the first bite, the kind that whispers of home and warmth. It’s surprisingly straightforward, and the result? Pure magic. Forget those complicated brines or basting every 15 minutes; this method gives you that incredible, juicy, perfectly seasoned Thanksgiving turkey with way less stress.
What is the
So, what exactly *is* this “Perfectly Simple” Thanksgiving turkey I keep raving about? Think of it as the ultimate cheat code for a show-stopping bird that’s bursting with flavor and unbelievably moist, without requiring a culinary degree or a full day spent hovering over the oven. It’s essentially a method that uses a few key techniques to maximize moisture and infuse flavor right from the start. It’s not about fancy ingredients; it’s about smart preparation. We’re talking about a turkey that’s tender enough to fall off the bone, with skin that’s impossibly crispy and golden. It’s the kind of Thanksgiving turkey that makes everyone at the table go quiet for a moment of pure appreciation. It’s the centerpiece you dream of, without the kitchen drama.
Why you’ll love this
Honestly, there are so many reasons why this Thanksgiving Turkey Recipe has become my absolute go-to, and I know you’re going to love it just as much. First and foremost, the flavor is just out of this world. It’s deeply savory, with hints of herbs and a subtle sweetness that just sings. It’s not overpowering; it’s just… *right*. And the texture? Oh my goodness. We’re talking unbelievably moist meat that isn’t stringy or dry in the slightest. Even the dreaded breast meat comes out perfectly tender! What I love most, though, is the simplicity. You might be thinking, “A whole turkey? Simple? No way!” But trust me, this method cuts down on the fuss dramatically. You don’t need to be constantly basting or worrying about dry spots. It’s surprisingly forgiving. Plus, it’s incredibly cost-effective when you consider the impact it makes. A beautiful, perfectly cooked Thanksgiving turkey can be expensive if you’re buying pre-cooked or fancy injected birds. This way, you control the quality and the cost. It’s also incredibly versatile; you can easily tweak the herb combinations or add different aromatics inside the cavity to make it your own. It truly is the perfect Thanksgiving turkey for any home cook, whether it’s your first time or your fiftieth.
How do I make a perfect Thanksgiving turkey
Quick Overview
The beauty of this method lies in its straightforward approach. We’ll prep the turkey for maximum flavor and moisture, roast it until it’s golden and cooked through, and then let it rest beautifully. The key is a simple herb butter, strategic aromatics, and a smart oven temperature approach. It’s designed to give you that impressive, juicy Thanksgiving turkey centerpiece with minimal fuss and maximum deliciousness. You’ll be amazed at how easy it is to achieve such incredible results!
Ingredients
Thanksgiving turkey: What are some good Thanksgiving turkey recipes?
1 (12-15 pound) whole turkey, thawed completely if frozen.
2 sticks (1 cup) unsalted butter, softened. I always opt for good quality unsalted butter; it makes a difference in the richness.
1/4 cup chopped fresh sage. Fresh is key here! It has such a vibrant flavor.
1/4 cup chopped fresh rosemary. Again, fresh will give you the best aromatic punch.
2 tablespoons chopped fresh thyme. Thyme is lovely and earthy, perfect for turkey.
2 cloves garlic, minced. For that subtle garlicky undertone.
1 teaspoon salt. Kosher salt is my preference for its texture.
1/2 teaspoon freshly ground Black Pepper. Always fresh, it’s a game changer for any dish.
Optional: A lemon or orange, halved, for stuffing inside the cavity.
For the Cavity Aromatics:
1 large yellow onion, quartered. Adds a wonderful savory depth.
2 carrots, roughly chopped. Sweetness and earthy notes.
2 celery stalks, roughly chopped. Classic mirepoix for flavor base.
A few sprigs of fresh sage, rosemary, and thyme. To boost that herbaceous aroma.
Step-by-Step Instructions
Step 1: Preheat & Prep Pan
First things first, get your oven preheating to 425°F (220°C). While that’s warming up, take your turkey out of its packaging. Remove the giblets and neck from the cavities (save these for gravy if you like!). Pat the entire turkey *really* dry, inside and out, with paper towels. This is a crucial step for crispy skin, so don’t skip it! Place your turkey on a sturdy roasting rack set inside a large roasting pan. If you don’t have a rack, you can create a makeshift one with large chunks of carrots and onions, or even some sturdy vegetable scraps.
Step 2: Mix Dry Ingredients
In a small bowl, combine the softened butter with the chopped fresh sage, rosemary, thyme, minced garlic, salt, and black pepper. Mash it all together with a fork until it’s well combined and forms a fragrant paste. This herb butter is where a lot of the magic happens, so make sure it’s evenly mixed.
Step 3: Mix Wet Ingredients
In this recipe, the “wet ingredients” are essentially the softened butter mixture, which we’ll use to coat the turkey. There’s no separate wet mix to prepare at this stage. The magic is in how we incorporate this flavored butter.
Step 4: Combine
This is where we get our hands a little messy, but it’s totally worth it! Gently separate the skin from the breast meat of the turkey. You can do this with your fingers, being careful not to tear the skin. Then, take spoonfuls of that herb butter mixture and spread it directly onto the breast meat, under the skin. This helps the flavor penetrate the meat and keeps it incredibly moist. Spread any remaining butter all over the outside of the turkey, ensuring it’s evenly coated. This will give you that beautiful golden-brown, crispy skin.
Step 5: Prepare Filling
Now, let’s get the cavity ready. Stuff the quartered onion, chopped carrots, celery, and the extra herb sprigs inside the main cavity. If you’re using a lemon or orange, cut it in half and tuck those in too. These aromatics will steam inside the turkey as it roasts, infusing the meat with wonderful, subtle flavors. Don’t pack it too tightly, as you want air to circulate.
Step 6: Layer & Swirl
There’s no layering or swirling involved in preparing the turkey itself. The focus is on coating the bird evenly with the herb butter and stuffing the cavity with aromatics. The “swirl” effect you might see in some dishes isn’t applicable here, as we’re aiming for a uniformly delicious roasted turkey.
Step 7: Bake
Place the prepared turkey in the preheated 425°F (220°C) oven. Roast for 30 minutes. This initial high heat helps to crisp up the skin beautifully. After 30 minutes, reduce the oven temperature to 325°F (160°C). Continue roasting, about 13-15 minutes per pound, or until a meat thermometer inserted into the thickest part of the thigh (without touching the bone) reads 165°F (74°C). If the skin starts to get too dark before the turkey is cooked through, you can loosely tent it with aluminum foil.
Step 8: Cool & Glaze
Once your Thanksgiving turkey reaches that perfect 165°F (74°C), carefully remove it from the oven. Tent it loosely with aluminum foil and let it rest for at least 20-30 minutes (even 45 minutes is great!). This resting period is absolutely critical. It allows the juices to redistribute throughout the meat, ensuring every slice is incredibly moist and flavorful. Do NOT skip this step! There’s no glaze in this particular recipe, as the herb butter and natural juices create all the deliciousness you need.
Step 9: Slice & Serve
After resting, it’s time to carve! Use a sharp carving knife and fork to slice the turkey. Start by removing the legs and wings, then carve the breast meat. Serve it up hot with all your favorite Thanksgiving sides. The aroma alone will have everyone gathered around the table, eager for their first taste!
What to Serve It With
This Thanksgiving turkey is the absolute star of the show, but it plays wonderfully with a supporting cast of delicious dishes. For a classic Thanksgiving breakfast, I love serving leftover turkey slices alongside fluffy scrambled eggs and some crispy Breakfast Potatoes. It’s surprisingly hearty and starts the day off right. For a more elegant brunch, think about serving carved turkey alongside a beautiful cranberry-orange relish and some warm, buttery croissants. It feels so festive and special. As a dessert, while it might sound unusual, small, thinly sliced pieces of the perfectly cooked, slightly cooled turkey breast can be surprisingly good dipped in a rich gravy or a cranberry sauce for a savory-sweet bite – I know, I know, but trust me on this one! For cozy snacks throughout the day, especially on Thanksgiving itself while everyone’s hanging out, I’ll often set out a platter of carved turkey with a selection of dipping sauces like my homemade cranberry sauce, a tangy mustard, or even a little bit of leftover gravy. My family also loves having it cold on hearty sourdough bread the day after Thanksgiving, making for some epic turkey sandwiches. It’s just so versatile, you really can’t go wrong.
Top Tips for Perfecting Your Thanksgiving Turkey
I’ve made this Thanksgiving turkey more times than I can count, and over the years, I’ve picked up a few tricks that really elevate it from good to unforgettable. First, about the zucchini: actually, there’s no zucchini in this turkey recipe! Perhaps that’s a thought from a different recipe, but for this turkey, the key is the **turkey prep**. Make sure you get it *completely* dry with paper towels. Moisture is the enemy of crispy skin, and a dry bird means a beautifully golden, crackly exterior. When you’re spreading that herb butter, be thorough! Don’t just smear it on top; really get it under the skin on the breast meat. It’s a little bit of effort, but it makes a world of difference in keeping that breast meat incredibly juicy. For the **mixing advice**, ensure your butter is soft but not melted. You want it spreadable, not soupy. If it’s too cold, it won’t mix well with the herbs and garlic. If it’s too soft, it will just slide off. Regarding **swirl customization**, while not applicable to the turkey itself, if you were making something like a swirl bread or cake, gentle swirling with a knife or skewer creates beautiful patterns. For the turkey, focus on even coating. As for **ingredient swaps**, if you can’t find fresh sage, you can use about a tablespoon of dried sage, but the flavor won’t be as vibrant. Same goes for rosemary and thyme. For garlic, a teaspoon of garlic powder can work in a pinch, but fresh minced garlic is always superior for this application. If you’re out of unsalted butter, salted will work, but just omit the added salt in the herb mixture. When it comes to **baking tips**, really trust your meat thermometer. Oven temperatures can vary wildly, and relying on visual cues alone can lead to an under or overcooked bird. Make sure you’re inserting it into the thickest part of the thigh, avoiding the bone. And that resting period? I cannot stress this enough. Seriously, don’t carve too early! It makes all the difference between a good turkey and a spectacular one. Your patience will be rewarded tenfold.
Storing and Reheating Tips
Leftover Thanksgiving turkey is a gift that keeps on giving, and I’ve found the best ways to keep it tasting fantastic. For **room temperature** storage, it’s best to only leave carved turkey out for a maximum of two hours to ensure food safety. If you plan to eat it within a few hours, you can leave it on a platter, covered loosely with foil, but refrigeration is always the safest bet. When it comes to **refrigerator storage**, wrap your carved turkey tightly in plastic wrap or place it in an airtight container. It will stay delicious for about 3-4 days. I always make sure to get it into the fridge within two hours of it coming out of the oven. For **freezer instructions**, if you have a lot of leftovers, wrap the carved turkey very well in a couple of layers of plastic wrap, then a layer of aluminum foil, or use a freezer-safe airtight container. It can be stored in the freezer for up to 3-4 months. To thaw, it’s best to transfer it to the refrigerator overnight. For reheating, I find that gently warming carved turkey in a covered dish with a little bit of broth or gravy in the oven at around 300°F (150°C) until heated through is the best way to retain moisture. You can also gently reheat it on the stovetop over low heat. Avoid microwaving for too long, as it can make the meat a bit rubbery. For the **glaze timing advice**, since this recipe doesn’t have a specific glaze, the focus is on the natural juices. If you were to add a glaze, I’d typically apply it in the last 30-60 minutes of baking or right before serving if it’s a cold glaze.
Frequently Asked Questions
Final Thoughts
So there you have it – my foolproof guide to the most delicious, tender, and stress-free Thanksgiving turkey you’ll ever make. This recipe truly embodies the spirit of the holiday for me: warmth, family, and incredible food without all the fuss. It’s the kind of dish that makes everyone’s eyes light up and prompts murmurs of delight around the table. I really hope you give it a try this year. If you’re looking for more Thanksgiving inspiration, you might also enjoy my recipes for [link to another Thanksgiving recipe, e.g., “Creamy Mashed Potatoes“] or my foolproof [link to another Thanksgiving recipe, e.g., “Homemade Cranberry Sauce”]. They pair perfectly with this turkey! I can’t wait to hear how your Thanksgiving turkey turns out. Please leave a comment below and share your experience, or let me know about any special twists you added! Happy cooking, and happy Thanksgiving!
Classic Thanksgiving Turkey
Ingredients
Main Ingredients
- 1 pound Whole turkey thawed if frozen, giblets removed
- 0.5 cup Unsalted butter softened
- 2 teaspoon Salt
- 1 teaspoon Black pepper
- 1 medium Onion quartered
- 1 stalk Celery cut into 2-inch pieces
- 1 bunch Fresh thyme
- 1 bunch Fresh rosemary
Instructions
Preparation Steps
- Preheat oven to 325°F (160°C).
- Remove the turkey from its packaging. Discard the giblets and neck. Pat the turkey dry inside and out with paper towels. This is crucial for crispy skin.
- Place the turkey on a roasting rack in a large roasting pan.
- In a small bowl, mix the softened butter with salt and pepper.1 pound Whole turkey
- Loosen the skin over the breast and thighs by gently sliding your fingers underneath. Spread half of the butter mixture evenly under the skin.
- Rub the remaining butter mixture all over the outside of the turkey.
- Stuff the cavity of the turkey with the quartered onion, celery pieces, thyme, and rosemary sprigs.1 pound Whole turkey
- Tuck the wing tips under the body of the turkey and tie the legs together with kitchen twine.
- Roast the turkey for approximately 13-15 minutes per pound, or until a meat thermometer inserted into the thickest part of the thigh (without touching bone) registers 165°F (74°C).
- Baste the turkey with pan juices every 30-45 minutes during roasting.
- If the skin begins to brown too quickly, loosely tent the turkey with aluminum foil.
- Once cooked, remove the turkey from the oven and let it rest for at least 20-30 minutes before carving. This allows the juices to redistribute, resulting in a more tender and moist turkey.
Notes
Featured Comments
“Impressed! Clear steps and super easy results. Perfect for busy nights.”
“New favorite here — super easy. crowd-pleaser was spot on.”
“Super easy and turned out amazing! My family asked for seconds. Saving this one.”
“This sweet treat was absolutely loved — the balanced really stands out. Thanks!”
“Made it tonight and wow — crowd-pleaser! Will definitely make Thanksgiving turkey again.”
“Packed with flavor and so simple. Exactly what I wanted from Thanksgiving turkey.”


