I still remember the first time I set out a tray of bright, color-rich bites on the kitchen counter and called over the crowd for a taste. The room smelled like sun-warmed basil and garlic, with a hint of olives right off the coast. It felt like a party in miniature—a little celebration you could pick up with one hand. That’s what Antipasto Skewers are to me: a portable, no-fuss version of a familiar antipasto platter that somehow tastes even more festive when you can grab it between sips of coffee and easy conversation. This recipe is a lifesaver on busy nights, a crowd-pleaser for casual gatherings, and a gentle reminder that great flavor doesn’t require turning on the oven for hours. I’ve made these countless times, and I still catch myself grinning when someone says, “These taste like a party in my mouth.” The kids practically beg for them, which means they’re doing something right—colorful, bite-sized, and delicious enough to disappear in minutes.
What is antipasto skewers?
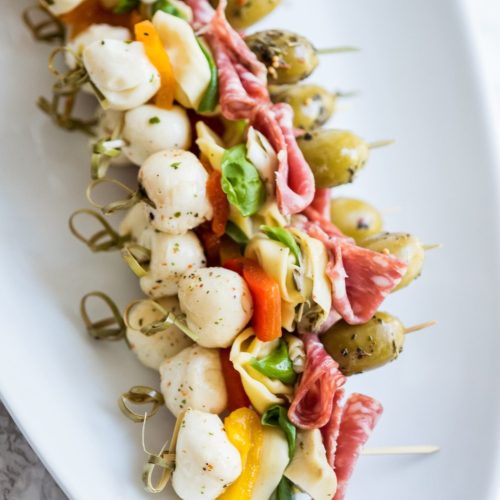
Antipasto Skewers are essentially a handheld version of the classic Italian antipasto platter. Think marinated vegetables, cheese, cured meats, olives, and artichokes threaded onto small skewers so you can nibble without needing plates and forks. The idea is simple: take the best bites from a traditional antipasto and arrange them on sticks for easy sharing. The name itself hints at “before the meal” in Italian culture—a little starter that invites conversation, not fuss. It’s essentially a celebration of texture and brightness: the snap of a pepper, the creaminess of mozzarella, the briny punch of olives, and a kiss of balsamic glaze tying it all together. Think of it as a refrigerator clean-out that works as a showstopper, perfect for game nights, veggie-forward eaters, and anyone who loves a balanced bite with contrast in every chew.
Why you’ll love this recipe?
What I love most about Antipasto Skewers is how they manage to feel fancy without taking up your entire evening. The flavors sing, and the assembly is forgiving enough for a weeknight routine yet polished enough for a crowd. The flavor profile here is a sunlit Mediterranean mix—briny olives, tangy mozzarella, sweet tomatoes, and smoky cured meat—brightened with fresh basil and a glossy glaze that brings everything together. The simplicity is a big win: you don’t need to fuss with multiple pans or long simmer times. It’s basically a quick assembly line, and your kitchen stays calm while everyone else hovers near the platter. Budget-friendly? Absolutely. You can mix and match with what’s in the fridge or on sale, and the same batch can stretch to several gatherings if you slice things differently. Versatility is the secret sauce: swap in roasted peppers, swap in pepperoni or prosciutto, or go vegetarian with extra artichokes and zucchini ribbons. My kids ask for this all the time, and honestly, I love that it doubles as a pretty centerpiece while still tasting like a comforting, familiar treat.
How do I make antipasto skewers?
Quick Overview
This method is all about assembly and balance. You’ll soak the skewers, prep a quick olive-oil–garlic drizzle, and then thread a little bit of everything—cheese, meat, veg, and a splash of brightness—onto each stick. The result is a colorful, bite-sized sampler that’s as great for a casual dinner as it is for a party appetizer. If you’re grilling, you can give them a quick char for a smoky finish, but they’re equally delightful served room-temperature. The key is to keep everything uniform in size so every bite feels harmonious, and to finish with a light glaze that ties the flavors together without weighing them down. Trust me, a little drizzle goes a long way and makes the platter look irresistibly glossy and inviting.
Ingredients
For the Main Batter:
– 12–16 fresh mozzarella balls (bocconcini) or mozzarella pearls, drained and patted dry
– 24 cherry tomatoes or grape tomatoes, whole
– 24 perfectly sized slices of salami or prosciutto, folded if needed
– 12–16 marinated artichoke heart quarters (from a jar or can, well drained)
– 1 cup pitted black olives or green olives, halved if large
– 12–16 fresh basil leaves, whole or torn into halves
– 24 small cubes of Roasted Red Pepper or pepperoncini for color and crunch
– 12–16 small, firm cucumber rounds (optional for extra crunch)
For the Filling:
– 2–3 tablespoons extra-virgin olive oil, plus a whisper of lemon zest (for brightness)
– 1 tablespoon balsamic glaze or reduction (adjust to taste)
– 1 teaspoon dried oregano or Italian seasoning
– Pinch of flaky sea salt and freshly ground Black Pepper
For the Glaze:
– 3–4 tablespoons balsamic glaze or reduction (extra to drizzle lightly at the end)
– 1 teaspoon honey or maple syrup (optional, for a touch of sweetness)
– A pinch of red pepper flakes (optional, for a subtle kick)

Step-by-Step Instructions
Step 1: Preheat & Prep Pan
If you’re baking them, preheat the oven to 425°F (220°C) and line a rimmed baking sheet with parchment. If you’re grilling, heat the grill to medium-high and oil the grates lightly. Soak wooden skewers for about 15 minutes to prevent scorching, then pat dry. This is the moment I always think, “Okay, keep it simple, keep it beautiful.”
Step 2: Mix Dry Ingredients
In a small bowl, whisk together the dried oregano or Italian seasoning, a pinch of flaky salt, and a little pepper. This dry mix is your whisper of herbaceous perfume that catches on every bite.
Step 3: Mix Wet Ingredients
In another little bowl, combine the olive oil, lemon zest (if using), and a light splash of balsamic glaze. This becomes your bright, glossy coating that makes the skewers feel special without being heavy.
Step 4: Combine
Toss the mozzarella, tomatoes, olives, artichokes, pepper, and meat with the oil–herb mixture. You’re not marinating deeply here—just a quick toss to catch each piece with a little gloss and aromatics. If you have time, let them sit for 10 minutes so the flavors can mingle, but a quick assembly works beautifully too.
Step 5: Prepare Filling
If you’re using extras like cucumber rounds, fold them into your skewers now so they stay crisp and don’t get soggy. Pat everything dry if you notice any excess moisture; moisture on skewers makes them slippery and less appealing to bite into.
Step 6: Layer & Swirl
Thread your components in a balanced pattern. A typical rhythm is mozzarella, tomato, olive, basil, artichoke, pepper, meat, repeat. Aim for a mix of colors and textures on each skewer so every bite offers something familiar and something surprising. A light twist of the skewer helps secure everything without tearing delicate pieces like basil leaves.
Step 7: Bake
Arrange the skewers on the prepared sheet pan in a single layer. Bake for 6–8 minutes, just until the mozzarella starts to melt and the edges of the vegetables glisten. If you prefer, you can finish with a quick 1–2 minute broil to coax a tiny caramelization on the meats and peppers. You’re not looking for a full roast here—just a warm, cohesive blend of flavors that tastes like a celebration and not a long-lit kitchen timer.
Step 8: Cool & Glaze
Let the skewers rest for about 3–4 minutes off the heat so the cheese holds its shape. Drizzle a delicate line of balsamic glaze over the platter or on individual skewers for a glossy finish. If you like a touch of sweetness, whisk a tiny bit of honey into the glaze before drizzling. A light dusting of flaky salt at this stage accentuates the briny notes in the olives and artichokes.
Step 9: Slice & Serve
There’s no need to slice these—just arrange them across a long platter or rustic wooden board. A few fresh basil sprigs scattered around add fragrance and color. Serve with extra bowls of olives, peppers, and maybe a little extra balsamic glaze on the side for dipping. These Antipasto Skewers look stunning, and I’ve found they disappear before the drinks do if you set them alongside a cheese board. The first bite is often the best: a snap of pepper, the creamy bite of mozzarella, and that tangy glaze tying everything together.
What to Serve It With
These skewers shine on their own, but they’re also a wonderful party anchor when you want a low-effort spread that still feels special. Here are some easy accompaniments organized by occasion:
For Breakfast: A bright mini-mimosa bar and a light, lemony yogurt dip can pair beautifully with the freshness of the skewers. A quick cup of strong coffee or a chicory latte complements the savory bite with a warm signal that the day is off to a bright start.
For Brunch: Add a caprese riff with sliced fennel, a citrus-herb vinaigrette, and a sparkling rosé. Plate the skewers alongside crusty bread, marcona almonds, and a small bowl of marinated mushrooms for a colorful, crowd-pleasing board.
As Dessert: Okay, hear me out—balance is everything. A light, vanilla-kissed pastry cream in mini tartlets or a fresh Fruit Salad can provide a counterpoint to the salty, briny skewers. A drizzle of honey over the fruit can echo the glaze on the skewers and tie the course together.
For Cozy Snacks: Warm pita triangles with a lemon-garlic yogurt dip and a few handfuls of roasted chickpeas make a comforting, casual pairing. The skewers themselves are their own snackable centerpiece, so keep the rest simple and inviting.
Personally, I love serving these Antipasto Skewers as part of a relaxed Sunday lunch with a pitcher of iced tea. It’s those little moments—sitting around a big wooden table, catching up, and picking at bright bites—that make cooking feel like a conversation with someone you love.
Top Tips for Perfecting Your Antipasto Skewers
Here’s where a few practical tricks have saved me countless times. They’re small things, but they add up to better texture, brighter flavor, and less waste.
Skewer-Ready Veggies: Dice vegetables into uniform pieces so every bite feels balanced. Zucchini, when used, should be patted completely dry to avoid bringing extra moisture into the skewers. If you’re avoiding zucchini, stick to peppers, artichokes, and tomatoes for crisp, clean bites.
Meat & Cheese Handling: If you’re using cured meats, layer them lightly so they don’t overwhelm the cheese or vegetables. For mozzarella, pat dry and don’t crowd too many mozza balls on a single skewer—space helps each bite stay distinct.
Moisture Management: A quick pat-down of all ingredients before skewering keeps moisture from making the skewers soggy. If you notice moisture pooling on your sheet during baking, give the skewers a quick turn halfway through to promote even drying.
Swirl & Pattern: Play with patterns for visual appeal. Alternate colors and textures in a repeating rhythm (mozzarella–tomato–olive–basil–artichoke–pepper–meat). It helps guests anticipate the flavors and makes your platter look professionally put together.
Ingredient Swaps: Don’t be afraid to swap in roasted peppers for fresh peppers, or swap in pepperoncini for extra tang. If you’re vegetarian, pile on extra artichokes, olives, peppers, and torn basil. If you’re short on mozzarella, a few cubes of provolone or even cubes of halloumi can work nicely when seasoned well.
Baking Tips: Oven placement matters. A middle rack yields even heating, while a preheated sheet pan helps sear the outside just enough to keep everything together. If you’re short on time, skip the bake and just give everything a good toss with the oil and herbs, then serve at room temperature.
Glaze Variations: The glaze should kiss the skewers lightly. Too much glaze can weigh things down or make them feel sticky. You can switch to a white balsamic glaze for a lighter touch, or add a whisper of honey for a subtle caramel note that brightens the overall profile.
These little adjustments have saved me on busy nights when I want something that looks like I spent hours in the kitchen, but it actually took less than 30 minutes from start to finish. The sense of accomplishment is huge, and the taste? It feels like a hug from the Italian coast each time you bite in.
Storing and Reheating Tips
Leftovers aren’t common with this dish, but you might end up with a few skewers if you’re hosting a bigger crowd. Here’s how I handle storage and reheating so the flavors stay bright and the texture remains pleasant.
Room Temperature: If you’re serving within an hour of assembling, you can keep skewers at room temperature on a platter covered lightly with foil. Give them a quick toss before serving to refresh the herbs and brighten the olive oil coating.
Refrigerator Storage: Store any leftovers in an airtight container, layered with parchment between layers to prevent sticking. They’ll keep best for up to 1 day. I know that’s not ideal for Antipasto Skewers, but it happens at potlucks. Re-toss with a touch of olive oil before serving again to revive brightness.
Freezer Instructions: I don’t recommend freezing skewers with tomatoes or fresh basil; they’ll lose their texture. If you must, freeze components separately (cheese, olives, artichokes) and assemble fresh for best results.
Glaze Timing Advice: Glaze tends to mellow with time. If you’re prepping ahead, skip glazing until just before serving, or drizzle a fresh coat of glaze right before you plate. That keeps the shine and bite intact.
In my kitchen, these tips save the day when guests arrive early and I’m juggling a dozen other tasks. The goal is vibrant, bite-sized joy that travels well and tastes like something you spent ages perfecting, even if you didn’t.
Frequently Asked Questions
Final Thoughts
If you’re searching for a recipe that feels inviting and alive on the table, this Antipasto Skewers platter delivers. It’s the kind of dish you can throw together with pantry staples, yet somehow it looks restaurant-worthy when you plate it. The play of textures—soft mozzarella, crisp peppers, briny olives, and tender meat—creates a chorus you’ll want to hear again and again. I’ve learned to keep a jar of marinated artichokes on hand for moments just like this, and a bottle of balsamic glaze close by for a finishing kiss. If you try this, I’d love to hear which combination you loved most—did you swap in zucchini ribbons, or did you go full-on classic with pepper, tomato, and mozzarella? Share your variations in the comments, rate the recipe, and tell me how you served it at your table. Happy cooking, friend, and enjoy every vibrant bite of these Antipasto Skewers!

Antipasto Skewers
Ingredients
Main Ingredients
- 0.5 pound Italian salami sliced into quarters
- 0.5 pound Prosciutto sliced into quarters
- 0.25 pound Fresh mozzarella balls small
- 0.25 pound Marinated artichoke hearts drained
- 0.5 cup Kalamata olives pitted
- 0.5 cup Cherry tomatoes halved
- 0.25 cup Roasted red peppers jarred, drained and sliced
- 1 tablespoon Balsamic glaze
Instructions
Preparation Steps
- Thread the ingredients onto small skewers in any desired order. A good combination might be salami, mozzarella, artichoke heart, olive, cherry tomato, and roasted red pepper.
- Arrange the skewers on a platter.
- Drizzle with balsamic glaze just before serving.
Notes
Featured Comments
“Impressed! Clear steps and quick weeknight win results. Perfect for busy nights.”
“New favorite here — crowd-pleaser. crowd-pleaser was spot on.”
“Super easy and turned out amazing! My family asked for seconds. Saving this one.”
“This sweet treat was absolutely loved — the buttery really stands out. Thanks!”
“Made it tonight and wow — spot on! Will definitely make Antipasto Skewers again.”
“Packed with flavor and so simple. Exactly what I wanted from Antipasto Skewers.”


