

If you’ve ever been to a pumpkin patch in autumn, you’ll know the smell of pumpkin guts, hayrides, and that warm, cinnamony air. For me, it’s a feeling — the kind of cozy nostalgia that makes me crave something sweet and comforting. And let me tell you, this pumpkin patch-inspired pie has become my new fall favorite. It’s sort of like a pumpkin pie’s fun, rustic cousin — approachable, satisfying, and bursting with flavor. I always do this when cozying up on a chilly weekend: whip up a batch of this, sit back with a mug of hot cider, and just enjoy the season. It’s surprisingly easy to make, and I promise, your family will go nuts over it. Honestly, I’ve made this countless times, and even my skeptical teenagers ask for seconds. Trust me on this one, it’s the kind of dessert that disappears in minutes at my house!
What is a pumpkin patch?
Think of “pumpkin patch” as more than just the place where pumpkins grow. It’s a vibe — a little slice of fall magic, a nostalgic scene of haybales, pumpkin vines, and kids giggling while picking their perfect gourd. This recipe takes that happy, rustic feeling and translates it into a delicious, slightly rustic pie that captures the essence of those crisp autumn days. It’s essentially a cozy, all-in-one dessert that combines sweet pumpkin, warm spices, and a touch of buttery goodness. The name “pumpkin patch” is just my way of saying this pie is as comforting and inviting as walking through a bustling patch on a chilly afternoon. It’s perfect for sharing with loved ones — or even just for treating yourself after a longweek of fall chaos.
How do I make a pumpkin patch?
Quick Overview
This pie is a no-fuss, straightforward process. Basically, you mix your pumpkin filling, pour it into a prepared crust, swirl in some filling or streusel if you like, and bake. It’s a one-pan wonder that fills the house with that irresistible aroma, and it’s done in about an hour. What makes it special is how forgiving it is — you can play with the spices, add nuts or chocolate chips if you’re feeling fancy, and still come out with a show-stopping dessert. My secret? I always chill the filling for a bit before baking — it helps it set up perfectly without cracking or splitting.
Ingredients
For the Main Batter:
– 1 can (15 oz) pure pumpkin puree (fresh or canned, but make sure it’s true pumpkin, not pie filling)
– 3/4 cup granulated sugar (or a little less if you like it less sweet)
– 2 large eggs
– 1 cup heavy cream (or full-fat coconut milk for a dairy-free version)
– 1 teaspoon vanilla extract
– 1 teaspoon ground cinnamon
– 1/2 teaspoon ground nutmeg
– 1/4 teaspoon ground clove
– Pinch of salt
For the Filling (Optional Swirl or Topping):
– 1/4 cup cream cheese, softened (for extra richness)
– A handful of chopped nuts or chocolate chips (if you want a little crunch or surprise inside)
For the Glaze (Optional):
– Powdered sugar mixed with a splash of milk and vanilla for a simple glaze
– Or just a dusting of cinnamon sugar for that rustic touch
Step-by-Step Instructions
Step 1: Preheat & Prep Pan
Set your oven to 350°F (175°C). Grab your favorite pie dish or a deep baking dish. If you’re using a store-bought crust, just fit it into your pan and poke some holes in the bottom with a fork — this keeps it from puffing up while baking. If you love homemade crust, now’s the time to roll it out, but honestly, this pie works just as well with a buttery graham cracker crust or even a sweet pastry.
Step 2: Mix Dry Ingredients
Since this is pretty straightforward, I like to whisk my sugar, spices, and salt together first. It ensures even flavor distribution — trust me, it makes a difference when every bite has that perfect cinnamon-spice punch.
Step 3: Mix Wet Ingredients
In a separate bowl, whisk together the pumpkin, eggs, cream, and vanilla until smooth and velvety. I always do this last because it’s satisfying to see how beautifully orange and creamy it gets, and it smells incredible.
Step 4: Combine
Pour the wet mixture into your dry bowl and gently stir until combined — don’t overmix, or you’ll risk a dense pie. Just fold until it looks uniform and glossy. If you’re adding chocolate chips or nuts, fold them in now.
Step 5: Prepare Filling
If you’re doing the swirl idea, dollop some cream cheese or extra pumpkin filling in the center of your prepared crust. Then, use a toothpick or skewer to swirl it gently through the pumpkin mixture for a marbled effect — think of it as painting with flavors.
Step 6: Layer & Swirl
Pour the pumpkin mixture into your crust, smoothing the top with a spatula. If you added a swirl, try to keep it nice and even for that beautiful marbled look. A gentle swirl with a toothpick or skewer adds a rustic, inviting pattern that I love.
Step 7: Bake
Pop it into the oven for about 45-50 minutes. Check doneness by inserting a toothpick near the center; it should come out mostly clean, with a little moist crumb. The edges will be set, and the middle might jiggle just a bit — don’t worry, it firm’s up as it cools. Keep an eye on it — every oven is a little different!
Step 8: Cool & Glaze
Let the pie cool on a wire rack for at least an hour. This is key: it allows the filling to fully set. If you want to add a glaze, do it once it’s cooled — powdered sugar mixed with a splash of milk and vanilla makes a lovely, simple drizzle. Or sprinkle some cinnamon sugar for a rustic look.
Step 9: Slice & Serve
Use a sharp knife to cut through the pie, wiping it clean between slices for smooth cuts. Serve slightly warm or at room temperature, perhaps with a dollop of whipped cream or a scoop of vanilla ice cream. Honestly, my kids ask for this with a glass of cold milk — it’s that kind of comfort food.
What to Serve It With
This pie pairs beautifully with a hot mug of coffee or spiced cider, especially on lazy weekend mornings or festive fall afternoons. For brunch, I like serving a slice alongside a handful of toasted pecans and a drizzle of caramel sauce. As a dessert, it’s divine with a sprinkle of extra cinnamon and a drizzle of honey or caramel. If you’re in a cozy mood, I also love eating it with a cup of chai or warm spiced tea. Sometimes, I even sprinkle crushed graham crackers on top for added crunch. This pie is equally happy on a dessert table or just wrapped in a blanket, curled up on the sofa. It’s totally versatile — and honestly, even the leftovers taste better the next day!
Top Tips for Perfecting Your Pumpkin Patch
Over the years, I’ve learned a few tricks that make a big difference. First, always use good-quality pumpkin puree — I tested this with homemade and canned puree, and canned is way more consistent. Make sure to drain excess moisture if your pumpkin feels watery; I usually pat it dry with paper towels before mixing. When mixing the filling, avoid overworking it — this keeps your pie light and tender. I also recommend baking the pie slowly and at the right temperature; if you notice the edges browning too quickly, tent it with foil. A little patience goes a long way here! For toppings, I’ve played around with toasted pecans, marshmallows, even crumbled chocolate cookies — all delicious options. One thing I suggest avoiding is overbaking — you want the filling just set enough to hold its shape without turning rubbery. Also, don’t skip the cooling step; it’s essential for that perfect slice. Lastly, if you want a little extra flair, try mixing in some pumpkin seeds or a sprinkle of sea salt on top before baking for a sweet-salty contrast. This recipe truly is adaptable — I’ve tested it with everything from maple syrup (adds a nice depth) to coconut cream (super creamy and dairy-free). The key to success is taste-testing as you go and trusting your nose and instincts.
Storing and Reheating Tips
This pie is best enjoyed within a couple of days, but it keeps surprisingly well. Cover whole or sliced pie loosely with plastic wrap or foil and store at room temperature for up to two days if it’s cool outside, or in the refrigerator for up to 4 days. I find that refrigerating actually helps the filling firm up — just let it sit at room temp for about 10 minutes before slicing for a more tender cut. If you want to freeze it, wrap the whole pie tightly in plastic wrap and then foil — it’ll last up to a month. To reheat, pop a slice into the microwave for about 20-30 seconds or warm it gently in the oven at 350°F until warmed through. If you froze it with glaze or toppings, wait to add those until just before serving for best texture. Honestly, the smell alone when reheating makes it worth saving a slice for the next day — I swear, it still tastes like fall in every bite!
Frequently Asked Questions
Final Thoughts
This pumpkin patch pie is one of those recipes that feels like a warm hug — the perfect way to celebrate the cooler months and the beautiful changing leaves. It’s simple, budget-friendly, and endlessly versatile. Whether you’re baking for family, friends, or just yourself on a cozy Sunday, this dish checks all the boxes. I love how it fills my kitchen with that undeniable fall aroma, and I swear it tastes even better than it looks — which is saying something, because it’s pretty adorable in its rustic simplicity. Once you try it, I bet it’ll become a new favorite in your autumn lineup, just like it is in mine. Happy baking, and I can’t wait to hear how yours turns out! Don’t forget to leave a comment or share your tweaks — I love hearing new ideas! And if you’re craving more seasonal treats, check out my other fall favorites — I promise, they’re just as cozy.
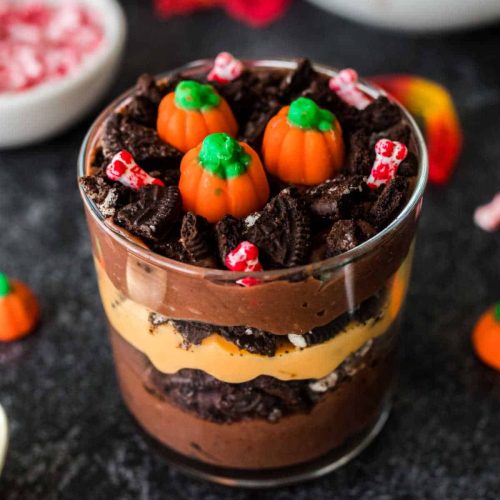
pumpkin patch
Ingredients
Main Ingredients
- 1 box Vanilla pudding Made orange from food coloring
- 1 box Chocolate pudding
- 1 cup Crushed Oreos
- 8 gummy worms Gummy worms
- 12 pumpkin candies Pumpkin candies
- 12 bone candies Bone candy
Instructions
Preparation Steps
- In a glass, scoop one spoonful of chocolate pudding and spread evenly.
- Add a layer of gummy worms followed by crushed Oreos.
- On top of the Oreo layer, scoop a spoonful of vanilla pudding, followed by crushed Oreos.
- On top of the Oreo layer, scoop a spoonful of chocolate pudding, followed by crushed Oreos.
- Place 3 pumpkin candies on top of the final Oreo layer and stick the bone candy out of the Oreos at random.
Notes
Featured Comments
“This sounds cozy and nostalgic! I’d love to try making these — do they taste like they smell?”
“Impressed! Clear steps and quick weeknight win results. Perfect for busy nights.”
“New favorite here — super easy. crowd-pleaser was spot on.”
“Super easy and turned out amazing! My family asked for seconds. Saving this one.”
“This sweet treat was absolutely loved — the silky really stands out. Thanks!”
“Made it tonight and wow — quick weeknight win! Will definitely make Autumn Dirt Cups A Simple Treat again.”


This sounds cozy and nostalgic! I’d love to try making these — do they taste like they smell?