

There’s something magic about baked potatoes—the way the skin crisps to a whisper, the inside becomes fluffy as clouds, and you can dress them up or down to fit any mood. I learned this recipe from my aunt, who would bake them on a weekend that started with a lazy coffee and ended with everyone gathered around the table, bowls ready and forks clinking. The aroma of garlic and butter drifting through the kitchen is the memory I chase on busy weeknights. This dish is a cousin to a classic roast potato, but it’s faster, more forgiving, and infinitely adaptable. I keep a tray in the oven, and the moment the clock hits 20 minutes, I start layering toppings, because this dish is a lifesaver when time is short but hunger is tall. The focus here is simple: hot, fluffy baked potatoes with a cozy, savory filling that tastes like a hug in a crust of salt. If you’ve ever tried ordinary Mashed Potatoes, you’ll see how this is different—the potato skin adds texture and a snappy bite, while the interior remains soft and creamy. I’ve made variations with sour cream and chives, crisp bacon, and a veil of melted cheddar, and every time it disappears in minutes at my house.
What is baked potato?
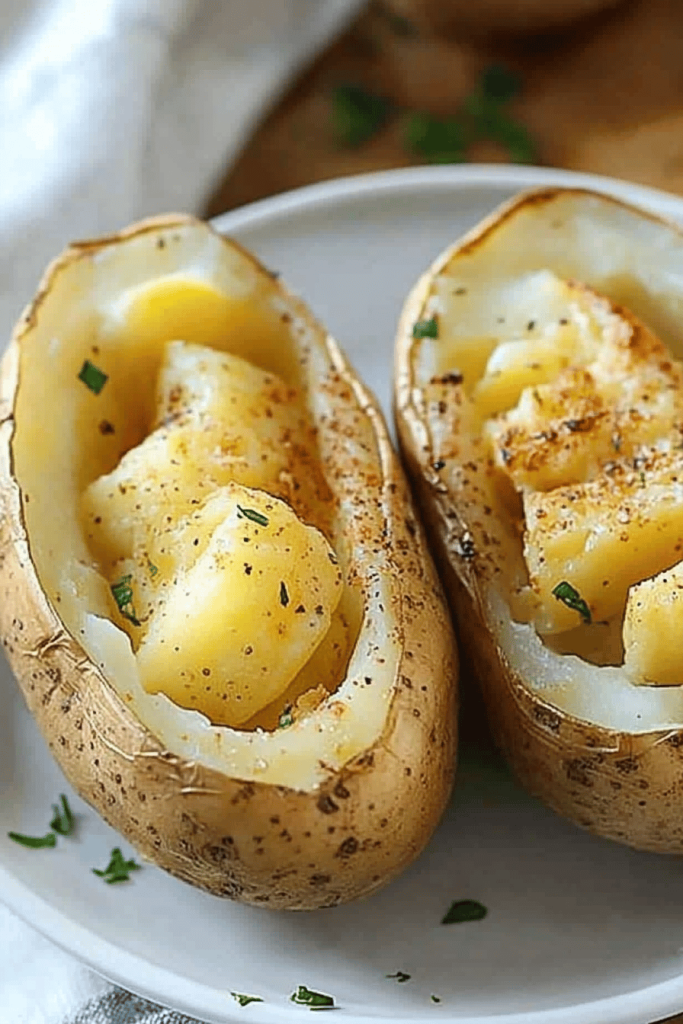
Think of baked potatoes as a blank canvas you can paint with whatever you’re craving. It’s essentially a sturdy potato—usually a russet—that’s scattered with a bit of oil and salt, roasted until the skin turns bronzy and crisp, and the insides turn light and pillow-soft. The name is simple, but the concept is wonderfully flexible: you can sling on butter and herbs for a silky finish, pile on cheddar and Sour Cream for a comforting, filling bite, or go lighter with yogurt and chives for a bright, tangy twist. The beauty is that you can cook them all at once, then customize each potato at the table. This is my go-to method on busy weeknights when I want something comforting but not fussy—and yes, my kids actually ask for seconds, which is basically a parental miracle in our house.
How to Make Baked Potatoes
Quick Overview
This method is all about crisp skin and fluffy insides with a little extra flair. You’ll scrub and dry the potatoes, rub them with a salty oil, give them a hot bake so the skins blister, then slice them open and pile on a creamy, flavorful filling. The glaze—a quick garlic-butter finish—brings everything together in a glossy satin finish. It’s straightforward, forgiving, and, honestly, delicious enough to make anyone feel like a gourmet chef in their own kitchen. It’s the kind of dish that looks impressive but is forgiving enough for a weeknight. Trust me on this one: a hot tray pulled from a roaring oven, a careful open-top, and a dollop of “everything you love” on top is basically happiness on a plate.
Ingredients
For the Main Potatoes:
- 4 large Russet potatoes (about 2 1/2 pounds)
- 2–3 tablespoons extra-virgin olive oil
- 1 1/2 teaspoons kosher salt (plus a pinch for finishing)
- 1/2 teaspoon freshly ground black pepper
For the Filling:
- 2 tablespoons unsalted butter
- 1/2 cup sour cream or Greek yogurt
- 1 cup shredded sharp cheddar cheese (plus extra for topping)
- 4 slices cooked bacon, crumbled (optional)
- 2 tablespoons chopped chives or scallions
- 1/4 teaspoon garlic powder (optional for extra depth)
- Salt to taste
For the Glaze:
- 2 tablespoons melted butter
- 1 clove garlic, minced
- 1 teaspoon chopped fresh parsley or chives
- Pinch of sea salt

Step-by-Step Instructions
Step 1: Preheat & Prep Pan
Heat your oven to 425°F (220°C). Line a large baking sheet with foil for easy clean-up, or just use a bare sheet if you like the crunch a touch better. Rinse the potatoes well, then pat them completely dry. Any moisture on the skin will steam the surface and keep it from getting crisp, so dry thoroughly and give the potatoes a final rub with a clean towel.
Step 2: Mix Dry Ingredients
In a small bowl, whisk together the kosher salt, Black Pepper, and garlic powder if you’re using it. This dry mix is your flavor base for the skins, so don’t skimp. Think of it as the sun-kissed crust that will make every bite sing.
Step 3: Mix Wet Ingredients
In a separate bowl, combine the olive oil with a touch more salt. If you like a deeper flavor, you can add a whisper of paprika here. The oil is what helps the salt stick to the skin and creates that beautiful crackle when the potatoes roast.
Step 4: Combine
Toss the dry mix with the prepared potatoes, then drizzle in the oiled coating and toss again until every potato is lightly coated. Arrange them cut-side up if you’ve got a fancy stack; more surface area means more crispness, which is what we’re chasing.
Step 5: Prepare Filling
While the potatoes roast, melt butter in a small pan. Stir in sour cream (or yogurt), half the cheese, the crumbled bacon (if using), and chives. Let it come together on low heat—just long enough for the cheese to start melting and the flavors to mingle. Taste and add salt as needed. This filling should feel indulgent without being overpowering.
Step 6: Layer & Swirl
When the skins are blistered and the insides give a gentle squeeze when you prod them, it’s time to open the potatoes. Slice a neat cross in the top of each potato and gently push the sides to create a pocket. Spoon a generous amount of the warm filling into each potato, then sprinkle the remainder of the cheese on top. If you want, swirl a little sour cream or yogurt over the top for a marbled look and extra creaminess.
Step 7: Bake
Return the stuffed potatoes to the oven for another 8–10 minutes, just long enough for the cheese to melt and the filling to meld with the potato. If you like a crisper top, give them a couple more minutes under the broiler—but watch closely so they don’t burn. The beauty here is you can bake the potatoes first, then finish with the filling and toppings right before serving.
Step 8: Cool & Glaze
While they rest for a few minutes (they’ll be piping hot), whisk the glaze ingredients together. Brush a thin layer of the garlic butter over the tops while they’re still warm; it glistens, adds aroma, and pulls everything together. The glaze should feel silky, not runny—think a light lacquer rather than a pool of butter.
Step 9: Slice & Serve
Cut a little opening in each potato to reveal the fluffy interior, then sprinkle with extra chives, a poetically small dusting of paprika if you love color, and a final crack of black pepper. Serve immediately so the cheese stays creamy and the skins stay crisp. My kids love this with a cold glass of milk, and my partner swears the bacon makes it a holiday meal in disguise. It’s simple happiness in a foil packet.
What to Serve It With
These baked potatoes shine on their own, but they’re even better when you pair them with a few sides or beverages that balance their richness. Here are some crowd-pleasing ideas organized by occasion:
For Breakfast: A sunny-side-up egg tucked into the slit of a warm potato becomes a hearty morning plate. Pair with a mug of strong coffee, a squeeze of lemon in water, and a few slices of avocado for a breakfast that feels special but totally doable.
For Brunch: Serve as a “build-your-own” station with bowls of crumbled bacon, sautéed mushrooms, chopped tomatoes, and a big bowl of sour cream with chives. Add a pitcher of sparkling lemonade or a light white wine spritzer for a relaxed, late-morning vibe.
As Dessert: Okay, not dessert—this is a savory dish, but you can finish with a sweet yogurt-based topping or a lightly sweetened whipped cream with a hint of honey and cinnamon for a surprising contrast if you’re serving a full meal at the table.
For Cozy Snacks: Make smaller spud boats and set out a tray of toppings: shredded cheese, bacon bits, green onions, and a dollop of Greek yogurt. It’s a snack you can pick at while chatting with friends or watching a movie, especially when the weather turns chilly and the house smells like garlic and butter.
In our family, baked potatoes have become a symbol of togetherness. I still remember the night we all stood around the island, piling toppings and trading stories about school days. It’s a dish that invites sharing, and that feeling is what makes it so memorable.
Top Tips for Perfecting Your Baked Potatoes
Over the years I’ve learned a few tricks that take these potatoes from good to unforgettable. Here are the best, organized by technique:
Potato Prep: Choose russet potatoes for their starchy, fluffy centers. Scrub them clean until the water runs clear, then pat dry completely. Dry skin = crisper skin. If you have the time, dry them a bit longer and give each potato a light poke with a fork to vent steam while baking.
Mixing & Texture: Don’t skip the oil. A light coat helps the salt stick and creates that irresistible crackle. The moment you sprinkle the dry rub, you should hear a tiny sizzle—that’s your cue that the skin will crisp nicely.
Swirl & Filling: The cheese and sour cream add creaminess, but you can swap in Greek yogurt or a plant-based sour cream for a lighter version. For a richer finish, add a touch more butter to the hot filling so everything glides into every bite.
Swirl Pattern: If you like pretty swirls on top, after you spoon the filling, use a toothpick or the back of a spoon to drag a line through melted cheese toward the center. It’s just cosmetic, but it makes plates look irresistible.
Ingredient Swaps: Want more color and sweetness? Try a handful of caramelized onions or roasted red peppers. For a smoky edge, stir in a little smoked paprika into the filling. If you’re avoiding dairy, use a dairy-free cheese and a dollop of dairy-free yogurt.
Baking Tips: If your oven is temperamental, rotate the pan halfway through and check for even browning. If you’re using a dark baking sheet, reduce the temperature by 25°F to prevent scorching. Serve immediately for the best texture, but these stay nice for a short time wrapped in foil if you need to rest before serving.
Glaze Variations: A lemon-herb glaze gives a bright note, while a maple-butter glaze adds a sweet counterpoint. You can also brush with chili-lime butter for a punch of zing. Keep the glaze thin—this isn’t a glaze that sits heavy on top; it should kiss the surface and amplify aroma.
I’ve found that keeping the fillings simple at first makes it easy to adjust later. This dish is a canvas, and your kitchen is the studio—have fun with it, and you’ll discover your own favorite version in no time.
Storing and Reheating Tips
Leftover baked potatoes are surprisingly forgiving, and they reheat beautifully if you give them a little love. Here’s how I handle it so they stay tasty and not dry.
Room Temperature: If you’re eating them the same day, you can store them loosely wrapped in foil for a few hours at room temperature. They’ll stay warm and the skin will stay a touch tacky in the best way, ready for a quick reheat.
Refrigerator Storage: Store leftover potatoes in an airtight container or tightly wrapped in foil. The filling can separate a bit, so a quick reheat with a splash of milk or yogurt helps restore creaminess. Lasts 2–3 days.
Freezer Instructions: I don’t love freezing whole loaded potatoes because the texture of the interior can become mealy, but you can freeze them unfilled for future use. Bake, cool, wrap in foil, and freeze for up to 2 months. Reheat in a 350°F (175°C) oven until hot, then stuff with your filling and finish with cheese if desired.
Glaze Timing Advice: If you’re keeping the glaze for later, brush it on after reheating to preserve its sheen. Otherwise, apply glaze while the potatoes are still warm to ensure it soaks in nicely and doesn’t clump.
These tips have saved me on many a busy night—a slightly ahead-of-time bake, a quick filling, and a finish cake of cheese and herbs. It’s not fancy, but it’s always comforting, and that’s what we crave most.
Frequently Asked Questions
Final Thoughts
This baked potatoes recipe is the kind of staple you reach for when you want something cozy, flexible, and deeply satisfying. It’s a dish that can feed a crowd or quiet a hungry family with a single tray in the oven. The sensory magic—the crackle of the skin, the steam that carries garlic and butter through the room, the way the filling pools into every crevice of the potato—never gets old. It’s also a reminder that great food doesn’t need to be complicated; it just needs to be thoughtfully assembled and shared. If you’re new to this method, give it a try with a simple lineup of toppings first, then branch out to your own favorite foibles and flavors. I’d love to hear your variations and what your family loves most on top of a hot baked potato. Happy baking!
If you tried this and have a minute, drop a comment below with your favorite topping combination or a small tweak you made that surprised you in a good way. Did the garlic-butter glaze become your new obsession, or did you fall in love with the paprika-crisp skin? I can’t wait to hear how yours turn out and which topping becomes your go-to pairing. And if you’re sharing this with friends, a quick note about the memories that come with it always makes the dish taste even better. Here’s to many cozy evenings with oven-warmed potatoes and the people we love most. Happy baking!
Classic Baked Potatoes
Ingredients
Main Ingredients
- 4 large Russet potatoes
- 2 tablespoons olive oil
- 1 teaspoon salt
- 0.5 teaspoon black pepper
Instructions
Preparation Steps
- Preheat your oven to 400°F (200°C).
- Wash the potatoes thoroughly under cold water. Prick each potato several times with a fork to allow steam to escape.
- Rub the potatoes with olive oil, salt, and pepper. Ensure they are evenly coated.
- Place the potatoes directly on the oven rack or on a baking sheet.
- Bake for 50-60 minutes, or until the potatoes are tender when pierced with a fork and the skin is crispy.
- Carefully remove the potatoes from the oven. Cut them open and serve hot with your favorite toppings.
Notes
Featured Comments
“Impressed! Clear steps and crowd-pleaser results. Perfect for busy nights.”
“New favorite here — perfect for busy nights. crowd-pleaser was spot on.”
“Super easy and turned out amazing! My family asked for seconds. Saving this one.”
“This sweet treat was absolutely loved — the light really stands out. Thanks!”
“Made it tonight and wow — absolutely loved! Will definitely make baked potatoes again.”
“Packed with flavor and so simple. Exactly what I wanted from baked potatoes.”


