

There’s something magical about the way a simple tray of baklava can fill a kitchen with honeyed warmth and a chorus of clinking spoons. I remember helping my grandmother roll sheets of phyllo and press them into little cups, the scent of butter and citrus turning the whole house sweet. These Baklava Cups are my cozy, faster version of the same idea—portable, shareable, and still wonderfully flaky and nutty. They’re the kind of treat that tastes fancy but comes together in no time, a lifesaver on busy weeknights when you crave something special after dinner. I always do this trick with extra lemon zest—it brightens the filling in a way that makes the perfume in the room practically sing. If you’ve got a late-night sweet tooth, this is the recipe you reach for: crisp phyllo shells, a warm walnut filling, and a glossy honey glaze that doesn’t overwhelm. Trust me, these Baklava Cups disappear in minutes at my house, especially when there’s a scoop of vanilla Ice Cream nearby.
What is Baklava Cup?
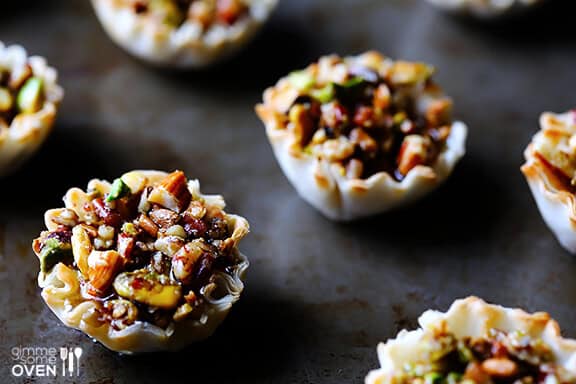
Think of baklava cups as the bite-sized, guest-friendly version of classic baklava. Instead of a stacked pastry where you bite into a honey-soaked slab, you get little phyllo cups—like tiny edible flower petals—crisp around the edges and holding a fragrant, nutty filling. It’s essentially baklava turned into portable portions you can pop on a party platter or serve as a fancy dessert at a weeknight dinner. The name hints at the same core ingredients—phyllo, nuts, honey, citrus, and warming spices—but the format makes it approachable for home cooks who want big flavor with less fuss. I love that you can customize the filling with pistachios, almonds, or just walnuts, depending on what’s in the pantry. And the glaze? It’s a gentle kiss of honey that keeps the cups glossy and wonderfully sticky—in the best way possible.
How do you make Baklava Cups?
Quick Overview
Okay, here’s the quick lane to the good stuff: you’ll bake tiny phyllo cups until they’re golden and crisp, then fill them with a fragrant walnut mixture that’s sweetened with cinnamon and lemon zest. A warm honey glaze ties everything together, giving a glossy finish without making them soggy. The beauty is that you don’t need to bake a full pan of baklava to get that same honey-soaked, nutty magic. It’s all about layering crisp shells, a lush filling, and a drizzle of glaze. If you’ve got a mini muffin tin, you’re already halfway there. The rest is just a little patience and a lot of flavor.
Ingredients
For the Main Batter:
- 16 sheets phyllo dough, thawed (keep covered to prevent drying)
- 1/2 cup unsalted butter, melted
- 1 teaspoon ground cinnamon
- 1/4 cup granulated sugar
- Pinch of salt
- 1 teaspoon lemon zest (optional, but it brightens the filling)
For the Filling:
- 1 cup walnuts, finely chopped
- 1/2 cup almonds, finely chopped (or swap in pistachios if you prefer)
- 1/4 cup sugar
- 1 teaspoon ground cinnamon
- 1 tablespoon honey
- 1 teaspoon lemon zest or zest from one small lemon
- Pinch ground cloves or cardamom (optional for warmth)
For the Glaze:
- 1/3 cup honey
- 2 tablespoons lemon juice
- 1 tablespoon water
- Optional: 1/2 teaspoon rosewater or orange blossom water
- Finely chopped pistachios or lemon zest for topping
Step-by-Step Instructions
Step 1: Preheat & Prep Pan
Preheat your oven to 350°F (175°C). Lightly grease a mini muffin tin with a touch of melted butter or use a light spray. Keep the phyllo covered with a damp towel as you work, because it dries out fast—no one wants crackers for shells. If your phyllo sheets are stubbornly large, trim them into strips that fit the cups, and plan to layer two or three sheets per cup for strength.
Step 2: Mix Dry Ingredients
In a small bowl, whisk together the cinnamon, sugar, and a pinch of salt. This dry mix will season both the filling and part of the shell’s aroma, giving you that familiar baklava warmth in every bite. I like to add a tiny spark of citrus zest here so the filling doesn’t taste flat.
Step 3: Mix Wet Ingredients
In a separate dish, melt the butter and keep it warm but not hot. You’ll brush this onto the phyllo to glue the sheets together and build that delicate crisp. A quick whisk of the butter with a splash of water can help if your butter is too thick for brushing, but keep it simple—you want a smooth, cohesive sheen, not a runny mess.
Step 4: Combine
Now comes the playful part: you’ll take several sheets of phyllo, brush each with a light coat of butter, and press them into the mini muffin cups to form little cups. Layering two to three sheets per cup gives you sturdy shells that don’t collapse when you fill them. If a sheet tears, don’t panic—patch with another strip and keep going. The goal is crisp, golden edges with a soft, tender center.
Step 5: Prepare Filling
In a bowl, mix the walnuts, almonds (or pistachios), sugar, cinnamon, and lemon zest. Stir in the honey and a pinch of cloves or cardamom if you like a warm kick. The texture should be a bit sandy with tiny nut chunks—this gives wonderful bite and depth. If your nuts are very finely chopped already, you can add a tablespoon of melted butter to help everything bind just enough to stay together inside the cup.
Step 6: Layer & Swirl
Drop a small spoonful of the filling into each phyllo cup, then press another thin layer of phyllo on top, brushing with butter as you go. You want a little swirled apex on top so each cup looks inviting. If you’re in the mood for pretty marbling, sprinkle a few extra nuts on top and give the cups a final light brush of butter so they brown evenly.
Step 7: Bake
Bake for 18–22 minutes, or until the edges are deeply golden and the centers feel set when you lightly press them. The kitchen will smell like a warm spice market, with a hint of citrus lingering in the air—this is the moment you know you’ve got something special. If your oven runs hot, rotate the pan halfway through to prevent over-browning on one side.
Step 8: Cool & Glaze
Let the cups cool in the pan for about 10 minutes, then transfer to a wire rack to finish cooling. While they cool, whisk together the honey, lemon juice, and water. If you want a floral note, splash in a tiny amount of rosewater. Drizzle the warm glaze over each cup or dip the tops for a glossy finish. A quick sprinkle of chopped pistachios on top makes them look like little treasures.
Step 9: Slice & Serve
These Baklava Cups are best served at room temperature, which lets the flavors mellow into a more cohesive kiss of honey and citrus. If you’re serving them to a crowd, arrange them on a pretty platter and add a dusting of powdered sugar or orange zest for a finishing touch. My favorite moment is watching guests bite into the crisp edges and find the chewy, nutty center—the contrast is irresistible. If there are leftovers (which is rare), store them in an airtight container and cover tightly to keep the shells crisp.
What to Serve It With
Baklava Cups are a little dessert stand-alone, but they shine when paired thoughtfully. Here are a few ideas that keep the magic going without overpowering the delicate flavors:
For Breakfast: A strong cup of coffee, a dollop of Greek yogurt, and a few fresh berries. The yogurt balances the honey sweetness, and the coffee’s bitterness makes the pastry feel even brighter in the morning. It’s the kind of treat you can nibble on while you read the morning news and pretend you’re at a cafe in a sunlit alley.
For Brunch: Serve with mint tea or a tiny glass of sweet sparkling wine for a celebratory touch. Plate with fresh citrus slices and a few edible flowers for that brunch-chic vibe. The contrast between the warm spiced filling and the cool drink is absolutely delightful.
As Dessert: Pair with vanilla Ice Cream or a spoonful of thick Greek yogurt for a creamy counterpart. The cool dairy tames the glaze’s sweetness, and the nuts add a satisfying crunch with every bite. This is a dessert that twice-bakes your heart—comfort first, then a little celebration on the palate.
For Cozy Snacks: Keep a stash for after-school treat time or late-night movie marathons. They’re sturdy enough to pick up with your fingers, and the honey glaze gives a little late-night glow you’ll appreciate when you’re reaching for something sweet but don’t want a full project in the kitchen.
These serving ideas aren’t just practical; they’re a nod to the way I grew up—sharing bite-sized sweets with friends and family after a long day. The cups stay faithful to the original baklava spirit while giving you a neat, workable format for any occasion. It’s a recipe I’ve pulled into many gatherings, and it always earns a chorus of “mmm” and a few people asking for seconds—and yes, that always makes me smile.
Top Tips for Perfecting Your Baklava Cups
Here are a few field-tested tricks that keep these cups consistently delicious, no matter who’s tasting:
Phyllo Prep: Keep phyllo covered as you work. It dries out fast, and once it’s dry, it becomes brittle. If you must, brush a tiny bit more melted butter onto any dry sheets to rehydrate them slightly before pressing into the cups.
Nut Texture: I like a mixture of powdery and chunky nuts for a better bite. If your nuts are finely chopped, add a tablespoon of melted butter to the filling to help it cling, then chill the filling for 15 minutes before filling the cups. It sets up nicely and won’t slide out during baking.
Spice Balance: Cinnamon is the star, but don’t forget the lemon zest. The citrus lift keeps the sweetness from feeling cloying. If you’re a cardamom fan, a tiny pinch can add a whisper of floral warmth that pairs beautifully with honey.
Swirl & Shape: Don’t stress the symmetry. A little random marbling on top looks more artisanal and tastes just as good. If your cups puff a little, that’s okay—the outer rim will stay crisp and the center will stay tender.
Glaze Consistency: If the glaze feels too thick to drizzle, warm it gently over a low flame or in short 10-second bursts in the microwave. If it’s too thin, simmer a minute longer to thicken. A glossy, slow drizzle is all you need to finish the look.
Make-Ahead Tips: You can assemble the shells a day ahead and store them covered at room temperature. Bake them the next day, glaze while they’re warm, and you’re ready to wow guests with minimal last-minute effort.
Flavor Swaps: Almonds can be swapped for pistachios, or you can do a 50/50 mix. If you’re not a honey fan, a light maple syrup glaze is a nice alternative, though it will change the flavor profile slightly. Start with a 1:1 swap and adjust to taste.
These tips come from countless batches in my kitchen, and they’ve saved me on more than one rushed entertaining night. The joy of Baklava Cups is that they forgive a few small missteps and still deliver that signature, cozy, honeyed bite you want at the end of a busy day. My family will tell you I’m stubborn about keeping the glaze just right, but the honest truth is: if the cups taste great, the glaze is doing its job even if it isn’t perfectly glossy in every single cup. That’s real life in a kitchen—worthwhile, delicious, and a little imperfect in the best possible way.
Storing and Reheating Tips
Storage can keep the flavor from fading, but you’ll want to protect texture as best you can. Here’s how I handle it:
Room Temperature: In a loosely covered container for up to 2 days. Keep them away from direct sunlight; the phyllo can start to soften if exposed to humid air for too long.
Refrigerator Storage: If you’re making ahead, store the cups in an airtight container for up to 5 days. They’ll stay delicious, but the phyllo might lose a tiny bit of its crisp edge. Bring them to room temperature before glazing if you’re leaving the glaze off for storage.
Freezer Instructions: Freeze unglazed cups for up to 1 month. Wrap tightly in plastic, then cover with foil. Thaw completely, then glaze and briefly rewarm in a low oven (300°F/150°C for 5–7 minutes) to restore some crispness. If you glaze before freezing, the texture can soften, so I usually glaze after thawing for the best finish.
Glaze Timing Advice: If you’re freezing, glaze after you reheat. If you’re storing for many days in the fridge, you can glaze just before serving to keep a bright, fresh sheen.
These guidelines have kept Baklava Cups tasting fresh and flaky for family gatherings, potlucks, and the occasional spontaneous dessert night. The key is to protect texture where you can and to enjoy the warmth of the flavors in the moment you bite in.
Frequently Asked Questions
Final Thoughts
Baklava Cups have become a little ritual in my kitchen—a way to pause, savor something sweet, and share a moment with friends and family. They’re not just dessert; they’re a memory wheel that ticks forward with every bite: the crack of the crisp phyllo, the warm whisper of cinnamon, the bright kiss of lemon, and the slow, honeyed finish that feels like a hug. If you’re craving something comforting yet elegant, this recipe hits that sweet spot. It’s simple enough for a weeknight but special enough to bring to gatherings or to leftovers that disappear quickly the moment a pot of coffee appears. I hope you’ll try these Baklava Cups and tell me how you customize them—what nuts you chose, what glaze you loved, and what your family said the first time they tasted them. Happy baking! And if you’d like, drop a comment below with your variations and a photo—I love seeing your twists and your happy faces when they come out of the oven.
Baklava Cups
Ingredients
Main Ingredients
- 0.5 cup phyllo dough thawed
- 0.5 cup unsalted butter melted
- 1 cup walnuts chopped
- 0.25 cup granulated sugar
- 0.5 teaspoon ground cinnamon
- 0.125 teaspoon ground cloves
Syrup
- 0.5 cup honey
- 0.25 cup water
- 0.125 teaspoon lemon juice
Instructions
Preparation Steps
- Preheat oven to 350°F (175°C). Grease a 12-cup muffin tin.
- In a bowl, combine chopped walnuts, granulated sugar, cinnamon, and cloves. Mix well.0.5 cup phyllo dough
- Carefully unroll the phyllo dough. Cover with a damp towel to prevent drying out.0.5 cup phyllo dough
- Take one sheet of phyllo dough, brush it with melted butter, and place it into a muffin cup, pressing it into the bottom and up the sides.0.5 cup phyllo dough
- Repeat with 2-3 more sheets of phyllo dough for each cup, brushing each layer with butter and arranging them to create a cup shape. You can overlap the edges slightly.0.5 cup phyllo dough
- Spoon about 1-2 tablespoons of the walnut mixture into each phyllo cup.0.5 cup phyllo dough
- Bake for 20-25 minutes, or until the phyllo is golden brown and crispy.
- While the cups are baking, prepare the syrup. In a small saucepan, combine honey, water, and lemon juice. Bring to a simmer over medium heat and cook for 5 minutes.0.5 cup phyllo dough
- Once the baklava cups are out of the oven, immediately spoon the warm syrup over them.
- Let the baklava cups cool completely in the muffin tin before removing.
Notes
Featured Comments
“Impressed! Clear steps and turned out amazing results. Perfect for busy nights.”
“New favorite here — creamy. crowd-pleaser was spot on.”
“Super easy and turned out amazing! My family asked for seconds. Saving this one.”
“This sweet treat was absolutely loved — the cozy really stands out. Thanks!”
“Made it tonight and wow — so flavorful! Will definitely make Baklava Cups again.”
“Packed with flavor and so simple. Exactly what I wanted from Baklava Cups.”


