

There’s something magical about a warm tray of Baklava Cups cooling on the counter—the way the honey glaze glistens, the crisp edges giving way to a chewy, nutty center, and that aroma that instantly says “special treat.” I still remember sneaking a bite from my mom’s tin when I was little, the kitchen filling with cinnamon and citrus, like a memory you can taste. These baklava cups are the cozy, no-fuss version I reach for on busy weeknights and lazy Sunday afternoons alike. They’re basically baklava in bite-sized cups, so you get all the magic without wrestling with filo sheets at every turn. If you’ve ever wished baklava came with a friendlier vibe for weeknight dessert, these baklava cups are your answer. Trust me, one tray disappears faster than you think—my kids actually ask for seconds, which is how you know you’ve hit the sweet spot.
What is Baklava Cup?
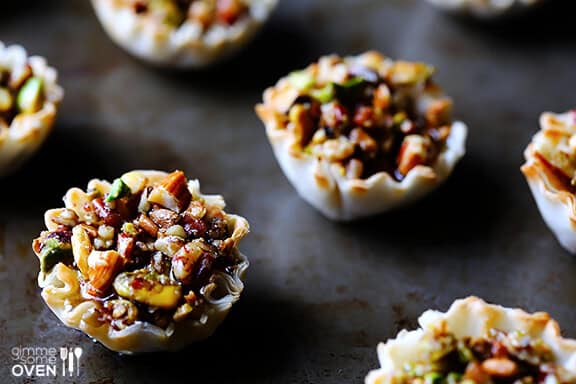
Baklava cups are a playful, approachable take on the classic Middle Eastern pastry. Think flaky, butter-brushed phyllo cups filled with a cinnamon-scented nut mixture and finished with a warm honey-syrup glaze. The name says it all: these are individual cups of baklava goodness, easy to bake in mini muffin tins so everyone gets their own perfect bite. It’s essentially baklava converted into a form that’s quick to assemble, easy to portion, and forgiving if you’re short on time. I love that the flavor remains bold—the toasted nuts, citrus zest, and honey mingle in the most comforting way—while the process becomes something you can pull off after a long day without wrestling with sheets of phyllo. If you’ve got a craving for something sweet but don’t want to commit to a full pan of baklava, these baklava cups are exactly what you need.
How do you make Baklava Cups?
Quick Overview
In short, you bake buttered phyllo cups until they’re golden and crisp, then pile in a warm, spiced nut mixture. A drizzle of honey-lemon glaze ties everything together, giving that glossy finish baklava fans adore. The beauty of these baklava cups is in the balance: crunch from the phyllo, sweetness and warmth from the honey and cinnamon, and a bright zing from citrus. It’s approachable, forgiving, and instantly comforting—perfect for sharing with friends or family over coffee. If you’re new to working with phyllo, don’t worry—these baklava cups are forgiving and quick, especially when you use individual cups that don’t require layering sheets for hours. This is my go-to solution when I want baklava vibes without the fuss.
Ingredients
For the Main Batter:
– 1 package (16–18 sheet) phyllo dough, thawed if frozen, kept covered to prevent drying.
– 4 tablespoons unsalted butter, melted and cooled slightly
– Pinch of salt
– Optional: 1 teaspoon sugar for a touch of sweetness in the crust
For the Filling:
– 1 cup walnuts, toasted and finely chopped
– 1/2 cup pistachios, chopped (reserve a few whole shells or larger pieces for texture if you like)
– 1/2 cup almonds, finely chopped
– 1/4 cup granulated sugar
– 1 teaspoon ground cinnamon
– Zest of 1/2 orange or lemon (optional but brightens the filling)
– 1–2 tablespoons butter, melted (to toss the nuts)
For the Glaze:
– 1/3 cup honey, warmed to loosen it up
– 1 tablespoon lemon juice or orange juice
– Pinch of lemon zest (optional)
Step-by-Step Instructions
Step 1: Preheat & Prep Pan
Preheat your oven to 350°F (175°C). Lightly grease a mini muffin tin with butter or oil spray. If you’re using a silicone tray, you can skip greasing, but I still give each cup a light brush of melted butter for that extra crispy edge. This is where the magic starts—the scent of butter and warm phyllo filling the kitchen is irresistible, and it’s exactly the moment you know these baklava cups will deliver.
Step 2: Prepare Phyllo
Gently unfold the phyllo sheets. Keep the stack covered with a damp towel to prevent drying. Cut each sheet into smaller rectangles that will fit into the mini muffin cups. I like to cut a strip about 4 inches wide and then cut that into squares—this gives me neat little squares for easy cup formation. If you see tears, don’t panic; you can patch with a second piece and still get a perfect cup.
Step 3: Form the Cups
Lay a phyllo square in each muffin cup, brush lightly with melted butter, then stack another square at a slight angle to create a little cup. Repeat until you have a sturdy base and rim. You’re not trying to create a skyscraper—just a compact, crisp shell that won’t collapse under the filling. A few extra layers around the edges help the cups stay crisp even after baking with the filling inside.
Step 4: Bake the Shells
Bake the shells for 8–10 minutes, or until the edges are golden and crisp. The aroma is heavenly and will make your mouth water before you even finish the first tray. If your phyllo starts to puff up too much, you can press gently with the back of a spoon to keep the cups uniform, but be careful not to squish them. Keep an eye on them—the goal is bronzed, delicate edges, not dark, brittle shells.
Step 5: Prepare Filling
While the shells bake, toast the chopped nuts lightly in a dry skillet for 3–4 minutes, until they smell toasty and inviting. Remove from heat and mix with the sugar, cinnamon, and citrus zest. A quick toss with 1–2 tablespoons melted butter helps the mixture cling to the cups, and the warmth of the nuts brings out their fragrance. If you want a touch more sweetness, a whisper of vanilla can be added to the filling.
Step 6: Fill & Layer
When the shells are crisp and still warm, spoon a generous spoonful of the nut mixture into each cup. You want a nice mound, but not so high that the glaze struggles to coat it. If you like more texture, reserve a handful of chopped nuts and press a few on top for a decorative finish. The idea is to have a little crunch with every bite, so don’t go shy on the filling.
Step 7: Bake Again
Return the filled cups to the oven for about 5–7 minutes, just long enough to let the filling mingle with the warm shells and to encourage the nut oils to mingle with the butter. If you notice any edges browning too quickly, loosely tent the tray with a piece of foil and keep an eye on it. You want the filling set but not dry—juicy and fragrant is the sweet spot.
Step 8: Cool & Glaze
Remove the tray from the oven and let the cups cool for 5–10 minutes on a rack. While they’re still warm, whisk the glaze ingredients together until smooth. Drizzle a light, glossy sweep of honey-lemon glaze over each baklava cup or dip the tops for a more generous finish. The glaze should be warm but not syrupy—the goal is a thin, even coating that catches the light and adds a touch of sweetness without overpowering the nut filling.
Step 9: Slice & Serve
These baklava cups are best enjoyed a few hours after glazing, when the flavors have had a moment to mingle. If you’re serving them for a crowd, lay a few on a pretty platter with a little citrus zest for color. They’re fantastic with a strong coffee or a cup of Turkish tea, and they pair beautifully with a scoop of vanilla Ice Cream if you’re feeling particularly indulgent. Each bite should deliver that satisfying crunch, followed by the warm, honeyed finish—a little bite of celebration in a cup.
What to Serve It With
These baklava cups shine in many contexts, so I always keep a few options in mind. For Breakfast: pair with a robust coffee or a cinnamon-spiced latte and a dollop of yogurt on the side for a creamy contrast. Brunch: present them on a tiered platter with orange slices and a sprinkle of finely grated zest to brighten the plate. As Dessert: serve with a scoop of pistachio or cardamom Ice Cream, or a silky vanilla bean yogurt for a lighter finish. For Cozy Snacks: stash a few in a decorative tin with a few almond biscotti on the side; they’re the kind of treat that makes movie nights feel luxurious. In our family kitchen, baklava cups often appear alongside a pot of strong coffee and a few lively conversations—the kind that happen after finishing a big Sunday meal. These baklava cups are a little celebration, a tiny bite of joy that travels well from oven to plate to memory.
Top Tips for Perfecting Your Baklava Cups
Here are the tricks I’ve learned after testing this recipe countless times. They keep baklava cups deliciously reliable, even on busy nights when you need something reliable and comforting.
Phyllo Prep: Keep the phyllo sheets covered as you work, and brush each layer with melted butter. The layers should feel delicate but sturdy, and the butter helps them crisp up beautifully. A crust with enough butter on every layer is non-negotiable for that classic baklava crunch.
Nut Toasting: Toast nuts until they smell nutty and sweet, but watch them carefully—they can go from perfect to burnt quickly. Ground to a medium-coarse texture gives you the best chew and pop of nut flavor in every bite.
Sweetness Balance: If you’re new to baklava cups, start with less sugar in the filling and build up to taste. The glaze adds sweetness, so you can cut back a touch in the filling and still get that luscious balance you’re after.
Swirl & Layer: If you want a prettier cross-section in the finished cups, reserve a handful of chopped nuts to press into the top after glazing. A few larger pieces peeking through create an inviting marbled look and a pleasant crunch on top.
Glaze Variations: For different flavor notes, try orange blossom water in the glaze, or a splash of lemon juice with a pinch of zest. You can also alternate honey with a maple-lemon glaze for a different aroma and depth.
Make-Ahead Wisdom: The shells can be baked and stored, then filled and glazed the day you plan to serve them. If you’re preparing ahead, keep the glazed cups in a cool, dry place for up to 2 days; refrigerating can make the phyllo lose some crispness, so I prefer room temperature for best texture.
Storing and Reheating Tips
Storage is easy with baklava cups, and the glossy glaze helps preserve that special texture you love. Here’s how I keep them fresh and tasty.
Room Temperature: Store in a single layer on a plate or in a shallow container with a loose lid for up to 2 days. Keep away from heat and humidity to preserve the crisp edges. If they soften a touch, a quick 5–7 minute re-crisp in a low oven does wonders.
Refrigerator Storage: You can refrigerate for up to 4 days, but cover well to prevent the phyllo from drying out and losing its crispness. Bring to room temperature before serving to maximize flavor and texture.
Freezer Instructions: Freeze baked shells (without glaze) in an airtight container for up to 1 month. Thaw overnight in the fridge, then re-crisp in a 325°F oven for 5–7 minutes before glazing. Glaze timing should be done right before serving for the best shine and texture.
Glaze Timing Advice: If you’re freezing the shells, hold off on applying the glaze until you’re reheating to serve. A final glaze just before serving keeps the surface glossy and the flavors fresh.
Frequently Asked Questions
Final Thoughts
If you’re craving baklava but need something that comes together quickly, these baklava cups are your new best friend. They deliver the same warmth and spice as the traditional pastry, just in a friendlier, shareable format. I’ve watched friends lean in with a grin when they realize how easy it is to bake these, and how stunning they look on a plate. The best part is that you can tailor the flavor to your mood—more citrus for bright mornings, extra cinnamon for cozy evenings, or a few pistachios on top for color and crunch. This dessert feels like a hug in a tray, something you can bring to a potluck or offer to a neighbor as a small act of sweetness. I’ve tested different nuts and glazing options, and the core crowd-pleaser remains: crisp phyllo, nutty filling, and that glossy honey glaze. Happy baking, and I’d love to hear how you customize your baklava cups—leave a note in the comments and share your favorite twists!
Easy Baklava Cups
Ingredients
Main Ingredients
- 1 package phyllo dough thawed
- 1.5 cup walnuts finely chopped
- 0.5 cup granulated sugar
- 1 teaspoon ground cinnamon
- 0.25 teaspoon ground cloves
- 0.5 cup unsalted butter melted
Honey Syrup
- 0.75 cup honey
- 0.25 cup water
- 1 tablespoon lemon juice
- 0.25 teaspoon orange zest optional
Instructions
Preparation Steps
- Preheat oven to 350°F (175°C). Grease a 12-cup muffin tin.
- In a medium bowl, combine chopped walnuts, granulated sugar, cinnamon, and cloves. Mix well.1 package phyllo dough
- Carefully unroll the phyllo dough. Keep the sheets covered with a damp cloth to prevent them from drying out.1 package phyllo dough
- Place one sheet of phyllo dough on a clean surface. Brush it lightly with melted butter. Layer another sheet on top and brush with butter. Repeat with a total of 4-5 sheets for each cup.1 package phyllo dough
- Cut the stacked phyllo sheets into squares that fit into the muffin cups. Gently press the phyllo squares into each muffin cup, allowing the edges to extend slightly over the rim.
- Fill each phyllo cup with about 2 tablespoons of the nut mixture.
- Fold the overhanging phyllo edges inward to enclose the filling, creating a cup shape. Brush the folded edges with melted butter.1 package phyllo dough
- Bake for 20-25 minutes, or until the baklava cups are golden brown and crispy.
- While the baklava is baking, prepare the syrup. In a small saucepan, combine honey, water, lemon juice, and orange zest (if using). Bring to a simmer over medium heat and cook for 5 minutes.1 package phyllo dough
- Once the baklava cups are out of the oven, immediately spoon the hot syrup over them, ensuring each cup is well-coated.
- Let the baklava cups cool completely in the muffin tin before removing. This allows the syrup to soak in and the cups to set.
Notes
Featured Comments
“So good! I love how the honey glaze just makes them shine—and that perfect crunch and chew combo is everything.”
“Impressed! Clear steps and restaurant-level results. Perfect for busy nights.”
“New favorite here — so flavorful. crowd-pleaser was spot on.”
“Super easy and turned out amazing! My family asked for seconds. Saving this one.”
“This sweet treat was absolutely loved — the zingy really stands out. Thanks!”
“Made it tonight and wow — super easy! Will definitely make baklava cups again.”


So good! I love how the honey glaze just makes them shine—and that perfect crunch and chew combo is everything.