

There’s something magical about pulling a tray of Caramel Crumb Bars from the oven and imagining the house smelling like a warm hug. I remember these treats from my grandmother’s kitchen, where the butter glowed soft in the pan and the air carried a caramel-sweet promise that made everyone hover by the oven door. This isn’t just dessert—it’s a friendly ritual we fall back on on busy weeknights and lazy Sundays alike. I’ve made these countless times, and I still catch myself smiling when the crust crackles at the edges and the caramel swirls through the crumb topping. If you’ve ever eaten a bar that tasted like a cozy blanket and a caramel kiss at the same time, you know the exact moment I’m chasing here. Caramel Crumb Bars are incredibly straightforward to bake, but they feel special enough for celebrations. They’re the kind of treat that tastes like teamwork—crumbs, caramel, and a little sprinkle of sea salt, all coming together in one chewy bite. I’ve got a couple of tiny tricks I’ve learned along the way, and I can’t wait to share them with you, friend.
What is caramel crumb bar?
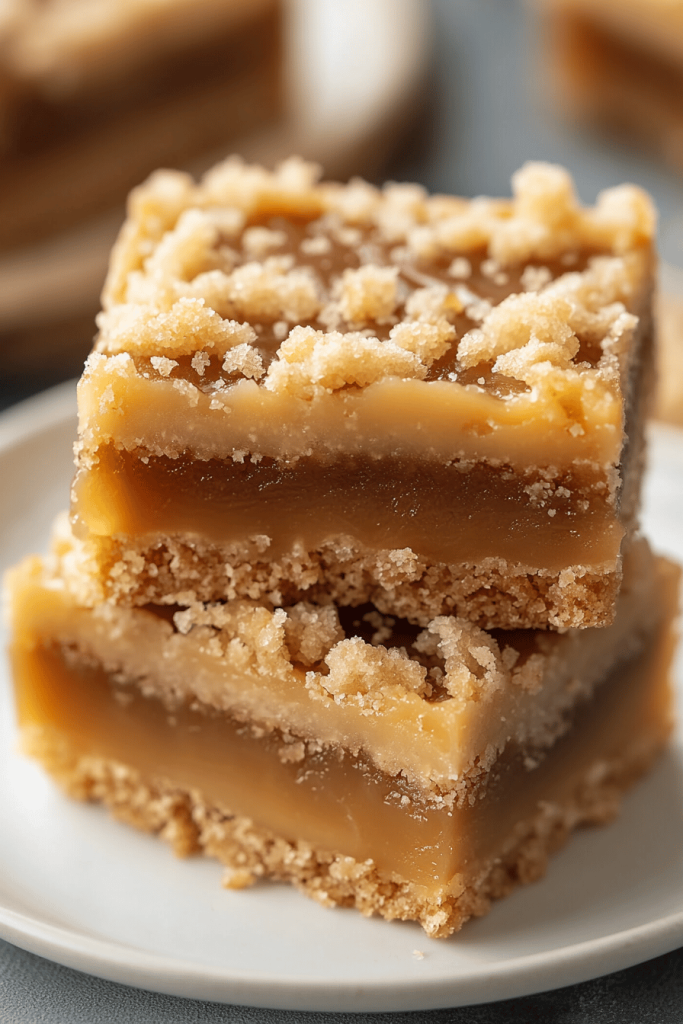
Think of Caramel Crumb Bars as a love letter to double-crunch texture and that irresistible, gooey caramel center. It’s essentially a shortbread-like crust that’s sturdy enough to stand up to a generous caramel layer, all topped with a buttery oat-crumb crumble that bakes into a toasty, maple-gold crust on top. The name is simple and honest: bars with a caramel center and a crumbly topping you’ll want to snack on straight from the pan. I love the way the crust provides a toasty foundation, while the filling stays gloriously fudgy without being too sweet, and the crumble crown adds a crunchy counterpoint. The origin? It’s a classic American bake—a no-fuss crowd-pleaser that travels well and cuts into neat squares for sharing. Think of it as a grown-up version of a caramel cookie bar, with the texture of a crumble pie topping and the comforting familiarity of a family recipe that’s been passed down in layers. It’s essentially a dessert you can make in a single afternoon, with results that feel like a warm blanket and a well-loved photo album all in one bite.
How do I make caramel crumb bars?
Quick Overview
Here’s the quick version: melt butter and whisk together a few dry ingredients to form a sturdy crust, then bake until just lightly golden. While that crust rests, you soften caramel to a pourable state (or scoop dulce de leche right from the tub if that’s easier). Spread the caramel over the warm crust, sprinkle a buttery oat crumble over the top, and bake again until the crumble becomes toasty and beautifully crisp. A quick glaze or light dusting of flaky salt finishes the surface. It’s basically assembly and patience, with one final bake that binds everything together. The result is bars that hold their shape neatly, yet stay chewy and indulgent on the inside. Don’t worry—you’ll feel like a pro after your first sheet.
Ingredients
For the main battery (crust):
– 1 1/2 cups all-purpose flour
– 1/2 cup rolled oats
– 1/2 cup light brown sugar, packed
– 1/4 teaspoon baking powder
– 1/4 teaspoon salt
– 1/2 cup (1 stick) unsalted butter, melted and cooled
– 1 teaspoon Vanilla Extract (optional, but I love it for a hint of warmth)
For the Filling:
– 1 cup caramel sauce or dulce de leche, warmed until pourable
– 1/4 cup heavy cream or milk (to loosen, if needed)
– A pinch of sea salt (to balance sweetness; skip if you’re not into salt)
For the Crumble Topping:
– 3/4 cup all-purpose flour
– 1/2 cup old-fashioned oats
– 1/2 cup light brown sugar
– 1/4 teaspoon salt
– 6 tablespoons unsalted butter, melted
For the Glaze (optional):
– 1/2 cup powdered sugar
– 2–3 tablespoons caramel sauce or milk to reach drizzling consistency
– Pinch of salt (optional)
Step-by-Step Instructions
Step 1: Preheat & Prep Pan
Preheat your oven to 350°F (175°C). Line a 9×13-inch baking pan with parchment or foil, leaving overhang on the sides for easy bars removal. Cuddle that pan with a quick spray of nonstick, and make sure you’ve got a bowl at the ready for the melted butter. I always do this when I’m prepping: I set out the ingredients first so I can move from one step to the next without chasing clutter. This is the moment you can actually hear the oven sigh with warmth—you’re about to bake something that tastes like home.
Step 2: Mix Dry Ingredients
In a medium bowl, whisk together flour, oats, brown sugar, baking powder, and salt. The texture should resemble a sandy, slightly clumpy mix. I like to rub the ingredients between my fingers a little to wake up the oats and release their aroma—it sounds silly, but this little squeeze of joy makes the kitchen feel extra cozy.
Step 3: Mix Wet Ingredients
Pour in the melted butter and vanilla, if using. Stir until the mixture comes together into a cohesive, sandy dough. It should hold its shape when you pinch it in your hand but still feel a touch crumbly—perfect for forming a sturdy crust with a delicate crumb layer on top. If you find it a touch too dry, add a teaspoon of water or milk; you don’t want it to be sticky, just cohesive.
Step 4: Combine
Press about two-thirds of the crust mixture into the prepared pan, filling the bottom evenly. I use the back of a spoon or a flat-bottomed glass to press firmly so there are no bare spots. This is the foundation, and you want it even. Bake for 12–15 minutes until the edges just start to turn pale golden. The crust will finish baking with the top crumble, so you’re aiming for a gentle nap of color, not a deep tan.
Step 5: Prepare Filling
If you’re using store-bought caramel, warmth it briefly to loosen. If you’re making a caramel from scratch, make sure it’s glossy and pourable but not too runny. Stir in a splash of cream to loosen if it feels a touch stiff. Pour the warmed caramel over the hot crust, then sprinkle with a pinch of sea salt if you like that balance of sweet and Salted Caramel magic. The smell as the caramel hits the pan is one of the great kitchen moments—rich and inviting.
Step 6: Layer & Swirl
Scatter the crumb topping evenly over the caramel layer. Don’t worry about perfect consistency—the little crumbles will burst into golden, crispy islands as they bake. If you want a prettier marbled effect, you can dot the top with a few extra caramel droplets and gently swirl with a knife in a few deliberate passes, but I’ve learned that this step is mostly for style points. Bake for 20–25 minutes, until the top is deeply golden and the edges pull away from the sides slightly. Your kitchen should smell like a caramel bakery by now.
Step 7: Bake
Return the pan to the oven and bake until the topping is crisp and the caramel is set—about 25 minutes more. If your oven runs hot, start checking at 22 minutes. You want the top to be deeply bronzed; if it looks pale, bake a few more minutes and watch closely toward the end.
Step 8: Cool & Glaze
Let the bars cool completely in the pan on a rack. This can be hard for impatient bakers like me, but cooling is essential for clean slicing and for the caramel to firm up. If you’re using the glaze, whisk together powdered sugar with caramel sauce and a splash of milk until you reach a pourable consistency. Drizzle over the cooled bars in a quick, zig-zag pattern or a neat lattice—whatever makes you smile. A light sprinkle of flaky salt while the glaze is still tacky is a lovely finishing touch.
Step 9: Slice & Serve
Lift the whole slab from the pan using the parchment overhang, then place it on a cutting board. Slice into generous squares with a sharp knife. Clean the knife between cuts for the neatest edges. I like to wipe the blade after every few slices to prevent caramel from gumming up the blade. Serve with a cup of strong coffee or a cold glass of milk. These bars are best at room temperature within the first 2–3 days, but they freeze beautifully if you want to stash them for later.
What to Serve It With
Caramel Crumb Bars aren’t just dessert guests; they’re versatile little bundles that fit different occasions. Here are a few ways I serve them that make every bite feel special.
For Breakfast: A light dusting of powdered sugar with a cup of black coffee makes a simple morning moment feel celebratory. If you’re in a rush, crumble a bar over yogurt and add sliced almonds for texture. The sweetness isn’t overpowering, so it’s a gentle, comforting way to start the day.
For Brunch: Plate with sliced fruit and a dollop of mascarpone or cinnamon whipped cream. A scatter of chopped walnuts adds crunch and a nice contrast to the caramel’s silkiness.
As Dessert: Pair with a scoop of vanilla ice cream or a scoop of salted caramel gelato for a double chocolate-chocolate moment. A short espresso on the side keeps the flavors balanced and round.
For Cozy Snacks: Cut larger squares and wrap individually for a movie night or a long car ride. The bars travel well, and the caramel keeps its moisture, so they stay delicious even after a little chill. My family loves them with a warm mug of cocoa when the evenings turn crisp.
Top Tips for Perfecting Your Caramel Crumb Bars
These tips aren’t official rules, just little things I’ve learned after baking these dozens of times. They keep me confident when I’m chasing the perfect texture and flavor.
Texture balance: The crumb topping should be sandy and slightly clumpy, not powdery. If it’s too wet, it won’t crisp; if it’s too dry, you’ll taste flour more than caramel. The trick is to let the melted butter cool just a touch before mixing so the oats and flour don’t get greasy.
Caramel consistency: If your caramel is too thick, you’ll have lumpy layers. If it’s too runny, it may soak into the crust. Warm it gently and whisk in a splash of cream to reach a silky, pourable consistency. It should spread like warm honey, not drip like maple syrup.
Salt balance: A pinch of salt really lifts the caramel. If you’re using salted butter, skip the extra salt in the filling, or reduce it to taste. If you prefer a sweeter, less salty profile, you can leave the salt out completely.
Marble vs. uniform topping: I love a tidy, uniform crumble, but a few caramel drips through the topping look gorgeous too. If you’re aiming for a bit of swirl, dab the caramel in a few places and use a skewer to create a light marbling before you bake. It makes the bars look extra tempting when you cut them.
Glaze options: The glaze adds a glossy finish and a touch more sweetness. For a simple variation, skip the glaze and dust with a little cocoa powder or finely chopped toasted pecans for an extra layer of crunch. If you want a stronger caramel punch, mix a tablespoon of the glaze into the caramel before you spread it, but be mindful of the balance so you don’t overshadow the crust and crumble.
Make ahead: Dough and crumble can be prepared a day ahead and stored in the fridge, then assembled the next day. If you’re freezing, freeze the baked bars unglazed; glaze once you thaw and are ready to serve. The flavors deepen a bit after a night in the fridge, and I’m not mad about it.
Storing and Reheating Tips
Caramel Crumb Bars stay beautifully tender when stored properly. Here’s how I keep them at their best.
Room Temperature: Store in an airtight container for up to 3 days. If your kitchen is warmer than usual, keep them covered and away from direct sunlight to prevent the caramel from becoming too soft.
Refrigerator Storage: For longer freshness (4–5 days), keep the bars in a sealed container. They’ll firm a bit in the fridge, so if you prefer a softer bite, let them come to room temperature for 20–30 minutes before serving.
Freezer Instructions: Wrap individual bars tightly in plastic wrap and seal in a freezer bag. They’ll keep for up to 2 months. Thaw in the refrigerator overnight or at room temperature for a couple of hours. Glaze can be added after thawing for a fresh, glossy finish.
Glaze Timing Advice: If you’re freezing, skip the glaze until you’re ready to serve. Glazing before freezing can cause the glaze to crack and cling oddly when thawed. If you’re refrigerating, you can glaze before your bars go into the fridge for a more integrated finish, but you may want to reheat gently to restore gloss before serving.
Frequently Asked Questions
Final Thoughts
Caramel Crumb Bars have become a quiet ritual in my kitchen—a dish I reach for when I want to feel connected to the people who taught me to bake and to slow down just enough to appreciate the butter’s scent on the air. They’re a reminder that simple ingredients, treated well, become something deeply comforting. The crust, the caramel, and the crunch of the topping each tell a part of the story, and together they create a dessert that’s both nostalgic and refreshingly easy to make on a weeknight. If you’re new to caramel bars, I promise you’ll fall in love with how forgiving the process is and how forgiving the texture becomes after a little cool-down time. I can’t wait to hear how yours turn out—whether you stick to the classic version, or you swap in a pinch of sea salt or a drizzle of chocolate to make it your own. Happy baking, friend, and may your kitchen fill with that unmistakable, cozy glow of caramel.
Caramel Crumb Bars
Ingredients
Cookie Base and Crumb Topping
- 1.5 cups all-purpose flour
- 1.5 cups old-fashioned oats
- 0.75 cups packed brown sugar
- 1.5 teaspoons baking powder
- 0.3333 cups butter, melted
Caramel Filling
- 14 ounces caramel bits or unwrapped chewy caramels
- 3 tablespoons heavy whipping cream
- 0.5 cups semi-sweet chocolate chips
Optional Add-ons
- 0.25 cups chopped pecans toasted, for garnish
Instructions
Preparation Steps
- Preheat oven to 350°F (175°C). Line a 9x13-inch baking pan with aluminum foil and lightly grease with non-stick spray or butter.
- In a large mixing bowl, combine flour, oats, brown sugar, and baking powder. Pour in melted butter and stir until crumbly and well mixed.
- Spread half of the oat mixture evenly onto the bottom of the prepared pan. Press down firmly to form a uniform base.
- Bake the base for 12 minutes. Remove from oven and set aside.
- In a small saucepan, melt the caramel bits with heavy cream over low heat, stirring constantly until smooth. Pour evenly over the pre-baked base.
- Sprinkle the chocolate chips over the caramel layer, then crumble the remaining oat mixture on top. Sprinkle with chopped pecans if using.
- Return to oven and bake for an additional 18-20 minutes, or until the edges are lightly golden and the filling is set.
- Cool completely on a wire rack (at least 2 hours). Use the foil overhang to lift bars from the pan and cut into 16 squares.
Notes
Featured Comments
“Impressed! Clear steps and so flavorful results. Perfect for busy nights.”
“New favorite here — spot on. crowd-pleaser was spot on.”
“Super easy and turned out amazing! My family asked for seconds. Saving this one.”
“This sweet treat was absolutely loved — the silky really stands out. Thanks!”
“Made it tonight and wow — absolutely loved! Will definitely make Caramel Crumb Bars again.”
“Packed with flavor and so simple. Exactly what I wanted from Caramel Crumb Bars.”


