


There are some treats that just feel like home, aren’t there? For me, that’s anything with the warm, comforting scent of cinnamon and oats wafting from the oven. And when you combine all the cozy, chewy goodness of an Oatmeal Raisin cookie with the celebratory flair of a cake, well, you’ve got something truly magical. My family absolutely adores this oatmeal raisin cookie cake, and I’ve been making it for years. It’s the perfect answer when you want that deeply satisfying, spiced cookie flavor but don’t have the patience to scoop and bake dozens of individual cookies. Think of it as your favorite classic oatmeal raisin cookie, but on a grander, more forgiving scale. It’s seriously one of my go-to recipes when I need a little sweet comfort, or when unexpected guests pop over. It truly is a lifesaver!
What is Oatmeal Raisin Cookie Cake?
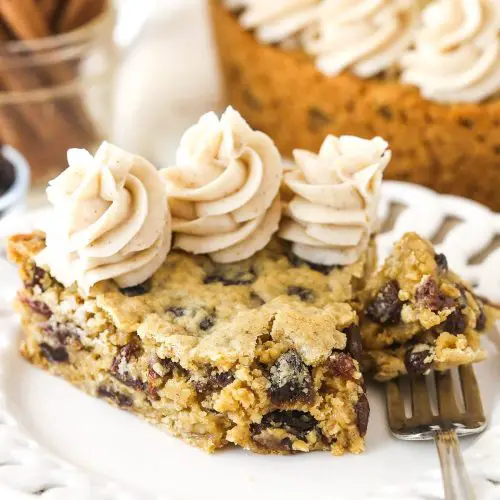
So, what exactly *is* an oatmeal raisin cookie cake? It’s precisely what it sounds like: a big, glorious cake baked from an oatmeal raisin Cookie Dough! Instead of shaping individual cookies, you press the dough into a cake pan, maybe swirl in some extra goodies, and bake it into one unified, delightful creation. It’s not a traditional sponge cake or a dense brownie; it’s its own special thing. Imagine the chewy texture and spice notes you love in a cookie, but in a format that’s easier to share (or not, I won’t judge!). It’s essentially taking all the best parts of a perfectly baked oatmeal raisin cookie and magnifying them into a beautiful, shareable centerpiece. It’s rustic, it’s comforting, and it’s unapologetically delicious.
How do I make Oatmeal Raisin Cookie Cake?
Quick Overview
Making this oatmeal raisin cookie cake is surprisingly straightforward! You’ll simply whisk together your dry ingredients, cream your butter and sugars, add your eggs and vanilla, then combine the wet and dry. You’ll gently fold in your oats and raisins, press the dough into a prepared pan, and bake until golden and fragrant. The result is a rustic, chewy, and wonderfully spiced cake that tastes like pure comfort. It’s a recipe that proves you don’t need complicated techniques to achieve spectacular results.
Ingredients
For the Main Batter:
* 2 cups all-purpose flour: This is your base. Make sure it’s spooned and leveled, not scooped directly from the bag, to avoid packing too much flour in, which can make the cake tough.
* 1 teaspoon baking soda: This is what gives our cake that perfect lift and chewy texture.
* 1/2 teaspoon salt: Balances the sweetness and enhances all those lovely spices.
* 2 teaspoons ground cinnamon: The star spice! Don’t skimp here; it’s crucial for that classic oatmeal cookie flavor.
* 1/4 teaspoon ground nutmeg: A little nutmeg adds a beautiful warmth that pairs so well with cinnamon.
* 1 cup (2 sticks) unsalted butter, softened: Make sure it’s softened, not melted! This is key for creaming and achieving the right texture.
* 1 cup granulated sugar: For sweetness and structure.
* 1 cup packed light brown sugar: The brown sugar adds moisture and that irresistible caramel-like depth of flavor that cookies are known for. I find light brown sugar gives the best balance, but dark brown works too if you have it!
* 2 large eggs: These bind everything together and add richness. Make sure they’re at room temperature for easier mixing.
* 1 teaspoon Vanilla Extract: Pure vanilla extract makes all the difference. It rounds out the flavors beautifully.
* 3 cups old-fashioned rolled oats: Crucial for that classic chewy texture. Quick oats will make it a bit too mushy, so stick with rolled oats if you can.
* 1 ½ cups raisins: You can use regular seedless raisins, or even a mix of raisins and dried cranberries for a little tartness. I like to plump mine up a bit before adding, but it’s not essential.
For the Filling (Optional but Highly Recommended!):
* 1/2 cup chopped walnuts or pecans: For a delightful crunch and nutty flavor. Toasting them first really amplifies their taste!
* 1/4 cup packed brown sugar: Just a little to caramelize slightly.
* 1 teaspoon cinnamon: To reinforce those warm spice notes.
For the Glaze (Optional):
* 1 cup powdered sugar: Sifted to avoid lumps.
* 2-3 tablespoons milk or cream: Start with 2 and add more until you reach your desired drizzling consistency. A splash of half-and-half makes it extra rich!
* 1/2 teaspoon vanilla extract: A little extra vanilla for flavor.
Step-by-Step Instructions
Step 1: Preheat & Prep Pan
First things first, let’s get our oven ready. Preheat it to 350°F (175°C). Now, grab a 9-inch round cake pan or an 8×8 inch square pan. I find a well-greased and floured pan works best to prevent any sticking. You can also line the bottom with parchment paper for extra security – this is a trick I always use when I’m worried about something sticking! A light spray of cooking oil or a good smear of butter followed by a dusting of flour should do the trick.
Step 2: Mix Dry Ingredients
In a large bowl, whisk together the all-purpose flour, baking soda, salt, cinnamon, and nutmeg. You want to make sure all those spices are evenly distributed, so give it a good whisk. This ensures consistent flavor in every bite. Just a quick whisk until everything looks nicely combined is perfect.
Step 3: Mix Wet Ingredients
In a separate, even larger bowl (or the bowl of your stand mixer if you’re using one), cream together the softened butter, granulated sugar, and packed light brown sugar. Beat them together until the mixture is light and fluffy, about 3-5 minutes. This step is super important for texture! It incorporates air, which makes the cake tender. Then, beat in the eggs, one at a time, making sure each is well incorporated before adding the next. Finally, stir in the vanilla extract.
Step 4: Combine
Now, it’s time to bring it all together. Gradually add the dry ingredients to the wet ingredients, mixing on low speed (or with a wooden spoon) until just combined. Be careful not to overmix here! Overmixing develops the gluten in the flour, which can lead to a tough cake. We want tender! Once it’s mostly combined, gently fold in the rolled oats and raisins. Again, mix only until everything is just distributed. The dough will be thick and a bit sticky.
Step 5: Prepare Filling
If you’re making the optional filling, now’s the time! In a small bowl, combine the chopped nuts, brown sugar, and cinnamon. Toss them together until the nuts are evenly coated. This little mixture adds such a lovely texture and a hint of extra spice.
Step 6: Layer & Swirl
Scrape about two-thirds of the cookie cake batter into your prepared pan and press it down evenly to form a base layer. If you’re using the nut filling, sprinkle it evenly over the base layer. Then, dollop the remaining one-third of the batter over the filling. Don’t worry about making it perfect; you can gently spread it with a spatula or even your fingers (lightly floured, of course). If you want a more swirled effect, you can take a knife and gently swirl through the layers. Don’t overdo it, or you’ll lose the definition.
Step 7: Bake
Place the pan in your preheated oven. Bake for 30-40 minutes, or until the edges are golden brown and a toothpick inserted into the center comes out with moist crumbs attached, but not wet batter. The baking time can vary a bit depending on your oven, so keep an eye on it towards the end. You want it cooked through but still wonderfully moist and chewy.
Step 8: Cool & Glaze
Once baked, let the cake cool in the pan for about 10-15 minutes. This is important because it allows the cake to set up a bit. Then, carefully invert it onto a wire rack to cool completely. While it’s cooling, you can whisk together your glaze ingredients. Start with 2 tablespoons of milk and add more as needed to reach a drizzly consistency. Drizzle it over the completely cooled cake. If you glaze it while it’s warm, the glaze will melt right off!
Step 9: Slice & Serve
Once the glaze has set (or if you skipped the glaze), cut the oatmeal raisin cookie cake into wedges. It’s fantastic served slightly warm, or at room temperature. I love cutting it into generous slices, like you would a regular cake. It’s perfect on its own, but even better with a scoop of vanilla ice cream or a dollop of whipped cream.
What to Serve It With
This oatmeal raisin cookie cake is so versatile, it fits in perfectly at any meal or occasion! For breakfast, I love slicing off a piece and enjoying it with a hot cup of coffee. The warm spices and oats are just the perfect way to start the day. It’s not overly sweet, so it feels like a treat without being too decadent. For a more festive brunch spread, I’ll present it on a pretty platter, perhaps with some fresh berries on the side. A mimosa or a sparkling cider would be the perfect beverage pairing. As a dessert, it truly shines. Serving it warm with a scoop of creamy vanilla bean ice cream is pure bliss – the contrast of warm cake and cold ice cream is unbeatable. A dollop of lightly sweetened whipped cream is also lovely. For those cozy snack moments, it’s the ultimate comfort food. I like to pair a slice with a glass of cold milk or a soothing cup of herbal tea. My kids especially love it after school with a glass of chocolate milk. It’s also a fantastic option for potlucks and picnics because it travels so well and is always a hit with everyone, young and old.
Top Tips for Perfecting Your Oatmeal Raisin Cookie Cake
I’ve made this oatmeal raisin cookie cake more times than I can count, and over the years, I’ve picked up a few tricks that I think really make a difference. First, about the oats: always use old-fashioned rolled oats. Quick oats just don’t give you that satisfying chewy texture. They tend to absorb too much moisture and can make the cake gummy. For the raisins, if they’re a bit dry and hard, you can soak them in warm water for about 10 minutes, then drain them really well before adding them to the batter. This plumps them up and makes them wonderfully chewy. When it comes to mixing, remember that classic cookie rule: don’t overmix! Once you add the flour, mix until *just* combined. A few streaks of flour are okay; they’ll disappear in the oven. Overmixing develops gluten, leading to a tough cake, and we definitely don’t want that. For the optional nut filling, toasting your nuts beforehand makes a world of difference in their flavor. Just a quick toast in a dry skillet or in the oven until fragrant really brings out their nutty aroma. If you’re not a fan of raisins, feel free to swap them out for dried cranberries, chopped dates, or even chocolate chips! I’ve tried it with a mix of raisins and dried cherries, and it was delicious. For baking, ovens can be tricky. My oven tends to run a bit hot, so I often check my cake around the 30-minute mark. A toothpick inserted into the center should come out with moist crumbs attached, not wet batter. If it’s browning too quickly on top, you can loosely tent it with aluminum foil for the remainder of the baking time. And for the glaze, consistency is key. It should be thick enough to drizzle but not so thin that it runs off the cake. If it’s too thick, add milk a teaspoon at a time; if it’s too thin, whisk in a bit more powdered sugar. I love a good, thick glaze, but sometimes just a light dusting of powdered sugar is also lovely and much simpler!
Storing and Reheating Tips
This oatmeal raisin cookie cake is honestly best enjoyed fresh, but it holds up really well, which is fantastic. If you have any leftovers (a rare occurrence in my house!), storing it is simple. At room temperature, it will keep well for about 2-3 days. Just make sure to cover it tightly with plastic wrap or place it in an airtight container. This helps to keep it from drying out. I usually find it best to leave the glaze off until just before serving if I know it will be sitting out for a while, but if it’s already glazed, just wrap it up securely. If you’re not going to finish it within a few days, or if you want to make it ahead, refrigerator storage is your best bet. Wrap it well in plastic wrap, then in foil, or store it in an airtight container in the fridge for up to a week. When you’re ready to enjoy a slice from the fridge, you can eat it cold, or warm it up gently. I usually pop a slice in the microwave for about 15-20 seconds, just to take the chill off and make it soft and chewy again. It’s amazing how well it reheats! For longer storage, this cake freezes beautifully. Once completely cooled and glazed (or unglazed), wrap it tightly in plastic wrap, then in aluminum foil. You can also place the wrapped cake in a freezer-safe bag or container. It will keep well in the freezer for up to 2-3 months. To thaw, simply transfer it to the refrigerator overnight. If it was glazed, you might want to re-glaze it or add a fresh dusting of powdered sugar after thawing, as the original glaze can sometimes become a bit sticky. For reheating frozen slices, let them thaw in the fridge first, then warm gently in the microwave or oven. Just be careful not to overheat it, or it might become dry.
Frequently Asked Questions
Final Thoughts
Seriously, if you’re looking for a dessert that’s comforting, delicious, and wonderfully easy to make, you’ve got to try this oatmeal raisin cookie cake. It’s one of those recipes that just makes everyone happy, and it’s so forgiving, even if you’re new to baking. The combination of chewy oats, sweet raisins, and warm spices is just pure magic, and baking it in a cake pan makes it feel like a special occasion without all the fuss. It’s a taste of home, a hug in dessert form, and I truly hope it becomes a favorite in your kitchen too. If you love this, you might also enjoy my [link to chewy chocolate chip cookie bars] or my [link to spiced apple crumble cake] for more comforting baked goods! Give this oatmeal raisin cookie cake a go, and I can’t wait to hear how it turns out for you! Don’t forget to leave a comment and let me know your favorite part or any delicious variations you try!
Oatmeal Raisin Cookie Cake
Ingredients
Cookie Cake
- 1.75 cups all-purpose flour
- 1 tsp baking soda
- 0.75 tsp ground cinnamon
- 0.5 tsp salt
- 0.75 cup unsalted butter, room temperature
- 0.75 cup packed light brown sugar
- 0.5 cup sugar
- 2 large eggs eggs
- 2 tsp vanilla extract
- 2 cups uncooked quick cook oats
- 1.5 cups raisins
Buttercream
- 0.5 cup unsalted butter, room temperature
- 2 cups powdered sugar
- 0.5 tsp maple extract
- 0.5 tsp ground cinnamon
- 2 tbsp heavy cream or more as needed
Instructions
Cookie Cake
- Preheat oven to 350°F (180°C). Prepare a 9-inch cake pan with parchment paper in the bottom and baking spray on the sides. Set aside.
- Combine the flour, baking soda, cinnamon and salt in a medium sized bowl and set aside.
- Cream the butter and sugars together in a large mixer bowl on medium speed until light in color and fluffy, about 2-3 minutes. Scrape down the sides of the bowl a few times to be sure all is well incorporated. You should be able to see the change in color and texture happen and know it’s ready.
- Add the eggs one at a time and mix until well combined after each.
- Add the vanilla extract and mix until well combined.
- Add the dry ingredients and mix until the dough is just combined. Do not over mix.
- Stir in the oats and raisins. Dough will be thick, but sticky.
- Press the cookie dough evenly into the cake pan. Press a few more raisins into the top of the cookie cake, if desired.
- Bake for 18-20 minutes, or until the edges just begin to turn golden.
- Remove from oven and allow to cool completely in the cake pan, then transfer to a serving plate. It it’s fully cool, you should be able to flip it upside down onto a cooling rack, place another cooling rack on top (which is actually the bottom) and then flip it back over so that it’s right side up.
Buttercream
- To make the buttercream, add the butter to a large mixer bowl and beat until well combined and smooth.
- Add about half of the powdered sugar and mix until well combined and smooth.
- Add the maple extract, cinnamon and a tablespoon of cream and mix until well combined and smooth.
- Add the rest of the powdered sugar and mix until well combined and smooth. Add more cream to get the right consistency.
- Add the buttercream to a piping bag fitted with a piping tip (I used Ateco 844) and pipe swirls of frosting around the outer edge of the cake.
Notes
Featured Comments
“Impressed! Clear steps and comforting results. Perfect for busy nights.”
“New favorite here — perfect for busy nights. crowd-pleaser was spot on.”
“Super easy and turned out amazing! My family asked for seconds. Saving this one.”
“This sweet treat was absolutely loved — the bright really stands out. Thanks!”
“Made it tonight and wow — comforting! Will definitely make Chewy Oatmeal Raisin Cookie Cake Perfection again.”
“Packed with flavor and so simple. Exactly what I wanted from Chewy Oatmeal Raisin Cookie Cake Perfection.”


