

Oh, where do I even begin with this glorious creation? If there’s one appetizer that screams “party,” “holiday,” or “just because I need something utterly delicious,” it’s a killer cheese ball. I remember the first time I really nailed my mom’s classic cheese ball recipe. It was for my dad’s surprise 50th, and I was a nervous wreck, convinced I’d mess it all up. But this cheese ball? It was the star of the show. Seriously, people were asking for the recipe before they even finished their first cracker. It’s one of those things that feels fancy but is surprisingly simple to whip up, and it always, always disappears. It’s like the little black dress of the appetizer world – always appropriate, always stunning, and always a crowd-pleaser. Forget those dry, bland versions you might have encountered; this classic cheese ball is creamy, tangy, and absolutely packed with flavor. It’s a lifesaver on busy nights when you need to bring something impressive to a potluck, or even just for a cozy night in with a good movie.
What is a classic cheese ball?
So, what exactly *is* this magical creation? Think of a classic cheese ball as the ultimate dip, molded into an elegant, snackable sphere. It’s essentially a rich, creamy, flavorful cheese mixture, usually based on Cream Cheese, that’s been blended with savory ingredients, then shaped and rolled in a delicious coating. The beauty of it is its simplicity – no baking required! It’s pure assembly and chilling. The name itself just conjures up images of holiday gatherings and friendly get-togethers, doesn’t it? It’s been a go-to for generations because it’s just so darn good and versatile. It’s not just about the cheese; it’s about the harmony of flavors and textures that come together to create something truly addictive. It’s essentially a flavor bomb waiting to be unleashed on your favorite crackers, bread, or veggies. It’s the kind of appetizer that makes people go, “Wow!”
How do I make a cheese ball?
Quick Overview
Making this irresistible classic cheese ball is a breeze! You’ll simply combine softened Cream Cheese with finely grated sharp cheddar, some savory seasonings, and a touch of Worcestershire sauce. Then, you’ll shape this glorious mixture into a ball and roll it in a crunchy coating – usually toasted nuts like pecans or walnuts. The key is to make sure everything is well combined and chilled thoroughly so it holds its shape beautifully. It’s the perfect make-ahead appetizer, meaning you can whip it up the day before your event and relax, knowing one of the most delicious parts of your spread is already taken care of. This method ensures maximum flavor and a delightful texture that guests will rave about.
Ingredients
For the Main Batter:
8 ounces cream cheese, softened: This is the creamy, dreamy foundation of our cheese ball. Make sure it’s nice and soft so it blends smoothly. I usually leave it out on the counter for about an hour before I start. If you forget, you can always zap it in the microwave for 15-20 second bursts, but be careful not to melt it! Using full-fat cream cheese gives the best texture and flavor, but I’ve had success with reduced-fat in a pinch. Just know it might be a little less rich.
8 ounces sharp cheddar cheese, finely grated: This is where the classic flavor really comes in. I always, always, always recommend grating your own cheese. Pre-shredded cheese has anti-caking agents that can make your cheese ball a little gritty. Plus, freshly grated cheddar has so much more flavor! I like extra-sharp for a real punch, but sharp will work great too.
2 tablespoons finely chopped fresh chives: These add a lovely pop of color and a mild oniony flavor that complements the cheese perfectly. If you’re not a fan of chives, you can omit them or use a tiny pinch of onion powder instead, but chives really add a fresh element.
1 teaspoon Worcestershire sauce: This is my secret ingredient! It adds a depth of savory, umami flavor that you just can’t get anywhere else. It really elevates the cheese mixture from good to spectacular.
1/4 teaspoon garlic powder: Just a little hint of garlic to round out the savory notes. You don’t want it to overpower the cheese.
1/4 teaspoon Black Pepper: Freshly ground pepper is always best if you have it! It adds a nice little zing.
For the Filling:
(This recipe doesn’t have a separate “filling” in the traditional sense, as all the flavor is mixed directly into the cheese base. However, some variations might include a dollop of jam or relish in the center. For this classic version, we’re keeping it streamlined and all about the cheese goodness! If you *wanted* to add a surprise center, you could carefully push a tablespoon of your favorite pepper jelly or chutney into the middle of the cheese mixture before shaping.)
For the Glaze:
(This recipe uses a coating instead of a glaze. The traditional coating for a classic cheese ball is usually nuts. Here’s what I like to use:)
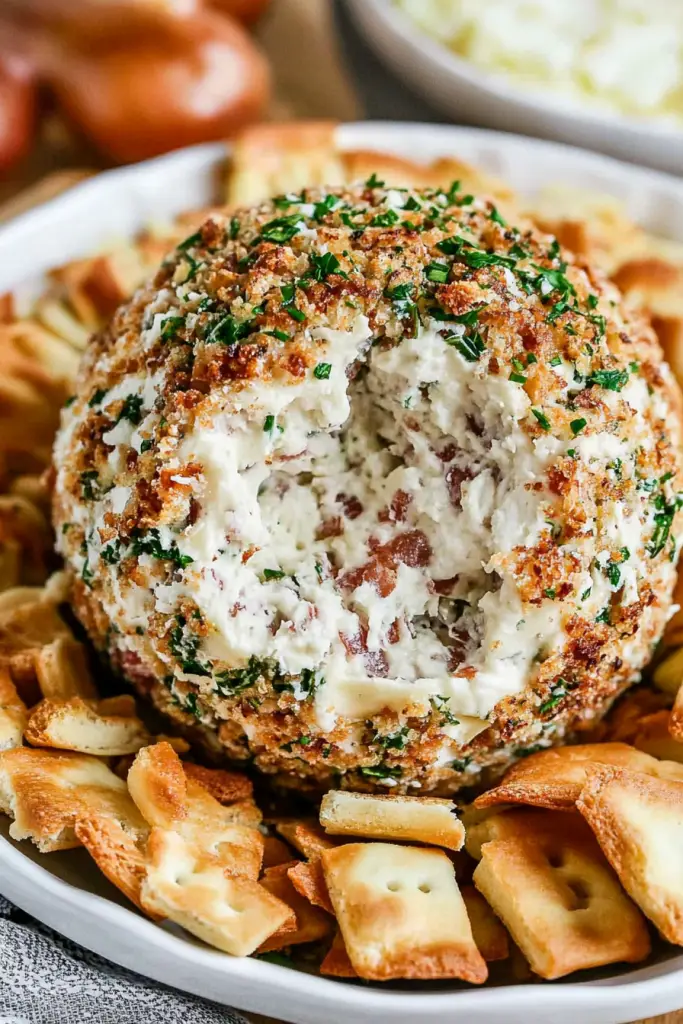
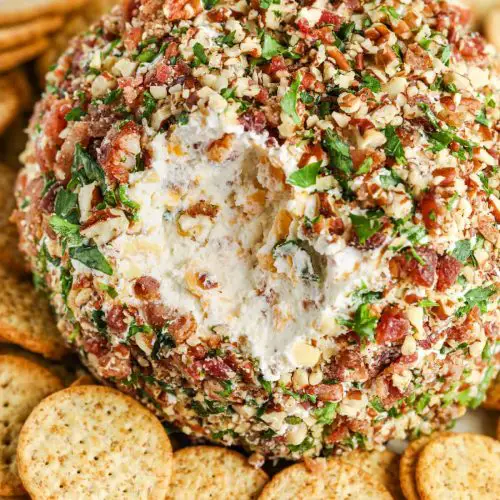
1 cup finely chopped pecans or walnuts: Toasted pecans are my absolute favorite for this classic cheese ball. They add such a wonderful crunch and a slightly sweet, nutty flavor. Toasting them really brings out their best flavor. You can toast them in a dry skillet over medium-low heat for a few minutes until fragrant, or spread them on a baking sheet and pop them in a 350°F (175°C) oven for about 5-7 minutes. Watch them closely, as they can burn quickly! Walnuts are also a fantastic choice if you prefer them.
Step-by-Step Instructions
Step 1: Preheat & Prep Pan
Okay, so for this recipe, there’s no oven involved in the initial prep, which is awesome! But we do need to get our ingredients ready. First things first, make sure your cream cheese is truly softened. It should be yielding to the touch but not melted or greasy. This is crucial for a smooth, lump-free cheese ball. If it’s too cold, it will be tough to mix, and you’ll end up with a lumpy texture. I usually take my cream cheese out about an hour before I plan to start mixing. For the cheddar cheese, you’ll want to grate it nice and finely. I find that a medium-sized grater works best – not too fine that it turns into paste, but fine enough that it incorporates well into the cream cheese. And for the chives, give them a good rinse and pat them dry before chopping them finely. This is just a little tip to make sure you don’t have excess moisture from rinsing them affecting the mix. All set and ready to go!
Step 2: Mix Dry Ingredients
This step is super simple! In a medium-sized bowl, we’re going to combine the grated cheddar cheese, the finely chopped chives, the garlic powder, and the black pepper. Give these a good stir with a fork or a small whisk to distribute everything evenly. You want to make sure the chives, garlic powder, and pepper are mixed throughout the shredded cheese. This ensures that every bite of your cheese ball has a balanced flavor. It’s kind of like prepping your dry ingredients before you start baking – it just makes the whole process smoother and ensures even distribution of all those delicious savory elements. Don’t overthink it; just a quick mix is all you need here!
Step 3: Mix Wet Ingredients
Now for the creamy component! In a separate larger bowl (this is where we’ll do most of our mixing), place the softened cream cheese. Add the Worcestershire sauce to the cream cheese. Give these two a good stir with a spoon or a rubber spatula until they are well combined and smooth. The cream cheese should be light and fluffy, and the Worcestershire sauce should be fully incorporated. This step is important because it ensures that the Worcestershire sauce is evenly distributed throughout the cream cheese base, so you don’t get pockets of it. It also starts to break down the cream cheese just a bit, making it easier to mix with the cheese and chives.
Step 4: Combine
Alright, it’s time to bring it all together! Add the mixture of cheddar cheese, chives, garlic powder, and pepper from Step 2 into the bowl with the cream cheese and Worcestershire sauce. Now, using your rubber spatula or a sturdy spoon, begin to mix everything together. You want to fold and press the ingredients until they are just combined. The key here is NOT to overmix. Overmixing can make the cheese ball greasy or tough. You’re looking for a cohesive mixture where all the ingredients are incorporated, but it still holds its shape. It should look like a beautiful, creamy, cheesy dough. I usually go around the bowl a few times, scraping down the sides and bottom, making sure there are no streaks of plain cream cheese or clumps of cheddar. Stop as soon as everything is well blended. Trust me on this one; gentle mixing is your friend!
Step 5: Prepare Filling
For this classic cheese ball, there isn’t a separate filling step. All the deliciousness is right there in the main cheese mixture! However, if you wanted to get a little fancy and add a surprise center, this is where you’d do it. You could take about a tablespoon of something like fig jam, spicy pepper jelly, or even a dollop of sun-dried tomato pesto. Then, you would take about half of your cheese mixture, press it into the bottom of your serving dish or a small bowl, make a little well in the center, spoon in your chosen filling, and then cover it with the remaining cheese mixture. Then, you’d gently shape it into a ball. For this classic version, though, we’re keeping it simple and all about that perfectly blended cheese flavor throughout!
Step 6: Layer & Swirl
Since we’re not doing a separate filling, we’re going straight to shaping! Now that your cheese mixture is all combined and lovely, it’s time to form it into a ball. I find it easiest to do this with my hands – just make sure they’re clean! You can lightly grease your hands with a tiny bit of cooking spray or even a little olive oil if the mixture feels a bit sticky, but usually, it’s manageable. Gently scoop out the mixture and start shaping it into a round ball. Don’t press too hard, as you don’t want to make it dense. Just roll it gently between your palms until it’s smooth and round. Once you have your ball, place it on a piece of plastic wrap. Now, carefully spread out your toasted pecans (or walnuts) on a shallow plate or in a wide bowl. Gently roll the cheese ball in the nuts, pressing lightly so they adhere all over. Try to get an even coating. You can also spoon the nuts over the top and sides if rolling feels tricky. If you want extra decoration, you can add some fresh parsley sprigs or a few whole pecans on top after rolling.
Step 7: Bake
Here’s the best part about a classic cheese ball: no baking required! This recipe relies on chilling to firm up and meld the flavors. So, once your cheese ball is shaped and coated, wrap it up tightly in plastic wrap. You can also place it in an airtight container. Then, pop it into the refrigerator. You’ll want to chill it for at least 2 hours, but I always recommend chilling it for at least 4 hours, or even overnight. This is when the magic happens! The flavors meld together beautifully, and the cheese ball firms up, making it easy to serve and slice. If you’re short on time, you can pop it in the freezer for about 30-45 minutes, but be careful not to freeze it solid, just firm it up enough to hold its shape.
Step 8: Cool & Glaze
As I mentioned, this recipe doesn’t involve a bake, but it does need crucial cooling time in the fridge! So, after you’ve shaped and coated your cheese ball, it’s time for its chill session. Wrap it up tightly in plastic wrap and then, if you like, place it in an airtight container for extra protection. Pop it into the refrigerator for a minimum of 2-4 hours. Honestly, the longer it chills, the better the flavors meld and the firmer it becomes. I often make mine the day before a party, and it’s always even better the next day. This chilling period is essential for the cheese ball to set up properly so it doesn’t fall apart when you serve it. No glaze needed here, as the nutty coating is the perfect finish!
Step 9: Slice & Serve
Once your classic cheese ball has had a good, long chill and is beautifully firm, it’s time to serve! Transfer it carefully to your favorite serving platter. The best way to serve it is usually with a variety of crackers – I love butter crackers, whole wheat crackers, and even some pumpernickel bread slices. If you want to add some freshness, a little bowl of cherry tomatoes or some crisp celery sticks on the side is always a good idea. You can also serve it with pretzels or even apple slices for a sweet and savory combo. Just arrange your crackers and accompaniments around the cheese ball, and watch it disappear! It’s the perfect centerpiece for any appetizer spread.
What to Serve It With
This classic cheese ball is honestly a chameleon when it comes to pairings. It’s so wonderfully versatile! For a lovely BREAKFAST, I know this sounds a bit unusual, but imagine a small dollop of this cheese ball on a toasted bagel with a little smoked salmon. It’s surprisingly sophisticated! Or, for a more traditional brunch, this cheese ball is fantastic as part of a larger spread. Serve it alongside mini quiches, fruit salad, and maybe some nice crusty bread. A mimosa or a sparkling rosé would be the perfect beverage pairing. As a DESSERT, it’s a bit unconventional, but hear me out! If you make a slightly sweeter version (maybe add a touch of honey to the cheese mixture), it can be surprisingly delicious with some thinly sliced pears or even a drizzle of balsamic glaze. For COZY SNACKS, this is where it truly shines in its classic role. Serve it with your favorite assortment of crackers – I love a good hearty whole grain cracker or a simple water cracker that lets the cheese ball flavor shine. Add some colorful veggie sticks like carrot, cucumber, and bell pepper for a healthier crunch. And don’t forget some pretzels for that salty crunch! My family tradition is to always have this cheese ball out during the holidays, and it’s the first thing to go. We usually pair it with a mix of buttery crackers and some grapes for a touch of sweetness. It’s just pure comfort and joy!
Top Tips for Perfecting Your Classic Cheese Ball
Over the years, I’ve learned a few tricks that I think make this classic cheese ball recipe even better. First, ZUCCHINI PREP isn’t applicable here as this is a cheese ball, not a zucchini bread! But for cheese balls, the key is really the quality of your ingredients. Use good quality, full-fat cream cheese and, as I mentioned, grate your own sharp cheddar. Trust me, it makes a world of difference in texture and flavor. For MIXING ADVICE, remember what I said about not overmixing. You want it just combined. If you see the cheese mixture starting to look oily or greasy, you’ve definitely mixed too much. Stop immediately! It’s better to have a few tiny streaks of cream cheese than an oily mess. For SWIRL CUSTOMIZATION, well, this isn’t really a swirl recipe, but for the nut coating, make sure your nuts are toasted! It intensifies their flavor SO much. You can even chop them very finely for a smoother coating or leave them a bit chunkier for more texture. My favorite is a mix of finely chopped and slightly coarser bits. For INGREDIENT SWAPS, if you’re not a fan of chives, you can absolutely use a tablespoon of finely minced green onion (scallions) or even a teaspoon of dried dill. For a spicier kick, add a pinch of cayenne pepper or some finely diced pickled jalapeños to the cheese mixture. For the coating, if you don’t have pecans or walnuts, try chopped almonds, pistachios, or even a mix of different nuts. You could even try rolling it in everything bagel seasoning for a savory twist! For BAKING TIPS, since there’s no baking involved, the focus is on chilling. Make sure your cheese ball is wrapped tightly so it doesn’t dry out in the fridge. And always allow ample chilling time – at least 2-4 hours, but overnight is truly best. For GLAZE VARIATIONS, we’re sticking to a nut coating here, but if you were making a sweet cheese ball, you could drizzle with honey, caramel, or a fruit reduction. But for this classic, the nutty crunch is perfection!
Storing and Reheating Tips
One of the best things about this classic cheese ball is how well it stores, making it perfect for making ahead. For ROOM TEMPERATURE storage, honestly, it’s best to keep it chilled until you’re ready to serve. If you have it out for a party, try to limit it to no more than 2 hours at room temperature, especially if it’s warm. Otherwise, it can start to soften and become a bit greasy. Once it’s been served, it’s best to discard any leftovers that have been sitting out for a long time. For REFRIGERATOR STORAGE, this is where this cheese ball truly shines. Once it’s made and chilled, wrap it tightly in plastic wrap, and then place it in an airtight container. It will stay delicious in the refrigerator for up to 3-4 days. The flavors actually get even better as it sits! When you’re ready to serve it again, just let it sit at room temperature for about 15-20 minutes to soften slightly, making it easier to spread. For FREEZER INSTRUCTIONS, you can freeze a cheese ball before coating it in nuts, or after it’s been chilled but before serving. Wrap it very, very tightly in plastic wrap, then again in foil, and place it in a freezer-safe bag or container. It should last for about 1-2 months. To thaw, transfer it to the refrigerator overnight, then unwrap and roll it in fresh toasted nuts. For GLAZE TIMING ADVICE, since we’re using a nut coating, you’ll want to apply that just before serving after it’s fully chilled or thawed. If you’re freezing, it’s best to add the nuts *after* thawing and chilling it again. This keeps the nuts nice and crunchy!
Frequently Asked Questions
Final Thoughts
So there you have it – my go-to recipe for the most delicious, crowd-pleasing classic cheese ball you’ll ever make. It’s one of those recipes that’s simple enough for a weeknight but impressive enough for any party. The combination of creamy cheese, savory seasonings, and that delightful nutty crunch is just pure magic. I truly hope you give this a try, because it never fails to bring smiles to faces and requests for seconds (and thirds!). If you love this recipe, you might also enjoy my other appetizer favorites, like my easy spinach artichoke dip or my no-bake bruschetta bites. They’re all about bringing people together with delicious, fuss-free food. Please, let me know in the comments below how yours turns out! I absolutely love hearing your feedback and seeing how you put your own spin on it. Happy cheese ball making!
Classic Cheese Ball
Ingredients
Main Ingredients
- 16 ounces cream cheese softened
- 1 cup cheddar cheese shredded
- 0.5 cup pecans chopped
- 2 tablespoons dried parsley
- 1 teaspoon garlic powder
- 0.5 teaspoon onion powder
- 0.25 teaspoon salt
- 0.25 teaspoon black pepper
Instructions
Preparation Steps
- In a medium bowl, beat the softened cream cheese until smooth.
- Add the shredded cheddar cheese, half of the chopped pecans, dried parsley, garlic powder, onion powder, salt, and pepper. Mix well until all ingredients are combined.
- Shape the mixture into a ball. Roll the ball in the remaining chopped pecans, pressing gently to coat.
- Wrap the cheese ball tightly in plastic wrap and refrigerate for at least 1 hour to firm up before serving.
- Serve with crackers, pretzels, or vegetable sticks.
Notes
Featured Comments
“I’ve made this a few times and it always disappears fast—perfect for parties! Love how creamy and flavorful it turns out.”
“This sounds amazing—cheese balls are always a hit at gatherings! Definitely adding this to my next party spread.”
“Impressed! Clear steps and quick weeknight win results. Perfect for busy nights.”
“New favorite here — super easy. crowd-pleaser was spot on.”
“Super easy and turned out amazing! My family asked for seconds. Saving this one.”
“This sweet treat was absolutely loved — the balanced really stands out. Thanks!”


This sounds amazing—cheese balls are always a hit at gatherings! Definitely adding this to my next party spread.
I’ve made this a few times and it always disappears fast—perfect for parties! Love how creamy and flavorful it turns out.