

I still remember the first time I tasted creamy, garlicky hummus—the kind that makes pita feel like a little edible hug. The memory isn’t just taste; it’s the texture in your mouth, the way lemon wakes up every spoonful, and the way my kitchen fills with that warm, toasty tahini aroma. This is classic hummus in its purest form: simple ingredients, big flavor, and a texture so smooth it gleams under the light. I’ve served this at casual weeknight dinners and at weekend gatherings, and it disappears faster than you can man the pita plate. It’s the kind of dip that tastes like comfort and nostalgia, yet it’s incredibly easy to whip up. If you’ve ever hesitated thinking hummus needs fancy ingredients, I’m here to tell you—this classic hummus comes together with pantry staples and a little patience. It’s a lifesaver on busy nights, and yes, my kids actually ask for seconds. I always do this one with a squeeze of lemon and a drizzle of olive oil, and honestly, that tiny bright note changes everything.
What is hummus?
Think of classic hummus as a creamy chickpea spread that’s been kissing the concept of savory, nutty, and lemony all at once. It’s essentially blended chickpeas with tahini, garlic, lemon juice, salt, and a touch of olive oil until it’s dreamily smooth. The name itself nods to history—this humble, protein-packed dip travels through centuries of Middle Eastern kitchens, showing up in different forms across regions, always with that same, comforting base. The idea is simple: chickpeas become a silky paste when whipped with sesame, acid, and a little fat to loosen things up. The result is a crowd-pleasing dip that doubles as a spread, a sauce for bowls, or a topping for vegetables and warm pita. I love that classic hummus doesn’t buried under heavy flavors; it invites you to add your own personality—roasted garlic, smoked paprika, a splash of olive oil—without losing its fundamental, smooth personality. It’s a small, humble dish with a big, generous heart.
How do I make Hummus?
Quick Overview
Here’s the quick version: rinse and drain your chickpeas, blend them with tahini, garlic, lemon, and salt, then loosen the mixture with a splash of water or ice to achieve that swooshably smooth consistency. The beauty of this method is that it respects the core flavors while letting you tailor the texture to your liking. If you’ve never used ice or very cold water, give it a try—cold liquid helps keep the hummus airy and glossy, almost luxuriously smooth. I’m picky about texture, so I’ll usually scrape the bowl halfway through and give it another quick whirr for a few seconds. The result is a classic hummus that’s incredibly forgiving and richly satisfying, even when you’re rushing to plate something fast.
Ingredients
For the Main Base:
– 1 15-ounce can chickpeas, drained and rinsed (reserve 2-3 tablespoons of the liquid for adjusting texture)
– 2-3 tablespoons tahini (adjust to taste and thickness; a high-quality tahini makes all the difference)
– 1-2 cloves garlic, minced (roasted garlic is a gorgeous variation if you prefer a milder bite)
– 2-3 tablespoons fresh lemon juice (start with 2 and taste; more for brightness)
– 2-4 tablespoons ice-cold water or aquafaba from the chickpeas (start with 2 and add as needed)
– 1/2 teaspoon fine salt, or to taste
– 1-2 tablespoons extra-virgin olive oil (plus a little for serving)
– Optional: pinch of ground cumin or paprika for a subtle warmth
For the Filling:
– A pinch more garlic or a roasted garlic paste if you want a stronger profile
– Extra drizzle of olive oil and a few sesame seeds for garnish
For the Glaze:
– 1 tablespoon good olive oil per serving, a squeeze of lemon, and paprika or sumac for color and lift

Step-by-Step Instructions
Step 1: Preheat & Prep Pan
No oven preheating is required for classic hummus, but you’ll want to prep your gear. Rinse and drain the chickpeas, saving a tablespoon or two of the liquid if you’re feeling fancy about texture. Gather your blender or food processor, a spatula, measuring spoons, and a splash of cold water or aquafaba. If you’ve got a garlic press, pull that out too; I love the way pressed garlic blends into the mixture without overworking it. The goal here is to have everything close at hand so you can glide from one step to the next without thinking twice.
Step 2: Mix Dry Ingredients
In hummus, there aren’t a lot of dry ingredients, but there is a texture consideration. I like to whisk a pinch of salt with the garlic while it rests—this helps soften the bite and lets the flavors bloom. If you’re using ground cumin or paprika, add a tiny pinch now; you’ll taste the warmth as the spices wake up in the blender. This is also a good moment to toast a tiny bit of sesame or cumin in a hot dry pan for 30 seconds if you’re into deeper, roasted notes. The smell alone will make your kitchen feel like a small neighborhood market in the middle of winter.
Step 3: Mix Wet Ingredients
Whisk together the tahini, lemon juice, and olive oil until it looks slightly creamy and cohesive. Tahini can be stubborn at first, splitting into oil and paste, but as you whisk, it will emulsify into a thick, silky base. If your tahini is especially thick, warm it gently for a few seconds in a bowl set over hot water so it flows more easily. Add the minced garlic and season with salt. The lemon should brighten everything without turning it sour; you’ll know you’re close when the aroma lifts you up rather than pouncing you.
Step 4: Combine
Now, fold the wet mix into the chickpeas with your blender running on low. Slowly add ice-cold water or chickpea liquid to loosen the mixture until it’s luxuriously smooth and almost glossy. If the texture seems too thick, add a little more liquid in small increments. If it’s too thin, stop and let it sit for a minute; the chickpeas will thicken a touch as they rest. This is the moment to taste and tune: a little more lemon, a touch more salt, or a whisper more tahini. Trust your palate; classic hummus is a personal thing, and there’s no one-size-fits-all texture.
Step 5: Prepare Filling
The filling here is the base hummus itself, but this is the step where you can tailor for a swirl of flavor. I sometimes whisk in a teaspoon of roasted garlic paste or a drizzle of extra tahini for a deeper, silkier tone. If you’re serving a party platter, reserve a small amount of the plain base and set aside separately; then when you plate, you can swirl a little of the extra-tahini version on top for a visually appealing marbled effect. For a peppery finish, stir in a pinch of smoked paprika into a portion of the hummus and keep the rest vanilla for a clean, classic taste.
Step 6: Layer & Swirl
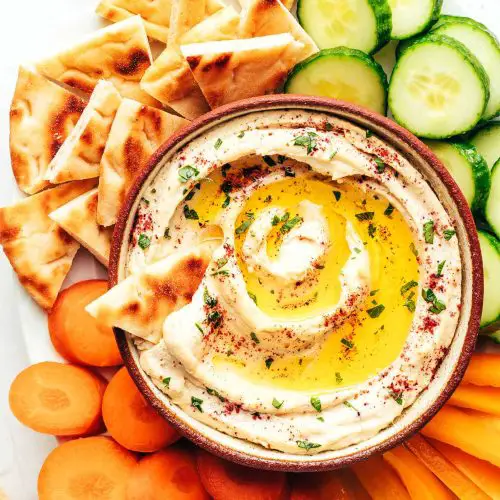
Presentation matters here. For a simple swirl, spoon the hummus into a shallow bowl and drag a knife through the surface in a circular motion to create concentric rings. Drizzle a little olive oil along the surface and sprinkle paprika or sumac for color. If you want a more dramatic marbling, layer two or three flavors in different bowls and then gently swirl with a skewer to create a pretty pattern. This is where your neighbors will ooh and aah even before dipping. The more you experiment with small rosettes of olive oil and lemon zest, the more it looks like a chef-made showpiece—without the stress.
Step 7: Bake
There’s no need to bake classic hummus, but I’ll offer a quick, optional flirtation with warmth. If you like a warm hummus for dipping on a chilly evening, you can heat it gently in a small pot over low heat, whisking as it warms. Alternatively, you can spread a thick layer of hummus on a small baking tray, dab with olive oil, and briefly broil for 1-2 minutes to caramelize the top a touch. If you try this, watch closely—the moment the surface blisters and lightly browns, pull it out. You’ll get a toasty, smoky hint without losing the smooth interior. This is purely optional, but it’s a fantastic trick when you want to serve hummus as a warm, dip-ready centerpiece.
Step 8: Cool & Glaze
Let the hummus rest for a minute or two so it finishes setting and the oils re-emulsify. Then finish with a final drizzle of extra-virgin olive oil, a light squeeze of lemon, and a dusting of paprika or sesame seeds. If you roasted garlic earlier, you can spread a tiny bit of that on top for an extra kick. The glaze here is simple and bright—just enough to encourage scooping without overpowering the nutty, creamy base.
Step 9: Slice & Serve
Here’s the fun part: transfer to a shallow, wide bowl for maximum surface area so the toppings shine. Use warm pita wedges, cucumber coins, carrot batons, or crisp crackers for dipping. My family loves a simple arrangement of parsley leaves and a couple of lemon wedges for color and a fresh aroma. The first bite should be creamy, slightly tangy, and rich with tahini—what I call that classic hummus moment. This is the dip that turns a plain plate into a little party: you’ll see smiles as soon as the spoon hits the table.
What to Serve It With
Classic hummus is a chameleon in the best possible way. It shines as a snack, a starter, or a quick light meal. Here are some of my favorite, tried-and-true pairings and occasions:
For Breakfast: A scoop of hummus on top of warm toast with sliced cucumbers, a sprinkle of flaky salt, and a drizzle of olive oil makes a savory open-faced breakfast. Add a fried egg if you’re in the mood for something heartier. It’s my go-to when I’m rushing to the desk and want something nourishing that doesn’t require much cooking. A morning cup of coffee and a bright slice of lemon on the side make all the difference.
For Brunch: Serve alongside roasted veggies, soft scrambled eggs, and warm pita wedges. A little cucumber-tomato salad on the side balances the richness. I love setting out a little bowl of olives and pickles with the hummus—the contrast in textures wakes up the table. My guests often go back for seconds, dipping, swirling, and making little taste experiments—zest from lemon peel, a few chili flakes for heat, and a swirl of olive oil to finish.
As Dessert: Okay, I know it sounds odd, but a touch of honey and crispy pita chips can be a surprisingly delightful pairing when you want something light after a heavier meal. The gentle sweetness from a light drizzle of honey and a pinch of cinnamon makes the hummus feel dessert-adjacent without losing its identity. It’s a playful finish that’s become a family favorite during holiday gatherings when everyone’s grazing their way through the night.
For Cozy Snacks: Hummus and veggie sticks is a classic for movie nights or late-night study sessions. I keep a bowl of hummus nearby along with carrot sticks, cucumber ribbons, and bell pepper strips. It’s also fantastic spread on a simple wrap with sliced turkey or roasted veggies for a quick, cozy dinner. This is the dip that always seems to appear when you need something comforting and easy to reach for.

Personal note: I’ve found that small changes—like using a three-part garlic schedule (raw, roasted, and just a whisper of fresh) or swapping in almond milk for a dairy-based option in a pinch—can tweak the texture and flavor in delicious ways. This classic hummus is flexible, forgiving, and, frankly, a little magical in its simplicity. It’s the kind of dish you can make in your sleep and still feel proud of when it lands on the table.
Top Tips for Perfecting Your Classic Hummus
Here’s how I’ve landed on a consistently dreamy bowl of hummus, with tips organized by technique to keep you cooking confidently.
Zucchini Prep: I know this sounds odd for classic hummus, but sometimes I’ll whisk in a cheat of finely grated zucchini for extra moisture and a whisper of sweetness. If you go that route, squeeze a bit of moisture out after grating to avoid watering down the dip. It’s all about balance — you want a creamy texture, not a watery one. If you’re staying strictly traditional, skip zucchini entirely and let the chickpeas shine.
Mixing Advice: Don’t rush the emulsion. If you overblend at high speed right away, you might trap air and end up with a light, foamy texture. Start on low, then gradually increase, and rest the blade for a moment if you hear any grinding. If your mixture seems stubborn, a spoonful of the reserved chickpea liquid will often coax it to the right consistency. Taste as you go — the balance of lemon, salt, and tahini can shift depending on the chickpeas’ absorption and tahini thickness.
Swirl Customization: Visual appeal matters as much as flavor. Create a few “puddles” of olive oil, a swirl of paprika, and a dusting of sesame seeds for a pretty, restaurant-like presentation. If you’re feeling bold, layer two versions in a single bowl and use a skewer to create a marbled pattern that’s almost too pretty to dip into. The marbling doesn’t just look good; it gives a preview of the flavor journey in each bite.
Ingredient Swaps: Tahini can be substituted with a touch more olive oil for a lighter sesame note, or you can swap lemon juice with lime for a different brightness. If you’re avoiding sesame, a bit of roasted nut butter can mimic some of that warmth, though it will alter the flavor. If you need a dairy-free or vegan alternative, aquafaba works beautifully as a lightening agent and helps the texture stay silky. Keep notes on what you try so you can replicate your favorites later.
Baking Tips: Not needed for classic hummus, but if you’re playing with a warm version, you can briefly warm in a pot or under a broiler for a minute for a toasty finish. If you try the broiler method, keep a watchful eye—reserving the last few seconds of broiling prevents any scorching on top and keeps your texture glossy underneath.
Glaze Variations: A drizzle of olive oil is the classic glisten, but you can experiment with a citrus glaze (lemon or orange zest in a tiny amount of juice), a peppery-chile oil, or a smoky paprika drizzle for color and complexity. If you want a sweeter contrast, a light touch of maple or honey in a separate small bowl for drizzling at the end can be a surprising and lovely pairing with crudités.
Lessons learned: the best hummus is often the simplest. I’ve learned not to be afraid of a little texture; a touch of grit from the chickpeas isn’t a failure, it’s a note that reminds you you’re eating real, wholesome ingredients. I’ve also learned that lemon can be your best friend or your biggest challenge—start with less, taste, and then adjust. And finally, the most important lesson: let it rest. A 10- to 20-minute rest period after blending lets the flavors meld, and the texture relaxes to something that feels luxurious on the tongue.
Storing and Reheating Tips
Classic hummus loves a good fridge adventure. It actually improves after a day or two in the fridge as the flavors settle, so don’t be shy about making a little extra. Here’s how I handle storage and reheating to keep that silky texture intact:
Room Temperature: If you’re serving within a couple of hours, a room-temperature hummus is perfectly fine. Just keep it covered and away from direct sunlight. A thin film of olive oil on top can help preserve moisture and prevent a dry crust from forming on the surface.
Refrigerator Storage: Transfer to an airtight container, smooth the surface, and drizzle a thin layer of olive oil on top to seal in moisture. It will keep well for 3-5 days. If you notice a slight separation, give it a quick whisk or a pulse in the blender before serving to restore its glossy, creamy texture.
Freezer Instructions: Freezing hummus isn’t ideal for the texture, but if you must, portion it into freezer-safe bags or containers. It will keep up to 2-3 months. Thaw in the fridge overnight, then stir well; a little extra water or lemon juice can help restore the creaminess after thawing.
Glaze Timing Advice: If you plan to freeze, wait to add any delicate glazes or garnishes until you’re ready to serve. A simple olive oil drizzle plus paprika on top is best added after thawing and before serving to maintain color and freshness.
Ultimately, this classic hummus is a reliable, flexible friend in the kitchen. It’s not fussy, it’s deeply satisfying, and it pairs with almost everything you’ve got on hand. I’ve kept it close for years, and I still find new little tweaks that surprise me in the best possible way. If you try a new topping or a slight lemon-flavor adjustment, tell me how it goes—I love hearing how your version evolves.
Frequently Asked Questions
Final Thoughts
In the end, this classic hummus is the kind of recipe that earns a regular spot on the weekly menu. It’s reliable, comforting, and endlessly adaptable, which is exactly what I want from a dish I keep returning to. I love how a few pantry staples can come together into something that feels both familiar and exciting. If you’re new to hummus, this is the recipe to start with because it teaches you the balance of creaminess, acidity, and savory depth without overwhelming your senses. If you’re a long-time fan, you’ll appreciate how this version honors the tradition while inviting your own tweaks and extras. Try it with different toppings, sauces, or textures, and let me know what combination becomes your new favorite. I’m always curious to hear your variations and the small changes that made this classic hummus sing for your family. Happy dipping, friends, and may your pita stay warm and your bowls stay full!
If you loved this, tell me in the comments what you swapped, what you skipped, and what you added to your bowl. Don’t forget to rate the recipe and share a photo of your beautiful plate. I can’t wait to see how your classic hummus looks on your table tonight. Here’s to delicious, cozy evenings and plenty of chips, veggies, and smiles around the table. Enjoy!
Classic Hummus
Ingredients
Main Ingredients
- 0.43 can chickpeas drained and rinsed
- 0.125 cup tahini
- 0.0625 cup lemon juice
- 2 cloves garlic minced
- 0.125 cup olive oil plus more for serving
- 0.5 teaspoon salt
- 0.25 teaspoon cumin
Instructions
Preparation Steps
- Combine chickpeas, tahini, lemon juice, garlic, 0.125 cup olive oil, salt, and cumin in a food processor.
- Process until smooth, scraping down the sides as needed. If too thick, add a tablespoon of water at a time until desired consistency is reached.
- Serve drizzled with additional olive oil and a sprinkle of paprika or parsley, if desired.
Notes
Featured Comments
“Impressed! Clear steps and spot on results. Perfect for busy nights.”
“New favorite here — comforting. crowd-pleaser was spot on.”
“Super easy and turned out amazing! My family asked for seconds. Saving this one.”
“This sweet treat was absolutely loved — the balanced really stands out. Thanks!”
“Made it tonight and wow — family favorite! Will definitely make classic hummus again.”
“Packed with flavor and so simple. Exactly what I wanted from classic hummus.”


