

Oh, this cod fish sandwich… it’s more than just a meal for me; it’s a feeling. It’s the smell of the ocean on a warm summer day, the gentle crunch of perfectly fried fish, and that first bite that just *sings*. I remember my dad making something similar when I was a kid, usually after a trip to the coast, and it always felt like such a special occasion. Now, years later, I’ve tinkered and tweaked this recipe until it’s just right – the kind of sandwich that makes everyone at the table happy, even the picky eaters! It’s honestly my go-to when I want something incredibly satisfying but don’t have hours to spend in the kitchen. Forget those soggy, sad fish sandwiches you might have encountered; this one is a revelation, a crispy, flavorful masterpiece that’s surprisingly simple to pull off. If you’ve ever loved a good fish and chips, you’re going to adore this cod fish sandwich.
What is Crispy Cod Sandwich?
So, what exactly *is* this magical cod fish sandwich? Think of it as the ultimate upgrade to your classic fish sandwich. We’re talking about flaky, moist cod fillets that get a super-crispy, golden-brown coating, nestled into a soft bun with all the perfect toppings. It’s not just about the fish, though; it’s the whole symphony of flavors and textures. The name itself, “Crispy Cod Fish Sandwich,” really says it all, doesn’t it? It’s honest and tells you exactly what you’re getting: delicious, crispy cod. It’s essentially the comfort food equivalent of a seaside getaway, all wrapped up in a portable, delicious package that you can enjoy right in your own kitchen. No fancy ingredients needed, just good old-fashioned flavor.
How do I make this Crispy Cod Fish Sandwich?
Quick Overview
The process is wonderfully straightforward. We’ll start by getting our cod ready, then create a simple but effective batter that coats the fish beautifully. The key is a good fry time to get that irresistible crispiness without overcooking the delicate cod. While the fish is frying, you can prepare your favorite toppings and buns. It’s a quick assembly job once everything is cooked, making it ideal for when you’re craving something delicious *now*. The result is a sandwich that’s way better than any fast-food version, and you’ll feel so proud making it yourself.
Ingredients
For Crispy Cod: For the Crispy Cod: For the Crispy Cod: For the Crispy Cod:
1.5 lbs fresh cod fillets, about 1-inch thick (look for good quality, firm white fish – Alaskan cod is usually a great choice and readily available)
2 cups all-purpose flour
1 teaspoon baking powder (this makes the coating extra light and crispy!)
1 teaspoon paprika (for a lovely subtle flavor and color)
1/2 teaspoon garlic powder
1/2 teaspoon onion powder
1/4 teaspoon cayenne pepper (optional, for a little kick!)
Salt and freshly ground Black Pepper, to taste (don’t be shy with this!)
1.5 cups ice-cold club soda or beer (the colder, the crispier the coating! Beer adds a lovely depth of flavor, but club soda works great too.)
Vegetable oil or canola oil, for frying (enough to fill your pan about 1.5-2 inches deep)
For the Tartar Sauce (my quick & easy version):
1/2 cup mayonnaise (use your favorite brand, or even make your own!)
2 tablespoons finely chopped dill pickles (dill relish works in a pinch, but fresh pickles give the best crunch)
1 tablespoon finely chopped red onion (or shallots for a milder bite)
1 teaspoon capers, drained and chopped (optional, but adds a lovely briny note)
1 teaspoon fresh lemon juice
1/2 teaspoon Dijon mustard
Pinch of salt and pepper
For Serving:
4-6 soft burger buns or potato rolls
Shredded lettuce (iceberg is classic for crunch, but romaine is nice too)
Thinly sliced tomato
Lemon wedges, for serving
Step-by-Step Instructions
Step 1: Preheat & Prep Pan
First things first, let’s get your frying station ready. Pour your vegetable or canola oil into a heavy-bottomed pot or deep skillet, making sure it’s about 1.5 to 2 inches deep. You want enough oil to generously coat the fish. Heat the oil over medium-high heat until it reaches about 350-360°F (175-180°C). If you don’t have a thermometer, don’t worry! You can test it by dropping a tiny bit of batter into the oil – it should sizzle immediately and float to the top. While the oil heats up, pat your cod fillets completely dry with paper towels. This is super important for getting that crispy coating to stick and avoiding oil splatters.
Step 2: Mix Dry Ingredients
In a medium-sized bowl, whisk together the flour, baking powder, paprika, garlic powder, onion powder, cayenne pepper (if using), salt, and black pepper. Give it a really good stir to make sure everything is evenly distributed. This is your flavor base! Having all these spices in the dry mix ensures that every part of the fish is seasoned. I always make sure to taste a tiny bit of the dry mix before adding liquid – it should taste flavorful but not overly salty on its own.
Step 3: Mix Wet Ingredients
This is where the magic happens for the batter! In a separate bowl, you’re going to combine the ice-cold club soda (or beer) with about 1/4 cup of your seasoned flour mixture. Whisk it gently until it’s just combined. You don’t want to overmix; a few lumps are perfectly fine, even desirable. The key is that super cold liquid hitting the hot oil – it creates that amazing crispiness. I’ve found that using club soda makes it extra light and airy, almost like a tempura, while beer adds a subtle malty note that’s lovely.
Step 4: Combine
Now, we’re going to bring the dry and wet ingredients together for the batter. Add the rest of the seasoned flour mixture to the bowl with the club soda and whisk until you have a thick, pancake-like batter. Again, don’t overmix! If it seems a little too thick, you can add another splash of ice-cold club soda. If it seems too thin, add a tablespoon or two more of flour. You want it to be thick enough to coat the fish well but not so thick that it becomes doughy. This is the consistency that will give you that perfect crunchy exterior.
Step 5: Prepare Filling
While the oil is heating, quickly whip up your tartar sauce. In a small bowl, combine the mayonnaise, finely chopped dill pickles, chopped red onion, capers (if using), lemon juice, Dijon mustard, and a pinch of salt and pepper. Stir it all together until it’s well combined. Give it a taste and adjust seasoning if needed. You want it tangy and bright! This sauce is so good, you’ll probably want to slather it on everything. I like to make it a bit ahead of time so the flavors can meld together.
Step 6: Layer & Swirl
This step is all about getting that beautiful coating on your fish. Take your dried cod fillets and dredge each one thoroughly in the flour mixture you set aside earlier. Make sure they’re well-coated on all sides. Then, dip the floured cod into the batter, letting any excess drip off for a second. Carefully place the battered cod fillets into the hot oil. Don’t overcrowd the pan! Fry in batches of 2-3 fillets at a time so the oil temperature stays consistent and the fish can get properly crispy. I usually find swirling them gently in the oil helps them develop an even crust.
Step 7: Bake
This is actually a frying step, not baking! We’re frying the cod. Fry the fillets for about 4-6 minutes per side, or until they are golden brown and cooked through. The exact time will depend on the thickness of your cod. You want the fish to be opaque and flake easily with a fork. Once they’re done, carefully remove them from the oil using a slotted spoon or spider strainer and place them on a wire rack set over a baking sheet. This allows any excess oil to drain off, keeping them nice and crisp. You can sprinkle them with a little extra salt immediately after they come out of the oil – it really makes a difference!
Step 8: Cool & Glaze
Let the fried cod fillets cool slightly on the wire rack while you prepare your buns. You can lightly toast your buns on a griddle or in a toaster if you like. The cod doesn’t need a glaze in this specific recipe, but it’s important to let it rest for a couple of minutes so it’s not piping hot when you assemble the sandwich. This slight cooling period also helps the crust stay crispy.
Step 9: Slice & Serve
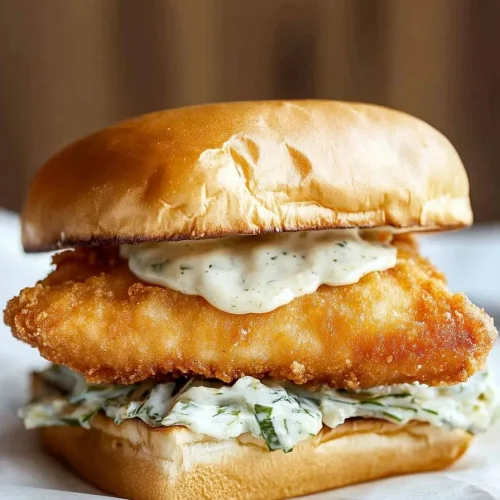
Time for the grand finale! Spread a generous amount of your homemade tartar sauce on the bottom bun. Top with some shredded lettuce, then place your perfectly crispy cod fillet on top. Add a slice or two of tomato, a little more tartar sauce if you’re feeling decadent, and crown it with the top bun. Serve immediately with lemon wedges on the side for squeezing over the fish. The smell alone is incredible, and that first bite is pure bliss!
What to Serve It With
This cod fish sandwich is practically a meal in itself, but it loves company! For a simple, classic breakfast, I’ll often just serve one with some extra lemon wedges and maybe a simple side of sliced avocado. It feels indulgent but is quick enough for a weekday. For brunch, it’s a showstopper! I love pairing it with a vibrant, fresh coleslaw or a light, zesty potato salad. A glass of crisp white wine or a refreshing sparkling water with cucumber and mint makes it feel extra special. If you’re looking for a dessert option that’s totally unexpected, a small, tart berry compote served alongside can be surprisingly delightful – the sweetness and acidity cut through the richness of the fish beautifully. And for those cozy snack moments, just having the sandwich itself is perfect, maybe with a side of homemade Sweet Potato fries or some crunchy dill pickles. My kids always beg for extra tartar sauce and sometimes just eat the fish on its own, so it’s super kid-friendly too!
Top Tips for Perfecting Your Cod Fish Sandwich
Let’s talk about making this cod fish sandwich absolutely perfect, every single time. My biggest tip for the fish itself is **patting it bone dry**. Seriously, moisture is the enemy of crispiness. I’ve learned that the harder you pat it dry, the better the batter adheres and the crispier the result. For the batter, remember the golden rule: **ice cold is key**. If your club soda or beer isn’t cold enough, your coating won’t be as light and airy. I’ve even thrown my bowl and whisk in the freezer for 10 minutes before making the batter, and it makes a noticeable difference. When it comes to **mixing the batter**, resist the urge to whisk it into oblivion. A few lumps are your friend! Overmixing develops the gluten in the flour, which can lead to a tougher, less crispy coating. Just a gentle swirl until it comes together is all you need. For the **frying process**, don’t overcrowd the pan. I know it’s tempting to cook more at once, but it lowers the oil temperature, leading to greasy, soggy fish. Cook in batches, and make sure your oil is at the right temperature (around 350-360°F) before adding the fish. Use a thermometer if you have one; it’s a game-changer. If you don’t, the toothpick test (dropping a tiny bit of batter) works wonders. I’ve learned that immediately salting the fish *after* it comes out of the fryer, while it’s still hot, helps the salt adhere and enhances the flavor. For the **tartar sauce**, don’t be afraid to experiment with the ingredients. Add a pinch of sugar if you like it a bit sweeter, or more lemon juice for extra zing. I’ve also tried adding a bit of finely chopped chives, which is lovely. And for the **buns**, toasting them lightly, either in a dry pan or toaster, adds a wonderful texture and prevents them from getting soggy under the fish and sauce. It’s a small step that elevates the whole sandwich!
Storing and Reheating Tips
Okay, so sometimes you’re just one person, or you’ve made a massive batch because, well, deliciousness calls! Here’s how to store any leftover crispy cod fish sandwich components. The best way to store the fried cod is **un-sauced and un-bunned**. If you have leftover fried cod fillets, let them cool completely, then store them in an airtight container lined with paper towels in the refrigerator for up to 1-2 days. The paper towels help absorb any residual moisture, keeping them as crisp as possible. For the **tartar sauce**, it’s best kept in a separate airtight container in the fridge for up to 3-4 days. The buns are best stored at room temperature, wrapped in their original packaging or a bread bag. Reheating the cod is where the magic happens to bring back that crispiness. The absolute best way is in a hot oven or toaster oven set to around 375-400°F (190-200°C). Place the cod fillets on a baking sheet and reheat for about 5-8 minutes, or until heated through and crispy again. Avoid the microwave at all costs – it will make the fish soggy! If you’re in a real pinch, an Air Fryer also works wonders for reheating, often yielding an even crispier result than the oven. For the **glaze** (if you were to use one, though this recipe doesn’t require it, it’s good to know!), you’d typically apply it fresh to the sandwich just before serving, or at most, shortly before serving after reheating components. Reheating with a glaze already on can sometimes make it sticky or burn. When assembling, toast your buns fresh, reheat the cod in the oven, and then add your sauce and toppings for the best possible experience.
Frequently Asked Questions
Final Thoughts
So there you have it – my absolute favorite way to make a cod fish sandwich. It’s simple, incredibly flavorful, and has that perfect crispy texture that just makes you want to close your eyes and savor every bite. This recipe is a testament to how amazing home-cooked food can be, especially when it’s made with a little love and a few good ingredients. It’s the kind of meal that brings people together, sparking conversation and creating happy memories. I really hope you give this cod fish sandwich a try; I’m almost certain it will become a staple in your kitchen, just like it has in mine. If you love this, you might also enjoy my recipe for Crispy Chicken Sandwiches or my easy Fish Tacos – they share that same dedication to amazing flavor and satisfying crunch! I can’t wait to hear how your cod fish sandwich turns out. Please leave a comment below and share your thoughts, or even your own favorite topping ideas! Happy cooking!
Cod Fish Sandwich
Ingredients
Cod Fillets
- 1.5 pounds cod fillets skinless, boneless
Seasoning
- 1 teaspoon salt
- 0.5 teaspoon black pepper
- 0.5 teaspoon paprika
For Frying
- 0.25 cup all-purpose flour
- 2 tablespoons olive oil
Sandwich Assembly
- 4 each burger buns toasted
- 0.5 cup mayonnaise
- 1 cup shredded lettuce
- 0.5 cup sliced tomatoes
Instructions
Preparation Steps
- Pat the cod fillets dry with paper towels. Cut into sandwich-sized portions.
- In a shallow dish, mix together the flour, salt, pepper, and paprika.
- Dredge each cod portion in the flour mixture, ensuring it's evenly coated.
- Heat the olive oil in a large skillet over medium-high heat.
- Carefully place the cod fillets in the hot skillet. Cook for 3-4 minutes per side, until golden brown and cooked through.
- Remove the cod from the skillet and place on a paper towel-lined plate to drain any excess oil.
- Assemble the sandwiches: spread mayonnaise on the bottom halves of the toasted buns. Top with lettuce, tomato, and a piece of cod. Add the top bun.
Notes
Featured Comments
“Love how this brings the sandwich to life! The ocean vibe really makes me hungry.”
“Impressed! Clear steps and comforting results. Perfect for busy nights.”
“New favorite here — quick weeknight win. crowd-pleaser was spot on.”
“Super easy and turned out amazing! My family asked for seconds. Saving this one.”
“This sweet treat was absolutely loved — the hearty really stands out. Thanks!”
“Made it tonight and wow — absolutely loved! Will definitely make cod fish sandwich again.”


Love how this brings the sandwich to life! The ocean vibe really makes me hungry.