

When I close my eyes, I’m whisked straight back to Sunday afternoons at grandma’s house, where the kitchen smelled like vanilla, butter, and a little bit of chocolate cookie magic. This Cookie Cheesecake is the dessert I reach for when I want something that tastes big and comforting but still feels easy enough for a weeknight. It’s like if a chewy cookie bar and a silky cheesecake had a delicious, clingy embrace. The richness of the filling meets the familiar crunch of cookie crumbs, and honestly, this one disappears faster than you can say “second slice.” It’s not fussy, it doesn’t demand hours of attention, and yet it delivers a show-stopping moment every time. If you’ve ever wondered how to get cookies and cheesecake into one perfect bite, you’ve found your new favorite go-to. cookie cheesecake has that cozy, crowd-pleasing appeal that makes it feel like a warm hug in dessert form, and I’m excited to share my go-to method with you today.
What is cheesecake?
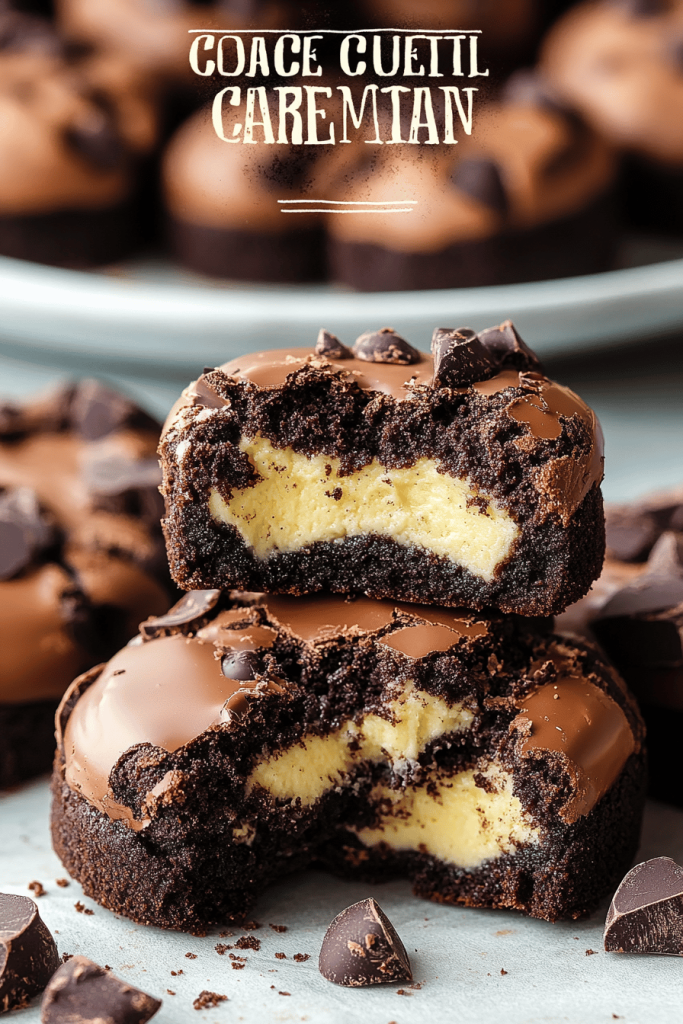
cookie cheesecake is essentially a cheesecake built around a cookies-forward base and filling. Think of a buttery crust made from crushed cookies, then a velvety Cream Cheese filling studded with bits of cookies, and sometimes a chocolate glaze or extra cookie topping to finish. The name says it all: it’s cheesecake with the comforting, crumbly goodness of cookies folded in and around every bite. It’s a friendly, approachable dessert that doesn’t require a pastry chef’s touch. It can be baked—like a classic cheesecake—or set in the fridge for a no-bake version that still delivers that creamy-sweet finish. The result is a dessert that tastes like your favorite cookie and your favorite cheesecake, all in one glorious slice. My family calls it “your cookie cheesecake magic,” because somehow the crust and filling cooperate to create a texture that’s at once smooth, slightly tangy, and delightfully crumbly in every forkful.
How to Make cookie cheesecake
Quick Overview
Here’s the quick version: crush cookies and blend them with a touch of butter to form a sturdy crust. Beat Cream Cheese with sugar and vanilla until silky, then fold in eggs and optional cookie pieces. Pour the batter into the crust, swirl in extra cookie chunks if you like, and bake gently in a water bath until the center just jiggles. Let it cool completely, then chill for several hours (or overnight) for a clean slice. If you’re in a hurry, you can opt for a fridge-set version with the same filling components, skipping the bake altogether. Either way, the result is a creamy, cookie-packed cheesecake—one that makes your kitchen smell like a cozy cookie shop and your guests grin with anticipation.
Ingredients
For the Main Crust:
2 cups crushed chocolate sandwich cookies (about 14–16 cookies), 4 tablespoons unsalted butter, melted, 1 tablespoon granulated sugar, pinch of salt
For the Filling:
24 oz (675 g) cream cheese, softened to room temperature, 3/4 cup granulated sugar, 2 large eggs, 1/2 cup sour cream or heavy cream, 1 teaspoon Vanilla Extract, 1/2 cup finely chopped cookies (optional)
For the Glaze:
1/2 cup chocolate chips, 1 tablespoon heavy cream; optional toppings: extra cookie crumbles, flaky salt, or a drizzle of caramel
Step-by-Step Instructions
Step 1: Preheat & Prep Pan
Preheat your oven to 325°F (165°C). Lightly butter a 9-inch springform pan and line the bottom with parchment for easy removal. Wrap the outside of the pan in a couple of layers of foil if you’re using a water bath, because you want to keep water away from the crust and melt-free filling. Press a little extra cookie crumbs up the sides to reinforce the crust’s grip, then set the pan aside while you mix the filling.
Step 2: Mix Dry Ingredients
In a small bowl, mix the 2 cups of crushed cookies with the 4 tablespoons of melted butter, the tablespoon of sugar, and a pinch of salt. The mixture should hold together when you press it with your fingers. If it’s too dry, add a touch more butter; if it’s too wet, a tablespoon or two of extra crumbs will do. Press firmly into the bottom and about 1/2 inch up the sides of the pan to form a cohesive crust. Bake for 8 minutes just to set the crust, then cool while you prep the filling.
Step 3: Mix Wet Ingredients
In a large bowl, beat the softened Cream Cheese with the sugar on medium speed until ultra-smooth and creamy. Scrape the bowl well, then add the vanilla and sour cream or heavy cream. Beat again until the mixture is glossy and homogeneous. The goal is a lump-free, velvety base that whispers of cheesecake perfection. If you want to fold in cookie pieces, now’s the moment to gently fold them in with a spatula, avoiding overmixing.
Step 4: Combine
Turn the mixer to low and add the eggs one at a time, letting each incorporate fully before adding the next. You want a silky batter without air pockets, which can cause cracks—gentle folding is your friend here. If you like extra cookie pockets, stir in the half cup of chopped cookies now. Pour the filling onto the crust and smooth the top with a silicone spatula.
Step 5: Prepare Filling
Spread the batter evenly. If you love a marbled look, you can reserve a small amount of batter, tint it with a drop of food coloring, and drop it in for a soft swirl after you pour the main batter in. It’s not required, but it’s a pretty, tasty touch that kids and adults both notice. Tap the pan lightly to release any air bubbles.
Step 6: Layer & Swirl
Optional: sprinkle a handful of cookie pieces over the top for extra texture. You can use a spoon to create a quick, rustic swirl by dragging a small amount of the batter across the surface. The goal is a few visible ribbons of cookie bits without turning the top into a muddy mess. If you’re aiming for a clean, professional look, skip this step and keep the surface sleek and smooth.
Step 7: Bake
Set the filled pan into a larger baking dish three-quarters full of hot water to form a gentle water bath. Bake for 60–75 minutes, or until the edges are set and the center jiggles just slightly when you move the pan. The center should not be lava, but it should wobble a little—that’s how you know it will set as it cools. If the top looks deeply browned, tent it with foil to prevent over-browning. Remember: cheesecake firming happens as it cools, not while it’s hot out of the oven.
Step 8: Cool & Glaze
Remove the pan from the water bath and let it sit on a rack until it’s room temperature. Then refrigerate for at least 4 hours, ideally overnight, to finish setting. If you’re adding a glaze, melt the chocolate with the cream until glossy, then drizzle over the cooled cheesecake. A little salt flake on top is a delightful counterpoint to the sweetness. If you’re serving straight from the fridge, a minute or two at room temp helps make slicing easier.
Step 9: Slice & Serve
Run a hot knife around the edge before you slice to prevent sticking. Wipe the blade between cuts for clean slices. Serve chilled or just slightly softened with a dollop of whipped cream and a few cookie crumbs for garnish. This cookie cheesecake shines with a simple berry compote or a handful of fresh berries to cut through the richness. It’s a showstopper that feels like a celebration, even on a weeknight.
What to Serve It With
Cookie cheesecake loves company. Here are my favorite ways to present it, depending on the moment.
For Breakfast: A shot of espresso or a creamy latte, a few berries, and a light dusting of powdered sugar. The contrast between the tangy filling and morning coffee is irresistible.
For Brunch: Slice into small wedges and arrange on a platter with fresh fruit, mint leaves, and a warm berry coulis. It looks fancy but tastes comforting enough for a lazy Sunday.
As Dessert: A simple vanilla bean whipped cream, a drizzle of caramel, and a few extra cookie crumbles around the plate create a dessert that feels special without fuss.
For Cozy Snacks: Warm a single slice in the microwave for 15–20 seconds, top with a scoop of vanilla ice cream, and sip hot cocoa on the side. This is pure comfort after a long day.
In our family, this cookie cheesecake is the always-requested finale to birthdays and potlucks alike. I’ve learned to bake it a touch longer for sturdier edges or reduce the bake time for a creamier center, depending on the oven’s quirks. The key is patience and a generous chill—this is a dessert that benefits from a little quiet time in the fridge so every bite is perfectly set and delightfully creamy.
Top Tips for Perfecting Your cookie cheesecake
Here are some practical, field-tested tips to elevate your cookie cheesecake game. I’ve grouped them by technique so you can skim for what you need.
Zucchini Prep: You’ll notice this heading doesn’t belong to a cookie cheesecake, but moisture control matters for any cheesecake. If you ever add grated zucchini or other moist add-ins, be sure to squeeze out as much moisture as possible and err on the side of a slightly firmer crust. It keeps the crumb from turning soggy and helps your crust stay intact when you slice. In this recipe, we’re keeping to cookies and cream cheese, but the principle still applies: moisture management is your friend.
Mixing Advice: Don’t overmix once you add the eggs. Overmixing introduces air that can cause cracks as the cheesecake bakes and cools. Beat the filling just until smooth, then fold in any cookie pieces gently. If you whip it too aggressively, you’ll end up with a lighter, less creamy texture—this is cheesecake, not mousse, so gentleness wins.
Swirl Customization: Swirls are a fun way to personalize. Try a 3-1 pattern by dropping spoonfuls of a darker batter onto the surface and running a knife through it in a few curved passes. You’ll create a pretty marble effect that also hints at chocolate-cookie flavor in every bite.
Ingredient Swaps: Gluten-free cookies work beautifully here—use crumb-sized gluten-free wafers or cookies and reduce the butter by a tablespoon to keep the crust cohesive. For dairy-free options, use dairy-free cream cheese blocks and a plant-based sour cream alternative; you may need a touch more sugar to compensate for the tang. If you want a lighter filling, swap part of the cream cheese for mascarpone or yogurt, but expect a softer set and slightly different tang.
Baking Tips: A water bath is your friend for an even bake and minimal cracks. If you can’t use a bath, bake in a convection-free oven and keep the oven door closed as you go. Place the rack in the middle of the oven and rotate halfway through to ensure even heat. If your oven runs hot, tent with foil to prevent overbrowning of the top while the center finishes setting.
Glaze Variations: Chocolate glaze is classic, but you can switch it up. A white chocolate glaze with a pinch of vanilla works beautifully for a lighter finish, and a salted caramel drizzle brings a welcome contrast. You can also crush some dry cookies and sprinkle them on top after glazing for added texture and flavor depth. The glaze should be glossy and slightly thick, so it clings to the surface without pooling.
I’ve learned that giving the cake time to rest after glazing makes the flavors settle in and makes slicing cleaner. My friends always ask for seconds, and I tell them the same thing I tell my own kids: patience pays off with this dessert. It’s worth waiting a little so every bite feels as luxurious as it should.
Storing and Reheating Tips
Here’s how to keep this cookie cheesecake tasting its best, whether you’re storing leftovers or planning ahead for future cravings.
Room Temperature: Not ideal for more than 2 hours. Cheesecake sets better when kept cool, especially if your kitchen is warm. If you’re transporting to a gathering, consider a cooler bag or insulated container to preserve the texture.
Refrigerator Storage: Wrap slices or the whole cake tightly in plastic wrap or store in an airtight container. It will stay fresh for 3–5 days. The flavors deepen as it rests, and the cookies continue to mingle with the cheesecake, which is a tasty thing.
Freezer Instructions: You can freeze cheesecakes or slices for up to 1–2 months. Wrap tightly in plastic wrap, then foil, and thaw in the fridge overnight before slicing. If you freeze with glaze, the texture may be a touch different, but the flavor remains superb.
Glaze Timing Advice: If you’re freezing the cheesecake, it’s best to apply the glaze after thawing, right before serving, to preserve the shine and texture of the topping. If you chill it first, the glaze will set nicely and stay put when you slice.
In my kitchen, this cookie cheesecake tends to taste even better after a night in the fridge—the flavors mellow and the slices cut cleanly. It’s also the kind of dessert that tastes better the next day, once the crust has had time to soak in a bit more of the filling’s richness.
Frequently Asked Questions
Final Thoughts
This cookie cheesecake isn’t just a dessert; it’s a little ritual that reminds me to slow down and savor the sweet moments. The crust crackles faintly when you bite in, the filling glides across your tongue with just the right tang, and the cookies tucked inside—whether chips, shards, or crumbles—bring a smile before the first bite is even finished. It’s a versatile crowd-pleaser you can tailor to your pantry and mood, yet it always lands as comforting and classy at the same time. I hope you’ll try it, tweak it to your taste, and share your own tweaks in the comments—I love hearing how your family enjoys it. Happy baking!
If you’re curious for more, this cookie cheesecake pairs beautifully with a simple vanilla bean ice cream, a warm berry sauce, or a crisp glass of milk. It’s the kind of dessert that becomes a family memory over time, with little stories attached to each slice. I’d love to hear yours—drop a note below with your favorite cookie choose, glaze variation, or your best make-ahead move. And if you’ve got a friend who loves cookies as much as cheesecake, share this post with them. May your kitchen be forever filled with the scent of vanilla, butter, and chocolate cookies cold and creamy in the middle.
Want to save this for later? Pin a photo, print the recipe, or share your own version in the comments. I’m cheering you on from my kitchen, and I can’t wait to hear how yours turns out. Cookie cheesecake, my friends—it’s the little joy we all deserve.

Cookie Cheesecake
Ingredients
Cookie Crust
- 0.5 cup unsalted butter, room temperature
- 0.5 cup light brown sugar
- 0.03 cup sugar
- 1 large egg
- 1.5 tsp vanilla extract
- 1.5 cup all purpose flour
- 0.75 tsp baking soda
- 0.25 tsp baking powder
- 0.25 tsp salt
- 1.25 cup semi-sweet chocolate chips
Cheesecake Filling
- 20 oz cream cheese, room temperature
- 0.5 cup sugar
- 5 tbsp natural unsweetened cocoa powder
- 1 tsp vanilla extract
- 0.25 cup semi sweet chocolate chips, melted
- 1.25 cup heavy whipping cream, cold
- 0.73 cup powdered sugar
- 1 cup chopped chocolate chip cookies
Chocolate Whipped Cream Topping
- 0.75 cup heavy whipping cream, cold
- 0.25 cup powdered sugar
- 3 tbsp natural unsweetened cocoa powder
- 0.5 tsp vanilla extract
- mini chocolate chips, optional
Instructions
Preparation Steps
- To make the cookie bottom, preheat the oven to 350°F (176°C). Place parchment paper in the bottom of a 9 inch springform pan and grease the sides.
- Cream the butter and sugars together until light and fluffy, about 3-4 minutes.
- Mix in egg and vanilla extract until combined.
- In a separate bowl, combine the flour, baking soda, baking powder and salt.
- Add the dry ingredients to the butter mixture and mix until well combined.
- Stir in the chocolate chips. The cookie dough will be thick.
- Press the dough evenly into the springform pan.
- Bake for 16-18 minutes or until the edges are slightly golden. Remove from oven and allow to cool completely in the pan.
- To make the cheesecake filling, add the cream cheese, sugar and cocoa powder to a large mixer bowl and beat until well combined and smooth.
- Add the vanilla extract and melted chocolate and mix until well combined. Set aside.
- In another large mixer bowl, add the heavy whipping cream and powdered sugar. Whip on high speed until stiff peaks form.
- Add about 1/3 of the whipped cream to the cream cheese mixture and fold carefully to combine.
- Add the remaining whipped cream and fold carefully until well combined.
- Add the chopped cookies and fold to combine.
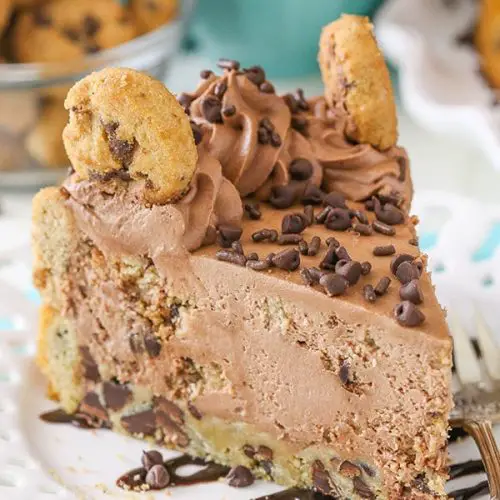
- To put the cheesecake together, first add chocolate chip cookies around the sides of the pan, sitting on top of the edge of the cookie bottom. If you have trouble getting them to stand up, spoon small amounts of cheesecake filling up against the cookies to help keep them in place.
- Add the remaining cheesecake filling and spread into an even layer. Refrigerate cheesecake until firm, 5-6 hours or overnight.
- To finish off the cheesecake, make the chocolate whipped cream. Add the heavy whipping cream, powdered sugar, cocoa powder and vanilla extract to a large mixer bowl and whip on high speed until stiff peaks form.
- Remove the cheesecake from the springform pan and pipe swirls of whipped cream around the edge. Top the cheesecake with additional cookies and mini chocolate chips. Refrigerate cheesecake until ready to serve. Cheesecake is best for 3-4 days.
Notes
Featured Comments
“This takes me back—grandma’s kitchen was the best! The smell of vanilla and cookies always felt like pure comfort.”
“This brings back such sweet memories! The smell alone takes me back to those cozy afternoons with grandma.”
“Impressed! Clear steps and perfect for busy nights results. Perfect for busy nights.”
“New favorite here — turned out amazing. crowd-pleaser was spot on.”
“Super easy and turned out amazing! My family asked for seconds. Saving this one.”
“This sweet treat was absolutely loved — the zingy really stands out. Thanks!”


This brings back such sweet memories! The smell alone takes me back to those cozy afternoons with grandma.
This takes me back—grandma’s kitchen was the best! The smell of vanilla and cookies always felt like pure comfort.