

You know, there are some recipes that just feel like a warm hug. This cowboy cornbread is absolutely one of them for me. It’s the kind of thing I whip up when the weather turns crisp, or when the kids are clamoring for something comforting after a long day at school. Honestly, it’s become my go-to when I need a reliable, crowd-pleasing side dish that doesn’t require a culinary degree. I remember my grandma making something similar when I was little, and the smell of it baking would fill the whole house, making our old farmhouse feel even cozier. It’s not quite a cake, not quite bread, but it’s perfectly in between, with a delightful crumb and just the right amount of sweetness. If you’re a fan of classic cornbread but looking for something with a little more character and depth, you’re going to adore this cowboy cornbread. It’s a real winner, and I can’t wait to share it with you!
What is cowboy cornbread?
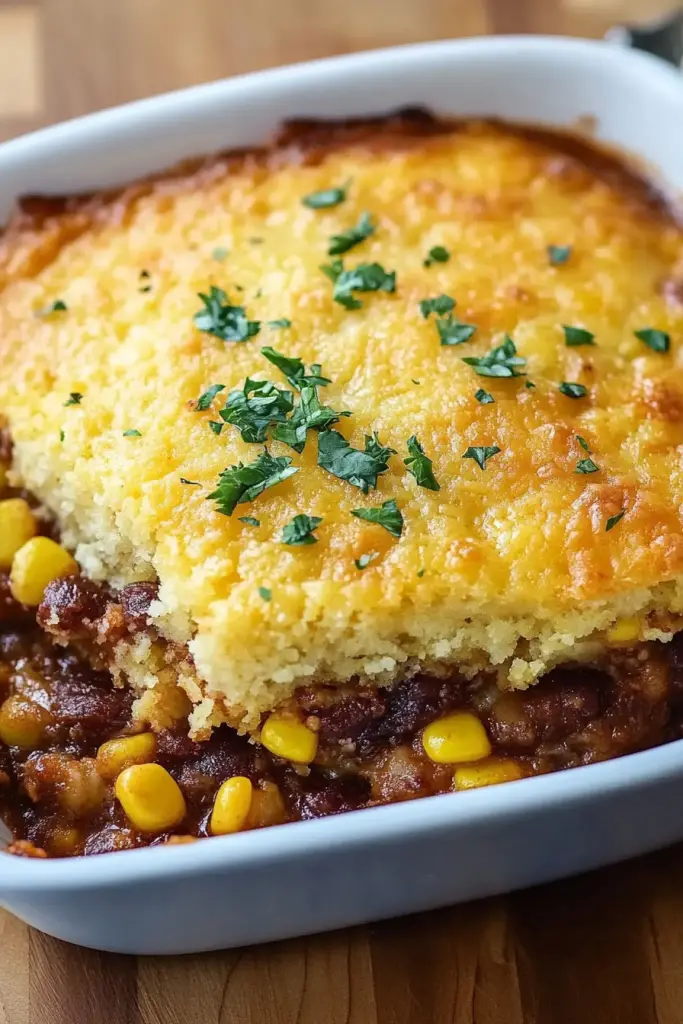
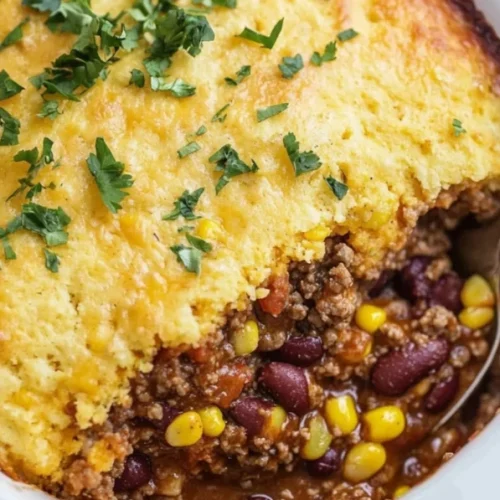
So, what exactly makes this cornbread a “cowboy” cornbread? Well, it’s not just a fancy name! Think of it as a heartier, more flavorful, and often slightly sweeter cousin to your everyday cornbread. The “cowboy” aspect usually implies a few things: it’s built to be robust and satisfying, perfect for fueling long days. Often, you’ll find it has a bit more texture, maybe a touch more sweetness, and sometimes even some fun additions like corn kernels or a hint of spice. This version is my take on that classic idea – it’s got a beautiful golden hue, a tender crumb that melts in your mouth, and a hint of sweetness that makes it incredibly versatile. It’s essentially a comforting, delicious, and slightly more indulgent take on a beloved staple, designed to be enjoyed by everyone, whether you’re wrangling cattle or just your to-do list!
How to Make Cowboy Cornbread
Quick Overview
Making this cowboy cornbread is surprisingly simple! You’ll whisk together your dry ingredients, then your wet ingredients, and then bring them together for a quick mix. The batter is then poured into a prepared pan and baked until golden and puffed. The result is a tender, flavorful cornbread that’s perfect for any occasion. It’s designed to be forgiving, so don’t stress too much – just follow the steps, and you’ll have a delicious treat in no time.
Ingredients
For the Main Batter:
2 cups all-purpose flour: I like to use a good quality all-purpose flour for a consistent texture. If you’re feeling adventurous, you could try a blend with some Whole Wheat for extra nuttiness, but for classic flavor, AP is the way to go.
1 cup yellow cornmeal: This is crucial for that iconic cornbread flavor and texture. I prefer medium-grind cornmeal for a good balance – not too fine, not too coarse.
1/2 cup granulated sugar: Just enough to give it that subtle sweetness that makes it so enjoyable on its own.
2 teaspoons baking powder: This is our leavening agent, making sure the cornbread rises beautifully.
1/2 teaspoon baking soda: Works with the baking powder for an extra lift.
1 teaspoon salt: Enhances all the other flavors.
1 1/2 cups buttermilk: This is key for moisture and that classic tangy flavor. If you don’t have buttermilk, you can make a substitute by adding 1 1/2 tablespoons of white vinegar or lemon juice to 1 1/2 cups of milk and letting it sit for 5-10 minutes.
1/2 cup unsalted butter, melted: For richness and that lovely tender crumb. Make sure it’s cooled slightly so it doesn’t cook the eggs.
2 large eggs: These bind everything together and add richness.
For the Filling:
1 cup frozen or fresh corn kernels: I often use frozen because it’s so convenient, but fresh tastes amazing too. It adds little bursts of sweetness and texture throughout.
1/2 cup shredded sharp cheddar cheese: This is optional but highly recommended! It adds a lovely savory note that complements the sweetness of the cornbread. Use a good sharp cheddar for the best flavor.
For the Glaze:
1/4 cup honey or maple syrup: For a touch of extra sweetness and a beautiful sheen.
2 tablespoons unsalted butter, melted: To help the glaze spread and add a bit more richness.
Step-by-Step Instructions
Step 1: Preheat & Prep Pan
First things first, get your oven preheated to 375°F (190°C). While that’s happening, grab a 9×13 inch baking pan. I like to grease mine really well with butter or cooking spray, and then I sometimes dust it with a little extra cornmeal. This helps prevent sticking and gives the bottom of the cornbread a lovely, slightly crisp texture. Some folks like to pour their batter into a preheated cast iron skillet for an even crispier bottom, which is a fantastic option if you have one!
Step 2: Mix Dry Ingredients
In a large bowl, whisk together the all-purpose flour, cornmeal, granulated sugar, baking powder, baking soda, and salt. Give it a good whisking to make sure everything is evenly distributed. This ensures that your leavening agents and salt are spread throughout the batter, which means your cornbread will rise evenly and taste perfectly seasoned. You want to see no clumps of baking powder or soda!
Step 3: Mix Wet Ingredients
In a separate medium bowl, whisk together the buttermilk, melted butter, and eggs until they’re well combined. Make sure the melted butter isn’t too hot when you add the eggs, or you might end up with scrambled eggs in your batter – yikes! Just let it cool for a minute or two.
Step 4: Combine
Now, pour the wet ingredients into the bowl with the dry ingredients. Use a spatula or a wooden spoon to mix them together until *just* combined. It’s really important not to overmix here! A few lumps are perfectly fine, even desirable. Overmixing develops the gluten in the flour, which can lead to a tough, dense cornbread. We want tender, tender cornbread, so stop mixing as soon as you don’t see any big streaks of dry flour.
Step 5: Prepare Filling
If you’re using the corn and cheese, gently fold them into the batter now. Be careful not to overmix. This is where you get those delightful pops of corn and the gooey pockets of cheese throughout your cornbread. It really elevates it from simple to spectacular!
Step 6: Layer & Swirl
Pour the batter evenly into your prepared baking pan. If you added the corn and cheese, try to distribute them somewhat evenly. If you like a swirl, you can reserve a little bit of the batter and swirl some jam or a bit more cheese on top before baking, though for this recipe, I usually just pour it all in.
Step 7: Bake
Pop the pan into your preheated oven. Bake for about 25-30 minutes, or until a toothpick inserted into the center comes out clean and the top is a beautiful golden brown. The edges should be lightly golden and pulling away from the sides of the pan. Every oven is a little different, so keep an eye on it towards the end of the baking time.
Step 8: Cool & Glaze
Once it’s baked, take the cornbread out of the oven and let it cool in the pan for about 10-15 minutes. While it’s still warm, whisk together the honey (or maple syrup) and melted butter for the glaze. Drizzle this delicious glaze over the top of the warm cornbread. It adds a lovely sheen and an extra touch of sweetness. The warmth of the cornbread will help the glaze soak in just a little bit, making it extra delicious.
Step 9: Slice & Serve
After glazing, let it cool a little more until it’s warm but not piping hot. This makes it much easier to cut cleanly. Slice into squares and serve! It’s truly best when served warm, with that gorgeous glaze glistening on top.
What to Serve It With
This cowboy cornbread is so versatile, it’s almost embarrassing! I love it for almost any meal. For breakfast, it’s fantastic alongside scrambled eggs, crispy bacon, or even just with a dollop of sour cream and a sprinkle of chives. It’s not too sweet, so it works perfectly in the morning. When we have people over for brunch, I’ll often serve slices of this alongside a fruit salad, some quiche, or even a smoked salmon platter. It adds a lovely rustic touch that feels special without being fussy. And as a dessert? Oh yes! It’s surprisingly wonderful as a light, sweet ending to a meal, especially when served warm with a scoop of vanilla Ice Cream or a drizzle of extra honey. It’s also an absolute champion as a side dish for hearty meals. Think about it with a big bowl of chili, a slow-cooked stew, or even grilled barbecue ribs. It’s the perfect comforting accompaniment. And for those impromptu cozy snacks? A warm slice with a smear of butter and a cup of tea or coffee is pure comfort. My family also loves it with a side of pulled pork or even just a good quality jam. It’s become a go-to for backyard BBQs and casual family dinners alike.
Top Tips for Perfecting Your Cowboy Cornbread
I’ve made this cowboy cornbread more times than I can count, and along the way, I’ve picked up a few tricks that I think really make a difference. For the zucchini prep (if you choose to add it – it’s another fantastic option!), it’s crucial to grate it and then squeeze out as much moisture as possible. I like to wrap it in cheesecloth or a clean kitchen towel and really wring it out. Excess water will make your cornbread gummy. For mixing advice, remember that gentle is key! Seriously, resist the urge to overmix. Lumps are your friend in cornbread batter; they mean you haven’t overdeveloped the gluten. Just mix until the dry ingredients are moistened. When it comes to swirl customization, if you’re adding something like jam or a different type of cheese, spoon dollops onto the batter and then use a knife or skewer to gently swirl it in. Don’t over-swirl, or you’ll muddy the flavors. You can also add a pinch of cinnamon or a dash of cayenne pepper to the batter for a little twist. For ingredient swaps, if you’re out of buttermilk, that homemade substitute (milk + vinegar/lemon juice) works beautifully. And if you don’t have cornmeal, you can often substitute it with more flour, but you’ll lose that signature cornbread flavor and texture. When it comes to baking tips, using a cast iron skillet preheated in the oven gives an incredibly crispy bottom crust that’s to die for. If you don’t have cast iron, ensure your pan is well-greased. To test for doneness, a wooden skewer or toothpick inserted into the center should come out clean. If the top is browning too quickly, you can loosely tent it with foil. For glaze variations, feel free to play around! A little bit of orange zest added to the honey glaze gives it a lovely brightness, or you could even mix in a touch of cinnamon for warmth. Just whisk it well until smooth. These little tweaks are what turn a good recipe into a truly unforgettable one!
Storing and Reheating Tips
Knowing how to store and reheat this cowboy cornbread properly is key to keeping it delicious. If you have any leftovers (which is rare in my house!), you can store them at room temperature for up to two days, as long as they’re covered tightly. I usually wrap the pan loosely in plastic wrap or foil, or transfer slices to an airtight container. For longer storage, the refrigerator is your best bet. It will stay fresh in the fridge for about 4-5 days. Make sure it’s in an airtight container to prevent it from drying out. When you’re ready to enjoy it again, you can reheat slices in a toaster oven or a regular oven at around 300°F (150°C) for about 5-10 minutes until warmed through. Avoid microwaving if you want to preserve that lovely texture, as it can make cornbread a bit chewy. If you’re planning to freeze it, definitely wait until it’s completely cooled. Wrap individual slices or the whole pan tightly in plastic wrap, then in aluminum foil, or place in a freezer-safe bag or container. It can be stored in the freezer for up to 2-3 months. To thaw, transfer it to the refrigerator overnight, then reheat as usual. For the glaze timing, I always recommend applying the glaze to warm, freshly baked cornbread. If you’re freezing portions, you can always drizzle a little extra honey or butter on top when you reheat it for that fresh-from-the-oven shine.
Frequently Asked Questions
Final Thoughts
This cowboy cornbread is more than just a recipe for me; it’s a little slice of comfort and a reminder of simple, good things. It’s the kind of dish that brings people together, making any meal feel a bit more special and a lot more delicious. Whether you’re serving it alongside a hearty stew or enjoying it as a sweet treat, its moist crumb and perfect balance of flavors are truly something to write home about. It’s proof that sometimes, the most satisfying recipes are the ones that are easy to make and use straightforward ingredients. If you enjoyed this, you might also love my recipe for Classic Chili Con Carne or my Easy Skillet Cornbread for more comforting classics. I really hope you give this cowboy cornbread a try – I’m so excited for you to experience how wonderful it is! Please let me know in the comments how yours turns out, or if you’ve tried any fun variations. Happy baking, everyone!
Cowboy Cornbread
Ingredients
Main Ingredients
- 1.5 cup all-purpose flour
- 1.5 cup cornmeal
- 0.5 cup granulated sugar
- 2 teaspoon baking powder
- 1 teaspoon salt
- 0.5 teaspoon baking soda
- 2 large eggs
- 1.5 cup buttermilk
- 0.5 cup unsalted butter, melted
- 0.5 cup corn kernels, fresh or frozen
- 0.5 cup cheddar cheese, shredded
- 0.25 cup jalapeño pepper, finely diced (optional)
Instructions
Preparation Steps
- Preheat your oven to 400°F (200°C). Grease and flour a 9x13 inch baking pan or a cast-iron skillet.
- In a large bowl, whisk together the flour, cornmeal, sugar, baking powder, salt, and baking soda.
- In a separate bowl, whisk together the eggs and buttermilk. Then, whisk in the melted butter.
- Pour the wet ingredients into the dry ingredients and stir until just combined. Do not overmix.
- Gently fold in the corn kernels, shredded cheddar cheese, and diced jalapeño (if using).
- Pour the batter into the prepared baking pan or skillet and spread evenly.
- Bake for 20-25 minutes, or until a toothpick inserted into the center comes out clean and the top is golden brown.
- Let cool slightly before serving. Serve warm.
Notes
Featured Comments
“Impressed! Clear steps and perfect for busy nights results. Perfect for busy nights.”
“New favorite here — restaurant-level. crowd-pleaser was spot on.”
“Super easy and turned out amazing! My family asked for seconds. Saving this one.”
“This sweet treat was absolutely loved — the cozy really stands out. Thanks!”
“Made it tonight and wow — comforting! Will definitely make Cowboy cornbread again.”
“Packed with flavor and so simple. Exactly what I wanted from Cowboy cornbread.”


