


When the kitchen fills with the scent of vanilla and warmed butter, I know I’ve picked a good day. My favorite Frosted cream cookies aren’t just cookies; they’re a little celebration you can pull together on a quiet weeknight or a busy weekend afternoon. The first time I made them, I compared them to classic sugar cookies—soft, tender, but with a modern twist: a Cream Cheese filling that feels like a cozy hug. This isn’t about fancy fuss; it’s about real flavors, a few good techniques, and a tray of cookies that disappear faster than you can say “grab me one more.” I’ve baked these for potlucks, school bake sales, and just because someone asked for a sweet treat after dinner. The secret? chilling the dough just enough to keep the edges neat, and giving the filling a little whisper of vanilla so every bite feels familiar and comforting. Frosted cream cookies are a lifesaver on busy nights, and everyone who tastes them asks for the recipe. Yes, they’re that kind of cookie.
What is Frosted Cream Cookies?
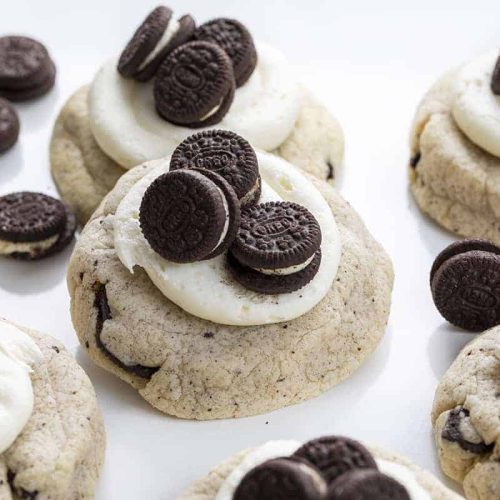
Frosted cream cookies are basically sandwich cookies with a luscious, creamy filling tucked between two soft vanilla cookies, all crowned with a delicate glaze. Think of them as a grown-up version of your favorite sandwich cookie, but with more butter, more vanilla, and a fill-you-up filling that stays perfectly creamy. The name hints at two things: frosting on top and a creamy center. It’s essentially a classic dessert reimagined for people who love that contrast between a tender bite and a smooth, tangy center. I like to picture them as a warm hug you can unwrap with your coffee cup in the morning or after dinner as a finish that feels celebratory without being heavy. The idea came from my grandmother’s recipe box, where simple ingredients become something special when you treat them with a little care and a dash of vanilla.
How to Make Frosted cream cookies
Quick Overview
Think of these cookies as three simple acts: bake the soft, vanilla-scented cookies, whip a light cream-cheese filling, and then bring it all together with a silky glaze. The real magic happens when you chill the dough for a short while and then pair up the cookies with a generous dollop of filling. From there, you’ll crown them with glaze and let them set just enough so the first bite reveals a perfect balance of cookie, cream, and sweetness. It’s straightforward, hands-on cooking that feels a little magical in the end.
Ingredients
For the Main Batter:
- 2 1/2 cups all-purpose flour
- 1/2 teaspoon baking powder
- 1/2 teaspoon baking soda
- 1/2 teaspoon salt
- 1 cup unsalted butter, softened
- 1 cup granulated sugar
- 2 large eggs
- 2 teaspoons vanilla extract
- 1/2 cup sour cream or plain yogurt (optional but keeps the dough ultra-tender)
For the Filling:
- 8 oz (1 cup) cream cheese, softened
- 1/2 cup unsalted butter, softened
- 3 1/2 cups powdered sugar
- 2 teaspoons vanilla extract
- A pinch of salt
For the Glaze:
- 1 cup powdered sugar
- 2–3 tablespoons milk or cream
- 1/2 teaspoon vanilla extract
- Optional: a few drops of lemon or almond extract for a twist
Step-by-Step Instructions
Step 1: Preheat & Prep Pan
Preheat your oven to 350°F (175°C). Line baking sheets with parchment paper or silicone mats. Keeping the sheets ready close at hand makes life easier later, trust me on this one. Chill the dough for 20–30 minutes if it feels too soft; this helps the cookies hold their shape while baking.
Step 2: Mix Dry Ingredients
In a bowl, whisk together flour, baking powder, baking soda, and salt. A light whisk is all you need—don’t overwork them; you want a soft, tender crumb, not a developed gluten monster. This step is all about even distribution, so a quick whisk will do.
Step 3: Mix Wet Ingredients
In a separate large bowl, beat the butter and sugar until fluffy and pale. This usually takes 2–3 minutes on medium speed. Add eggs one at a time, beating well after each addition. Stir in vanilla and the optional Sour Cream if you’re using it. The mixture should look glossy and feel like satin on your spoon.
Step 4: Combine
Gradually add the dry ingredients to the wet, mixing just until a soft dough forms. If it seems a touch too stiff, a splash of milk or extra sour cream can help. The dough should be cohesive but not sticky. Overmixing is the enemy of tender cookies, so stop as soon as the flour disappears into the dough.
Step 5: Prepare Filling
Beat the Cream Cheese and butter together until smooth and creamy. Add powdered sugar in two additions, then vanilla and a pinch of salt. The filling should be luscious but pipeable. If it’s too stiff, a teaspoon or two of cream can loosen it; if too soft, a ring of fridge time will firm it up nicely.
Step 6: Layer & Swirl
Roll the dough into balls or use a small cookie scoop for uniformity. Place half of the cookies on the prepared sheets and bake until the edges are just set and the centers look lightly puffed, about 9–11 minutes. Let them rest on the sheet a minute, then transfer to a wire rack to cool completely. Once cooled, spread a generous dollop of filling on the flat side of one cookie and top with another to make a sandwich. If you want a pretty swirl on top, you can drizzle a little glaze in a back-and-forth motion over the tops where the filling is visible; the glaze will set to a satin finish, giving you that bakery look at home.
Step 7: Bake
Bake the cookies in batches, rotating the sheets halfway through for even browning. Edges should be lightly golden, and centers should be pale. Avoid overbaking, which can dry out the cookies and make the filling feel heavy. If your oven runs hot or cool, adjust by 5–10 degrees and check a minute or two earlier or later. My oven sometimes behaves differently in the summer heat, so I always keep an eye on the first batch and rely on that experience for the rest.
Step 8: Cool & Glaze
Let the assembled cookies cool completely before glazing. A quick glaze—powdered sugar, milk, and vanilla—dries to a delicate sheen that doesn’t overpower the filling. If you’re decorating for a holiday, a drop of food coloring or a pinch of citrus zest in the glaze can add a festive touch. When you’re ready, drizzle the glaze over the tops and let it set for about 15 minutes; the glaze adds a glossy finish and a whisper of extra sweetness that pairs perfectly with the tangy filling.
Step 9: Slice & Serve
While these aren’t traditional slice-and-serve cookies, you can portion them on a pretty platter in tidy rows. If you’re making them for a party, consider a mini stack on a dessert tray—everyone loves a little tower of Frosted cream cookies. The texture contrast—soft, delicate cookies with a creamy center—works wonders with a hot cup of coffee or tea. My family often cuts a little peppermint sprinkle into the glaze around the holidays for a playful, festive look.
What to Serve It With
These Frosted cream cookies pair beautifully with different accompaniments depending on the occasion. Here are a few ideas I’ve tested and loved over the years:
For Breakfast: A cup of strong black coffee or a creamy latte with a sprinkle of cocoa. Plate a few cookies alongside a bowl of fresh berries for color and brightness. The vanilla and Cream Cheese notes wake up the palate without being too heavy, which makes them a surprisingly nice morning treat.
For Brunch: Set them out with a fruit compote or a light yogurt dip. A citrus-forward drink—orange juice with a hint of sparkling water—complements the glaze and provides a refreshing balance to the sweetness.
As Dessert: Serve with a scoop of vanilla ice cream or a dollop of light whipped cream. A few fresh strawberries or a drizzle of berry coulis adds a tart contrast that elevates the whole plate. The cookies will be the star, but a little accompaniment makes the moment feel special.
For Cozy Snacks: Keep a warm glaze drizzle on the side for dipping, and plate with a mug of tea or hot chocolate. This is my family’s favorite way to unwind on a rainy afternoon—soft cookies, creamy centers, and that cozy mug steam curling above the plate.
We have a small family tradition around this recipe: when the first batch comes warm from the oven, we take a moment to savor the scent before filling and cooling. The smell alone brings everyone to the kitchen, and I swear the house feels cozier with each batch. This is the kind of recipe that becomes a small ritual in a busy life, something to look forward to and share.
Top Tips for Perfecting Your Frosted cream cookies
Here are a few tricks I’ve learned after countless batches. They’re simple, but they make a huge difference in texture and flavor:
Dough handling: Chill the dough for 20–30 minutes if it’s very soft. It firms up enough to roll into neat balls and makes lifting onto the sheet easy. If you’re in a hurry, you can chill for as little as 10 minutes, but the 20–30 window helps with shape retention.
Mixing technique: When you beat butter and sugar, you’re building the air that gives these cookies their tenderness. Don’t skip this step or rush it. A minute or two of whisking at good speed makes a world of difference in the final texture.
Flavor development: The vanilla is a hero here. If you’ve got a good vanilla extract, use it. If you want more depth, a teaspoon of almond extract in the dough adds a gentle warmth that pairs beautifully with the glaze. I’ve even experimented with a pinch of citrus zest for a brighter finish.
Swirl & layering: When you decorate with glaze, keep it simple for the first batch—just a light drizzle across the top of the filled cookies. If you want a marbled look, mix a small amount of cocoa powder into a portion of the glaze and swirl with a toothpick for a subtle design.
Ingredient swaps: You can replace sour cream with yogurt for a tangier note or use half-and-half for a lighter texture. If you’re dairy-free, you can try coconut cream in the filling, but the consistency may shift—expect a slightly softer filling and adjust powdered sugar accordingly.
Baking tips: If your oven runs hot, rotate sheets halfway through and aim for edges that are just golden. If it runs cool, give it another couple of minutes. Every oven has its quirks, so use the first batch as your guide for the rest.
Glaze variations: For a fun twist, swap a portion of the milk with lemon juice for a bright citrus glaze, or add a teaspoon of espresso powder to the glaze for a café-inspired finish. If you’re avoiding dairy, try almond or oat milk in the glaze and a dairy-free cream cheese in the filling.
One lesson I return to again and again is this: patience pays off. A 15–20 minute chill before baking creates cookies that hold their shape and stay evenly soft in the center. It’s the little ritual I rely on to keep the texture just right, especially when I’m baking for a crowd.
Storing and Reheating Tips
Storage can make or break the texture here, so I’ve split it into a few practical scenarios:
Room Temperature: Store cookies in an airtight container at room temperature for up to 3 days. If you’re stacking them, place parchment between layers to prevent sticking. They stay soft and creamy, especially when the glaze is set and not sticky.
Refrigerator Storage: In a sealed container, cookies will keep for about 5–7 days. This is perfect for making ahead during the holidays or for weeklong treats. Let them come to room temperature before serving for the best texture.
Freezer Instructions: Freeze baked cookies (unfilled) for up to 2 months. Wrap well and store in a sturdy freezer bag. Thaw on the counter and fill just before serving, for the freshest creaminess. If you want to freeze filled cookies, freeze them separately and assemble after thawing to avoid the filling seeping out.
Glaze Timing Advice: If you’re freezing cookies, skip the glaze until you’re ready to serve. A glaze that’s frozen and thawed can crack or lose its sheen. You can glaze after thawing and let it set again for the best finish.
These tips have kept my Frosted cream cookies tasting fresh and delicious, no matter how many hours have passed since I baked them. The texture holds up, and the filling remains creamy without being greasy, which is exactly how I like my cookies—balanced and dependable.
Final Thoughts
So there it is—the little cookies that feel like a warm hug in a tin. Frosted cream cookies embody everything I love about home baking: a handful of simple ingredients, a few careful steps, and the joy of sharing something delicious with people you care about. I’ve learned to chill the dough, not rush the filling, and to savor the moment when the glaze begins to set and the kitchen smells like a buttery vanilla dream. My kids actually ask for seconds, and I won’t lie—I sometimes hide a few extras so I can nibble on them after the dishes are done and the house is quiet. If you’re the kind of baker who wants a recipe that’s comforting yet a touch impressive, this one is for you. I’d love to hear how yours turn out—what glaze did you choose, which twist did you try, and who you shared them with. Happy baking!
Frequently Asked Questions
Frosted cream cookies
Ingredients
Cookies
- 0.5 cup butter, softened
- 0.5 cup shortening
- 1 cup granulated sugar
- 2 large eggs, room temperature
- 1 teaspoon vanilla extract
- 3 cups all-purpose flour
- 2 tablespoons cornstarch
- 1 teaspoon kosher salt
- 0.5 teaspoon baking powder
- 1 cup Oreo cookies, crushed (about 8 cookies)
- mini Oreo cookies for garnish (optional)
Buttercream Frosting
- 0.5 cup unsalted butter, room temperature
- 2 cups confectioners' sugar, sifted
- teaspoon kosher salt small pinch
- 3 teaspoons milk, as needed for desired consistency
Instructions
Preparation Steps
- Preheat the oven to 325°F. Line a baking sheet with parchment paper and set it aside.
- Using a handheld mixer, combine the butter, shortening, sugar, eggs, and vanilla in a large bowl.
- To the butter mixture, add the flour, cornstarch, salt, and baking powder. Mix until the ingredients are incorporated.
- Add the crushed Oreo cookies to the dough. Mix on high speed to finely crush the Oreo pieces.
- Using a ¼ cup (or 2 scoops of dough with a 2 tablespoon scoop), add the dough out onto a lined cookie sheet, about 2 inches apart. (I usually put 6 cookie dough balls onto each cookie sheet.) Use your hands to shape and slightly flatten each ball of dough. (If you used 2, 2 tablespoon scoops, combine the scoops of dough into one large cookie.)
- Bake for 12 minutes for a softer cookie, up to 14 minutes for a firmer cookie.
- Remove cookies from the oven and let them cool completely before frosting with the buttercream.
- Store frosted cookies in the refrigerator. Serve cookies cold.
- In the bowl of a stand mixer with a paddle attachment, combine the butter, sugar, and salt.
- Start mixing on low speed until the sugar is incorporated with the butter. Increase the mixing speed to high and beat until smooth and fluffy, about 2 minutes.
- Adjust the consistency with milk as needed.
- Store unused buttercream in the refrigerator in an airtight container and bring it back to room temperature before using it to pipe or frost.
- Use buttercream to frost completely cooled cookies.
Notes
Featured Comments
“Love how you describe the cozy kitchen vibe! Those frosting secrets sound amazing—definitely trying them soon.”
“So comforting—like a warm hug in cookie form! Perfect for sharing (or not sharing 😉).”
“Impressed! Clear steps and turned out amazing results. Perfect for busy nights.”
“New favorite here — super easy. crowd-pleaser was spot on.”
“Super easy and turned out amazing! My family asked for seconds. Saving this one.”
“This sweet treat was absolutely loved — the zingy really stands out. Thanks!”


So comforting—like a warm hug in cookie form! Perfect for sharing (or not sharing 😉).