

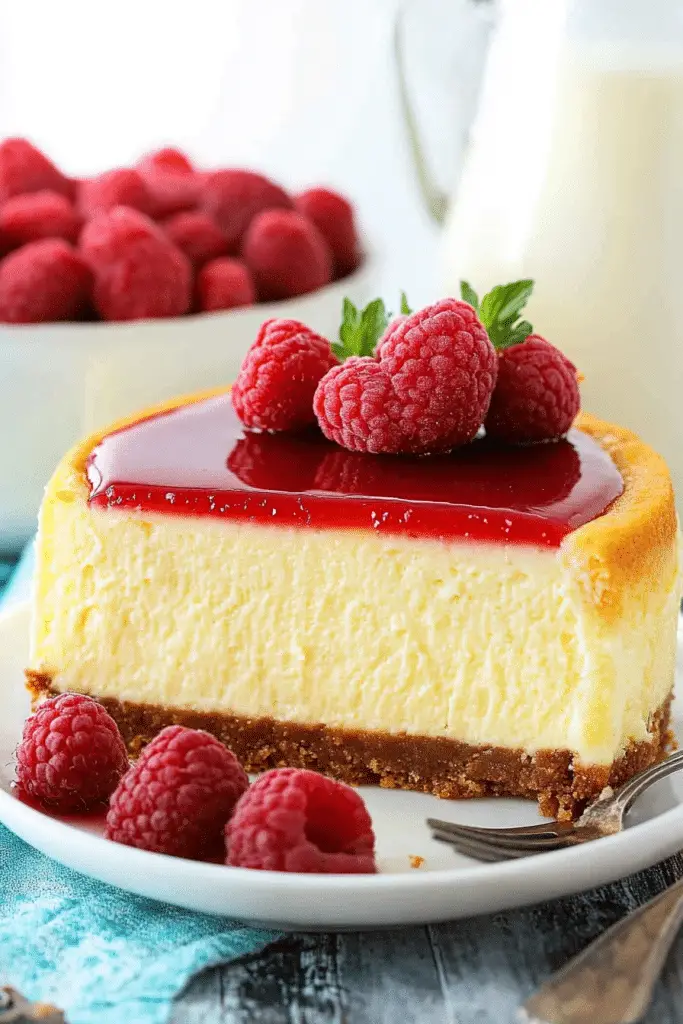
There are certain desserts that just have a special place in my heart, and then there’s New York Cheesecake. This isn’t just any dessert; it’s an experience. I remember the first time I tried a *real* New York style cheesecake, the kind that’s dense and rich, with just the right amount of tang, and a crust that’s more than just a afterthought. It was at a little Italian bakery tucked away on a side street in the city, and honestly, it was a revelation. I’ve been chasing that perfect slice ever since, tweaking and tinkering in my own kitchen, and I think I’ve finally nailed it. This New York Cheesecake recipe is the one I pull out when I want to impress, when I need a serious comfort food fix, or honestly, just when that craving hits at 10 PM and I don’t want to make a whole pie. It’s that good. Forget those flimsy, airy cheesecakes – this one is the real deal, and I’m so excited to share it with you.
What is New York cheesecake?
So, what exactly makes a cheesecake a “New York” cheesecake? It’s all about the texture and the richness. Think of it as the sophisticated cousin to other cheesecakes. It’s denser, heavier, and has a creamier, almost velvety texture that just melts in your mouth. It’s traditionally made with a simple graham cracker crust (though sometimes a shortbread or cookie crust makes an appearance), and the filling is predominantly cream cheese, eggs, and sugar, often with a touch of sour cream or heavy cream for that signature tang and extra smoothness. It’s not a light and fluffy dessert; it’s a decadent, unapologetic indulgence. The flavor is pure, unadulterated cheesecake bliss – rich, creamy, with a subtle sweetness and a pleasant tang that cuts through the richness beautifully. It’s the kind of dessert that makes you close your eyes and savor every single bite.
How do I make New York cheesecake?
Quick Overview
This recipe is all about building that rich, creamy texture. We’ll start with a simple, buttery graham cracker crust, then mix up a luscious cream cheese filling that’s baked low and slow to achieve that perfect density. The key is patience – allowing it to cool gradually to prevent cracks. The result? A show-stopping New York Cheesecake that’s dense, tangy, and absolutely divine. It might take a little time, but trust me, the payoff is more than worth it!
Ingredients
For the Graham Cracker Crust:
2 cups graham cracker crumbs (about 10-12 full graham crackers, finely crushed)
1/4 cup granulated sugar
1/2 cup (1 stick) unsalted butter, melted
For the Filling:
4 (8-ounce) blocks full-fat cream cheese, softened to room temperature
1 1/2 cups granulated sugar
1/4 cup all-purpose flour
1 teaspoon vanilla extract
1/4 cup sour cream, room temperature
1/4 cup heavy cream, room temperature
4 large eggs, room temperature
For the Optional Simple Glaze:
1/2 cup powdered sugar, sifted
1-2 tablespoons milk or lemon juice
Step-by-Step Instructions
Step 1: Preheat & Prep Pan
First things first, let’s get your oven and your pan ready. Preheat your oven to 350°F (175°C). You’ll need a 9-inch springform pan for this. Now, here’s a little trick I learned: wrap the outside of your springform pan tightly with a couple of layers of heavy-duty aluminum foil. This is crucial if you plan on using a water bath (which I highly recommend for even baking and preventing cracks!), but it’s also good practice even if you don’t. It helps keep any stray water out. Then, lightly grease the bottom and sides of the pan with butter or non-stick spray.
Step 2: Mix Dry Ingredients
In a medium bowl, combine your graham cracker crumbs and granulated sugar. Give them a good stir to make sure they’re evenly distributed. This might seem simple, but it ensures every bite of your crust has that perfect sweetness and crunch. If you’re making your own crumbs, I like to pulse them in a food processor until they’re fine, like coarse sand. It makes a more uniform crust.
Step 3: Mix Wet Ingredients
Now for the heart of the cheesecake! In a large bowl, you want to cream together your softened cream cheese and the granulated sugar until it’s incredibly smooth and fluffy. This is where your cream cheese *really* needs to be at room temperature; cold cream cheese will lead to lumps, and nobody wants a lumpy cheesecake! I usually whip mine with an electric mixer for a few minutes until there are no grainy bits left. Next, gently mix in the flour and vanilla extract. The flour acts as a stabilizer, helping to prevent the cheesecake from cracking and giving it that signature dense texture. After that, whisk in the sour cream and heavy cream until just combined. Again, make sure these are at room temperature, too!
Step 4: Combine
This is where we bring it all together, but gently! Add the eggs, one at a time, to the cream cheese mixture. Mix on low speed *just* until each egg is incorporated. Overmixing at this stage can incorporate too much air, which can lead to cracks as the cheesecake bakes and cools. You want a smooth, creamy batter, not something frothy. Scrape down the sides and bottom of the bowl with a spatula to make sure everything is thoroughly combined. The batter should look thick and luxurious.
Step 5: Prepare Filling
Actually, the filling is already prepared in Step 4! My apologies, sometimes my brain gets ahead of my fingers. This is the beautiful, pale yellow, luscious mixture we just created. It’s so tempting to just eat it with a spoon, but resist! This is the foundation of your incredible New York Cheesecake.
Step 6: Layer & Swirl
Pour about two-thirds of your glorious cream cheese filling into the prepared springform pan over the crust. Now, for the fun part – you can either swirl in some fruit puree (like raspberry or strawberry) or chocolate ganache into the remaining batter and then dollop it onto the cheesecake, or you can just pour the whole batch in for a pure, unadulterated cheesecake experience. If you’re swirling, use a knife or skewer to gently swirl the additions through the batter. Be careful not to over-swirl; you want distinct ribbons, not a muddy mess. If you’re going for the classic, just pour the entire batter into the crust. Smooth the top gently with an offset spatula.
Step 7: Bake
Now comes the “low and slow” part. Place your foil-wrapped springform pan into a larger roasting pan. Carefully pour hot water into the roasting pan, reaching about halfway up the sides of the springform pan. This is your water bath, and it creates a humid environment that helps the cheesecake bake evenly and prevents it from drying out or cracking. Carefully transfer the whole setup into your preheated oven. Bake for 60-75 minutes. You’re looking for the edges to be set, but the center should still have a slight wobble when you gently nudge the pan. It shouldn’t look soupy, but it shouldn’t be completely firm either. Don’t open the oven door too often!
Step 8: Cool & Glaze
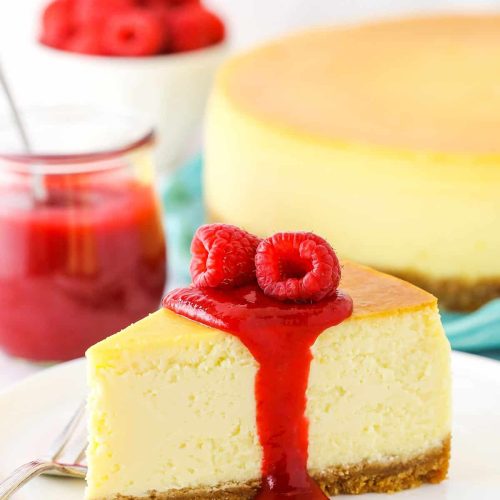
This is arguably the most important step for a perfect cheesecake, and it requires patience! Once the baking time is up, turn off the oven, but leave the cheesecake inside with the oven door slightly ajar (you can prop it open with a wooden spoon). Let it cool in the oven for about an hour. This gradual cooling helps prevent cracking. After an hour, carefully remove the cheesecake from the water bath and place it on a wire rack. Let it cool completely at room temperature. Once it’s fully cooled, cover it loosely with plastic wrap and refrigerate for at least 6 hours, or preferably overnight. The longer it chills, the better the flavor and texture develop. For the glaze: whisk together sifted powdered sugar and milk or lemon juice until smooth and pourable. Drizzle over the chilled cheesecake just before serving. A little goes a long way!
Step 9: Slice & Serve
The moment of truth! To get clean slices, run a thin, sharp knife under hot water, wipe it dry, and then slice. Repeat for each cut. This gives you those beautiful, clean edges. Serve chilled. This New York Cheesecake is wonderful on its own, but it’s also fantastic with a dollop of fresh whipped cream or some seasonal berries. The contrast of the cool, creamy cheesecake with a bit of fresh fruit is just perfection.
What to Serve It With
This New York Cheesecake is so versatile, it fits into almost any meal or occasion. For a leisurely breakfast, a small sliver alongside a strong, dark roast coffee is pure bliss. It’s rich enough that you don’t need much else to feel utterly decadent. For a more elaborate brunch spread, a beautifully sliced portion looks incredible next to fresh fruit salad, maybe some mini quiches or scones. I love pairing it with a mimosa or a sparkling rosé. When it’s time for dessert, this cheesecake is the star of the show. Imagine it after a hearty Italian dinner – it’s the perfect sweet ending. A sprinkle of cocoa powder or a drizzle of chocolate sauce takes it to another level. And for those cozy snacks when you just need something sweet and comforting, a small piece with a glass of milk or a warm cup of tea is just perfect. My family always requests this for birthdays, and we usually serve it with a simple strawberry sauce – it’s a tradition now! Sometimes, on a lazy Sunday afternoon, we’ll just have a slice with absolutely nothing else, and it’s pure comfort.
Top Tips for Perfecting Your New York Cheesecake
I’ve made enough New York Cheesecakes to fill a small bakery, and through trial and error (yes, there have been cracks!), I’ve picked up a few tricks that I swear by. For the crust, make sure your graham crackers are finely crushed. Little pea-sized chunks are fine, but avoid big, uneven pieces. Press the crumbs firmly into the bottom and slightly up the sides of the pan; a flat-bottomed glass is perfect for this. This helps create a sturdy base that won’t crumble when you slice it. For the filling, the key is softened, room-temperature ingredients. I can’t stress this enough! If your cream cheese is too cold, you’ll end up with lumps, and no amount of mixing will get them out. Take it out at least an hour before you start. When you add the eggs, mix on low speed and only until they’re just combined. Overbeating incorporates air, which expands during baking and then collapses, leading to cracks. When it comes to baking, the water bath is your best friend. It ensures gentle, even heat, preventing the edges from overbaking before the center is set. If you skip it, you run a much higher risk of cracks and uneven texture. My cooling process is also non-negotiable: the gradual cooling in the turned-off oven, followed by hours at room temperature, then refrigeration, is crucial for developing that signature dense, creamy texture and preventing those dreaded cracks. As for ingredient swaps, while this recipe is designed for full-fat cream cheese, if you *must* use a lighter version, be aware that the texture will be less dense and creamy. Some people experiment with a bit of lemon zest in the filling for an extra bright flavor, and I’ve found that adding about 1 teaspoon of lemon zest alongside the vanilla extract adds a lovely subtle citrus note without overpowering the cream cheese. For glaze variations, a simple berry coulis is always a winner, or a thin layer of melted dark chocolate is divine. Just make sure the cheesecake is fully chilled before adding any glaze or topping.
Storing and Reheating Tips
Proper storage is key to keeping your beautiful New York Cheesecake tasting its best. At room temperature, a fully baked and cooled cheesecake is usually safe to leave out for about 2 hours. After that, it really needs to go into the refrigerator, especially in warmer climates. For refrigerator storage, the best way is to wrap the entire cheesecake tightly in plastic wrap, or place it in an airtight container. It will stay delicious for about 5-7 days. The flavor actually tends to deepen over the first couple of days! If you’re looking to freeze portions, slice the cheesecake first. Wrap each slice securely in plastic wrap, then in aluminum foil or place them in freezer-safe bags. It can last for up to 2-3 months this way. To thaw, unwrap the slices and let them defrost slowly in the refrigerator overnight. Never try to thaw it at room temperature, as this can affect the texture. For the glaze, it’s always best to add it just before serving. If you’ve glazed the whole cheesecake and need to store it, the glaze might soften slightly in the fridge, but it’s usually still fine. If you plan on freezing, it’s better to store the cheesecake plain and add the glaze after thawing and chilling.
Frequently Asked Questions
Final Thoughts
I really hope you give this New York Cheesecake recipe a try. It’s the culmination of a lot of late-night baking sessions and taste tests, and I truly believe it delivers that authentic, rich, decadent slice you’re craving. It’s more than just a dessert; it’s a treat for the senses, a little slice of indulgence that feels incredibly special, yet surprisingly achievable. If you love classic desserts that really deliver on flavor and texture, this is the one. Don’t be intimidated by the process; take your time, follow the steps, and you’ll be rewarded with a cheesecake that’s truly unforgettable. If you enjoyed this recipe, you might also like my Classic Chocolate Chip Cookies or my Easy Apple Crumble. Happy baking, and please, please let me know in the comments how yours turns out! I love hearing about your kitchen adventures!
New York Cheesecake
Ingredients
Crust
- 1.75 cups graham cracker crumbs
- 6 tbsp salted butter, melted
- 2 tbsp sugar
Cheesecake
- 40 oz cream cheese, room temperature five 8 oz packages
- 1.75 cup sugar
- 3 tbsp all purpose flour
- 1 tsp lemon zest
- 4 tsp vanilla extract
- 0.5 cup heavy cream
- 5 large eggs, room temperature
- 2 large egg yolks, room temperature
Instructions
Crust
- Preheat oven to 325°F (163°C). Line a 9-inch (23cm) springform pan with parchment paper in the bottom and grease the sides.
- Combine the crust ingredients in a small bowl. Press the mixture into the bottom of the springform pan.
- Bake the crust for 8-10 minutes, then set aside to cool.
- Cover the outsides of the pan with aluminum foil so that water from the water bath cannot get in. Set prepared pan aside.
Cheesecake
- Reduce oven temperature to 300°F (148°C).
- In a large bowl, beat the cream cheese, sugar and flour on low speed until completely combined and smooth. Be sure to use low speed to reduce the amount of air added to the batter, which can cause cracks. Scrape down the sides of the bowl.
- Add the lemon zest and vanilla extract and mix on low speed until well combined.
- Add the heavy cream and mix on low speed until well combined.
- Add the eggs and egg yolks one at a time, mixing slowly to combine after each addition. Scrape down the sides of the bowl as needed to make sure everything is well combined.
- Pour the cheesecake batter into the crust. Your pan will be very full.
- Place the springform pan inside another larger pan. Fill the outside pan with enough warm water to go about halfway up the sides of the springform pan. The water should not go above the top edge of the aluminum foil on the springform pan.
- Bake for about 2 hours. The edges should be set and the center should be somewhat set, but still jiggly.
- Turn off the oven and leave the door closed for 30 minutes. The cheesecake will continue to cook, but slowly begin to cool as well.
- Crack the door of the oven for 30 minutes to allow the cheesecake to continue to cool slowly. This process helps prevent cracking.
- Remove the cheesecake from the oven and water bath wrapping and refrigerate until firm, 5-6 hours or overnight.
- Remove the cheesecake from the springform pan and place on a serving dish. Refrigerate cheesecake until ready to serve.
- Serve with your favorite toppings. Cheesecake is best when stored well covered and eaten within about 5 days.
Notes
Featured Comments
“This cheesecake looks absolutely divine! The rich, creamy texture is exactly what makes NY cheesecake so irresistible.”
“Absolutely love cheesecake! This recipe looks so smooth and rich—perfect for any special occasion. Can’t wait to try it!”
“Impressed! Clear steps and so flavorful results. Perfect for busy nights.”
“New favorite here — comforting. crowd-pleaser was spot on.”
“Super easy and turned out amazing! My family asked for seconds. Saving this one.”
“This sweet treat was absolutely loved — the rich really stands out. Thanks!”


Absolutely love cheesecake! This recipe looks so smooth and rich—perfect for any special occasion. Can’t wait to try it!
This cheesecake looks absolutely divine! The rich, creamy texture is exactly what makes NY cheesecake so irresistible.