You know those nights, right? The ones where your stomach is rumbling, you’re staring into the fridge with zero inspiration, and the thought of a full-blown, multi-step meal feels like climbing Mount Everest? That’s precisely when my mind always drifts to these incredible garlic oven fries. They’re not just fries; they’re little golden miracles that taste like they just came from your favorite diner, but made with love (and a whole lot less oil!) right in your own kitchen. Seriously, the aroma alone as they bake is enough to make my whole family appear as if by magic. Forget those sad, soggy oven-baked potato attempts you might have had; these are the real deal, the kind of crispy, fluffy, and intensely flavorful oven fries garlic dreams are made of. They’re so good, they can stand up to any fancy side dish, yet they’re ridiculously easy to whip up. It’s my go-to when I want maximum deliciousness with minimum fuss. This recipe has become a weeknight warrior in our house, a true lifesaver!
What are garlic oven fries?
So, what exactly are these magical things I’m raving about? Think of them as the ultimate upgrade to your standard baked potato. Instead of just tossing some potato wedges onto a baking sheet, we’re taking things up a notch by transforming them into perfectly crispy, golden-brown fries that are bursting with garlicky goodness. They’re essentially potatoes that have been cut into fry shapes, tossed in a flavorful coating that includes plenty of garlic (fresh and maybe a touch of powder, we’ll get to that!), and then baked at a high temperature until they’re irresistibly crisp on the outside and fluffy on the inside. It’s a simple concept, really, but the execution is what makes all the difference. The high heat and the specific coating create that coveted crunch you usually only get from deep-frying, but without all the mess or the guilt. It’s the perfect harmony of simple ingredients and smart cooking technique.
Why you’ll love this recipe?
Honestly, there are so many reasons why this recipe has earned a permanent spot in my kitchen rotation. First and foremost, the FLAVOR is out of this world. That punch of garlic, mellowed and toasted in the oven, combined with the natural sweetness of the potato and a hint of salt and pepper? It’s pure potato bliss. Then there’s the SIMPLICITY. I’ve tried so many recipes that promise crispy fries but end up being a multi-step nightmare. This one is so straightforward. You chop, you toss, you bake. That’s it. It’s a lifesaver on busy weeknights when the last thing you want is to be fussing over a complicated side dish. And let’s talk about COST-EFFICIENCY. Potatoes are incredibly budget-friendly, and the other ingredients are pantry staples. You get restaurant-quality results for a fraction of the price. What I love most about this is its VERSATILITY. These garlic oven fries aren’t just for burgers. They’re fantastic alongside grilled chicken, fish, or even as a base for loaded fries with cheese and bacon. My kids ask for these all the time, usually as a “treat” night side dish, and honestly, I don’t argue! They’re way better for you than their deep-fried counterparts, and they disappear in minutes at my house. If you love my Roasted Garlic Parmesan Broccoli with Parmesan Cheese.What is the same savory, comforting vibe with potatoes?
How to Make Garlic Oven Fries
Quick Overview
This is honestly as easy as it gets for such a crowd-pleasing dish. You’ll start by prepping your potatoes and giving them a good toss in a flavorful coating that sings with garlic. Then, you spread them out on a baking sheet and let the oven do its magic. The key is a nice, hot oven and giving them enough space so they can crisp up beautifully. It’s a simple, no-fuss process that results in the most addictive garlic oven fries you’ve ever had. No double-frying, no complicated steps, just pure, unadulterated potato perfection.
Ingredients
For the Main Event (The Potatoes):
I always opt for Russet potatoes for this. They have that perfect starchy interior that gets wonderfully fluffy when cooked. You can use Yukon Golds too, but Russets give you that classic fry texture. Aim for about 2 pounds, which usually means 3-4 medium-sized potatoes. Make sure they’re firm and free of any soft spots.
For the Irresistible Coating:
This is where the magic happens! You’ll need about 3 tablespoons of a good quality olive oil. I like extra virgin for the best flavor, but any olive oil will work. For the garlic, fresh is definitely best here. I mince about 4-6 cloves of garlic – adjust this to your own garlic-loving heart’s content! If you’re in a pinch, you can use 1 teaspoon of garlic powder, but fresh minced garlic really makes these shine. You’ll also need 1 teaspoon of dried rosemary (or 1 tablespoon of fresh, finely chopped), 1/2 teaspoon of smoked paprika for a little depth, salt, and freshly ground Black Pepper. I usually add about 1 teaspoon of salt and 1/2 teaspoon of pepper, but always taste and adjust!
Optional Flavor Boosts:
Sometimes, I like to add a pinch of cayenne pepper for a little heat, or a sprinkle of grated Parmesan cheese in the last 10 minutes of baking for an extra savory kick. Feel free to get creative!
Step-by-Step Instructions
Step 1: Preheat & Prep Pan
First things first, get that oven fired up to 425 degrees Fahrenheit (220 degrees Celsius). It’s crucial to have a nice hot oven for crispy fries. While it’s preheating, grab a large baking sheet. You can line it with parchment paper for super easy cleanup – trust me, this is a lifesaver! If you don’t have parchment, just a lightly greased baking sheet will do. The goal is to prevent sticking and encourage even browning.
Step 2: Prep the Potatoes
Now for the potatoes! Wash them thoroughly. For these garlic oven fries, I like to leave the skin on for extra texture and nutrients, but you can peel them if you prefer. Cut each potato in half lengthwise, and then cut each half into fry-shaped sticks, about 1/2 inch thick. Try to make them as uniform in size as possible so they cook evenly. Don’t worry if they’re not perfect steak-fry shapes; rustic is good!
Step 3: Mix the Flavor Coating
In a large bowl, whisk together the olive oil, minced fresh garlic, dried rosemary, smoked paprika, salt, and pepper. Give it a good stir to make sure the garlic and spices are well distributed in the oil. This is your flavor base!
Step 4: Toss to Coat
Add your cut potato fries to the bowl with the garlic-oil mixture. Using your hands (the best tool for this job!) or a spatula, gently toss the potato fries until they are all evenly coated. Make sure every single fry gets a good coating of that Delicious Garlic goodness. This step is key to getting that incredible flavor infused into every bite.
Step 5: Arrange on Baking Sheet
Spread the coated potato fries in a single layer on your prepared baking sheet. This is SUPER important for getting them crispy. If you overcrowd the pan, they’ll steam instead of roast, and you’ll end up with soggy fries. If you have too many potatoes for One Pan, use two! Give them some breathing room.
Step 6: Bake to Golden Perfection
Pop the baking sheet into your preheated oven. Bake for about 20-25 minutes. Then, carefully flip each fry using a spatula or tongs. This helps them get golden brown and crispy on all sides. Continue baking for another 15-20 minutes, or until they are tender on the inside and wonderfully crisp and golden brown on the outside. Keep an eye on them in the last 10 minutes, as ovens can vary!
Step 7: Rest (If You Can Wait!)
Once they’re done, carefully remove the baking sheet from the oven. Let them sit for just a minute or two. I know it’s tempting to dive right in, but this little rest helps them set up and become even crispier. You’ll notice the aroma filling your kitchen – it’s heavenly!
Step 8: Serve Hot
These garlic oven fries are best served immediately, piping hot, straight from the oven. They’re a glorious sight and smell! I like to serve them with a sprinkle of fresh parsley for a pop of color, but they’re perfect just as they are.
What to Serve It With
Oh, the possibilities are endless! For a classic breakfast that feels like a weekend treat, these fries are dynamite alongside scrambled eggs, crispy bacon, and a dollop of ketchup. They add a savory, comforting element that just makes the morning feel special. For a more elegant brunch, imagine these alongside some smoked salmon and a light dill cream cheese. They’re a fantastic, flavorful alternative to potatoes in any brunch spread, and they really elevate the whole meal. As a dessert? Well, maybe not a traditional dessert, but as a late-night snack that feels indulgent without being overly heavy, they’re perfect! Pair them with a simple dipping sauce like a sriracha mayo or a garlic aioli. For cozy snacks, they’re ideal. Serve them with burgers, grilled cheese sandwiches, or even just on their own with a side of your favorite dipping sauce. They’re also amazing served alongside my Sheet Pan Lemon Herb Roasted Chicken for a complete, fuss-free dinner. My kids love them with homemade chicken tenders, and honestly, I can’t blame them!
Top Tips for Perfecting Your Garlic Oven Fries
I’ve made these garlic oven fries more times than I can count, and over the years, I’ve picked up a few tricks that really make a difference. First, when it comes to potato prep, the KEY is to get them as dry as possible after washing and before cutting. Pat them really well with a clean kitchen towel or paper towels. Moisture is the enemy of crispiness! Also, when you’re cutting them, aim for consistent thickness. If you have some really thick ones and some super thin ones, the thin ones will burn before the thick ones are cooked through. For mixing, I always say, use your hands! It’s the best way to ensure every single fry is coated evenly with that delicious garlic oil mixture. Don’t be shy with the oil or the garlic; that’s where all the flavor comes from. When it comes to arranging them on the baking sheet, I cannot stress this enough: give them space! Overcrowding is the number one reason for soggy oven fries. If your baking sheet looks packed, use another one! Baking them at a high temperature, like 425°F, is also crucial. It mimics the intense heat of a deep fryer and gets them nice and crispy. I’ve experimented with lower temperatures, and the results just aren’t the same. Don’t be afraid to let them get deeply golden brown; that’s where the best flavor is! If you want to switch up the flavors, try adding a pinch of dried Italian herbs along with the rosemary, or even a little onion powder. For a Parmesan crust, I like to sprinkle grated Parmesan cheese over the fries during the last 10 minutes of baking. It gets wonderfully golden and adds a fantastic salty, cheesy note. And finally, remember that ovens can vary wildly! Keep an eye on your fries, especially during the last 15-20 minutes, and adjust the cooking time as needed. They should be tender inside and golden and crispy outside. Trust me, you’ll get the hang of it quickly!
Storing and Reheating Tips
Okay, so these garlic oven fries are definitely best enjoyed fresh, straight from the oven. That’s when they’re at their peak of crispiness. However, if you happen to have any leftovers (which is rare in my house, but it happens!), here’s how to store and reheat them so they’re still pretty darn good. For room temperature storage, I would say leave them out for no more than an hour or two. After that, they tend to lose their crispness quickly. If you have more than that, it’s best to refrigerate them. For refrigerator storage, let the fries cool completely on a wire rack before transferring them to an airtight container. This prevents them from steaming up and getting soggy. They should last in the fridge for about 2-3 days. When it comes to reheating, the microwave is NOT your friend here – it will just make them soft and sad. The best way to reheat them is back in the oven. Spread them out on a baking sheet in a single layer (again, space is key!) and pop them into a preheated oven at around 375-400°F (190-200°C) for about 8-10 minutes, or until they’re heated through and have regained some of their crispiness. You can also use an air fryer if you have one! Just air fry them at around 375°F for about 5-7 minutes, shaking the basket halfway through. They’ll come out surprisingly crispy! If you’re thinking about freezing these, it’s not ideal as they do lose a lot of their texture. However, if you absolutely must, let them cool completely, then spread them in a single layer on a baking sheet and freeze until solid. Once frozen, transfer them to a freezer-safe bag or container. They’ll be good for about a month, but expect them to be softer upon reheating. Honestly, though, I always aim to eat them all the first day because they are just *that* good!
Frequently Asked Questions
Final Thoughts
So there you have it – my absolute favorite way to make garlic oven fries. It’s a recipe that proves you don’t need to be a gourmet chef or spend hours in the kitchen to create something truly spectacular. These fries are a testament to the magic that happens when simple, good-quality ingredients are treated with a little heat and a lot of flavor. They’re crispy, they’re fluffy, and that garlic infusion is just pure comfort food bliss. They’re perfect for those nights you need a quick and satisfying side, but they’re also impressive enough to serve at a gathering. I really hope you give these a try. I’m confident they’ll become a favorite in your home too. If you loved this recipe, you might also enjoy my Crispy Baked Sweet Potato Fries for a different flavor profile. Can’t wait to hear how yours turn out! Let me know in the comments below if you try them and what you think – I love hearing your feedback and seeing your kitchen creations!
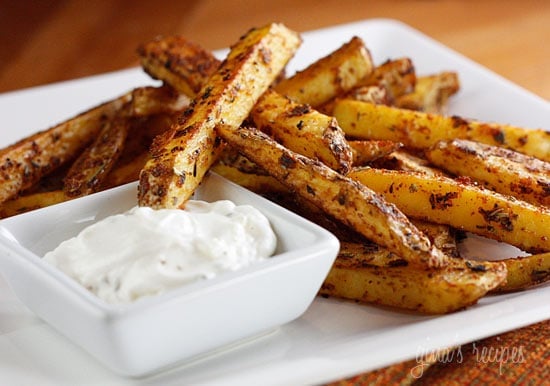
Oven Fries with Garlic
Ingredients
Fries
- 2 large potatoes (like Russet or Yukon Gold) washed and dried
- 2 tsp olive oil
- 1 tbsp herbs de Provence or a mix of dried rosemary, thyme, marjoram
- 0.25 tsp dried oregano
- 1 tsp smoked paprika
- 0.25 tsp chili powder
- 0.25 tsp onion powder
- 0.25 tsp garlic powder
- 0.25 tsp black pepper freshly cracked
- 0.5 tsp lime zest fresh
Garlic Aioli (Optional)
- 2 tbsp light mayonnaise
- 2 tbsp fat-free Greek yogurt
- 1 clove garlic crushed
Instructions
Preparation Steps
- Preheat oven to 400°F (200°C). Line a baking sheet with foil for easy cleanup.
- Wash and dry the potatoes. Cut each potato lengthwise into 1/4-inch thick slices, then cut each slice into 1/4-inch thick fries.
- In a large bowl, combine the cut potatoes and olive oil. Toss well to coat.
- Add the herbs de Provence, oregano, smoked paprika, chili powder, onion powder, garlic powder, and black pepper to the bowl. Toss to coat the fries evenly.
- Spread the seasoned fries in a single layer on the prepared baking sheet. Ensure they are not overcrowded for best crisping.
- Bake uncovered for about 20-25 minutes, or until the fries are tender on the inside and crispy on the outside. Flip them halfway through the baking time.
- While the fries are baking, prepare the garlic aioli (if using): In a small bowl, combine the light mayonnaise, Greek yogurt, and crushed garlic. Stir until well combined.
- Once the fries are done, remove them from the oven. Sprinkle with fresh lime zest. Serve hot with the garlic aioli on the side.
Notes
Featured Comments
“Impressed! Clear steps and super easy results. Perfect for busy nights.”
“New favorite here — absolutely loved. crowd-pleaser was spot on.”
“Super easy and turned out amazing! My family asked for seconds. Saving this one.”
“This sweet treat was absolutely loved — the balanced really stands out. Thanks!”
“Made it tonight and wow — crowd-pleaser! Will definitely make Crispy Oven Fries Easy Garlic Seasoning again.”
“Packed with flavor and so simple. Exactly what I wanted from Crispy Oven Fries Easy Garlic Seasoning.”


