


There’s just something about a warm, gooey brownie that makes everything feel a little better. I remember sneaking bites of my grandma’s brownies after school, the rich chocolate aroma filling the kitchen and making my heart happy. Honestly, these brownies are a little slice of childhood nostalgia for me—and honestly, the way they melt in your mouth still gets me every time. I’ve tried quite a few brownie recipes over the years, but I keep coming back to this one because it’s incredibly easy, ridiculously fudgy, and foolproof. Plus, they’re perfect for any occasion — whether it’s a quick afternoon treat or a last-minute party dessert. And trust me on this: once you try making these yourself, you’ll wonder why you ever bought that store-bought stuff. This recipe is sort of a family secret I love sharing—because everyone deserves a plate of heaven, right?
What is brownies?
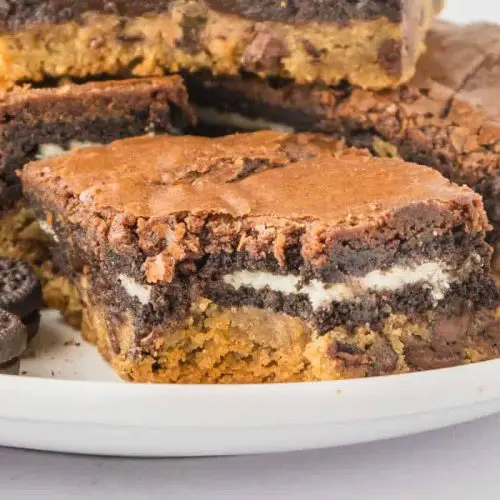
Think of brownies as the lovechild of cake and chocolate—rich, dense, and intensely chocolatey with a fudgy or cakey texture depending on your preference. They’re essentially an نوع of chewy chocolate bar baked in a pan, and their origins date back to the late 19th century when American cooks started experimenting with chocolate-based confections. Whether you call them brownies or chocolate squares, these treats are utterly versatile and have become a beloved staple in bakeries, homes, and potlucks all around the world. This particular recipe leans towards the fudgy side — think slightly gooey in the center, with a shiny crackly top that’s oh-so-satisfying to crack into. It’s basically chocolate comfort food at its finest, and believe me, once you bite into one, it’s hard to stop at just one!
Why do you love this movie?
What I love most about this brownie recipe is how simple it is—no fancy ingredients or complicated steps, but the result? Pure chocolate bliss. And it’s a total lifesaver on busy nights when you want something satisfying without hours of baking. The ingredients are all pantry staples: good quality cocoa, butter, sugar, eggs, and a little vanilla—nothing fancy, but the magic happens in the oven. Plus, these brownies are budget-friendly; you probably already have everything you need. And the best part? They’re super versatile. Want to add a handful of nuts? Swap the chocolate chips for chunks? Or swirl in peanut butter for a different twist? Done, done, and yum! I’ve made these countless times, and each batch disappears in minutes at my house. My kids actually ask for seconds—and I don’t blame them. The rich, fudgy texture combined with that deep chocolate flavor makes these brownies a guaranteed hit. If you love a good, dense brownie, you’re in the right place.
How do I make brownies?
Quick Overview
This brownie recipe is as straightforward as it gets. Start by melting butter and mixing in cocoa powder for that intense chocolate flavor. Whisk together eggs and sugar until sticky-sweet, then gently fold the dry ingredients into the wet. Pour half the batter into a lined baking dish, spread your choice of filling (like chocolate chips or caramel), swirl, then top with the remaining batter. Bake just enough to get that perfect crackly top and gooey center. The smell alone will draw everyone into the kitchen! Once baked, let them cool for a bit so they set up — then slice and serve. It’s quick, satisfying, and trust me, you’ll want to have this recipe bookmarked forever.
Ingredients
For the Main Batter:
- 1 cup unsalted butter, melted — trust me, melted butter makes everything richer
- 1 cup good quality cocoa powder — Dutch-processed if you can find it for deeper flavor
- 2 cups granulated sugar — because we want that sweet, indulgent hit
- 4 large eggs — at room temperature for easier mixing
- 1 teaspoon vanilla extract — for that warm, rounded flavor
- 1 1/2 cups all-purpose flour — I prefer unbleached for better taste
- 1/2 teaspoon salt — enhances all the chocolate notes
- 1/2 teaspoon baking powder — optional, for a slightly lighter crumb
For the Filling (Optional but Highly Recommended):
- 1 cup semi-sweet chocolate chips or chunks — for melty pockets of chocolate
- 1/2 cup caramel bits or swirl caramel sauce — if you want that gooey surprise
For the Glaze (Optional):
- 1/2 cup powdered sugar
- 1-2 tablespoons milk or cream
- A dash of vanilla or chocolate extract for extra flavor
Step-by-Step Instructions
Step 1: Preheat & Prep Pan
Set your oven to 350°F (175°C). Line an 8×8-inch baking pan with parchment paper or foil, leaving a little overhang on the sides—this makes it super easy to lift out the brownies later. Grease lightly if you like, but parchment is my favorite. Don’t rush this step; a well-prepped pan avoids sticking and messes when slicing.
Step 2: Mix Dry Ingredients
In a bowl, whisk together the flour, salt, and baking powder. This helps distribute everything evenly so your brownies bake uniformly. I’ve learned that overmixing isn’t a good idea, so I just do a quick stir until everything’s combined.
Step 3: Mix Wet Ingredients
In a large mixing bowl, whisk the melted butter and cocoa powder until they’re smooth and fragrant. Add the sugar and whisk until fluffy and shiny—this step really builds that glossy top. Then, one at a time, beat in the eggs, making sure each is fully incorporated before adding the next. Stir in vanilla for that cozy aroma. At this point, your batter will look thick and decadent.
Step 4: Combine
Gradually fold the dry ingredients into the wet using a spatula. Be gentle—overmixing can toughen the brownies. Stop when you see no more flour streaks but don’t go overboard. The batter should be thick but spreadable.
Step 5: Prepare Filling
If you’re using chocolate chips or caramel, sprinkle or dollop your filling over the batter now. I love adding chocolate chips because they melt slightly during baking, creating pockets of gooey goodness. For caramel, drop spoonfuls randomly, then swirl gently with a toothpick or skewer for a marbled effect.
Step 6: Layer & Swirl
Pour half of the batter into the pan, then add your filling on top. Cover with the remaining batter and gently swirl with a knife or skewer to create a marbled look. It’s super satisfying to see that beautiful pattern emerge. Trust me, this little step makes all the difference in flavor and presentation.
Step 7: Bake
Pop those brownies into the oven and bake for 25-30 minutes. Keep an eye on them—you’re aiming for a shiny crackly top and a slightly gooey center (a toothpick inserted in the middle should have moist crumbs). Don’t overbake; otherwise, they’ll lose that fudgy texture I adore.
Step 8: Cool & Glaze
Let the brownies cool in the pan for at least 15 minutes—this helps them set up perfectly. If you’re adding glaze, do it once they’re just warm but not hot so it doesn’t slide off. Mix powdered sugar with a splash of milk, pour over, and spread evenly. The glaze adds a lovely sweetness and a touch of elegance.
Step 9: Slice & Serve
Use the parchment overhang to lift the brownies out of the pan. Slice into squares with a sharp knife—warm them slightly for cleaner cuts if they’re too gooey. Serve on a pretty plate, maybe with a dollop of whipped cream or a few berries for contrast. These brownies are best enjoyed a little warm with a glass of cold milk or a steaming cup of coffee—trust me, that’s the ideal pairing.
What to Serve It With
These brownies are so versatile, they pair with just about anything. I love serving them for breakfast with a strong cup of black coffee—yes, breakfast dessert is a thing in my house! Or, for a brunch vibe, mound them with a scoop of vanilla ice cream and a drizzle of caramel sauce. As a finishing touch after dinner, add a dusting of powdered sugar and maybe some extra berries. When I want a cozy snack, I warm a brownie slightly and top it with a scoop of your favorite ice cream and chopped nuts—my kids ask for this all the time. It’s comfort food at its finest, and I promise, once you try this recipe, it’ll become your go-to for any sweet craving.
Top Tips for Perfecting Your Brownies
Over the years, I’ve picked up a few tricks to make sure your brownies turn out perfect every time. Here’s what I’ve learned:
- Butter & Cocoa: Make sure to use melted butter and sift your cocoa for a smoother batter. It avoids lumps and gives a deep chocolate flavor.
- Don’t Overmix: When combining dry and wet ingredients, fold gently. Overmixing leads to tougher brownies, and that’s the last thing we want.
- Ingredient Quality: High-quality cocoa and chocolate chips make a noticeable difference. It’s worth using good stuff here.
- Swirling & Filling: I like to add extra chocolate or caramel in layers for surprise pockets of flavor. Swirling confidently creates beautiful marbled effects, which makes these brownies even more tempting.
- Baking Time: Keep an eye on your oven since every one heats a little differently. Start checking at 25 minutes. A toothpick with moist crumbs means gooey perfection.
- Cooling: Resist the urge to slice hot brownies—they need at least 15 minutes cooling. Otherwise, they’ll fall apart when you cut.
- Glazing & Decorating: If adding glaze, do it when brownies are just warm. For extra flair, sprinkle some sea salt or chopped nuts on top before the glaze sets.
This recipe has been tested many times, and I’ve learned that patience and quality ingredients are your best friends. Little tweaks—like trying a splash of espresso powder—can elevate the flavor, but honestly, it’s hard to go wrong here. The secret is in the balance and the love you put into each step. Trust me, once you get the hang of it, a batch will be on your table in no time, ready to make everyone smile.
Storing and Reheating Tips
Leftover brownies? No problem! They store well if you keep them in an airtight container. At room temperature, they stay fresh for about 2-3 days—just keep them covered to prevent them from drying out. If you want to make them last longer, wrap them tightly with plastic wrap and pop them in the fridge for up to a week. Honestly, they’re still delicious cold or slightly warmed up. To reheat, just microwave a piece for about 15 seconds — the smell alone makes my mouth water. For longer storage, freezing is a great option. Wrap slices tightly in plastic wrap and then foil, and they’ll keep for up to 3 months. Thaw at room temperature or warm them briefly in the microwave. For the best presentation, add a fresh drizzle of glaze or a sprinkle of sea salt before serving if they’ve been stored.
Frequently Asked Questions
Final Thoughts
If you’ve been craving a chocolate fix that’s rich, chewy, and just the right amount of indulgent, look no further. This brownie recipe has become a staple in my house because it’s so forgiving yet utterly satisfying. From the moment you smell the cocoa in the oven to slicing that first warm square, I guarantee your heart—and taste buds—will be happy. Whether you enjoy them as is or add your favorite extras, these brownies never disappoint. I love experimenting with toppings, fillings, and flavor tweaks, so don’t be shy—make it your own! Happy baking, and I can’t wait to hear how yours turn out. Share in the comments or tag me in your photos—I’m always excited to see your creations!
brownies
Ingredients
Main Ingredients
- 1 box brownie mix (18.25 oz for 9x13 pan)
- 2 units eggs
- 0.666 cup oil
- 3 tbsp water
- 2 packages refrigerated chocolate chip cookie dough (16 oz each)
- 24 cookies Oreo cookies
Instructions
Preparation Steps
- Bring cookie dough to room temperature, approximately 30-60 minutes.
- Preheat your oven to 350°F.
- Coat the bottom and sides of a 9x13 inch baking pan with cooking spray.
- Layer the bottom of the pan with the cookie dough.
- Next, layer the Oreo cookies in approximately 6 rows of 4 cookies each.
- Mix the brownie mix according to package instructions and pour over the Oreo layer. It will form a thin top layer.
- Bake for 35-45 minutes. Use a toothpick to test if it is done.
- Remove from oven and allow cooling for 10-15 minutes before cutting into squares.
Notes
Featured Comments
“I totally get that! My grandma made the best brownies—so rich and fudgy. Every bite feels like a little comfort.”
“I totally agree—there’s nothing like a warm, fudgy brownie with that deep chocolate scent. My grandma used to make the best ones too!”
“Those brownies sound absolutely irresistible! I can totally picture the warm, gooey texture and rich chocolate smell—just what I’d need on a tough day.”
“Impressed! Clear steps and crowd-pleaser results. Perfect for busy nights.”
“New favorite here — creamy. crowd-pleaser was spot on.”
“Super easy and turned out amazing! My family asked for seconds. Saving this one.”


Those brownies sound absolutely irresistible! I can totally picture the warm, gooey texture and rich chocolate smell—just what I’d need on a tough day.
I totally agree—there’s nothing like a warm, fudgy brownie with that deep chocolate scent. My grandma used to make the best ones too!
I totally get that! My grandma made the best brownies—so rich and fudgy. Every bite feels like a little comfort.