

Oh, I’m so excited to share this with you! You know those moments when a craving hits, a really specific, intense craving, and nothing else will do? That’s exactly how I felt when I dreamt up this Thin Mint Cheesecake. It’s like the best of both worlds collided: the cool, creamy decadence of cheesecake meeting the bold, refreshing punch of those iconic chocolate-mint cookies. Honestly, it’s become my absolute go-to for impressing guests, or just for a ridiculously indulgent treat after a long week. Forget complicated desserts; this one is surprisingly manageable and the payoff is just… chef’s kiss. It’s the kind of dessert that makes people ooh and aah, and then you get to be all casual and say, “Oh, this old thing? I just whipped it up!” But really, it’s the Thin Mint Cheesecake magic. My kids, who are usually picky eaters, go absolutely bonkers for this. They always ask if it’s the “special chocolate cookie cheesecake” and I just have to smile.
What is a thin mint cheesecake?
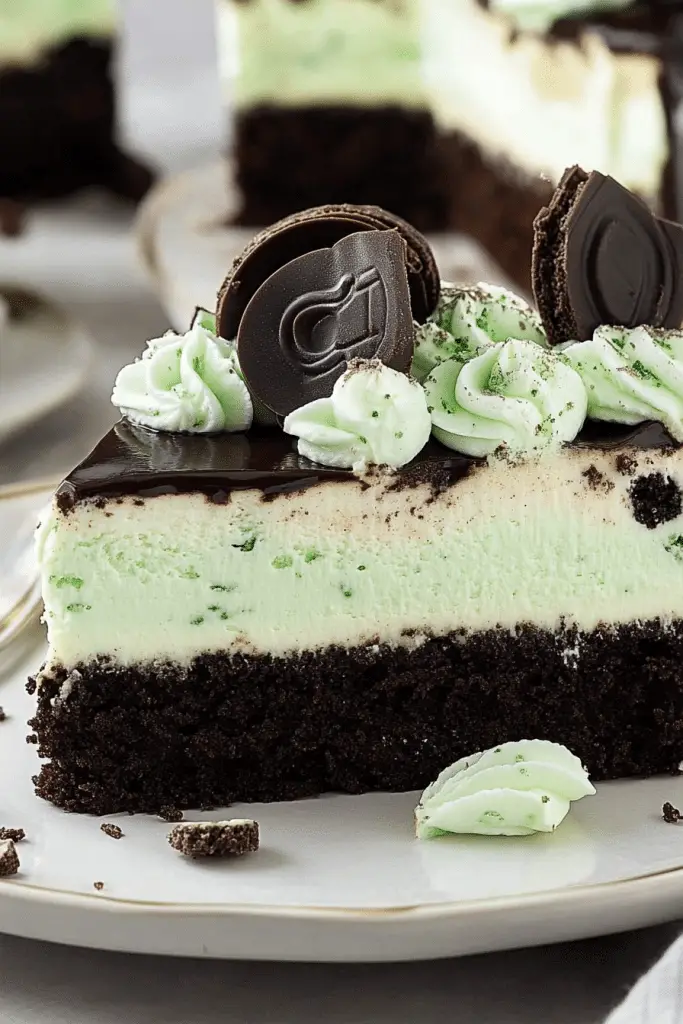
So, what exactly *is* Thin Mint Cheesecake? At its heart, it’s a luscious, rich cheesecake that’s been infused with the unmistakable flavor of Thin Mint cookies. Think of it as a classic New York-style cheesecake, but with a dreamy, minty twist. We’re talking a rich, creamy filling that’s got that perfect balance of sweet and just a hint of cool mint, all nestled on a buttery crust made from, you guessed it, those beloved chocolate-mint cookies. The name itself just rolls off the tongue and instantly tells you what you’re in for – pure bliss for anyone who loves both cheesecake and those little green-wrapped treasures. It’s not just a dessert; it’s an experience, a delightful homage to a cookie that holds a special place in so many of our hearts, mine included.
How do I make a thin crust cheesecake?
Quick Overview
This Thin Mint Cheesecake comes together in a few key stages: creating a crumbly cookie crust, whipping up a silky smooth cheesecake filling infused with mint, gently baking it to perfection, and finally, chilling it until it’s perfectly set. We’ll use some clever tricks to ensure a crack-free, incredibly creamy texture. The beauty of this method is how it highlights the unique flavor of the Thin Mint cookies without being overly complicated. It’s designed for success, ensuring you get that restaurant-quality dessert right in your own kitchen. You’ll be amazed at how straightforward it is!
Ingredients
For the Main Batter:
You’ll need about 2 ½ cups of finely crushed Thin Mint cookies (that’s roughly 25-30 cookies, depending on their size and how packed they are). I like to pulse them in a food processor until they’re like coarse sand, but you can also put them in a zip-top bag and get to work with a rolling pin – it’s quite therapeutic! For the binding, we’ll use ½ cup (1 stick) of unsalted butter, melted. Make sure your butter is good quality; it really does make a difference in the final flavor. For the cheesecake itself, you’ll need three 8-ounce packages of cream cheese, softened to room temperature. This is crucial for a smooth, lump-free batter, so don’t skip this step! I always take mine out at least an hour before I start. You’ll also need 1 ¼ cups of granulated sugar for sweetness, and 3 large eggs, also at room temperature, plus 1 egg yolk for extra richness. For that velvety texture, we’ll add 1 cup of sour cream, full-fat is best here, and 2 teaspoons of pure vanilla extract. And of course, the star of the show for the mint flavor: 1 to 1 ½ teaspoons of peppermint extract. Start with 1 teaspoon and taste your batter; you can always add a little more if you like a stronger mint flavor.
For the Filling:
The filling is where all the magic happens! As mentioned, we’re using three 8-ounce packages of cream cheese, softened, 1 ¼ cups granulated sugar, 3 large eggs and 1 egg yolk, 1 cup sour cream, 2 teaspoons vanilla extract, and 1 to 1 ½ teaspoons peppermint extract. I find that using a combination of the cookie crumbs in the crust and the extract in the filling gives you the most authentic and delightful Thin Mint flavor profile. If you want an extra boost of minty goodness, you can even stir in a few finely chopped Thin Mint cookies right into the batter at the very end, but be careful not to overmix.
For the Glaze:
This is optional but highly recommended for that extra pop of flavor and beautiful finish. You’ll need ½ cup of semi-sweet chocolate chips (or dark chocolate, if you prefer!) and 2 tablespoons of unsalted butter. Sometimes I add a tiny pinch of salt to the glaze to enhance the chocolate flavor, but that’s totally up to you. You can also use a few drops of green food coloring if you want that iconic Thin Mint look, but I usually let the chocolate do all the talking. For a mintier glaze, you can add just a *tiny* drop of peppermint extract, but be super careful – a little goes a very long way and you don’t want it to overpower the cheesecake.
Step-by-Step Instructions
Step 1: Preheat & Prep Pan
First things first, preheat your oven to 325 degrees Fahrenheit (160 degrees Celsius). You’ll need a 9-inch springform pan for this. I always like to grease the sides of my pan lightly with butter or cooking spray. Then, I take some parchment paper and cut a circle to fit the bottom. This is a little extra step, but it makes releasing the cheesecake so much easier later on, and it prevents any sticking. If you’re feeling extra fancy and want to avoid any water leaks in a water bath (more on that later!), you can wrap the outside of your springform pan tightly with a couple of layers of heavy-duty aluminum foil. This is a trick I learned after a slightly soggy bottom incident early in my baking adventures, and it’s a lifesaver!
Step 2: Mix Dry Ingredients
In a medium bowl, combine your finely crushed Thin Mint cookie crumbs. If you’re adding any sugar or salt to the crust, this is when you’d mix them in. I usually don’t add extra sugar to the crust because the cookies are already sweet enough, but you can certainly add a tablespoon or two if you like a sweeter base. Make sure your cookie crumbs are nice and fine; this helps them bind together better. Give them a good stir with a fork or whisk to ensure everything is evenly distributed.
Step 3: Mix Wet Ingredients
In a separate, larger bowl, cream together your softened cream cheese and granulated sugar. Use an electric mixer (handheld or stand mixer with the paddle attachment) on medium speed. Beat until the mixture is light, fluffy, and completely smooth, with no lumps of cream cheese visible. This might take a few minutes. Scrape down the sides of the bowl often to make sure everything is incorporated. Then, add your room temperature eggs and egg yolk, one at a time, beating well after each addition. Don’t overbeat once the eggs are in; you just want them incorporated. Finally, stir in the sour cream, vanilla extract, and peppermint extract until everything is just combined and smooth. Give it a taste – this is your chance to adjust the peppermint if needed. Remember, the flavor will mellow slightly as it bakes and chills.
Step 4: Combine
Now, we’ll prepare the crust. Pour the melted butter into the bowl with the crushed cookie crumbs and stir until all the crumbs are moistened and the mixture resembles wet sand. Press this mixture firmly and evenly into the bottom and slightly up the sides of your prepared springform pan. I like to use the bottom of a glass or a measuring cup to really pack it down; this helps create a sturdy crust that won’t crumble when you slice into it. Pop the crust into the freezer for about 10-15 minutes while you finish the filling. This also helps it set up nicely.
Step 5: Prepare Filling
For the filling, in a large bowl, beat the softened cream cheese on medium speed until it’s completely smooth and creamy. Gradually add the granulated sugar and continue beating until well combined and fluffy. Next, add the eggs, one at a time, beating on low speed just until each is incorporated. Overbeating after adding the eggs can lead to cracks, so be gentle! Stir in the sour cream, vanilla extract, and peppermint extract on low speed just until combined. Scrape down the sides and bottom of the bowl to ensure everything is evenly mixed. Taste the batter and adjust the peppermint extract if desired – remember, you can always add more, but you can’t take it away!
Step 6: Layer & Swirl
Pour about half of the cheesecake filling over the chilled cookie crust. If you want to add extra cookie pieces for texture, now’s the time to sprinkle some finely chopped Thin Mint cookies over this layer. Then, pour the remaining cheesecake filling on top, smoothing it out gently with an offset spatula. For that signature Thin Mint look, you can gently swirl in some extra cookie crumbs or even some melted chocolate. I like to just sprinkle a few extra crumbs on top and then use a toothpick to lightly swirl them into the surface. Don’t over-swirl; you want distinct layers, not a muddy mess. The goal is beautiful marbling that hints at what’s inside!
Step 7: Bake
Here’s the crucial part for a creamy, crack-free cheesecake: the water bath. Place your foil-wrapped springform pan into a larger roasting pan. Carefully pour hot water into the roasting pan until it comes about halfway up the sides of the springform pan. This helps the cheesecake bake gently and evenly. Carefully transfer the roasting pan to your preheated oven. Bake for 55-70 minutes, or until the edges are set but the center still has a slight wobble when you gently jiggle the pan. It will continue to set up as it cools. My oven tends to run a bit hot, so I usually start checking around the 55-minute mark. If you see any cracks forming, don’t panic; the glaze will cover them beautifully!
Step 8: Cool & Glaze
Once baked, turn off the oven, crack the oven door open slightly, and let the cheesecake cool inside the oven for about an hour. This gradual cooling process also helps prevent cracking. After an hour, carefully remove the cheesecake from the water bath and let it cool completely on a wire rack at room temperature. Once fully cooled, cover it loosely with plastic wrap and refrigerate for at least 6 hours, or preferably overnight. This is the hardest part – waiting! Once the cheesecake is thoroughly chilled and set, you can make the glaze. In a small microwave-safe bowl, combine the chocolate chips and butter. Microwave in 30-second intervals, stirring between each, until smooth and melted. If it’s too thick, add a tiny bit more butter or a splash of milk. Let it cool slightly, then drizzle or spread it evenly over the chilled cheesecake. For the most control, I like to use an offset spatula to spread it, ensuring an even coat.
Step 9: Slice & Serve
Once the glaze has set (this takes about 15-20 minutes at room temperature), you can carefully release the sides of the springform pan. For the cleanest slices, use a large, sharp knife dipped in hot water and wiped dry between each cut. This trick makes such a difference! Serve your glorious Thin Mint Cheesecake chilled. It’s truly best served cold, allowing all those flavors to meld together perfectly. You can add a few extra cookie crumbs around the edges or a fresh mint leaf for garnish if you’re feeling festive.
What to Serve It With
This Thin Mint Cheesecake is so versatile, it’s practically a chameleon! For a delightful breakfast treat (yes, I totally believe cheesecake can be breakfast!), I love pairing a smaller slice with a steaming mug of black coffee or a rich cappuccino. The bold coffee cuts through the richness beautifully. For a more elegant brunch spread, I serve it on a pretty tiered stand with fresh berries like raspberries or strawberries scattered around. A mimosa or a sparkling rosé is the perfect bubbly companion. As a show-stopping dessert, it’s divine on its own, but a drizzle of raspberry coulis or a dollop of whipped cream adds another layer of indulgence. For those cozy, late-night snack cravings, a small sliver with a glass of cold milk is pure comfort. My family has a tradition of having this for our “after-movie treat” on Friday nights, and it always feels special. We usually pair it with some dark chocolate squares, and the combination is just heavenly!
Top Tips for Perfecting Your Thin Mint Cheesecake
Over the years of making this (and countless other cheesecakes!), I’ve picked up a few tricks that I swear by. For the cookie crust, make sure you press it down *really* firmly into the pan. Use the bottom of a measuring cup or even a flat-bottomed glass. A well-compacted crust is key to preventing it from falling apart when you slice into that beautiful cheesecake. When you’re mixing the filling, remember that the key to a smooth, crack-free cheesecake is to avoid overmixing, especially after adding the eggs. Overbeating incorporates too much air, which can cause it to puff up and then collapse, leading to cracks. Mix on low speed and scrape down the bowl frequently. For the swirl, less is more! You want distinct ribbons of flavor and texture, not a muddled mess. A toothpick or a skewer is your best friend for creating beautiful patterns. If you’re worried about cracks, a water bath is your best friend. It creates a moist, steamy environment that helps the cheesecake bake gently and evenly. Make sure your springform pan is well-wrapped in foil if you use one, to prevent any water leakage. For ingredient swaps, if you can’t find Thin Mints (gasp!), you can use other chocolate sandwich cookies, but you might need to adjust the sugar in the crust slightly. For the mint extract, I’ve found that different brands vary in intensity, so it’s always best to start with the lower amount and taste your batter. You can always add a little more! And remember, patience is a virtue when it comes to cheesecake. Letting it chill thoroughly is non-negotiable for the best texture and flavor. I’ve learned that the hard way, trying to cut into it too soon is a recipe for disappointment!
Storing and Reheating Tips
Storing this Thin Mint Cheesecake is pretty straightforward, but there are a few things that will help keep it tasting amazing. If you happen to have any leftovers (a rare occurrence in my house!), you can store it at room temperature for up to 2 hours. After that, it’s best to refrigerate it. For refrigerator storage, cover the cheesecake tightly with plastic wrap or foil. It will stay fresh and delicious in the fridge for about 3-4 days. Make sure it’s well-covered to prevent it from absorbing any other odors. If you need to store it for longer, freezing is a great option. For freezing, I recommend slicing the cheesecake first. Wrap each slice tightly in plastic wrap, then place the wrapped slices in a freezer-safe airtight container or a heavy-duty freezer bag. Frozen cheesecake will last for about 1-2 months. To thaw, transfer the frozen slices to the refrigerator overnight. The glaze timing advice is important too: I always add the glaze *after* the cheesecake has fully chilled and is ready to be served or stored in the fridge. If you add the glaze before chilling, it can sometimes get a bit sticky or messy in the fridge. For freezing, it’s best to add the glaze after thawing, right before serving, to maintain its best texture.
Frequently Asked Questions
Final Thoughts
So there you have it – the ultimate Thin Mint Cheesecake! I really hope you give this a try. It’s one of those recipes that feels special and impressive, but is honestly so rewarding and manageable to make. It’s the perfect blend of creamy, dreamy cheesecake and that beloved, crisp minty cookie we all adore. It’s a recipe that brings smiles to faces, and isn’t that what baking is all about? If you’re a fan of the classic Girl Scout cookie, or if you’re just looking for a show-stopping dessert that’s surprisingly easy to pull off, this is definitely for you. I can’t wait to hear what you think! If you make it, please leave a comment below and let me know how yours turned out, or if you tried any fun variations. Sharing your creations always makes my day! Happy baking!
Thin Mint Cheesecake
Ingredients
Brownie Crust
- 18.3 ounces Fudge Brownie mix Duncan Hines brand
- 2 large eggs room temperature
- 0.67 cup vegetable oil
- 3 tablespoons water
Thin Mint Cheesecake Filling
- 16 ounces full-fat cream cheese softened to room temperature
- 1 cup powdered sugar sifted
- 0.75 teaspoon mint extract McCormick brand
- 0.5 teaspoon vanilla extract
- 7 drops liquid green food coloring McCormick brand
- 4 ounces frozen whipped topping thawed
- 1 cup chopped Thin Mint cookies from 12-13 cookies
Chocolate Ganache
- 1 cup semi-sweet chocolate chips Ghirardelli brand
- 0.5 cup heavy cream
- 0.25 teaspoon mint extract
Garnish
- 4 ounces frozen whipped topping thawed
- 7 Whole Thin Mint cookies cut in half
- 1 Green & white sprinkles
Instructions
Brownie Crust
- Preheat oven to 350°F. Line a 9-inch springform pan with a parchment round and spray the bottom and sides of the pan with baker’s spray. Set aside.
- In a large mixing bowl, whisk together the fudge brownie mix, eggs, vegetable oil, and water just until combined and no lumps remain. Do not over-mix, or your brownies will be tough.
- Transfer the brownie mix to the prepared springform pan and bake for 30-32 minutes or until a toothpick inserted in the center comes out clean or with just a couple of moist crumbs.
- Allow the brownie crust layer to cool completely on the counter while you prepare the thin mint cheesecake layer.
Thin Mint Cheesecake Layer
- Add the softened cream cheese to a large mixing bowl and beat, using a hand mixer on medium-high speed, for 1-2 minutes or until light and fluffy.
- Add the powdered sugar and beat again until fully incorporated.
- Add the mint extract, vanilla extract, and green food coloring to the cream cheese mixture. Mix on low speed just until all the cream cheese is uniformly colored green. Note that the cream cheese should be a slightly darker green than desired for the final cheesecake, as the whipped topping will lighten it.
- Fold in 4 ounces of thawed whipped topping just until no white streaks remain.
- Lastly, fold in the chopped thin mint cookies just until the cookies are evenly distributed in the cheesecake mixture.
- Spread the thin mint cheesecake mixture evenly over the cooled brownie crust layer. Use a small offset spatula to smooth the mixture into a smooth layer.
Chocolate Ganache Layer
- Add the semi-sweet chocolate chips and heavy cream to a microwave-safe bowl. Heat in the microwave on high for 1 minute. Allow the warm chocolate to sit for 1 minute, add the mint extract, then stir until smooth.
- Allow the chocolate ganache to cool to the touch before carefully pouring over the thin mint cheesecake layer and spreading it into a smooth layer. Be careful not to mix the ganache into the cheesecake layer.
- Refrigerate the thin mint cheesecake for 4 hours or up to overnight to allow the cheesecake layer to firm up.
- Before removing the outer ring of the springform pan, run a small sharp knife around the edges of the cheesecake to ensure no chocolate ganache sticks to the pan's outer ring.
Garnishing and Serving
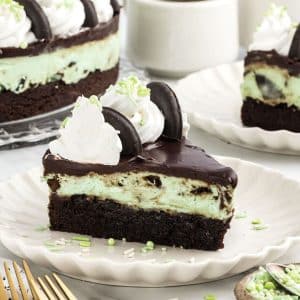
- When ready to slice and serve, add the remaining 4 ounces of thawed whipped topping to a large piping bag fitted with a large piping tip and pipe 14 decorative dollops around the outer edge of the cheesecake.
- Using a small sharp knife, cut seven Thin Mint cookies in half. Place a single half cookie between each of the whipped topping dollops.
- Sprinkle the whipped topping dollops with green and white sprinkles before slicing and serving.
Notes
Featured Comments
“I love cheesecakes, and mint is such a refreshing twist—definitely trying this soon!”
“Impressed! Clear steps and comforting results. Perfect for busy nights.”
“New favorite here — restaurant-level. crowd-pleaser was spot on.”
“Super easy and turned out amazing! My family asked for seconds. Saving this one.”
“This sweet treat was absolutely loved — the light really stands out. Thanks!”
“Made it tonight and wow — creamy! Will definitely make Delightful Mint Cheesecake Recipe again.”


