

Oh my goodness, where do I even begin with this Ding Dong cake? It’s one of those recipes that feels like a warm hug from the past, and honestly, it’s become my go-to for pretty much everything from a casual weekend treat to a showstopper for holidays. You know those Hostess Ding Dongs? The little chocolatey cakes with the creamy filling and that iconic chocolate coating? This is like the grown-up, infinitely better, totally homemade version. Forget those store-bought imposters; this Ding Dong cake is the real deal, and it’s surprisingly simple to whip up, which is a major win in my book. It’s also way more decadent and satisfying than you can imagine. When my kids get a whiff of this baking, you can bet they’re hovering in the kitchen, eagerly awaiting their slice. It reminds me so much of baking with my own mom when I was little, the kitchen filled with that irresistible chocolatey aroma. This cake has a way of bringing people together, and that’s what I love most about it.
What is a ding dong cake?
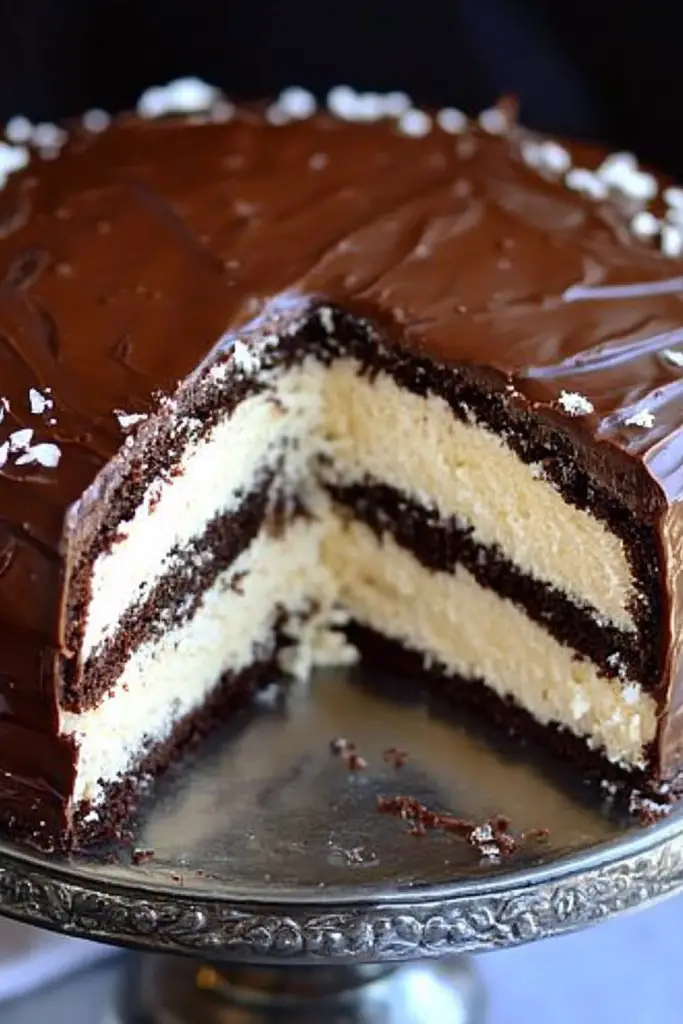
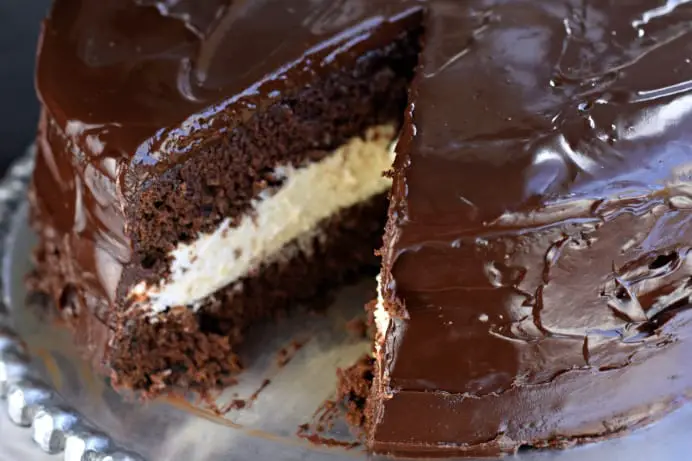
So, what exactly *is* a Ding Dong cake? Think of it as a glorious homage to those beloved snack cakes, but elevated to a whole new level. It’s essentially a moist, rich chocolate cake, often baked in a sheet pan or a couple of round pans, that gets filled with a luscious, creamy, marshmallow-y frosting. Then, the whole thing is enrobed in a decadent chocolate ganache or glaze. It’s not just a cake; it’s an experience! The name, of course, comes directly from the inspiration, those iconic little chocolate cakes. But making it at home means you control the quality of ingredients, the richness of the chocolate, and the perfect balance of sweetness and creaminess. It’s the kind of dessert that looks impressive but is honestly quite forgiving, making it perfect for beginners and seasoned bakers alike. It’s that perfect balance of familiar comfort and delightful indulgence.
How do I make a Ding Dong cake?
Quick Overview
Making this Ding Dong cake is a straightforward process that delivers spectacular results. You’ll start by mixing up a wonderfully moist chocolate cake batter. While that bakes, you’ll whip together a simple yet dreamy creamy filling. Once the cake is cooled, you’ll generously spread that filling over the top, and then it’s time for the grand finale: a luscious chocolate glaze that hardens just slightly, giving you that satisfying “snap” when you cut into it. It’s pretty much foolproof and incredibly rewarding, especially when you see everyone’s happy faces as they take their first bite.
Ingredients
For the Main Batter:
2 cups all-purpose flour: Make sure it’s fresh and not too old. Spoon and level it into your measuring cup for accuracy.
1 ¾ cups granulated sugar: This gives us that classic cake sweetness. You can reduce it slightly, but it might affect the texture a bit.
¾ cup unsweetened cocoa powder: Use a good quality one for the Best Chocolate flavor. Dutch-processed often gives a deeper color and smoother taste.
1 ½ teaspoons baking soda: This is our leavening agent, crucial for a nice rise.
1 ½ teaspoons baking powder: Works with the baking soda for that perfect, tender crumb.
1 teaspoon salt: Balances out the sweetness and enhances the chocolate flavor.
2 large eggs: At room temperature is best for better incorporation. I sometimes forget to pull them out early, and it’s okay, but room temp is ideal.
1 cup buttermilk: This is key for moisture and tenderness. If you don’t have buttermilk, you can make a substitute by adding 1 tablespoon of lemon juice or white vinegar to 1 cup of milk and letting it sit for 5-10 minutes. It works like a charm!
½ cup vegetable oil: Or any neutral-flavored oil like canola. This keeps the cake wonderfully moist.
2 teaspoons Vanilla Extract: Pure vanilla extract makes a big difference in flavor depth.
1 cup hot water or hot brewed coffee: Coffee really amplifies the chocolate flavor without making the cake taste like coffee. Don’t skip this if you can help it!
For the Filling:
8 ounces Cream Cheese, softened: Full-fat will give you the creamiest result. Make sure it’s nice and soft so there are no lumps.
½ cup unsalted butter, softened: Again, softened is key here for smoothness.
3-4 cups powdered sugar: Start with 3 and add more until you reach your desired sweetness and consistency. Sift it if you have time, it helps prevent lumps.
1 teaspoon vanilla extract: For that lovely hint of flavor.
2-3 tablespoons milk or heavy cream: Just enough to get the filling to a spreadable, luscious consistency. You can adjust this.
For the Glaze:
6 ounces semi-sweet or dark chocolate, chopped: I prefer semi-sweet for a balanced sweetness, but dark is wonderful too. Good quality chocolate makes a difference!
4 tablespoons unsalted butter: This makes the glaze super glossy and smooth.
1 teaspoon light corn syrup (optional): For extra shine and to prevent crystallizing.
½ teaspoon vanilla extract: Adds a subtle flavor note.
Step-by-Step Instructions
Step 1: Preheat & Prep Pan
First things first, preheat your oven to 350°F (175°C). I usually like to lightly grease and flour a 9×13 inch baking pan, or you can line it with parchment paper for extra insurance. This makes sure your beautiful cake doesn’t stick one bit. Trust me, wrestling a cake out of a pan is no fun!
Step 2: Mix Dry Ingredients
In a large bowl, whisk together the flour, sugar, cocoa powder, baking soda, baking powder, and salt. Give it a really good whisk until everything is thoroughly combined and there are no lumps of cocoa powder. This ensures an even distribution of leaveners and flavor throughout the cake.
Step 3: Mix Wet Ingredients
In a separate medium bowl, whisk together the eggs, buttermilk, oil, and vanilla extract until well combined. It should be a nice, smooth mixture.
Step 4: Combine
Pour the wet ingredients into the dry ingredients. Mix on low speed with an electric mixer (or by hand with a whisk) until just combined. Don’t overmix! This is where the magic happens: slowly pour in the hot water or coffee while mixing on low speed. The batter will be thin – don’t worry, that’s exactly what you want! It’s the secret to a super moist cake.
Step 5: Prepare Filling
While the cake is baking or cooling, let’s make that dreamy filling. In a medium bowl, beat the softened Cream Cheese and butter together until they’re light and fluffy. Gradually add the powdered sugar, about a cup at a time, beating well after each addition. Stir in the vanilla extract and then add the milk or cream, a tablespoon at a time, until you reach a smooth, spreadable consistency. You want it thick but easy to spread, kind of like a thick frosting.
Step 6: Layer & Swirl
Once your cake has cooled completely in the pan (this is important, otherwise the filling will melt!), you’ll spread the creamy filling evenly over the entire surface. Make sure to get it right to the edges. This is where it starts to look like that classic Ding Dong cake.
Step 7: Bake
Pour the batter into your prepared 9×13 inch pan. Bake for 30-35 minutes, or until a wooden skewer inserted into the center comes out clean. Ovens can be quirky, so start checking around the 30-minute mark. You want a fully baked cake, but not dry!
Step 8: Cool & Glaze
Let the cake cool in the pan for about 10-15 minutes before inverting it onto a wire rack to cool completely. Once it’s totally cool, spread the filling over the top. For the glaze, gently melt the chopped chocolate and butter in a heatproof bowl set over a saucepan of simmering water (a double boiler), or in the microwave in 30-second intervals, stirring in between. Stir until smooth. Mix in the corn syrup (if using) and vanilla extract. Pour the warm glaze over the cooled, filled cake and spread it evenly to cover the entire surface and sides. Let the glaze set for at least 30 minutes before slicing.
Step 9: Slice & Serve
Once the glaze has set, you can cut your Ding Dong cake into squares. I find a sharp knife dipped in hot water and wiped dry before each cut gives the cleanest slices, especially through the glaze. Serve it at room temperature for the best texture and flavor.
What to Serve It With
This Ding Dong cake is practically a meal in itself, but it pairs beautifully with a few things depending on the occasion. For breakfast, a simple slice with a hot cup of coffee is just divine. The richness of the cake is surprisingly satisfying to start the day, and that warm coffee cuts through the sweetness perfectly. For a more elegant brunch spread, I love serving smaller squares alongside fresh berries. The vibrant colors of the fruit look stunning against the dark chocolate, and it adds a refreshing counterpoint. For dessert, it’s a no-brainer. A small scoop of good quality vanilla bean Ice Cream or a dollop of lightly sweetened whipped cream takes it over the top. It’s also fantastic with a drizzle of raspberry coulis for a pop of tartness. And for those cozy, no-reason-to-celebrate-but-I-want-cake moments, it’s perfect on its own with a tall glass of cold milk. My kids always opt for the milk, of course!
Top Tips for Perfecting Your Ding Dong Cake
I’ve made this Ding Dong cake more times than I can count, and along the way, I’ve picked up a few tricks that really make a difference. For the cake batter, using hot coffee instead of hot water is a game-changer for intensifying that deep chocolate flavor. Don’t worry, you won’t taste coffee; it just makes the chocolate sing. When mixing the batter, remember that overmixing is the enemy of a tender cake. Mix just until the ingredients are combined; a few small lumps are perfectly fine. For the filling, ensure your cream cheese and butter are truly softened – not melted, but soft enough that your finger leaves an indentation easily. This guarantees a smooth, lump-free filling. If you find your filling is too stiff, a tablespoon or two of milk or cream will loosen it right up. When it comes to the glaze, chopping your chocolate finely and using good quality chocolate will result in a much smoother, glossier finish. If you want that super shiny look, the optional corn syrup really does help! I also learned the hard way that the cake MUST be completely cool before adding the filling and glaze. If it’s even slightly warm, the filling will melt and ooze out, and the glaze won’t set properly. Patience is key here! For ingredient swaps, if you don’t have buttermilk, the milk-and-vinegar trick is truly reliable. I’ve also tested using a gluten-free all-purpose flour blend with a 1:1 ratio, and it works out wonderfully, though you might need a touch longer to bake it. Don’t be afraid to adjust the powdered sugar in the filling to your preference; some people like it sweeter, some less so. Just taste and see!
Storing and Reheating Tips
This Ding Dong cake is pretty forgiving when it comes to storage, which is another reason I love it. If you have any leftovers (which is rare in my house!), you can store the uncut cake at room temperature, well covered, for about 2-3 days. Just make sure it’s in an airtight container or well-wrapped in plastic wrap to keep it from drying out. If you need to store it for longer, the refrigerator is your best bet. Keep it in an airtight container, and it should be good for up to a week. The texture might firm up a bit in the fridge, but it’s still delicious. Honestly, I usually end up eating it cold straight from the fridge, and it’s fantastic. If you plan to freeze it, I highly recommend doing so *before* you add the glaze. Wrap individual slices tightly in plastic wrap, then in foil, and they’ll keep for up to 2-3 months. Thaw them overnight in the refrigerator or at room temperature for a few hours. If you freeze the whole cake, it’s best to add the glaze after thawing for the freshest finish.
Frequently Asked Questions
Final Thoughts
So there you have it – my absolute favorite Ding Dong cake recipe! I truly believe this cake is a little slice of happiness. It’s got that nostalgic charm, that incredible chocolatey flavor, and that creamy filling that just makes everything feel right in the world. It’s perfect for birthdays, holidays, or just those days when you need a serious chocolate fix. Don’t be intimidated by making it at home; it’s much more straightforward than it looks, and the payoff is absolutely worth it. If you love this recipe, you might also enjoy my recipe for Fudgy Brownies or my Classic Chocolate Chip Cookies. They’re all about that comforting, homemade goodness. I really hope you give this Ding Dong cake a try. I can’t wait to hear what you think and see your creations! Happy baking, everyone!
Ding Dong Cake
Ingredients
Chocolate Cake
- 1.75 cup all-purpose flour
- 0.75 cup unsweetened cocoa powder
- 1.5 teaspoon baking soda
- 0.75 teaspoon baking powder
- 0.5 teaspoon salt
- 2 cup granulated sugar
- 2 large eggs
- 1 cup buttermilk
- 0.5 cup vegetable oil
- 1 teaspoon vanilla extract
- 1 cup hot water
Creamy Filling
- 8 ounce cream cheese, softened
- 0.5 cup unsalted butter, softened
- 3 cup powdered sugar
- 0.25 cup milk
- 1 teaspoon vanilla extract
Chocolate Ganache
- 12 ounce semi-sweet chocolate chips
- 1 cup heavy cream
Instructions
Preparation Steps
- Preheat oven to 350°F (175°C). Grease and flour two 9-inch round cake pans.
- In a large bowl, whisk together flour, cocoa powder, baking soda, baking powder, salt, and sugar.
- In a separate bowl, whisk together eggs, buttermilk, oil, and vanilla extract.
- Add the wet ingredients to the dry ingredients and mix until just combined.
- Gradually stir in the hot water until the batter is smooth.
- Pour the batter evenly into the prepared cake pans.
- Bake for 30-35 minutes, or until a wooden skewer inserted into the center comes out clean.
- Let the cakes cool in the pans for 10 minutes before inverting them onto a wire rack to cool completely.
- For the filling: Beat cream cheese and butter until smooth.
- Gradually add powdered sugar, alternating with milk, until smooth and creamy. Stir in vanilla extract.
- For the ganache: Place chocolate chips in a heatproof bowl. Heat heavy cream in a small saucepan until simmering.
- Pour hot cream over chocolate chips and let stand for 5 minutes. Whisk until smooth.
- Once cakes are completely cool, spread filling evenly over one cake layer. Top with the second cake layer.
- Pour ganache over the top of the cake, allowing it to drip down the sides.
- Chill for at least 30 minutes before serving.
Notes
Featured Comments
“I love how this recipe brings back such sweet memories—it tastes just like childhood! Definitely adding this to my baking list ASAP.”
“So nostalgic and delicious! I’ve been craving a cake like this for weeks—thanks for the inspiration!”
“Impressed! Clear steps and quick weeknight win results. Perfect for busy nights.”
“New favorite here — family favorite. crowd-pleaser was spot on.”
“Super easy and turned out amazing! My family asked for seconds. Saving this one.”
“This sweet treat was absolutely loved — the fresh really stands out. Thanks!”


So nostalgic and delicious! I’ve been craving a cake like this for weeks—thanks for the inspiration!
I love how this recipe brings back such sweet memories—it tastes just like childhood! Definitely adding this to my baking list ASAP.