


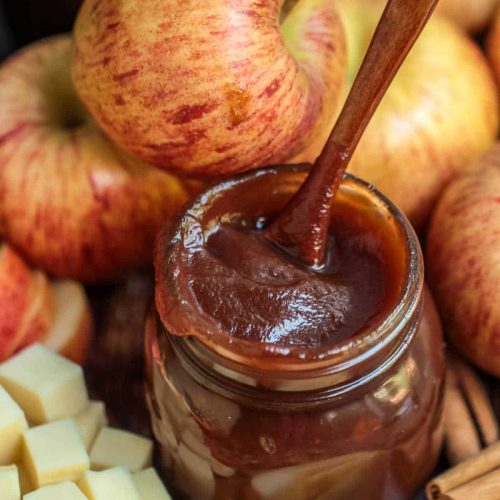
Oh, apple butter. Just the thought of it sends me back to crisp autumn days, the scent of woodsmoke in the air, and my grandmother humming in the kitchen. It’s more than just a spread; it’s pure, concentrated comfort. If you’ve ever thought apple butter was a complicated, time-consuming endeavor, let me tell you, I used to think so too! But over the years, I’ve found a way to make it that’s surprisingly simple and yields the most incredibly rich, deep flavor. It’s got that perfect balance of sweet and tart, with just a hint of spice that warms you from the inside out. Forget those store-bought versions that taste a bit… flat. This homemade apple butter is worlds apart, and honestly, once you try it, you’ll understand why it’s such a beloved classic. It’s what I reach for when I want to feel truly cozy, and it’s a lifesaver for using up those extra apples that somehow always seem to find their way into my cart.
What is Apple Butter?
So, what exactly is apple butter, and why does it have “butter” in the name when there’s no dairy involved? Think of it as the super-concentrated essence of apples, slow-cooked down until they’re smooth, spreadable, and incredibly flavorful. It’s essentially applesauce that’s been simmered for hours, reducing the liquid content and intensifying the natural sugars and apple flavor. The name “butter” likely comes from its smooth, buttery texture once it’s fully cooked and pureed. It’s not just a simple fruit spread; it’s a culinary alchemy that transforms humble apples into a decadent treat. It’s less about being a topping and more about being a flavor enhancer, a pantry staple that brings a little bit of sunshine to even the dreariest day. It’s pure apple goodness, concentrated and ready to be slathered on pretty much anything you can imagine!
How do I make Apple Butter?
Quick Overview
The whole process is really about slow and steady simmering. You’ll start by prepping your apples, then let them cook down with spices until they’re super tender. After that, a quick blend and a final slow simmer transform it into that luscious, spreadable apple butter we all adore. It’s remarkably straightforward – mostly hands-off time allowing the flavors to meld and deepen beautifully. The key is patience, but the results are absolutely worth every minute.
Ingredients
For the Main Apple Base:
4 pounds of apples (a mix of sweet and tart is best, like Honeycrisp, Gala, Fuji, and Granny Smith)
1 cup of water
1/4 cup of apple cider vinegar (this helps brighten the flavor and adds a lovely tang)
For the Spices:
2 teaspoons ground cinnamon
1/2 teaspoon ground allspice
1/4 teaspoon ground cloves
1/4 teaspoon ground nutmeg
1 cup of granulated sugar (or brown sugar for a deeper caramel note, adjust to your sweetness preference)
1 tablespoon Vanilla Extract
Step-by-Step Instructions
Step 1: Prepare the Apples
First things first, we need to get these apples ready. You don’t need to peel them, which is a huge time-saver! Just core them and chop them into roughly 1-inch pieces. The skins add wonderful color and nutrients, and they’ll break down so much during the long cooking process that you won’t even notice them. I usually use a mix of apples – maybe half sweet and half tart. It really gives the apple butter a more complex flavor profile. So, wash them well, chop away the cores, and toss them into a large, heavy-bottomed pot or Dutch oven. Trust me, a heavy pot is your best friend here to prevent scorching.
Step 2: Start the Simmer
Once your chopped apples are cozy in the pot, it’s time to add the liquid. Pour in the 1 cup of water and the 1/4 cup of Apple Cider vinegar. The vinegar might sound a little strange, but it really does help to balance the sweetness and give it that depth of flavor. Give it all a good stir, put a lid on the pot, and bring it to a boil over medium-high heat. Once it’s boiling, reduce the heat to low, just enough to maintain a gentle simmer. Let it cook, stirring occasionally, for about 20-30 minutes, or until the apples are very tender and easily pierced with a fork. They should be starting to break down on their own.
Step 3: Blend Until Smooth
Now comes the fun part – making it smooth! Carefully remove the pot from the heat. You can use an immersion blender directly in the pot to get it nice and smooth. Just be sure to hold it submerged to avoid splattering hot apple mixture. Alternatively, you can let it cool slightly and transfer it in batches to a regular blender. Blend until you have a completely smooth puree. If you prefer a slightly chunkier texture, you can pulse it a few times instead of going for fully smooth. I usually aim for super smooth because I love that luscious, buttery texture.
Step 4: Add Spices and Sugar
Back into the pot with your smooth apple puree! Now we add the flavor makers. Stir in the 2 teaspoons of cinnamon, 1/2 teaspoon of allspice, 1/4 teaspoon of cloves, and 1/4 teaspoon of nutmeg. I love this spice blend; it’s classic and comforting without being overpowering. Then, stir in your sugar – start with 1 cup. If you’re using brown sugar, it’ll give a lovely caramel note. Give it a good stir to combine everything. You can always taste and add more sugar later if you want it sweeter, but it’s always easier to add than to take away!
Step 5: The Slow Cook Down
This is where the magic truly happens. With the pot uncovered, bring the mixture back to a very gentle simmer over low heat. You want it to be just bubbling slightly around the edges. Now, you’ll let it cook, stirring very frequently to prevent sticking and burning, for anywhere from 1 to 3 hours, depending on how thick you want it. The longer it cooks, the thicker and darker it will become. You’ll notice it start to deepen in color, turning from a pale pink to a rich, caramel brown. The aroma filling your kitchen will be absolutely incredible! This slow simmering is what concentrates the flavors and gives the apple butter its signature rich taste. It’s a patient process, but truly worth it.
Step 6: Finish and Cool
Once your apple butter has reached your desired consistency – it should be thick and spreadable, coating the back of a spoon – stir in the tablespoon of vanilla extract. Give it one last good stir. Remove it from the heat and let it cool completely in the pot. As it cools, it will thicken even more. This is the hardest part: waiting for it to cool!
Step 7: Store Your Goodness
Once cooled, you can ladle your beautiful apple butter into clean jars or airtight containers. It’s best stored in the refrigerator, where it will keep for several weeks. If you’ve processed it properly in sterilized jars, you can even can it for longer shelf-stability, but honestly, it usually disappears from my fridge way before that becomes an issue!
What to Serve It With
Oh, the possibilities with this apple butter are endless! It’s not just for toast, though that’s a fantastic place to start. For breakfast, it’s divine slathered on warm pancakes, waffles, or even stirred into plain yogurt for a flavor boost. I love it on a toasted English muffin in the morning – it’s so quick and satisfying. For a more elegant brunch spread, imagine it alongside a cheese board, paired with sharp cheddar or creamy brie. It adds a delightful sweetness that cuts through the richness of the cheese beautifully. As a dessert, it’s wonderful dolloped on vanilla ice cream, swirled into pound cake batter, or even as a filling for simple tarts. My kids go crazy for it on Peanut Butter sandwiches; it’s a healthier, more flavorful alternative to jelly. And for those cozy, late-night snacks, a spoonful straight from the jar is pure comfort. Honestly, if you can dream it, you can probably enhance it with a bit of this apple butter!
Top Tips for Perfecting Your Apple Butter
Over the years, I’ve picked up a few tricks that make making apple butter even more foolproof. For the apples, don’t be afraid to experiment with different varieties. A mix of sweet and tart is key for balanced flavor, but feel free to lean more towards one if that’s your preference. If your apples are particularly juicy, you might need to simmer it a little longer to reach the desired thickness. When it comes to spices, this is where you can really personalize it. If you love ginger, a pinch of ground ginger can be wonderful. Some people add a tiny bit of cardamom for an extra aromatic touch. Taste as you go, especially after adding the sugar, and adjust to your liking. My biggest tip for the slow cook-down is to use the lowest heat possible and stir *very* frequently. I’ve learned the hard way that it can scorch easily if you let your attention wander for too long, and burned apple butter is a sad thing indeed. A good heavy-bottomed pot is an absolute non-negotiable for this step. If you’re worried about consistency, you can always cook it down a bit further after it’s cooled slightly, just to see how it thickens. And for storage, make sure your jars are super clean, and let the butter cool completely before sealing to prevent condensation. If you find it’s too thick after it’s cooled, you can always thin it out with a tiny bit of Apple Cider or water when you’re ready to use it.
Storing and Reheating Tips
Storing this homemade apple butter is pretty straightforward, and it keeps beautifully, which is why making a big batch is always a good idea. Once it’s completely cooled, transfer it to clean, airtight jars or containers. In the refrigerator, it should stay fresh and delicious for about 3 to 4 weeks. I often find myself finishing it up well before then because it’s just so addictive! If you’ve properly sterilized your jars and lids, you can water bath can it for longer shelf-stability, usually for up to a year. For reheating, if your apple butter has become quite firm in the fridge, just give it a stir. If it’s still too thick for your liking, you can gently warm it in a small saucepan over low heat, adding a tablespoon or two of apple cider or water to reach your desired consistency. For any of these storage methods, it’s always best to add any glazes or extra flavorings *after* you’ve stored and reheated it, just to maintain their freshness and texture.
Frequently Asked Questions
Final Thoughts
There you have it – my foolproof method for making the most delicious, comforting apple butter. It’s a recipe that truly embodies the warmth and sweetness of home cooking, and I just know you’re going to fall in love with it. The aroma alone is enough to make any day feel special, and the flavor is simply unmatched. It’s one of those recipes that makes you feel incredibly proud of what you can create in your own kitchen. If you enjoy recipes that bring a sense of nostalgia and pure, unadulterated flavor, I highly recommend giving this a try. And if you’re looking for more cozy autumn treats, you might want to check out my recipe for {{< wprm-recipe-link recipe=’6385′ text=’Spiced Pear Crumble’ >}} or my {{< wprm-recipe-link recipe=’7142′ text=’Pumpkin Bread with Cream Cheese Swirl’ >}}. I can’t wait to hear how your apple butter turns out! Please share your thoughts, any variations you try, or how you like to enjoy it in the comments below. Happy cooking!
Instant Pot Apple Butter
Ingredients
Main Ingredients
- 5.5 lb apples cored and chopped
- 1 cup brown sugar packed
- 0.75 cup granulated sugar
- 1 tbsp cinnamon
- 0.25 tsp ground cloves
- 0.25 tsp salt
- 2 tsp vanilla extract
Instructions
Preparation Steps
- Core and chop the apples into small pieces. Place them in a 6-quart Instant Pot.
- Add the brown sugar, granulated sugar, cinnamon, ground clove and salt to a small bowl. Stir to combine. Pour the mixture over the apples and mix well to coat the apples.
- Place the lid on the Instant Pot and turn to manual setting and pressure cook on high pressure for 90 minutes. Allow 10 minutes natural release before manually releasing any remaining pressure.
- Use an immersion blender to puree the apple mixture until completely smooth.
- Turn the Instant Pot to saute and allow the apple mixture to reduce. Stir until it reaches desired consistency.
- Stir in vanilla extract.
- Spoon the apple butter into sterile glass jars and cover with a lid.
Notes
Featured Comments
“Impressed! Clear steps and turned out amazing results. Perfect for busy nights.”
“New favorite here — quick weeknight win. crowd-pleaser was spot on.”
“Super easy and turned out amazing! My family asked for seconds. Saving this one.”
“This sweet treat was absolutely loved — the silky really stands out. Thanks!”
“Made it tonight and wow — perfect for busy nights! Will definitely make Easy Apple Butter in the Instant Pot again.”
“Packed with flavor and so simple. Exactly what I wanted from Easy Apple Butter in the Instant Pot.”


