


You know those recipes that just instantly feel like a warm hug? The ones that fill your kitchen with the most incredible aroma and have everyone asking, “What smells so good?” This apple delight dessert is exactly that for me. It’s my ultimate comfort bake, the one I turn to when I need something sweet but don’t have hours to spend in the kitchen. It’s so much easier than a full-blown Apple Pie, yet it delivers all those cozy, spiced apple flavors that just scream autumn (or any time you need a little cheer, really!). I first stumbled upon a version of this years ago, and after a few tweaks and personalizations, it’s become an absolute staple. It’s like a dreamy cross between a moist apple cake and a decadent crumble, and honestly, it’s usually gone within a day. If you love apple desserts, this apple delight dessert is about to become your new best friend.
What is an apple delicacy?
So, what exactly *is* this magical apple delight dessert? Think of it as a wonderfully forgiving, incredibly moist cake that’s studded with tender chunks of apple and topped with a delightful streusel-like topping that gets wonderfully crisp in the oven. It’s not quite a pie, not quite a crumble, and definitely not a cookie, but it borrows the best bits from all of them. The name “apple delight dessert” really does capture it perfectly – it’s pure delight! The beauty of it is that you don’t need fancy techniques or a pastry chef’s skill. It’s built on simple ingredients and straightforward steps, making it perfect for beginners and seasoned bakers alike. It’s the kind of dessert that feels homemade and special without the stress, which is my kind of baking.
How do I make Apple Delight Dessert?
Quick Overview
Making this apple delight dessert is a breeze! You’ll start by prepping your apples, then mixing up a simple cake-like batter. While that’s happening, you’ll whip up a quick, delicious topping. Everything gets layered into a baking dish and then baked until golden and bubbly. It’s truly that straightforward, making it an incredibly approachable recipe for anyone looking for a delicious homemade treat without a lot of fuss.
Ingredients
For the Main Batter:
I always make sure to use nice, firm apples for this. My go-to are Honeycrisp or Fuji because they hold their shape well and have a lovely sweet-tart balance. You’ll need about 3-4 medium apples, peeled, cored, and chopped into bite-sized pieces. If your apples are very juicy, you might want to let them sit in a colander for about 10 minutes after chopping to drain off some excess liquid – I learned that trick the hard way! You’ll also need 2 cups of all-purpose flour, 1 ½ teaspoons of baking powder for a nice lift, ½ teaspoon of baking soda to help with tenderness, and a pinch of salt to balance the sweetness. For the sweetness itself, 1 cup of granulated sugar works beautifully. And don’t forget the warmth: 1 teaspoon of ground cinnamon and a pinch of ground nutmeg. For the wet ingredients, you’ll need 2 large eggs, ½ cup of unsalted butter that’s been melted and slightly cooled, and ½ cup of milk. I’ve experimented with almond milk here, and it made the batter even creamier, which was a lovely surprise!
For the Filling:
This is where the apple magic really happens! You’ll use the chopped apples mentioned above. Sometimes, I like to toss them with an extra tablespoon of sugar and ½ teaspoon of cinnamon right before adding them to the batter. This really amps up that apple-cinnamon flavor and makes sure every bite is packed with it. It’s a little extra step, but it makes a noticeable difference!
For the Topping:
This is the crunchy, golden crown of our apple delight dessert! You’ll need 1 cup of all-purpose flour, ½ cup of packed brown sugar (light or dark, either works well for that caramel note), ½ teaspoon of ground cinnamon, and a pinch of salt. Then, you’ll need ½ cup of cold unsalted butter, cut into small cubes. This is what creates that lovely crumbly texture. For an extra bit of texture and flavor, I often add ½ cup of chopped pecans or walnuts to this topping. It’s totally optional, but oh-so-good!
Step-by-Step Instructions
Step 1: Preheat & Prep Pan
First things first, get your oven preheated to 375 degrees Fahrenheit (190 degrees Celsius). This ensures it’s nice and hot when your delicious creation is ready to bake. Grab an 8×8 inch (20×20 cm) baking dish. I like to lightly grease mine with butter or cooking spray, just to be safe, though it’s not strictly necessary if your dish is well-seasoned. Make sure you get into all the corners!
Step 2: Mix Dry Ingredients
In a medium-sized bowl, whisk together the 2 cups of all-purpose flour, baking powder, baking soda, salt, granulated sugar, cinnamon, and nutmeg. Whisking them together helps to distribute the leavening agents and spices evenly, so you don’t end up with pockets of baking soda or concentrated spice. You want everything to be perfectly blended for a consistent bake.
Step 3: Mix Wet Ingredients
In a separate, larger bowl, whisk together the 2 large eggs. Then, pour in the ½ cup of melted butter and the ½ cup of milk. Whisk until everything is well combined and smooth. The melted butter adds richness, and the milk helps create a tender crumb. Make sure your butter isn’t too hot, or it could scramble the eggs!
Step 4: Combine
Now, pour the dry ingredients into the bowl with the wet ingredients. Using a spatula or wooden spoon, gently fold them together until *just* combined. It’s really important not to overmix here! A few small lumps are perfectly fine. Overmixing develops the gluten in the flour, which can lead to a tough cake. We want tender and delicious!
Step 5: Prepare Filling
If you haven’t already, peel, core, and chop your apples into roughly ½-inch pieces. If you’re going for that extra flavor boost, toss the chopped apples in a separate bowl with an extra tablespoon of sugar and ½ teaspoon of cinnamon. This step is what makes the apple chunks burst with flavor throughout the dessert.
Step 6: Layer & Swirl
Add about half of your apple pieces to the batter and gently fold them in. Then, pour about half of the batter into your prepared baking dish and spread it out evenly. Sprinkle half of the remaining apples over this layer. Dollop the rest of the batter on top, making sure to cover as much of the apples as you can. Then, scatter the rest of your apple pieces over the top. This layering ensures apples and cake are in every bite!
Step 7: Bake
Pop the dish into your preheated oven. Bake for 35-45 minutes, or until a wooden skewer or toothpick inserted into the center comes out clean, and the top is a lovely golden brown. The edges should be pulling away slightly from the sides of the pan. If the topping starts to brown too quickly, you can loosely tent it with aluminum foil.
Step 8: Cool & Glaze
Once it’s baked, carefully remove the apple delight dessert from the oven. Let it cool in the pan for at least 15-20 minutes before attempting to slice or glaze. This is crucial for the dessert to set properly. While it’s cooling, you can whisk together a simple glaze: 1 cup of powdered sugar, 2 tablespoons of milk (or lemon juice for a tangier flavor), and ½ teaspoon of Vanilla Extract. Whisk until smooth. Once the dessert has cooled slightly, drizzle the glaze over the top. It will set up a bit as it cools further.
Step 9: Slice & Serve
This apple delight dessert is absolutely divine served warm. Cut it into squares directly from the pan. It’s perfect on its own, but I always recommend a scoop of good quality vanilla Ice Cream or a generous dollop of freshly whipped cream. The warm, spiced apples with the tender cake and creamy topping are just pure bliss!
What to Serve It With
This apple delight dessert is so versatile, it truly fits into almost any meal or occasion. For breakfast, imagine a slice still slightly warm with your morning coffee. It’s hearty enough to start your day off right, and the subtle sweetness is just enough to feel like a treat. On a weekend morning, it’s fantastic for brunch. I love to present it nicely in the pan, maybe with a few extra apple slices artfully arranged on top before the glaze. A mimosa or a sparkling cider pairs wonderfully. As a dessert, it really shines. Serving it warm with vanilla bean ice cream is my absolute favorite, but a dollop of crème fraîche or a drizzle of caramel sauce adds an extra layer of decadence. For cozy snacks, it’s perfect with a mug of hot apple cider or a warm cup of tea. My kids love it as an after-school snack, and it’s always a hit when I bring it to potlucks. It just makes people happy, and that’s what good food is all about, right?
Top Tips for Perfecting Your Apple Delight Dessert
Over the years, I’ve picked up a few tricks that make this apple delight dessert even better, or at least easier to get right. First, when it comes to the apples, don’t be afraid to use a mix of varieties if you have them! A tart apple like Granny Smith paired with a sweeter one like Gala can give a really lovely depth of flavor. And always, always chop them into roughly the same size pieces so they cook evenly. For the batter, remember my earlier tip about not overmixing – this is probably the most crucial step for a tender cake. Just mix until you don’t see any more dry flour streaks. When you’re preparing the topping, make sure your butter is cold and cut into small cubes. This is what creates those delicious, sandy crumbs. If you want to level up your topping game, adding those chopped nuts really does add a fantastic crunch that complements the soft cake and apples beautifully. My kids usually try to pick them out, so I often make a small separate batch without nuts for them, but for me, nuts are a must! For baking, ovens can be so different, so relying solely on the time can be tricky. Get to know your oven, and trust the toothpick test. A clean toothpick means it’s done! And if you’re worried about the topping browning too fast, a loose tent of foil is your best friend. Finally, for the glaze, consistency is key. If it’s too thick, add a tiny bit more milk or juice. If it’s too thin, whisk in a little more powdered sugar. It should be pourable but not watery.
Storing and Reheating Tips
This apple delight dessert is so good, you might find yourself with leftovers (though it rarely happens in my house!). If you do have some, it stores really well. At room temperature, it’s best enjoyed within a day or two. Just cover it loosely with plastic wrap or beeswax wrap to keep it from drying out too much. For longer storage, pop it into an airtight container in the refrigerator. It will stay fresh and delicious for up to 4-5 days. The flavors actually tend to meld together even more beautifully after a day or two! If you want to freeze it, I’ve had great success with this too. Let the dessert cool completely, then wrap it tightly in plastic wrap, followed by a layer of aluminum foil, or place it in a freezer-safe container. It should last for about 2-3 months in the freezer. To reheat, you can gently warm individual slices in the microwave for about 20-30 seconds, or for a whole piece, pop it in a low oven (around 300°F/150°C) for about 10-15 minutes until warmed through. I usually wait to add the glaze until *after* it’s cooled from being baked if I know I’ll be storing it, especially in the fridge, as condensation can make the glaze a little sticky. If I’m eating it the next day and it’s staying at room temp, I might glaze it before storing.
Frequently Asked Questions
Final Thoughts
This apple delight dessert truly is a gem. It’s the kind of recipe that brings joy to my kitchen and to my family’s table, and I’m so excited for you to try it. It’s proof that you don’t need complicated steps or fancy ingredients to create something incredibly delicious and comforting. It’s the perfect balance of tender, spiced apples and a cake-like base with that irresistible crunchy topping. If you’re a fan of this apple delight dessert, you might also enjoy my Spiced Pear Crumble or my Quick Berry Cobbler recipes – they have a similar homey, comforting vibe. I can’t wait to hear what you think once you’ve baked this! Let me know in the comments how yours turned out, and if you tried any fun variations. Happy baking!
apple delight dessert
Ingredients
Main Ingredients
- 2 cup graham cracker crumbs
- 3 tablespoon light brown sugar, packed
- 1 teaspoon cinnamon
- 7 tablespoon unsalted butter, melted
- 8 ounce cream cheese, softened
- 0.5 cup granulated sugar
- 1 teaspoon vanilla extract
- 16 ounce Cool Whip, thawed, divided divided (8 oz + 8 oz)
- 42 ounce apple pie filling two 21-ounce cans
- 0.25 cup chopped pecans for topping
Instructions
Preparation Steps
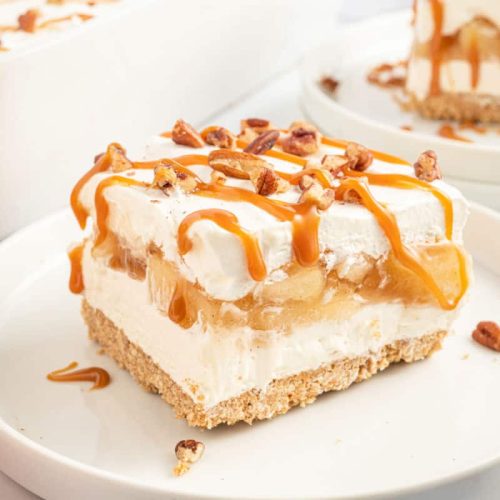
- For the crust, combine graham cracker crumbs with brown sugar, cinnamon, and melted butter until the crumbs are evenly coated. Press firmly in the bottom of a 13x9 baking dish. Freeze while you make the filling.
- For the filling, combine cream cheese with sugar, and vanilla. Beat until smooth, about 2-3 minutes. Fold in half of the Cool Whip (8 ounces) and spread this mixture over the frozen crust.
- Spoon apple pie filling over the cream cheese layer, arranging the apple slices evenly.
- Top with the remaining Cool Whip. Cover with plastic wrap and chill for at least 4 hours, or overnight.
- Before serving, sprinkle with chopped pecans (if desired). Serve cold.
Notes
Featured Comments
“Impressed! Clear steps and absolutely loved results. Perfect for busy nights.”
“New favorite here — quick weeknight win. crowd-pleaser was spot on.”
“Super easy and turned out amazing! My family asked for seconds. Saving this one.”
“This sweet treat was absolutely loved — the balanced really stands out. Thanks!”
“Made it tonight and wow — restaurant-level! Will definitely make Easy Apple Delight Dessert Perfection again.”
“Packed with flavor and so simple. Exactly what I wanted from Easy Apple Delight Dessert Perfection.”


