


I remember the first time I tried delicata squash—those vibrant, striped little beauties have a way of making everything feel a bit more special. When I discovered how ridiculously easy it was to turn them into a crispy, cheesy treat with just a few simple ingredients, I was hooked. This parmesan-crusted delicata squash recipe has become a staple at my house, especially on busy weeknights when I want something cozy, flavorful, and a little bit fancy without spending hours in the kitchen. Trust me, it’s even better than it sounds—think of it as a gourmet snack you can whip up in under 30 minutes, and my kids ask for it all the time. The magic lies in that perfect combo of sweet roasted squash contrasted with the crunchy, cheesy parmesan crust. Plus, it’s a sneaky way to get more veggies into the kids’ plates—they honestly have no idea they’re eating something healthy! This one’s a lifesaver on busy nights, and I promise once you try it, it’ll become a part of your regular rotation.
What is a delicata squash?
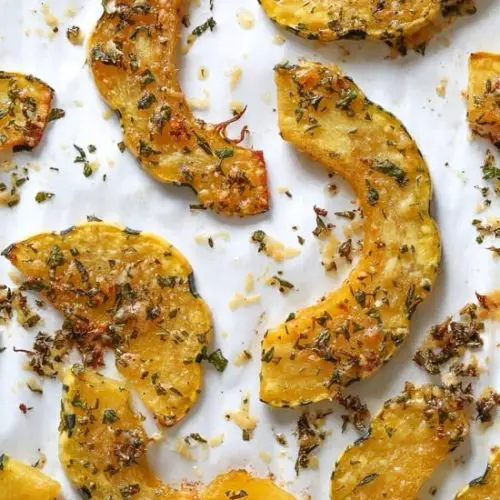
Think of parmesan-crusted delicata squash as a cozy, flavorful twist on roasted squash—think of it as a mash-up between roasted veggie goodness and a cheesy snack. Delicata is a smaller, edible-skin squash with lovely stripes and a delicate, sweet flavor. The beauty of this recipe is that you don’t need to peel the squash; its thin skin becomes crispy and adds to the texture. The squash slices are coated in a simple mixture of olive oil, grated parmesan, a little garlic powder, and some seasonings, then baked until golden and irresistibly crunchy. It’s essentially a fancy party snack, a side dish, or even a quick appetizer—whatever mood strikes you. Its name probably comes from how it’s both delicate and satisfying, with that cheesy crust giving it a touch of decadence without the fuss of breadcrumbs or heavy frying. That balance of sweet, salty, and crispy makes it a standout in my kitchen, and once you try it, you’ll see how it can elevate any meal.
How do you make delicata squash?
Quick Overview
This recipe is all about slicing your delicata squash, giving it a quick toss in olive oil and parmesan, then baking until crispy. It’s a straight-up game changer—no frying, no complicated breadings, just a simple seasoning mix that turns the humble squash into something irresistibly crunchy and cheesy. The key is to slice the squash evenly so everything bakes uniformly, and to watch it closely at the end so the parmesan doesn’t burn. I always do this when I need a quick side that feels fancy, and it’s a breeze to prep in just 10-15 minutes. Plus, the oven does most of the work, so I can relax while everything turns golden and fragrant. Once it’s out of the oven, that cheesy crust is just begging to be eaten—trust me, it’s addictive!
Ingredients
For the Main Batter:
– 2 medium delicata squashes, sliced into 1/4-inch rounds (try to keep slices uniform so they cook evenly)
– 2 tablespoons olive oil (extra virgin, of course! It makes a difference)
– 1/2 cup grated parmesan cheese (freshly grated for the best flavor)
– 1 teaspoon garlic powder
– 1/2 teaspoon smoked paprika (optional but adds smoky depth)
– Salt and freshly ground black pepper to taste
For the Filling:
– Extra parmesan for topping, if you like it extra cheesy
– Fresh herbs like thyme or parsley, chopped, for a fresh burst after baking
– Lemon wedge for a splash of brightness
For the Glaze:
– Not necessarily needed, but a drizzle of honey or balsamic glaze can add a sweet or tangy touch, respectively. I usually leave it out, but it’s a nice twist for serving.
Step-by-Step Instructions
Step 1: Preheat & Prep Pan
Heat your oven to 400°F (200°C). Line a baking sheet with parchment paper or a silicone baking mat—trust me, cleanup is a breeze, and nothing sticks. Set aside. While it preheats, wash your delicata squash—they don’t need peeling—and slice into evenly sized rounds. I like to use a sharp serrated knife because the skin can be a little tough, and I want those slices to be uniform for even roasting.
Step 2: Mix Dry Ingredients
In a small bowl, combine grated parmesan, garlic powder, smoked paprika, salt, and pepper. Mix well to distribute the flavors evenly. This helps create that delicious crust that gets perfectly crispy in the oven.
Step 3: Mix Wet Ingredients
In a large bowl, toss the squash slices with olive oil—make sure each slice gets coated well. I always do this when my kids are watching because it’s fun to see all those shiny slices coated with oil. You want each piece to be lightly slicked—you’re not looking for puddles, just enough to help the cheese stick and crisp up.
Step 4: Combine
Add the dry parmesan mixture to the bowl with the oiled squash. Gently toss everything together, using your hands or a spatula, until all the slices are evenly coated. Be gentle so the slices don’t break apart, but make sure each piece gets a nice cheesy coating.
Step 5: Prepare Filling
If you like, sprinkle extra parmesan over the slices or toss chopped herbs on top before baking. I usually do both because who doesn’t want more cheesy goodness and fresh flavors? You can also add a squeeze of lemon after they come out of the oven for a bright pop.
Step 6: Layer & Swirl
Lay the slices flat on your prepared baking sheet, making sure they aren’t overcrowded—give them some space to crisp up. If you want a pretty marbled effect, place some slices close, then gently give the sheet a little shake or use a fork to lightly swirl the cheese around a few slices during the latter part of baking. This adds visual interest and ensures every bite has that irresistible parmesan crust.
Step 7: Bake
Slide into your preheated oven and bake for about 20-25 minutes. Keep an eye on them—once the edges are golden and the parmesan has turned a touch crispy, it’s done. If you notice the cheese starting to burn, just turn the tray a little or lower the heat slightly. Everyone’s oven is different, so a little vigilance pays off.
Step 8: Cool & Glaze
Remove from the oven and let them cool for 5 minutes—I know it’s tempting to dive right in, but a little cool-down helps the crust firm up. If you’re adding a glaze or drizzle, do it now — honey or balsamic both work beautifully. Just a quick drizzle over the warm slices makes all the difference.
Step 9: Slice & Serve
Serve these crispy, cheesy slices on a platter with a sprinkle of fresh herbs or a squeeze of lemon. They are perfect warm, but honestly, they’re just as good at room temperature. My favorite way? Sitting on the patio with a cold drink, nibbling away, pretending I’m at a fancy restaurant. That crispy parmesan crust paired with the tender squash—yeah, it’s the kind of snack or side you keep coming back to!
What to Serve It With
This parmesan-crusted delicata squash is incredibly versatile. I love pairing it with a simple grilled chicken or fish for a weeknight dinner—it’s like the veggie version of a crispy chicken parmesan bite. On weekends, I sometimes serve it as a tapas-style appetizer with a big platter of olives, cheese, and cured meats. It’s also fantastic tossed into salads—think arugula, toasted walnuts, and a tangy vinaigrette for a crunchy, cheesy hit. My kids adore it on its own as a snack during movie night or packed into lunchboxes when I want something a little special. Honestly, the crispy parmesan topping makes everything feel indulgent, even when you’re just having a quick bite. It’s become a family favorite that disappears in minutes—I swear, even the veggie skeptics in my house come back for seconds!
Top Tips for Perfecting Your Parmesan-crusted delicata squash
After making this recipe countless times, I’ve gathered a few tricks to make it even better. First, when slicing the squash, I always remove the seeds and do a quick pat dry with paper towels. Extra moisture is the enemy of crispiness—trust me on this! I once skipped drying and ended up with a soggy crust, which was a total disappointment. A light coating of olive oil is key; too much and the crust won’t stick, too little and it’ll be dry. When mixing everything, be gentle and don’t overdo it; you want the cheese to stay on the surface rather than sinking into the squash. For a colorful twist, try adding some chili flakes or nutritional yeast to your cheese mixture—both add an extra flavor boost. I’ve also tested this with shredded manchego or pecorino instead of parmesan, and they work fantastically—just adjust the salt because some cheeses are saltier than others. When baking, oven positioning matters—center rack is best for even heat, and if your oven runs hot, lower the temperature slightly to avoid burnt cheese. Lastly, for an extra crispy crust, I flip the slices halfway through baking—this ensures both sides are perfectly toasted. Trust me on this—those little extra steps make all the difference!
Storing and Reheating Tips
Leftovers? No problem. Store any cooled slices in an airtight container in the refrigerator for up to 3 days. To keep the cheese crispy, I recommend reheating at 375°F for about 5-7 minutes—avoid microwaving if you want to preserve that crunch. If you want to save some for later, I suggest keeping the parmesan crust separate if possible, and adding it after reheating for maximum crispiness. Freezing is doable but not ideal—the crispness tends to soften once thawed. Wrap tightly in plastic wrap and store for up to a month, then reheat in the oven as mentioned. If you added a glaze or herbs, I recommend applying those fresh, right before serving, to keep the flavors vibrant. Honestly, this dish tastes just as fantastic reheated, especially if you aim for that crispy crust. The smell alone during reheating makes everyone gather in the kitchen, waiting for bites—so good!
Frequently Asked Questions
Final Thoughts
This parmesan-crusted delicata squash has truly become one of my favorite quick and delicious recipes. Its crispy edges, cheesy richness, and naturally sweet flavor make it a dish I never tire of. Whether served as a side for roast chicken, a snack on movie night, or tossed into a salad for crunch, it hits the spot every time. Honestly, it’s so simple yet looks and tastes like it took way more effort, which makes me feel like a kitchen magician each time I make it. I love how adaptable it is — you can experiment with different cheeses, add herbs, or even spice it up with chili flakes for a little heat. It’s a reminder that sometimes, it’s the humblest ingredients that turn into the most memorable bites. I can’t wait to hear how yours turns out—happy baking!
Parmesan-crusted delicata squash
Ingredients
Main Ingredients
- 14 oz delicata squash
- 1 tablespoon olive oil
- 1 clove garlic crushed
- 0.25 teaspoon kosher salt
- to taste black pepper
- 0.25 cup fresh grated parmesan
- 2 tablespoons finely chopped parsley
- 1 teaspoon finely chopped fresh thyme
- 0.5 teaspoon lemon zest
Instructions
Preparation Steps
- Preheat oven to 425°F. Line a large baking sheet with parchment and lightly spray with cooking spray.
- Slice the squash in half lengthwise and scoop out the seeds with a spoon. Slice into 1/4-inch thick rounds and place in a large bowl.
- In a small bowl, combine Parmesan, parsley, thyme, and lemon zest.
- Drizzle olive oil and add crushed garlic, salt, and black pepper over the squash slices. Toss well to coat.
- Lay the squash slices flat on the prepared baking sheet and sprinkle the Parmesan mixture evenly over the top.
- Bake for 25 minutes or until edges are crisp and golden brown.
Notes
Featured Comments
“Impressed! Clear steps and family favorite results. Perfect for busy nights.”
“New favorite here — family favorite. crowd-pleaser was spot on.”
“Super easy and turned out amazing! My family asked for seconds. Saving this one.”
“This sweet treat was absolutely loved — the zingy really stands out. Thanks!”
“Made it tonight and wow — family favorite! Will definitely make Easy Baked Butternut Squash with Parmesan again.”
“Packed with flavor and so simple. Exactly what I wanted from Easy Baked Butternut Squash with Parmesan.”


