

Could there be anything more satisfying than a crunchy, cheesy taco shell? I swear, nothing beats that perfect combination of crispness and flavor, especially when it’s homemade. I remember the first time I decided to bake taco shells rather than fry them—that simple shift totally changed the game. My kids ask for these all the time now, and honestly, I love how easy and quick they are to make. Plus, it’s a little healthier than deep-frying, but you still get that delightful crunch that makes every bite addictive. I always do this when I want a cozy family dinner or when friends swing by unexpectedly—these baked taco shells are a lifesaver on busy nights. Trust me, once you try baking your own shells, you’ll wonder why you ever bought those store-bought ones. They smell like warm corn and baked goodness that draws everyone to the kitchen. The best part? You can stuff them with anything—from classic beef to veggie-packed fillings—and they hold up beautifully. So, grab your ingredients, and let’s make some crispy, homemade baked taco shells that everyone will rave about!
What is baked taco shells?
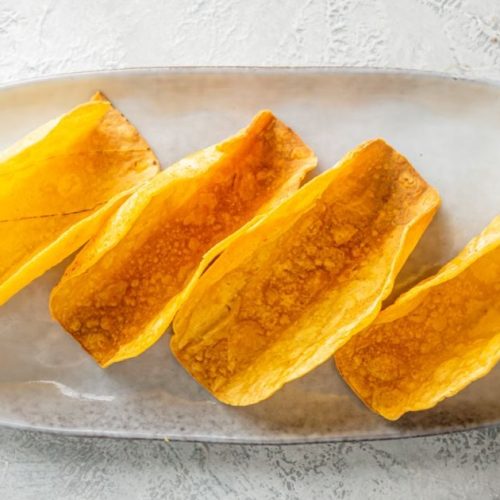
Think of baked taco shells as the smarter, healthier cousin of the traditional fried ones. They’re essentially corn tortillas that you shape into taco shells and bake until they’re perfectly crispy. The name “baked taco shells” is pretty straightforward—it’s a description of how they’re cooked, not fried in oil, which makes them a touch lighter but still incredibly crunchy. This method of baking gives the shells a fantastic crunch without all the greasy guilt. They’re great for making tacos, nachos, or even as crunchy edible bowls for salads and dips. I love that you can customize them, making them as plain or as flavorful as you like—sprinkling with a bit of seasoning before baking, for example, adds even more oomph! The idea actually isn’t new—people have been baking their shells for ages to avoid all that hot oil mess — but I definitely think it deserves more attention. Once you see how easy they are to make, you’ll never go back to store-bought again. Plus, it’s one of those simple swaps that feels like a small lifestyle upgrade—healthier, tastier, and way more fun to make from scratch.
How do I make Baked Taco Shells?
Quick Overview
This recipe is so easy I can’t believe I didn’t start doing it years ago. Basically, you warm up your tortillas, shape them into a cone, and place them on a baking sheet, then bake until golden and crisp. The secret is to avoid overbaking so they stay tender enough to hold fillings but crisp enough to bite through. It’s that simple! I love to add a little seasoning to the tortillas before baking for extra flavor, but even plain works beautifully. These shells are perfect when you want that crunch without the greasy aftermath of frying. You’ll love how quick they come together and how sturdy they hold up with various fillings—trust me, once you master this, it’s your go-to method for all taco nights!
Ingredients
For the Main Batter:
– Corn tortillas (fresh or day-old work perfectly, and I prefer yellow or white depending on what’s available) – about 8-10 for a family-sized batch
– Optional seasonings: chili powder, cumin, smoked paprika, or garlic powder for extra flavor
– Cooking spray or a light brush of oil (optional, for extra crispness)
For the Filling:
– Shredded cooked chicken, seasoned beef, or hearty bean mixes
– Fresh toppings like shredded cheese, chopped lettuce, diced tomatoes, sour cream, or guacamole
– Salsa or hot sauce for a bit of zing
For the Glaze (Optional):
– A spritz of lime juice or a dusting of chili powder before baking adds a little extra flair
Step-by-Step Instructions
Step 1: Preheat & Prep Pan
Preheat your oven to 375°F (190°C). Line a baking sheet with parchment paper or a silicone baking mat—it makes everything easier to clean up and helps the shells keep their shape. Keep your tortillas nearby; you’re about to shape magic!
Step 2: Mix Dry Ingredients
If you’re adding spices, mix them in a small bowl. I like to sprinkle chili powder and cumin onto my tortillas for a smoky flavor—they get crispy and fragrant while baking.
Step 3: Mix Wet Ingredients
If you’re using oil or lime juice, brush or spritz the tortillas lightly to help them crisp up. Sometimes, I even dip a paper towel in a bit of oil and lightly brush both sides — it makes them extra crunchy without overdoing it.
Step 4: Combine
Place tortillas on the prepared baking sheet. Using tongs or your hands, gently shape each tortilla into a cone or taco shape, pressing slightly to help them hold. Don’t worry if they crinkle a bit—that’s part of their charm. Fix any loose edges with a toothpick if needed.
Step 5: Prepare Filling
While the shells bake, prep your filling—seasoned meat, beans, or even veggie mixes. This part’s all about your personal favorite—think of it as the topping that makes each taco special.
Step 6: Layer & Swirl
If you want a marbled look or layered flavor, you can ladle a spoonful of batter or filling into each shell and swirl gently to create patterns. I do this with some sweet fillings too—strawberry jam or cream cheese, for example, for a little breakfast twist.
Step 7: Bake
Pop your shells into the oven and bake for about 12-15 minutes. Watch them closely towards the end – they should turn golden and firm. If they puff up too much, just gently flatten them with the back of a spatula—they’ll settle as they cool.
Step 8: Cool & Glaze
Once baked, let the shells sit for a few minutes to cool slightly. If you’re adding a glaze or a squeeze of lime, do it while they’re still warm for maximum flavor penetration.
Step 9: Slice & Serve
Serve these crispy baked taco shells upright filled with your favorite ingredients. You can also fold them gently if you want smaller, snack-sized bites. Keep some extra fillings and toppings on hand—leftover taco shells are perfect for a make-your-own station or quick snack later!
What to Serve It With
These baked taco shells are pretty much a blank canvas, so you can serve them with anything that tickles your fancy. For a quick weeknight dinner, a big batch of seasoned ground beef, salsa, and shredded cheese makes a classic combo. I love assembling a colorful taco bar for my family—letting everyone fill and top their shells exactly how they like. Think of it as a DIY taco night that everyone’s excited about. These shells work beautifully with vegetarian fillings too—black beans, corn, bell peppers, and a sprinkle of queso make for a hearty, flavorful meal. If I’m feeling fancy, I like to serve them with a side of Mexican street corn salad or fresh cucumber salad for added crunch. And for breakfast, I load them with scrambled eggs, avocado, and a drizzle of hot sauce—trust me, it’s the best way to start your day! No matter how I serve them, these shells are a hit. They’re perfect for casual family dinners, friendly get-togethers, or even packed lunches. Just fill them up, bake, and enjoy—their crunchy goodness is always a crowd-pleaser.
Top Tips for Perfecting Your Baked Taco Shells
Once I started experimenting, I realized a few things make a huge difference. First, always choose tortillas that are a little stale or even a day old; they roll and bend easier without cracking. I learned that brushing a little oil or lime juice onto each tortilla before baking helps them crisp evenly and adds a lovely flavor. Overbaking is a small trap—I used to leave them in too long, and they’d turn too hard, making biting a challenge. Now, I set the timer for 12 minutes, then check—they’re done when they turn a lovely golden hue and feel crispy but still hold a slight bend. Swirling batter or fillings adds visual interest, but I keep it simple most times. A tip I swear by: adding a pinch of sugar or cinnamon when I’m making sweet versions gives a subtle flavor boost. For substitutions, I’ve tried almond flour tortillas, and surprisingly, they’re pretty good—just watch them carefully so they don’t get too fragile. Also, I highly recommend baking on a rack if possible—air circulates better, and you get an even crisp. These little tricks have made me feel like a pro in the kitchen, and I promise they’ll work wonders for your tacos too.
Storing and Reheating Tips
If you have leftovers—or want to make them in advance—here’s what works best for me. Store cooled baked shells in an airtight container or zip-top bag at room temperature for up to a day—just keep them covered to prevent softening. For longer storage, refrigerate in a sealed container for 2-3 days; just re-crisp in a warm oven for a few minutes, or a quick blast in the toaster oven. Freezing is also an option—wrap each shell tightly in plastic wrap and store in a freezer-safe bag for up to a month. Thaw at room temperature or warm in a low oven before filling. A little tip: add the glaze or toppings fresh—if you’re using cheese or sour cream, best to add just before serving so they stay fresh. I like to reheat shells on a wire rack in the oven at 375°F for 5-7 minutes—this keeps them crispy. Honestly, they reheat beautifully this way, and my family never complains about sogginess. Just avoid microwaving them directly because they tend to get chewy; better to give them that gentle re-bake for maximum crunch. Trust me, with these tips, your baked taco shells stay crispy and delicious even days later.
Frequently Asked Questions
Final Thoughts
This recipe for baked taco shells has truly become a staple in my kitchen. They’re simple, flavorful, and customizable—plus, they’re the kind of thing everyone secretly wishes was around more often. There’s something so satisfying about knowing you made these from scratch, shaping each shell and watching it turn crisp in the oven. It’s a small act of love that makes taco nights feel extra special. I hope you give these a try and find yourself making them weekly—trust me, your family will thank you! If you experiment with fillings or seasonings, I’d love to hear about your favorites in the comments. Don’t forget to share your pictures—nothing beats a stack of perfectly baked shells ready to be filled with everything you love. Happy baking, and enjoy every crunchy, cheesy bite!
baked taco shells
Ingredients
Main Ingredients
- 8 taco shells corn tortillas
- 1.5 tablespoons olive oil
- 0.5 teaspoon salt
Instructions
Preparation Steps
- Preheat the oven to 375 degrees F.
- Brush each tortilla lightly with olive oil and sprinkle with salt.
- Arrange on a baking sheet and bake for 10-15 minutes until crispy.
- Remove and let cool before filling or serving.
Notes
Featured Comments
“I love making these at home—they’re way better than store-bought! Do you have a favorite filling to pair with them?”
“Impressed! Clear steps and spot on results. Perfect for busy nights.”
“New favorite here — comforting. crowd-pleaser was spot on.”
“Super easy and turned out amazing! My family asked for seconds. Saving this one.”
“This sweet treat was absolutely loved — the hearty really stands out. Thanks!”
“Made it tonight and wow — crowd-pleaser! Will definitely make Easy Baked Taco Shells How to Make Them again.”


I love making these at home—they’re way better than store-bought! Do you have a favorite filling to pair with them?