

The Ultimate No-Bake Banana Pudding Bars
Hey friends! If you’re anything like me, when the weather starts warming up, the absolute last thing you want to do is turn on your oven. But the cravings for a sweet, comforting dessert? Oh, those never magically go away. Enter my current obsession: Banana Pudding Bars. I remember the very first time I made these for a family cookout. They vanished before I could even grab a slice for myself!
There is just something incredibly nostalgic about the flavor of classic banana pudding. It takes me straight back to childhood potlucks and lazy Sunday dinners at my grandma’s house. But let’s be real, traditional banana pudding can get a little messy to serve. That is exactly why I decided to transform those beloved flavors into a neat, sliceable, totally irresistible bar. It has that buttery vanilla wafer crust we all fight over, loads of fresh bananas, and a fluffy, creamy pudding layer that tastes like pure heaven. Seriously, if heaven was a dessert, it would probably look exactly like this. Grab your favorite mixing bowl, and let’s make some magic happen in the kitchen!
What Are Banana Pudding Bars?
Basically, these are the fun, handheld cousin of the classic Southern dessert we all know and adore. If you have never had a banana pudding bar before, you are in for a massive treat. Instead of layering everything in a giant trifle dish where it turns into a delicious (but chaotic) scoopable mess, we are building those exact same layers in a standard 9×13 baking pan.
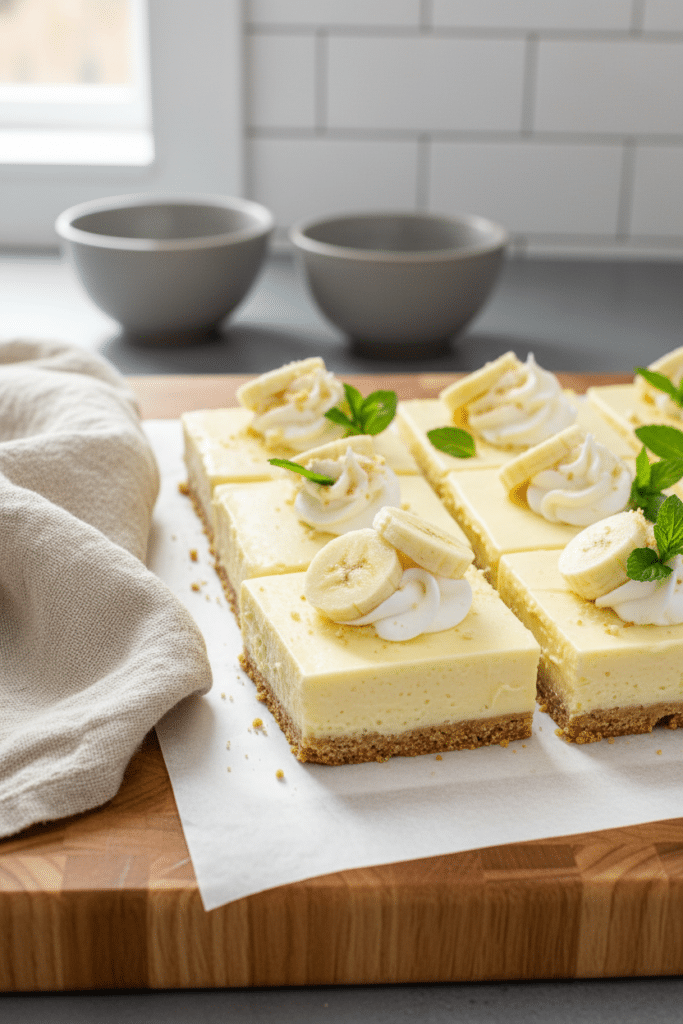
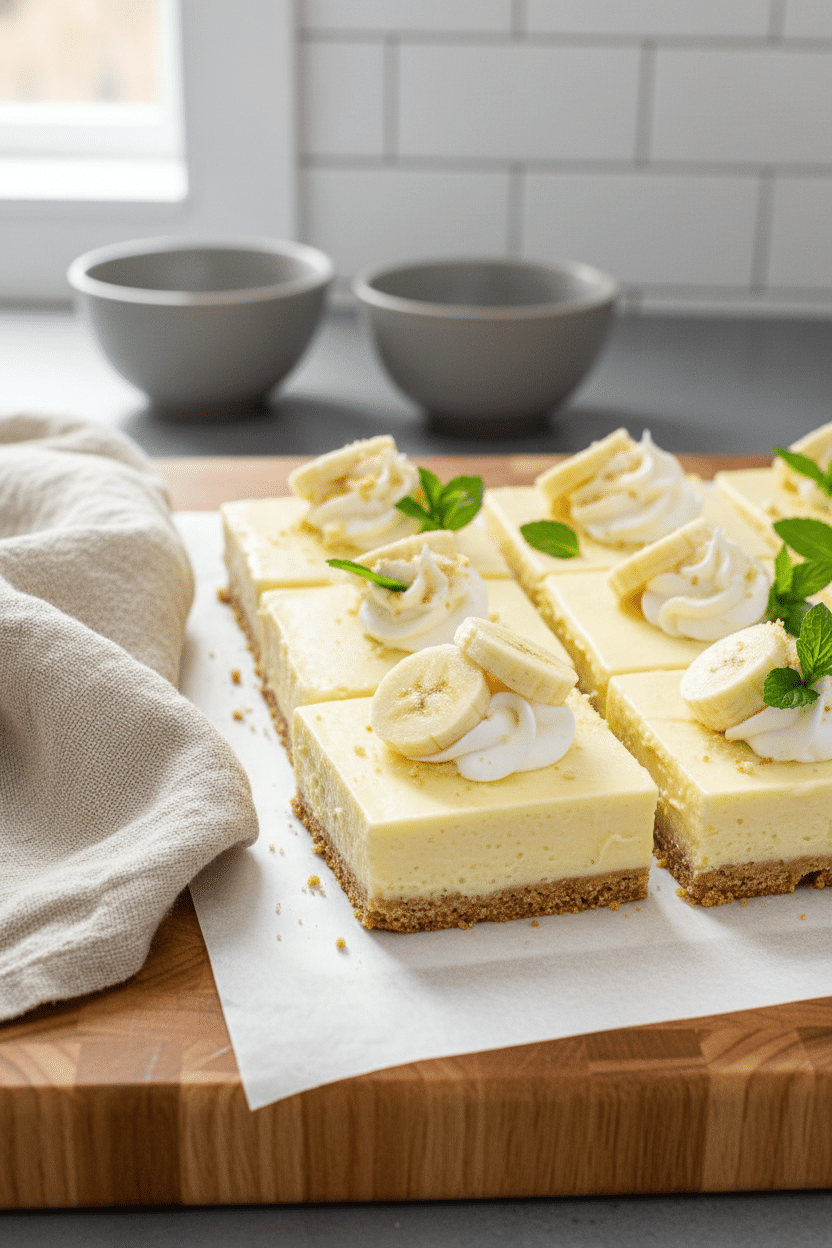
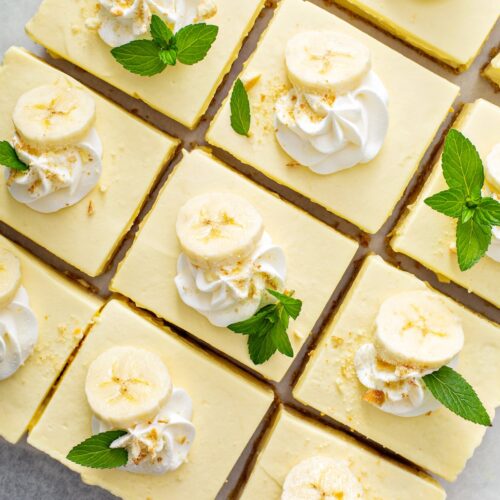
The foundation is a sweet, slightly salty, buttery crust made entirely out of finely crushed Nilla Wafers. It gets pressed firmly into the pan to create a solid base. On top of that beautiful crust sits a generous layer of fresh, perfectly ripe banana slices. Finally, the whole thing gets blanketed in a rich, velvety mixture of cream cheese, instant pudding, cold milk, and fluffy Cool Whip. Once it chills in the fridge, it sets up beautifully into firm, glorious squares. It is essentially a no-bake cheesecake meets traditional banana pudding. You get the crunch, the creaminess, and the fresh fruit in every single bite!
How to Make Banana Pudding Bars
Quick Overview
Making these bars is a total breeze, even if you don’t consider yourself a baker! We start by blitzing our vanilla wafers into fine crumbs and mixing them with melted butter to form our crust. After pressing that into a lined baking dish, we arrange our fresh banana slices right on top. Then comes the fun part: whipping up the filling! We beat softened cream cheese until it is light and fluffy, then blend in our instant pudding mix and cold milk. A quick fold of some thawed Cool Whip gives it that signature airy texture. Pour the filling over the bananas, smooth it out, and let the fridge do the hard work for a couple of hours. Slice, serve, and swoon!
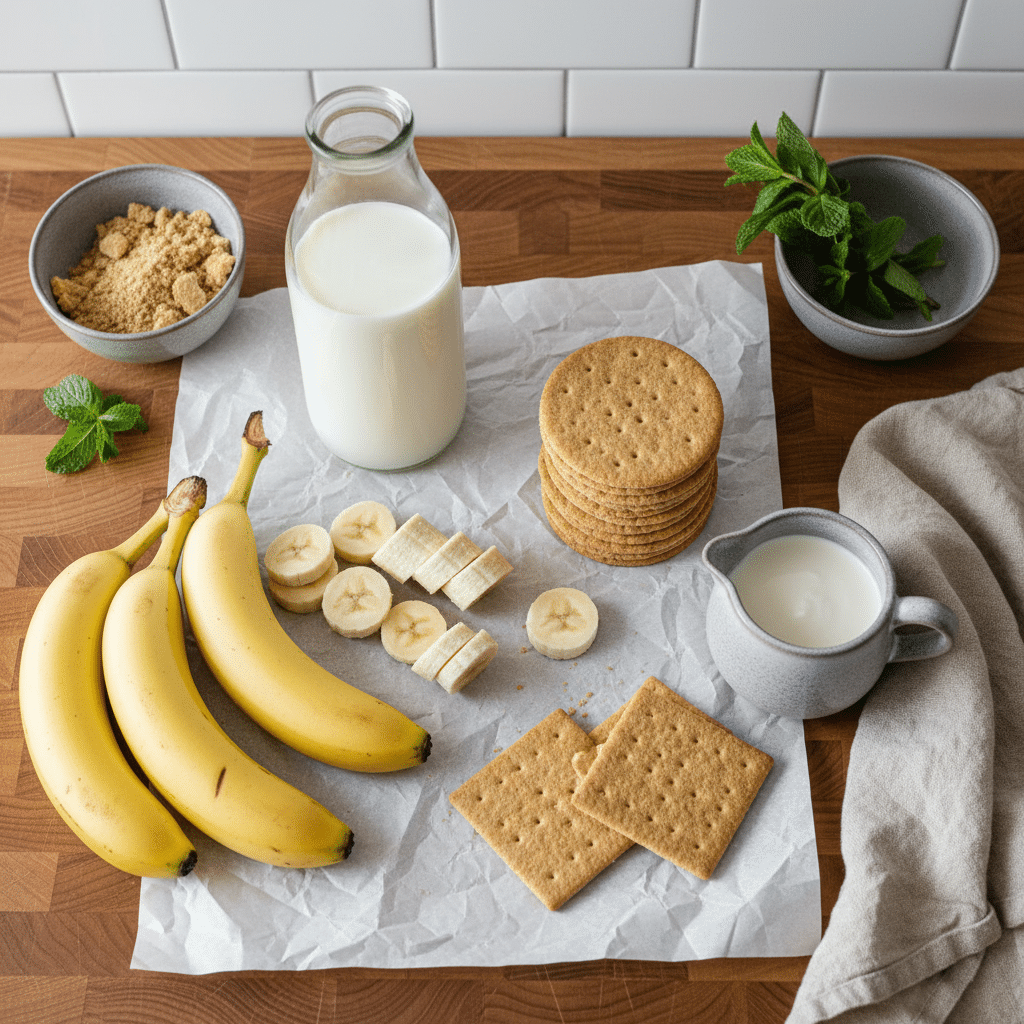
Ingredients
Let’s gather our lineup! Here is exactly what you need to make the magic happen:
- Vanilla Wafers: One 11-ounce box. Nilla Wafers are the gold standard here for that authentic flavor.
- Butter: Half a cup (one stick), melted. This binds our crust together perfectly.
- Bananas: 3 medium bananas, sliced into coins. Make sure they are ripe but not overly mushy!
- Cream Cheese: 4 ounces, softened to room temperature so it blends smoothly without lumps.
- Instant Pudding: One 5.1-ounce box. Make sure it says INSTANT! You can use banana cream or vanilla flavored.
- Whole Milk: 1 ¾ cups, nice and cold.
- Vanilla Extract: 1 teaspoon for that extra bump of flavor.
- Cool Whip: 8 ounces, thawed. You can also use homemade whipped cream if you prefer!
Step-by-Step Instructions
Step 1: Preheat & Prep Pan
Start by lining a 9×13-inch baking pan with parchment paper. Leave a little overhang on the sides to create a “sling.” This makes lifting the bars out for clean slicing an absolute breeze later on!
Step 2: Build the Crust
In a large bowl, mix your finely crushed vanilla wafers with the melted butter. Give it a good stir until it looks like wet sand. Squeeze a little in your hand to test it out. If it holds its shape, it is ready. Pour the mixture into your lined pan and press it down firmly and evenly. Use the flat bottom of a measuring cup to really pack it in there!
Step 3: Layer the Bananas
Take your freshly sliced banana coins and arrange them in an even layer directly on top of your buttery crust. Try to cover as much of the surface as possible so every single bite gets some fruit.
Step 4: Whip the Cream Cheese
Grab a hand mixer and beat your softened cream cheese in a large bowl for about 2 minutes until it is beautifully light and fluffy. Set this aside for a moment.
Step 5: Mix the Pudding
In a separate medium bowl, whisk together your instant pudding mix, cold milk, and vanilla extract until it is nice and smooth.
Step 6: Combine and Fold
Slowly pour the pudding mixture into your fluffy cream cheese while beating constantly. Once it is fully incorporated and smooth, let it sit for about 5 minutes to thicken up. Finally, gently fold in your thawed Cool Whip until no streaks remain.
Step 7: Chill and Slice
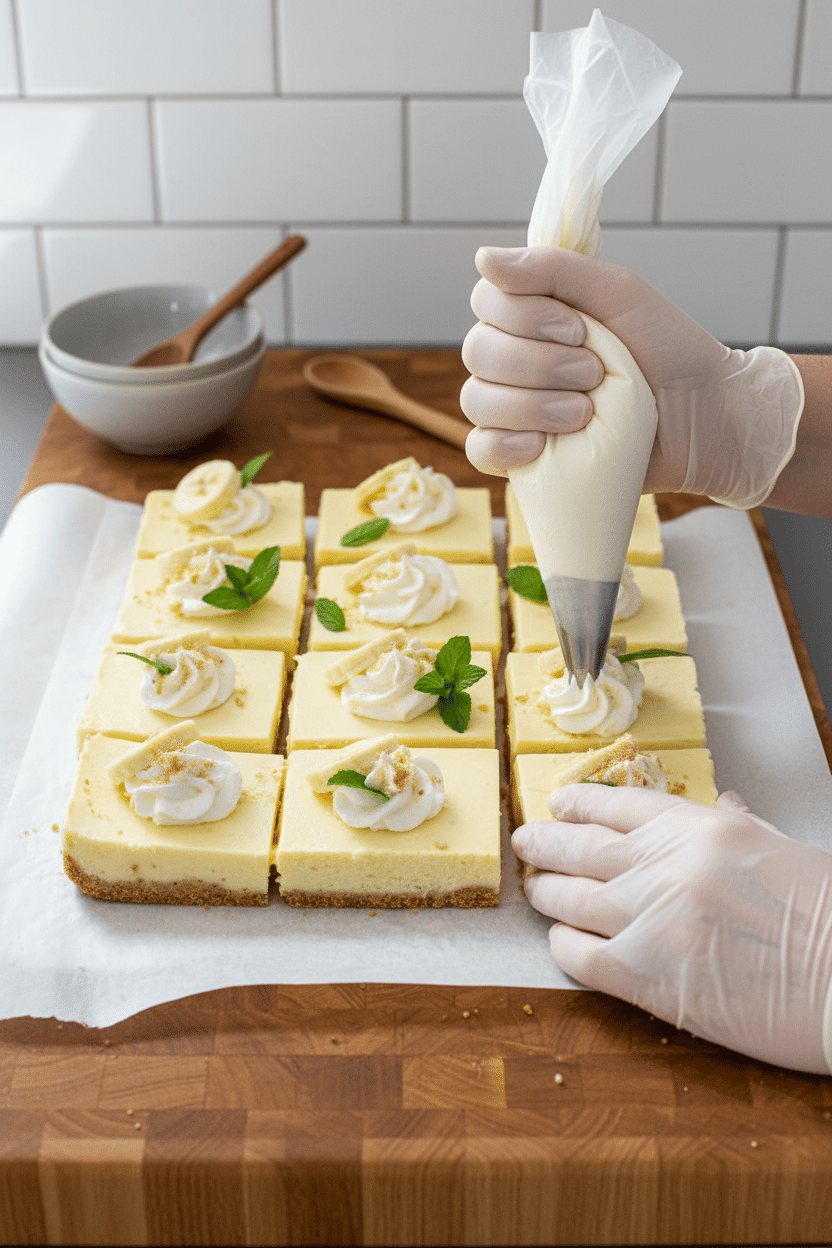
Pour your creamy pudding mixture right over the bananas and smooth out the top with a spatula. Cover the pan with foil or plastic wrap and pop it in the fridge for 2 to 3 hours (or ideally overnight!). When you are ready to serve, use the parchment sling to lift the bars onto a cutting board, slice, and enjoy!
What to Serve It With
These Banana Pudding Bars are incredibly rich and satisfying all on their own, but if you are hosting a gathering, they pair beautifully with a variety of other treats! I love serving them alongside a fresh summer fruit salad packed with strawberries, blueberries, and melon to cut through the richness. If you are putting together a dessert spread for a barbecue, they sit perfectly next to classic brownies or a tangy lemon icebox pie.
As for drinks, you can’t go wrong with a tall glass of ice-cold sweet tea or a refreshing homemade lemonade. If you are enjoying a slice as an afternoon pick-me-up, a hot cup of coffee or an iced vanilla latte complements the creamy, banana flavors wonderfully. And if you really want to go all out, serve each square with an extra dollop of whipped cream, a few extra banana slices, and a sprig of fresh mint for that fancy bakery presentation!
Top Tips for Perfecting Your Banana Pudding Bars
Over the years, I’ve picked up a few handy tricks to make sure these turn out flawless every single time:
- Check Your Pudding Box: I cannot stress this enough. Make sure you grab instant pudding, not the cook-and-serve kind. If you use the cook-and-serve version, your bars will never set up in the fridge, and you will end up with a pan of soup!
- Keep Bananas from Browning: To keep your fresh bananas looking gorgeous, work quickly so they aren’t exposed to the air for too long. If you’re worried about them turning brown, you can toss the slices very lightly in a tiny bit of lemon juice before layering them. You won’t taste the lemon, but it stops the oxidation process!
- Pack That Crust Tight: A crumbly crust makes for messy bars. Really put some muscle into pressing those buttery wafer crumbs into the bottom of your pan. A flat-bottomed glass or ramekin is your best friend here.
- Get Clean Slices: For those picture-perfect, bakery-style squares, run your knife under hot water, wipe it dry with a towel, and make a cut. Repeat this hot-water-and-wipe process between every single slice. It prevents the pudding from dragging across the edges!
Storing and Reheating Tips
Because these bars are packed with dairy and fresh fruit, they absolutely need to be kept chilled. Store any leftover Banana Pudding Bars in an airtight container in the refrigerator. They will stay fresh and delicious for up to 3 days. Honestly, I think they hit their absolute peak flavor around the 24-hour mark!
Just a quick heads up: as they sit in the fridge over a few days, the fresh bananas inside might start to soften and darken slightly. They are still totally safe and yummy to eat, they just might not look quite as pristine as day one. I do not recommend freezing these bars. The fresh bananas and the creamy pudding layers change texture dramatically when frozen and thawed, turning a bit watery and mushy. Stick to the fridge, and enjoy them cold!
Frequently Asked Questions
You absolutely can! Graham crackers work wonderfully as a crust substitute. However, to get that true, nostalgic banana pudding flavor, Nilla Wafers are definitely the way to go if you have them on hand.
This is totally up to your personal preference! I actually prefer using vanilla pudding because I feel it lets the flavor of the fresh bananas really shine through without tasting artificial. But if you want a super punchy banana flavor, banana cream instant pudding works great too!
Yes, please do! These bars are the ultimate make-ahead dessert. Giving them a full overnight chill in the fridge helps the layers set up perfectly and allows the flavors to meld together beautifully.
Yes! If you aren’t a fan of Cool Whip, you can whip up 1 cup of heavy whipping cream until stiff peaks form (which will yield about 2 cups of whipped cream) and fold that into your pudding mixture instead.
Final Thoughts
There you have it, friends! These Banana Pudding Bars are truly a slice of sweet, nostalgic perfection. They capture everything we adore about the classic Southern dessert but package it up into a neat, easy-to-serve, and absolutely stunning bar. Between the buttery Nilla Wafer crust, the sweet fresh bananas, and that unbelievably fluffy pudding layer, this is one recipe that is guaranteed to earn a permanent spot in your summer dessert rotation.
I can’t wait for you to whip these up in your own kitchen and share them with the people you love. Half the joy of “no-baking” is seeing the smiles on everyone’s faces when they take that first bite. Don’t forget to let me know how they turn out for you. I always love hearing about your kitchen adventures. Happy chilling, and enjoy every single creamy bite!
Banana Pudding Bars
Ingredients
Main Ingredients
- 1 box vanilla wafers 11 oz, crushed very fine
- 0.5 cup butter 1 stick, melted
- 4 oz cream cheese softened
- 1 box instant pudding 5.1 oz, banana cream or vanilla flavored
- 1.75 cups whole milk cold
- 1 teaspoon vanilla extract
- 8 oz cool whip thawed
- 3 medium bananas sliced into 0.75-inch thick coins
Instructions
Preparation Steps
- Line a 9x13-inch baking pan with parchment paper sling that hangs off of two sides.
- In a large bowl, stir together crushed vanilla wafers and butter until well combined. The mixture should hold it’s shape in your hand when you squeeze it. Pour the crust mixture into the prepared pan and press very firmly into an even layer in the bottom of the pan. Evenly spread sliced bananas on top of the crust layer.
- In a large bowl using a hand mixer, beat cream cheese until light and fluffy, about 2 minutes. Set aside.
- In a medium bowl, whisk to combine the dry pudding mixture, milk and vanilla until smooth. Slowly pour the pudding mixture into the beaten cream cheese, beating constantly, until all pudding mixture is incorporated and mixture is smooth. Let pudding mixture sit for 5 minutes to thicken up, then fold in cool whip, until well combined.
- Pour pudding mixture on top of banana slices and smooth the top with a spatula as needed. Cover bars with foil or saran wrap and store in the refrigerator for 2-3 hours (or overnight).
- When ready to serve, take the bars out of the refrigerator and carefully lift the parchment paper sides out and set on a cutting board. Using a large knife, slice the bars into squares. To keep your slices clean/neat: run your knife under hot water in between slicing and wipe off with a towel.
- For garnish, you can top each bar with more cool whip, banana slices and/or mint sprigs.
Featured Comments
“I totally get it — sometimes you just want something sweet and easy without the hassle. These sound perfect for those cravings!”
“Yes! These squares are a total lifesaver—perfect for when you need something sweet but don’t want the hassle. My kids devoured them!”
“Impressed! Clear steps and comforting results. Perfect for busy nights.”
“New favorite here — comforting. crowd-pleaser was spot on.”
“Super easy and turned out amazing! My family asked for seconds. Saving this one.”
“This sweet treat was absolutely loved — the light really stands out. Thanks!”


Yes! These squares are a total lifesaver—perfect for when you need something sweet but don’t want the hassle. My kids devoured them!
I totally get it — sometimes you just want something sweet and easy without the hassle. These sound perfect for those cravings!